
Popular categories
Looking for a yarn?


Comments / Questions (474)
Oksana wrote:
Would be really great if you mark the numbers of rows/stitches at the patterns
06.05.2015 - 10:06Lisa wrote:
I am finished up the Lft front collar-* 2 rows over all sts, 2 rows over only the outermost 18 sts (towards mid front) *, repeat from *-* until collar measures approx. 5½ cm at the inside on the most narrow part, cast off. - After the first 4 rows- I repeat 2 rows over all sts Do I do this over the 24st?
22.04.2015 - 19:01DROPS Design answered:
Dear Lisa, the short rows are worked as follows: *2 rows over all sts (= 24 sts), 2 rows over the outermost 18 sts*, repeat these 4 rows from *-* until collar measures approx 5½ cm towards shoulder (= where you worked all the 24 sts). Happy knitting!
23.04.2015 - 09:20Lisa wrote:
I have bound off 3 st each side of marker for armhole- should this have used all 6P st. between the Pattern? I am doing sz small-Now I have 64st on each side and 114 for back side, however when I do the math for armhole binding for lft side front 3sts 0, 2st 3 times,1st 5 times along with inc and dec for neck/collar total decrease 11 which leaves 53 st not 55 st. should the original armhole binding 3st each side incl some of pattern?
10.04.2015 - 15:31DROPS Design answered:
Dear Lisa, you bind off for armhole 6 sts (3 each side of each marker - ie all sts between pattern), inc a total of 18 sts for collar and dec a total of 12 sts for neck (6 times every other row + 6 times every 4 row), you should then get 55 sts and have now ½ repetition of A-1 towards the neck before collar and ½ repetition towards the armhole. Happy knitting!
10.04.2015 - 16:17Sophie Airas wrote:
Lovely pattern, just finished it after 4 months. One comment is that I found I needed about 7 cm extra for the collar which is sewn to the back neck instead of the 5 1/2 cm given in the pattern. It was way too short to be attached to the back neck, It is difficult to measure too since it is stretched by the fan pattern. I think it would be easier if you gave a number of rows to be knitted at that point rather than a cm measurement
05.03.2015 - 17:35
![]() Claudia wrote:
Claudia wrote:
Großes Kompliment für das tolle Modell. Ich habe die Jacke mit Lima in Grün (0705) gestrickt, sieht richtig Klasse aus. Besonders schön ist der Schnitt auf Taille. Was mich mal wieder begeistert hat, war das die angegebene Wollmenge genau gepasst hat. Da ich normalerweise M trage, ist die Jacke etwas knapp, da es die Anleitung nur in der Größe S/M gibt.
28.02.2015 - 17:38Debra wrote:
Sorry I just noticed where I was going wrong with the reading of what I just sent. P2 K2 K2 P2 = the 8 stitches I was looking for.
17.02.2015 - 19:57Debra McEdwards wrote:
CUFF: Cast on 22 sts on needle size 4 mm with Lima. K 1 row from WS. Work next row as follows: 1 st in GARTER ST – see explanation above, * P 2, K 2 in each of the next 2 sts (= K 4), P 2 *, repeat from *-* 2 more times, finish with 3 sts in garter st = 28 sts. ****You are missing a stitch***** to complete this so that it works you will need to add to this sequence * P 2, K 2 in each of the next 2 sts (= K 4), P 2 K2*
17.02.2015 - 19:53
![]() Veronika Zange wrote:
Veronika Zange wrote:
Hallo, habe ein Problem mit dem Kragen: *2R über alle M, 2R nur über die äußersten 18M, von *-*wdh. Wie verfahre ich mit den verbleibenden 6 Maschen? Danke im Voraus
17.02.2015 - 01:23DROPS Design answered:
Die restlichen M bleiben in diesen beiden R einfach ungestrickt und werden erst wieder in der darauf folgenden R mitgestrickt. Es handelt sich hierbei um eine verkürzte R. Die Grundlagen dazu erfahren Sie, wenn Sie sich ein Video anschauen, oben im Kopf neben dem Foto unter "Videos" finden Sie zwei Videos zu verkürten Reihen, die das Prinzip zeigen.
17.02.2015 - 10:01
![]() Caro wrote:
Caro wrote:
Zu den Knopflöchern... Wie oft, also in wie vielen Reihen muss ich die 3. und 4. zusammen Stricken und dann einen Umschlag?
12.02.2015 - 15:02DROPS Design answered:
Unter "Knopflöcher" sehen Sie ja die Maße, bei denen jeweils 1 Knopfloch eingearbeitet wird (d.h. 1x die 3. und 4. M zusammenstricken + 1 Umschlag arbeiten), insgesamt sind es 6 verschiedene Höhenmaße (immer gerechnet ab der Anschlagkante der Blende), also 6 Knopflöcher.
12.02.2015 - 19:36Inger wrote:
Super oppskrift! Rask å strikke og ble superfin! Jeg strikket den uten kragen, supert!!! :o) Anbefales for vante strikkere!!!!
11.02.2015 - 22:41
|
|||||||||||||||||||||||||
Celtica#celticacardigan |
|||||||||||||||||||||||||
 |
 |
||||||||||||||||||||||||
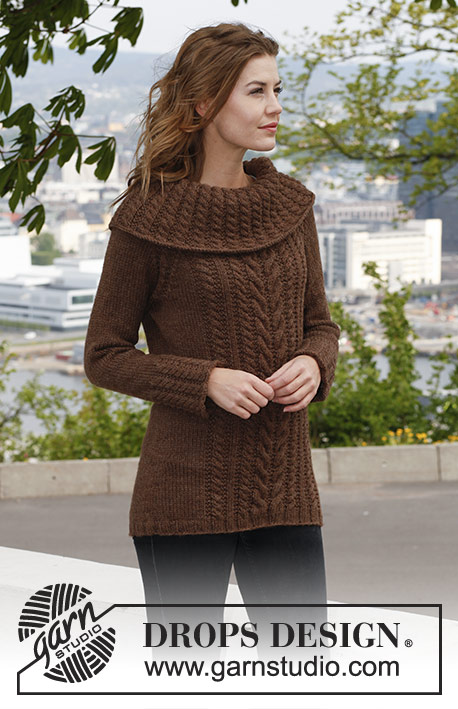
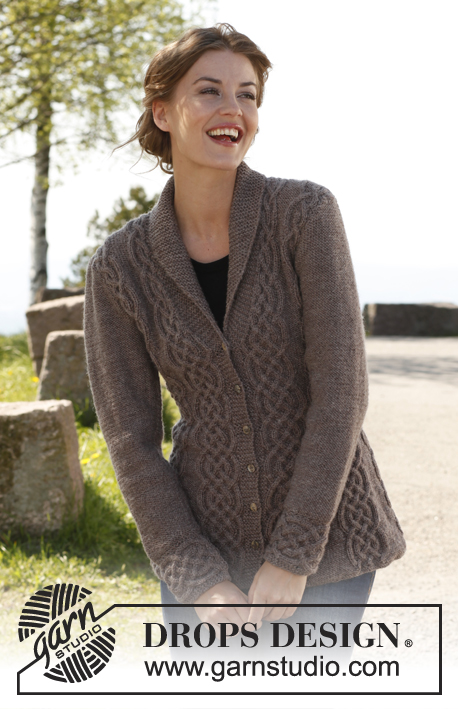
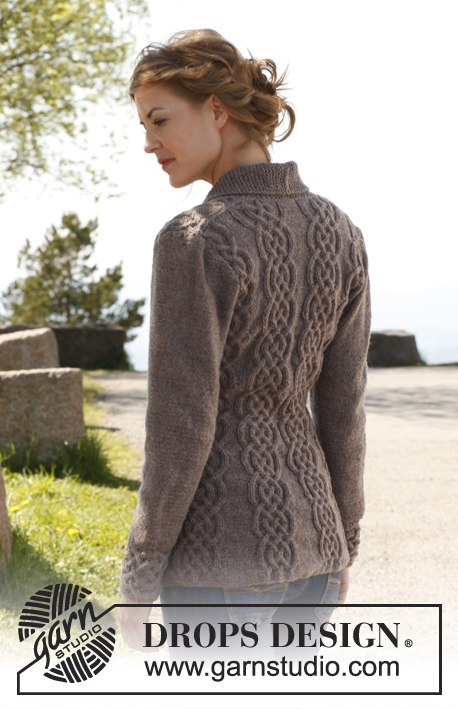
Knitted DROPS fitted jacket with cables and shawl collar in ”Lima”. Size: S - XXXL.
DROPS 143-1 |
|||||||||||||||||||||||||
|
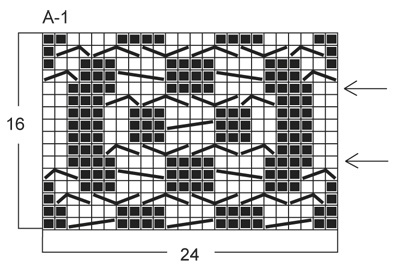
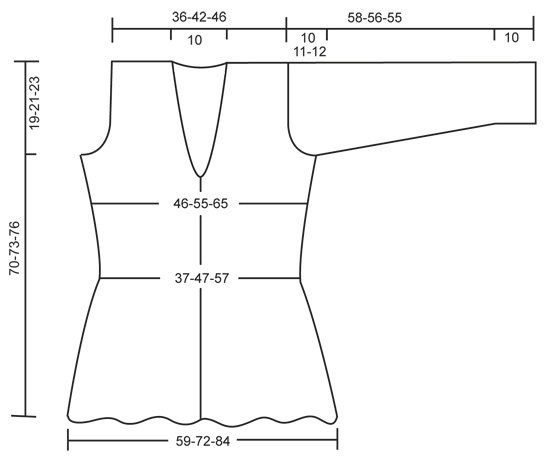
GARTER ST (back and forth on needle): K sts on all rows. 1 ridge = 2 K rows. PATTERN: See diagram A-1, diagram shows pattern from RS. First row = RS. BUTTONHOLES: bind off for buttonholes on right band. 1 buttonhole = K 3rd and 4th st from mid front tog and make 1 YO. Bind off for buttonholes when piece measures: SIZE S/M: 7, 14, 21, 28, 35 and 42 cm / 2¾", 5½", 8¼", 11", 13¾" and 16½". SIZE L/XL: 8, 15, 22, 29, 36 and 43 cm / 3⅛", 6", 8¾", 11⅜", 14¼" and 17". SIZE XXL/XXXL: 9, 16, 23, 30, 37 and 44 cm / 3½", 6¼", 9", 11¾", 14½" and 17¼". INCREASE TIP (applies to collar): Inc by making 1 YO inside outermost st - on next row K YO twisted to avoid holes. DECREASE TIP (applies to neck): Dec for neck inside all sts in garter st (i.e. band + the sts inc for collar). All dec are done from RS! Dec as follows AFTER sts in garter st: Slip 1 st as if to K, K 1, psso. Dec as follows BEFORE sts in garter st: K 2 tog. On all WS rows P sts after/before sts in garter st while dec. -------------------------------------------------------- BODY: Worked back and forth on circular needle from mid front. Cast on 254-309-360 sts (includes 6 band sts in each side towards mid front) on circular needle size 4 mm / US 6 with Lima. K 5 rows (1st row = WS). Then work as follows (seen from RS): 6 band sts in GARTER ST – see explanation above, [* P 2, K 2 in each of the next 2 sts (= K 4), P 2 *, repeat from *-* 2 more times, P 14-13-12], repeat from [-] 6-8-10 more times, then from *-* 3 more times and 6 band sts in garter st = 302-369-432 sts. Work K over K and P over P and band sts in garter st. Continue as follows (seen from from RS): 6 sts in garter st, [diagram A-1 (= 24 sts), P 14-13-12], repeat from [-] 6-8-10 more times, A-1 and 6 sts in garter st. Insert a marker after 75-92-108 sts in from each side (= 152-185-216 sts between markers on back piece). REMEMBER THE GAUGE! When piece measures approx. 5-7-9 cm / 2"-2¾"-3½" (adjust so that next row is worked from RS), dec 1 st in every P-section by P the first 2 sts tog (i.e. dec 7-9-11 sts on row). Repeat dec every 6th row 11-10-9 more times – NOTE: Dec alternately at the end and beg of every P-section. AT THE SAME TIME when piece measures 7-8-9 cm / 2¾"-3⅛"-3½", bind off for BUTTONHOLES - see explanation above. After all dec in P-sections, 218-270-322 sts remain on needle and only 2 P sts between every A-1 (piece now measures approx. 29 cm / 11½"). Continue until piece measures approx. 33-35-36 cm / 13"-13¾"-14¼" (adjust so that next row is worked from RS), now inc 1 st in every P-section by making 1 YO after last P st in every P-section, on next row (from WS) K YOs twisted to avoid holes. Repeat inc every 6th row 3-2-2 more times – NOTE: Inc alternately before and after all P sts by making 1 YO. When all inc are done, there are 6-5-5 P sts in every P-section and 246-297-355 sts in total on needle. READ UNTIL LEFT FRONT PIECE BEFORE CONTINUING! COLLAR: When piece measures 41-42-43 cm / 16⅛"-16½"-17", inc 1 st in each side towards mid front for collar - SEE INCREASE TIP. Repeat inc every other row 11 more times and then every 4th row 6 times = 18 sts inc for collar and 24 sts in garter st in total. NECKLINE: At the same time, 2 cm / ¾" after beg inc for collar, dec 1 st in each side for neck - SEE DECREASE TIP. Repeat dec every other row 5 more times and then every 4th row 6 times (i.e. half of A-1 in each side has been dec, continue with K 2 in the middle of diagram where there used to be a cable over 4 sts). ARMHOLES: At the same time when piece measures approx. 51-52-53 cm / 20"-20½"-21" (make sure that next row is worked from RS), bind off for armholes as follows: Size S/M and L/XL: bind off 6 sts in the side (i.e. 3 sts on each side of markers in the sides). SIZE XXL/XXXL: bind off 7 sts in the side, i.e. the 5 P sts where marker is + 1 st on each side of these. Finish each part separately. LEFT FRONT PIECE: Then bind off for armhole at beg of every row from the side: 3 sts 0-1-3 times, 2 sts 3-3-4 times and 1 st 5-4-6 times. After all bind offs for armhole, dec for neck and inc for collar, 55-66-70 sts remain on shoulder. There is now ½ repetition of A-1 towards the neck before collar in all sizes, there is also ½ repetition towards the armhole in the smallest size. Continue the pattern as before with 1 edge st in garter st towards armhole. When piece measures approx. 70-73-76 cm / 27½"-28¾"-30", stop after one whole or half repetition of A-1 vertically, dec 3 sts evenly over the half repetitions and 6 sts evenly over the whole ones (i.e. dec 6-9-9 sts in total) = 49-57-61 sts. On next row from RS, bind off the first 25-33-37 sts for shoulder, K the last 24 sts in garter st. Then work back and forth in garter st over these sts for collar as follows: * 2 rows over all sts, 2 rows over only the outermost 18 sts (towards mid front) *, repeat from *-* until collar measures approx. 5½ cm / 2¼" at the inside on the most narrow part, bind off. RIGHT FRONT PIECE: Work as left front piece but reversed. After sts for shoulder have been bound off (from RS so that same no of rows have been worked on both front pieces), cut the yarn at the end of row. Continue working the collar starting from WS. BACK PIECE: = 114-139-167 sts. Continue to bind off for armholes at beg of every row in each side as on front piece = 92-113-121 sts. Continue the pattern with 1 edge st in garter st in each side. When piece measures approx. 68-71-74 cm / 26¾"-28"-29" (make sure that last row worked is 1 of the rows marked with 1 arrow in diagram), then on next row (= RS), bind off the middle 24-23-23 sts for neck, work the rest of row, finish each shoulder separately in pattern. LEFT SHOULDER: Work 1 row from WS, bind off 2 sts at beg of next row (= towards neck) = 32-43-47 sts. K 1 row from WS. On next row (= RS), dec 3 sts evenly over the half repetitions of A-1 and 6 sts evenly over the whole repetitions of A-1 (i.e. dec 6-9-9 sts in total) = 26-34-38 sts. Bind off on next row (= WS). There is 1 st more on shoulder on back piece than on front piece, this is because the collar is to be sewn inside 1 st on back piece. RIGHT SHOULDER: Beg mid back, i.e. from WS, bind off 2 sts at beg of row (= 32-43-47 sts remain on shoulder). Work 1 row from RS and 1 row from WS. On next row (= RS), dec 3 sts evenly over the half repetitions of A-1 and 6 sts evenly over the whole repetitions of A-1 (i.e. dec 6-9-9 sts in total) = 26-34-38 sts. Bind off on next row (= WS). SLEEVE: First work the cuff sideways, back and forth on circular needle. CUFF: Cast on 22 sts on needle size 4 mm / US 6 with Lima. K 1 row from WS. Work next row as follows: 1 st in GARTER ST – see explanation above, * P 2, K 2 in each of the next 2 sts (= K 4), P 2 *, repeat from *-* 2 more times, finish with 3 sts in garter st = 28 sts. Work 1 row from WS with K over K and P over P with 1 st in garter st in one side and 3 sts in garter st in the other side. Continue with A-1 until 4-4-5 repetitions have been worked vertically, then work the first 2 rows in A-1 one more time (piece measures approx. 24-24-30 cm / 9½"-9½"-11¾"). Work next row as follows (= RS): 1 st in garter st, * P 2, K 2 tog, K 2 tog, P 2 *, repeat from *-* 2 more times, finish with 3 sts in garter st = 22 sts. K 1 row from WS over all sts, then bind off. Edge is approx. 10 cm / 4" wide, continue with sleeve. SLEEVE: Worked back and forth on circular needle size 4 mm / US 6. Pick up along the edge where there is only 1 garter st - pick up 1 st in every ridge (= 2 K rows). K 1 row from WS while at the same time adjusting no of sts to 52-54-62. Then K 1 row from RS, the continue in reverse stockinette st. When piece measures 15 cm / 6" in total, inc 1 st in each side. Repeat inc every 3-2-2 cm / 1⅛"-¾"-¾", 10-13-13 more times = 74-82-90 sts. When piece measures 48-45-43 cm / 19"-17¾"-17" (shorter measurements in the larger sizes because of longer sleeve cap and wider shoulders), bind off for sleeve cap at beg of every row in each side: 4 sts 1 time, 2 sts 3 times and 1 st 6-7-9 times, then bind off 2 sts in each side until piece measures 57-55-54 cm / 22½"-21½"-21¼", now bind off 3 sts 1 time in each side. Bind off the remaining sts, piece measures approx. 58-56-55 cm / 22¾"-22"-21½". ASSEMBLY: Sew the shoulder seams. Sew collar tog mid back and sew it on to neck line inside 1 edge st. Sew sleeve seams – sew cuff edge to edge (cast on edge against bind off edge) to avoid a chunky seam, sew the rest of sleeve inside 1 edge st. Sew sleeves in body and sew on buttons. |
|||||||||||||||||||||||||
Diagram explanations |
|||||||||||||||||||||||||
|
|||||||||||||||||||||||||
 |
|||||||||||||||||||||||||
 |
|||||||||||||||||||||||||
Have you finished this pattern?Tag your pictures with #dropspattern #celticacardigan or submit them to the #dropsfan gallery. Do you need help with this pattern?You'll find 16 tutorial videos, a Comments/Questions area and more by visiting the pattern on garnstudio.com. © 1982-2026 DROPS Design A/S. We reserve all rights. This document, including all its sub-sections, has copyrights. Read more about what you can do with our patterns at the bottom of each pattern on our site. |
|||||||||||||||||||||||||


With over 40 years in knitting and crochet design, DROPS Design offers one of the most extensive collections of free patterns on the internet - translated to 17 languages. As of today we count 324 catalogs and 12290 patterns - 12280 of which are translated into English (US/in).
We work hard to bring you the best knitting and crochet have to offer, inspiration and advice as well as great quality yarns at incredible prices! Would you like to use our patterns for other than personal use? You can read what you are allowed to do in the Copyright text at the bottom of all our patterns. Happy crafting!
Post a comment to pattern DROPS 143-1
We would love to hear what you have to say about this pattern!
If you want to leave a question, please make sure you select the correct category in the form below, to speed up the answering process. Required fields are marked *.