
Popular categories
Looking for a yarn?


Comments / Questions (474)
![]() Christine wrote:
Christine wrote:
Bonjour, Je commence ce (magnifique) modèle, je note que nous avons 302 m à env 6cm de hauteur. Or si 21m=10 cm (échantillon), alors 302 m = 1m43. C'est énooorme !! or on ne voit aucun godet ou plissé en bas du modèle. Comment cela doit il se comprendre ? Merci de votre aide, je pars en congés et j'ai bien l'intention de tricoter durant tout le voyage, je ne pourrai pas me retenir plus longtemps lol !!
26.02.2016 - 23:16DROPS Design answered:
Bonjour Christine, l'échantillon de 21 m = 10 cm est tricoté en jersey, or on tricote ici des torsades qui vont automatiquement resserrer l'ouvrage. Si votre tension en jersey est bonne, conservez-la bien et tricotez comme indiqué, vous aurez alors les mesures du schéma. Bon tricot!
27.02.2016 - 15:55
![]() Irene Leppers wrote:
Irene Leppers wrote:
Minder bij een hoogte van 5 cm en dit volgende snap ik niet : pas zo aan dat de volgende naald aan de goed kant is????? Moet je dus beginnen met minderen aan de verkeerde kant en de 2 steken recht samen breien? Terwijl er staat dat je 2 st av moet samen breien? Graag uw advies
17.02.2016 - 00:02DROPS Design answered:
Hoi Irene. Nee, de nld waarin je moet minderen moet aan de goede kant komen, je mindert dan in de av-gedeelten door 2 st av samen te breien
17.02.2016 - 11:39
![]() Moira Laughlin wrote:
Moira Laughlin wrote:
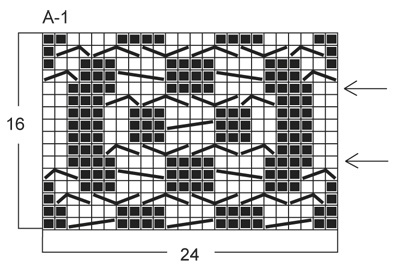
What are the arrows pointing at rows 13 and 19 of the cable pattern?
07.02.2016 - 22:50DROPS Design answered:
Dear Mrs Laughlin, the arrows apply to back piece, when piece measures approx. 68-71-74 cm "adjust so that last row worked is 1 of the rows marked with 1 arrow in diagram". Happy knitting!
08.02.2016 - 13:43
![]() LisaA wrote:
LisaA wrote:
Just finished knitting everything. I've sewn the shoulders & collar. Now trying to figure out the best way to attach the sleeves. The sleeve holes are a lot bigger than the sleeves! So I unpicked the seam on the sleeves, & am now trying to figure out how to lay them flattish against the armholes to get them to match up. Do you have any videos or tips for this? This seems to be the hardest step for me so far. Many thanks for any help you can give!! (love the sweater so far!!)
07.02.2016 - 22:13DROPS Design answered:
Dear LisaA, you can first pin up sleeve around armhole - pining first shoulder to mid upper sleeve and mid under sleeve to sts cast off for armholes. Your DROPS store will also provide you more tips & advices - remember you can contact them either per mail or telephone. Happy knitting!
08.02.2016 - 13:39
![]() Erie wrote:
Erie wrote:
Ik heb in de kabel een verkeerde kruising gemaakt met één steek, vier toeren geleden. Kan ik die herstellen of moet ik de vier toeren weer uithalen?
06.02.2016 - 17:21DROPS Design answered:
Hoi Erie. Als je handig bent, dan haal precies de st uit van deze kabel, je kan dan weer met een extra naald en haaknld de kabel opnieuw maken. Als het niet lukt, dan helaas - moet je terug.
09.02.2016 - 16:40
![]() Moira Laughlin wrote:
Moira Laughlin wrote:
Part of my previous question. Autocorrect problems! Knit over knit, not knot over knit. And also asking if even rows are tight side, odd rows wrong side! Thanks!
04.02.2016 - 03:32DROPS Design answered:
Dear Mr Laughlin, row 1 in A.1 will be worked from RS (= 8th row from cast-on edge - see below). and row 2 in A.1 will be worked from WS (= 9th row from cast-on edge). Happy knitting!
04.02.2016 - 10:12
![]() Moira Laughlin wrote:
Moira Laughlin wrote:
I completed row 6, and then see direction says knot over knit, purl over purl. Does this apply to the next row? And then start the cabling chart on the following row? I'm not sure what "seen from right side" means. Does it mean the cable pattern starts at route 8, and this is the right side? (In other words, even rows right side and of rows wrong side?)
04.02.2016 - 03:29DROPS Design answered:
Dear Mrs Laughlin, pattern with diagram A.1 starts on row 8: 5 rows K, then 1 row from RS as described, 1 row from WS and start working A.1 on next row from RS (you have worked a total of 7 rows). Happy knitting!
04.02.2016 - 10:10
![]() IreneLeppers wrote:
IreneLeppers wrote:
Ik moet bij 5 cm hoogte gaan minderen in de averechte gedeeltes en dat moet ik afwisselend doen. Bedoelen ze in 1 pen bij het 1e av deel aan het begin minderen en het volgende averechte deel aan het eind minderen?
17.01.2016 - 14:40DROPS Design answered:
Hoi Irene. Ja, bijna. Je mindert de eerste keer bijvoorbeeld aan het begin van alle av gedeeltes. Volgende keer minderen, dan aan het eind van alle av gedeelten enzovoort
19.01.2016 - 15:10
![]() Irene Leppers wrote:
Irene Leppers wrote:
Bij telpatroon A1 Moët he 14 st Bij telpatroon A1 moet je 14 st av breien, kun je die steken bij de volgende naald recht breien?
13.01.2016 - 23:56DROPS Design answered:
Hoi Irene. Je breit na A.1 14 st av op de goede kant, deze 14 st brei je inderdaad r op de verkeerde kant.
14.01.2016 - 16:28Maureen ORourke wrote:
Thank you for this lovely pattern. It was tough to complete but completely worthwhile. I love it.
30.12.2015 - 19:26
|
|||||||||||||||||||||||||
Celtica#celticacardigan |
|||||||||||||||||||||||||
 |
 |
||||||||||||||||||||||||
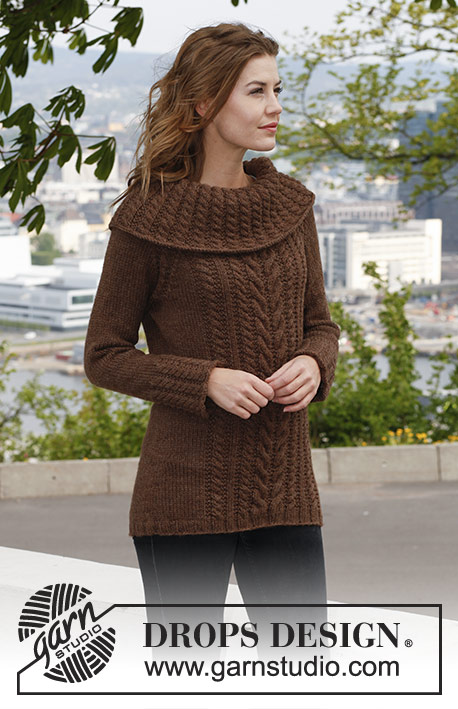
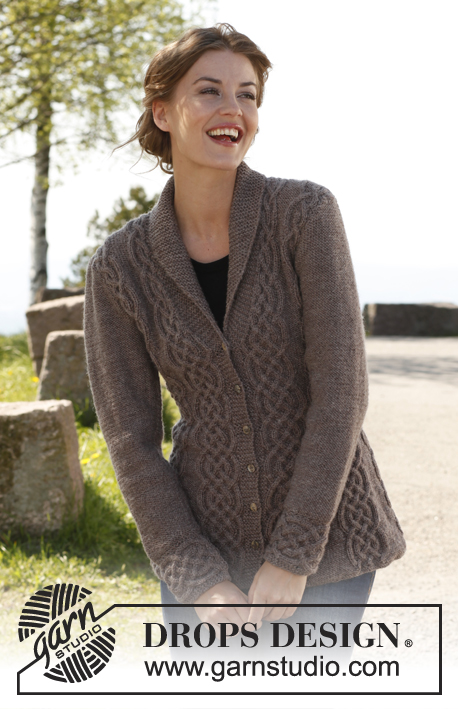
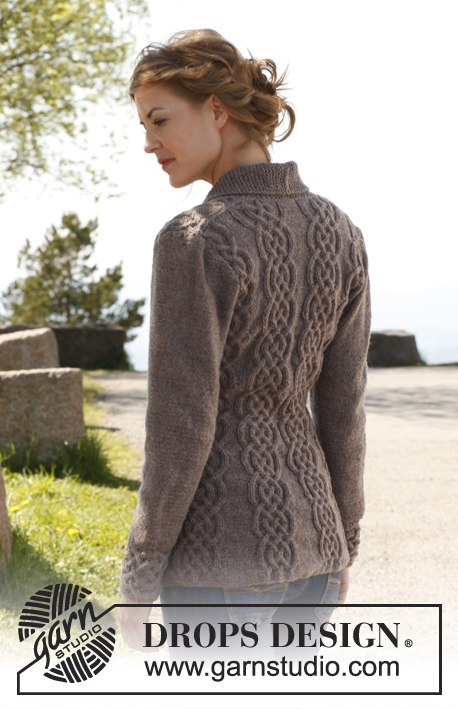
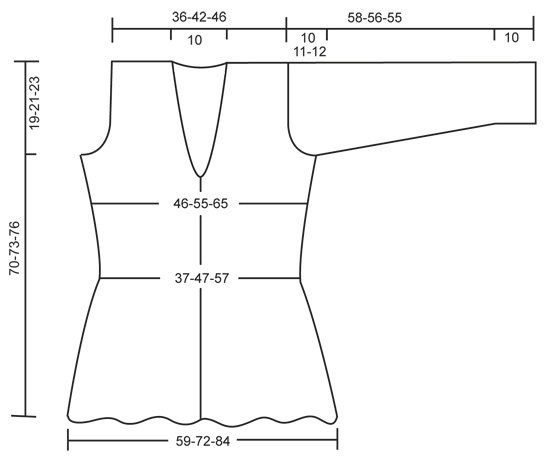
Knitted DROPS fitted jacket with cables and shawl collar in ”Lima”. Size: S - XXXL.
DROPS 143-1 |
|||||||||||||||||||||||||
|
GARTER ST (back and forth on needle): K sts on all rows. 1 ridge = 2 K rows. PATTERN: See diagram A-1, diagram shows pattern from RS. First row = RS. BUTTONHOLES: bind off for buttonholes on right band. 1 buttonhole = K 3rd and 4th st from mid front tog and make 1 YO. Bind off for buttonholes when piece measures: SIZE S/M: 7, 14, 21, 28, 35 and 42 cm / 2¾", 5½", 8¼", 11", 13¾" and 16½". SIZE L/XL: 8, 15, 22, 29, 36 and 43 cm / 3⅛", 6", 8¾", 11⅜", 14¼" and 17". SIZE XXL/XXXL: 9, 16, 23, 30, 37 and 44 cm / 3½", 6¼", 9", 11¾", 14½" and 17¼". INCREASE TIP (applies to collar): Inc by making 1 YO inside outermost st - on next row K YO twisted to avoid holes. DECREASE TIP (applies to neck): Dec for neck inside all sts in garter st (i.e. band + the sts inc for collar). All dec are done from RS! Dec as follows AFTER sts in garter st: Slip 1 st as if to K, K 1, psso. Dec as follows BEFORE sts in garter st: K 2 tog. On all WS rows P sts after/before sts in garter st while dec. -------------------------------------------------------- BODY: Worked back and forth on circular needle from mid front. Cast on 254-309-360 sts (includes 6 band sts in each side towards mid front) on circular needle size 4 mm / US 6 with Lima. K 5 rows (1st row = WS). Then work as follows (seen from RS): 6 band sts in GARTER ST – see explanation above, [* P 2, K 2 in each of the next 2 sts (= K 4), P 2 *, repeat from *-* 2 more times, P 14-13-12], repeat from [-] 6-8-10 more times, then from *-* 3 more times and 6 band sts in garter st = 302-369-432 sts. Work K over K and P over P and band sts in garter st. Continue as follows (seen from from RS): 6 sts in garter st, [diagram A-1 (= 24 sts), P 14-13-12], repeat from [-] 6-8-10 more times, A-1 and 6 sts in garter st. Insert a marker after 75-92-108 sts in from each side (= 152-185-216 sts between markers on back piece). REMEMBER THE GAUGE! When piece measures approx. 5-7-9 cm / 2"-2¾"-3½" (adjust so that next row is worked from RS), dec 1 st in every P-section by P the first 2 sts tog (i.e. dec 7-9-11 sts on row). Repeat dec every 6th row 11-10-9 more times – NOTE: Dec alternately at the end and beg of every P-section. AT THE SAME TIME when piece measures 7-8-9 cm / 2¾"-3⅛"-3½", bind off for BUTTONHOLES - see explanation above. After all dec in P-sections, 218-270-322 sts remain on needle and only 2 P sts between every A-1 (piece now measures approx. 29 cm / 11½"). Continue until piece measures approx. 33-35-36 cm / 13"-13¾"-14¼" (adjust so that next row is worked from RS), now inc 1 st in every P-section by making 1 YO after last P st in every P-section, on next row (from WS) K YOs twisted to avoid holes. Repeat inc every 6th row 3-2-2 more times – NOTE: Inc alternately before and after all P sts by making 1 YO. When all inc are done, there are 6-5-5 P sts in every P-section and 246-297-355 sts in total on needle. READ UNTIL LEFT FRONT PIECE BEFORE CONTINUING! COLLAR: When piece measures 41-42-43 cm / 16⅛"-16½"-17", inc 1 st in each side towards mid front for collar - SEE INCREASE TIP. Repeat inc every other row 11 more times and then every 4th row 6 times = 18 sts inc for collar and 24 sts in garter st in total. NECKLINE: At the same time, 2 cm / ¾" after beg inc for collar, dec 1 st in each side for neck - SEE DECREASE TIP. Repeat dec every other row 5 more times and then every 4th row 6 times (i.e. half of A-1 in each side has been dec, continue with K 2 in the middle of diagram where there used to be a cable over 4 sts). ARMHOLES: At the same time when piece measures approx. 51-52-53 cm / 20"-20½"-21" (make sure that next row is worked from RS), bind off for armholes as follows: Size S/M and L/XL: bind off 6 sts in the side (i.e. 3 sts on each side of markers in the sides). SIZE XXL/XXXL: bind off 7 sts in the side, i.e. the 5 P sts where marker is + 1 st on each side of these. Finish each part separately. LEFT FRONT PIECE: Then bind off for armhole at beg of every row from the side: 3 sts 0-1-3 times, 2 sts 3-3-4 times and 1 st 5-4-6 times. After all bind offs for armhole, dec for neck and inc for collar, 55-66-70 sts remain on shoulder. There is now ½ repetition of A-1 towards the neck before collar in all sizes, there is also ½ repetition towards the armhole in the smallest size. Continue the pattern as before with 1 edge st in garter st towards armhole. When piece measures approx. 70-73-76 cm / 27½"-28¾"-30", stop after one whole or half repetition of A-1 vertically, dec 3 sts evenly over the half repetitions and 6 sts evenly over the whole ones (i.e. dec 6-9-9 sts in total) = 49-57-61 sts. On next row from RS, bind off the first 25-33-37 sts for shoulder, K the last 24 sts in garter st. Then work back and forth in garter st over these sts for collar as follows: * 2 rows over all sts, 2 rows over only the outermost 18 sts (towards mid front) *, repeat from *-* until collar measures approx. 5½ cm / 2¼" at the inside on the most narrow part, bind off. RIGHT FRONT PIECE: Work as left front piece but reversed. After sts for shoulder have been bound off (from RS so that same no of rows have been worked on both front pieces), cut the yarn at the end of row. Continue working the collar starting from WS. BACK PIECE: = 114-139-167 sts. Continue to bind off for armholes at beg of every row in each side as on front piece = 92-113-121 sts. Continue the pattern with 1 edge st in garter st in each side. When piece measures approx. 68-71-74 cm / 26¾"-28"-29" (make sure that last row worked is 1 of the rows marked with 1 arrow in diagram), then on next row (= RS), bind off the middle 24-23-23 sts for neck, work the rest of row, finish each shoulder separately in pattern. LEFT SHOULDER: Work 1 row from WS, bind off 2 sts at beg of next row (= towards neck) = 32-43-47 sts. K 1 row from WS. On next row (= RS), dec 3 sts evenly over the half repetitions of A-1 and 6 sts evenly over the whole repetitions of A-1 (i.e. dec 6-9-9 sts in total) = 26-34-38 sts. Bind off on next row (= WS). There is 1 st more on shoulder on back piece than on front piece, this is because the collar is to be sewn inside 1 st on back piece. RIGHT SHOULDER: Beg mid back, i.e. from WS, bind off 2 sts at beg of row (= 32-43-47 sts remain on shoulder). Work 1 row from RS and 1 row from WS. On next row (= RS), dec 3 sts evenly over the half repetitions of A-1 and 6 sts evenly over the whole repetitions of A-1 (i.e. dec 6-9-9 sts in total) = 26-34-38 sts. Bind off on next row (= WS). SLEEVE: First work the cuff sideways, back and forth on circular needle. CUFF: Cast on 22 sts on needle size 4 mm / US 6 with Lima. K 1 row from WS. Work next row as follows: 1 st in GARTER ST – see explanation above, * P 2, K 2 in each of the next 2 sts (= K 4), P 2 *, repeat from *-* 2 more times, finish with 3 sts in garter st = 28 sts. Work 1 row from WS with K over K and P over P with 1 st in garter st in one side and 3 sts in garter st in the other side. Continue with A-1 until 4-4-5 repetitions have been worked vertically, then work the first 2 rows in A-1 one more time (piece measures approx. 24-24-30 cm / 9½"-9½"-11¾"). Work next row as follows (= RS): 1 st in garter st, * P 2, K 2 tog, K 2 tog, P 2 *, repeat from *-* 2 more times, finish with 3 sts in garter st = 22 sts. K 1 row from WS over all sts, then bind off. Edge is approx. 10 cm / 4" wide, continue with sleeve. SLEEVE: Worked back and forth on circular needle size 4 mm / US 6. Pick up along the edge where there is only 1 garter st - pick up 1 st in every ridge (= 2 K rows). K 1 row from WS while at the same time adjusting no of sts to 52-54-62. Then K 1 row from RS, the continue in reverse stockinette st. When piece measures 15 cm / 6" in total, inc 1 st in each side. Repeat inc every 3-2-2 cm / 1⅛"-¾"-¾", 10-13-13 more times = 74-82-90 sts. When piece measures 48-45-43 cm / 19"-17¾"-17" (shorter measurements in the larger sizes because of longer sleeve cap and wider shoulders), bind off for sleeve cap at beg of every row in each side: 4 sts 1 time, 2 sts 3 times and 1 st 6-7-9 times, then bind off 2 sts in each side until piece measures 57-55-54 cm / 22½"-21½"-21¼", now bind off 3 sts 1 time in each side. Bind off the remaining sts, piece measures approx. 58-56-55 cm / 22¾"-22"-21½". ASSEMBLY: Sew the shoulder seams. Sew collar tog mid back and sew it on to neck line inside 1 edge st. Sew sleeve seams – sew cuff edge to edge (cast on edge against bind off edge) to avoid a chunky seam, sew the rest of sleeve inside 1 edge st. Sew sleeves in body and sew on buttons. |
|||||||||||||||||||||||||
Diagram explanations |
|||||||||||||||||||||||||
|
|||||||||||||||||||||||||
 |
|||||||||||||||||||||||||
 |
|||||||||||||||||||||||||
Have you finished this pattern?Tag your pictures with #dropspattern #celticacardigan or submit them to the #dropsfan gallery. Do you need help with this pattern?You'll find 16 tutorial videos, a Comments/Questions area and more by visiting the pattern on garnstudio.com. © 1982-2026 DROPS Design A/S. We reserve all rights. This document, including all its sub-sections, has copyrights. Read more about what you can do with our patterns at the bottom of each pattern on our site. |
|||||||||||||||||||||||||


With over 40 years in knitting and crochet design, DROPS Design offers one of the most extensive collections of free patterns on the internet - translated to 17 languages. As of today we count 324 catalogs and 12290 patterns - 12280 of which are translated into English (US/in).
We work hard to bring you the best knitting and crochet have to offer, inspiration and advice as well as great quality yarns at incredible prices! Would you like to use our patterns for other than personal use? You can read what you are allowed to do in the Copyright text at the bottom of all our patterns. Happy crafting!
Post a comment to pattern DROPS 143-1
We would love to hear what you have to say about this pattern!
If you want to leave a question, please make sure you select the correct category in the form below, to speed up the answering process. Required fields are marked *.