
Popular categories
Looking for a yarn?


Comments / Questions (474)
![]() Regina wrote:
Regina wrote:
Buongiorno! sto facendo questa fantastica maglia e ho fatto tutte le diminuzioni per gli scalfi e per lo scollo: quindi mi ritrovo con metà dello schema da fare: ho molte difficoltà a capire come andare avanti, le due maglie a diritto al posto della treccia di quattro maglie nel centro del lavoro non vanno mai usate per continuare gli intrecci? oppure si? forse sarebbe utile avere uno schema di come continuare gli intrecci quando si hanno solo metà delle maglie...grazie mille!!!
07.04.2017 - 11:21DROPS Design answered:
Buongiorno Regina. Quando lavora solo metà del diagramma, non intreccerà le 2 maglie al posto della treccia centrale alle righe 1 e 9; le intreccerà alle righe 3, 7, 11 e 15. Buon lavoro!
07.04.2017 - 12:26
![]() Rosmorduc wrote:
Rosmorduc wrote:
Bonjour, je voudrais réduire la longueur de la veste, n'étant pas très grande. Que conseillez-vous : réduire le nombre de mailles initiales de telle sorte à faire moins de diminutions tous les 6rgs, ou garder le nombre initial, mais réduire le nombre de rangs entre chaque diminutions ?
18.03.2017 - 16:03DROPS Design answered:
Chère Madame Rosmorduc, nous ne sommes malheureusement pas en mesure de pouvoir ajuster chaque modèle à chaque demande individuelle, vous pouvez recalculer comme vous le souhaitez en vous basant sur les explications et le schéma des mesures par rapport à ce que vous voulez. Votre magasin DROPS saura également vous aider et vous conseiller, même par mail ou téléphone. Bon tricot!
20.03.2017 - 08:58Ali wrote:
I'm knitting l/xl celtica pattern. So when iv cast on I have got 309 sts....so p2,k2 in each of the next 2sts p2 x2 p13=25sts...then repeated 8x=225sts...then 3x more= 300sts then add 12 sts for the 2 bands=312sts needed....please advise
27.02.2017 - 14:24DROPS Design answered:
Dear Ali, you have to work that way: 6 band sts in garter st, [*P2, K2 in each of the next 2 sts (= K4), P2*, repeat from *-* (= 8 sts) 2 more times (= 8 sts x 3 = 24 sts in total), P 13 ], repeat from [-] (= 24+13= 37 sts) 8 more times (= 31 x 9= 333 sts), then from *-* 3 more times (= 8 sts x 3 = 24 sts) and 6 band sts in garter st = 6 + 333 + 24 + 6 = 369 sts. Happy knitting!
27.02.2017 - 16:24
![]() Martina Imre wrote:
Martina Imre wrote:
Ich habe die Jacke heute fertig gestrickt - sie ist so toll geworden! Mit Regia Tweed in der Farbe Schlamm sieht das Muster ganz klasse aus!
04.02.2017 - 17:05
![]() Annie TC wrote:
Annie TC wrote:
Bonjour,Je vous avais demandé votre aide il y a quelques jours car je n'arrivais pas à retrouver le point de torsades et en fait, en recommençant avec une autre laine non chinée et en suivant vos indications c'est à dire en commençant par la droit puis par la gauche à l'endroit puis l'envers, j'ai retrouvé le motif exactement comme I'll est sur la photo!!! Merci beaucoup!
29.01.2017 - 08:35
![]() Pia Ravn wrote:
Pia Ravn wrote:
Bryst 55cm og talje 47cm passer i str. L/LX, men hoften på 72cm blir alt for stort. Det svare til 72x2 = 144cm i omrids. Er det en fejl til den tætsiddende model ? Ta' jeg målen fra s/m passe det bedre, da det svare til 59x2= 118cm
25.01.2017 - 11:38DROPS Design answered:
Hej Pia. Maalene er korrekte. Modellen er taet i taljen, men har et bredt "skört". Du kan altid tilpasse opskriften, saa den evt er L/XL foroven og S/M forneden, hvis du selv synes det passer dig bedre.
25.01.2017 - 14:08
![]() Regina wrote:
Regina wrote:
Buongiorno! ho cominciato a fare questa bellissima maglia: sto seguendo le istruzioni per la taglia X/XL; in questo modo davanti+dietro della giacca avranno in tutto 10 motivi ad intreccio; nella foto che mostrate voi la giacca ne ha 8, la modella è magrolina, ma io sono un po' più grande....ma non vorrei ritrovarmi che dopo aver lavorato già da un po' la maglia risultasse troppo grande per me (sono una taglia 44). La taglia X a cosa corrisponde? Grazie mille
20.01.2017 - 12:04DROPS Design answered:
Buongiorno Regina. I modelli drops vestono generalmente comodo e le modelle indossano una taglia M. Alla fine delle spiegazioni trova un grafico con le misure espresse in cm. Confrontando queste misure con un suo capo analogo, la cui vestibilità la soddisfa, dovrebbe trovare la taglia corretta da seguire. Buon lavoro!
20.01.2017 - 12:14
![]() AnnieTC wrote:
AnnieTC wrote:
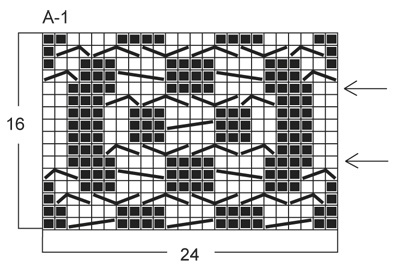
Bonjour,J'ai commencé ce modéle avec la laine Lima mix et fais un échantillon sur le point fantaisie avec les torsades, or au bout de 36 Rgs, le résultat n'est pas clair du tout, et ce sans erreur je pense. On ne voit pas du tout se détacher clairement le motif comme sur la photo. Il y a 14 m de point envers entre 2 bandes de 24 m de point fantaisie, plus deux fois 4 m de point mousse de chaque côté, soit 70 m. Puis je vous envoyer une photo de ce que cela donne? Merci d'avance
30.12.2016 - 16:10DROPS Design answered:
Bonjour Annie, le diagramme A.1 se tricote sur 24 m et 16 rangs, commencez en bas à droite du diagramme et lisez de droite à gauche sur l'endroit et de gauche à droite sur l'envers. Le motif devrait ainsi être celui de la photo. Bon tricot!
02.01.2017 - 08:22
![]() Giusy wrote:
Giusy wrote:
Grazie per i consigli, ora cercherò di metterli in pratica. Però nelle spiegazioni c'è scritto che il primo ferro corrisponde al rovescio del lavoro, quindi i ferri dispari sono il rovescio mentre i ferri pari sono il dritto, infatti la sequenza di lavorazione da voi indicata a me risultava l'esatto opposto.
23.12.2016 - 21:23DROPS Design answered:
Buonasera Giusy. Deve lavorare 5 ferri a dir (ultimo ferro sul rovescio del lavoro); poi lavora il ferro successivo sul diritto del lavoro come indicato; lavora il ferro successivo sul rovescio lavorando le m come si presentano. Al ferro successivo inizia a lavorare il diagramma. Ci riscriva se non è chiaro. Buon lavoro!
23.12.2016 - 22:45
![]() Giusy wrote:
Giusy wrote:
Sto incontrando molte difficoltà nel realizzare la giacca Celtica perché non sono in grado di trasformare i ferri pari dello schema A1 nella giusta sequenza di lavoro. È possibile avere una versione scritta (tipo 1m rov, 3 m dir...)? Grazie per il Vostro tempo, Giusy.
23.12.2016 - 13:24DROPS Design answered:
Buongiorno Giusy. I ferri pari li lavora sul rovescio del lavoro. lavora i quadratini neri a diritto e quelli bianchi a rovescio. P.es la seconda riga (dal basso) del diagramma, da sinistra verso destra, viene lavorata così: 2 m diritto, 4 rovescio, 4 dir, 4 rov, 4 dir, 4 rov, 2 dir. Buon lavoro!
23.12.2016 - 13:46
|
|||||||||||||||||||||||||
Celtica#celticacardigan |
|||||||||||||||||||||||||
 |
 |
||||||||||||||||||||||||
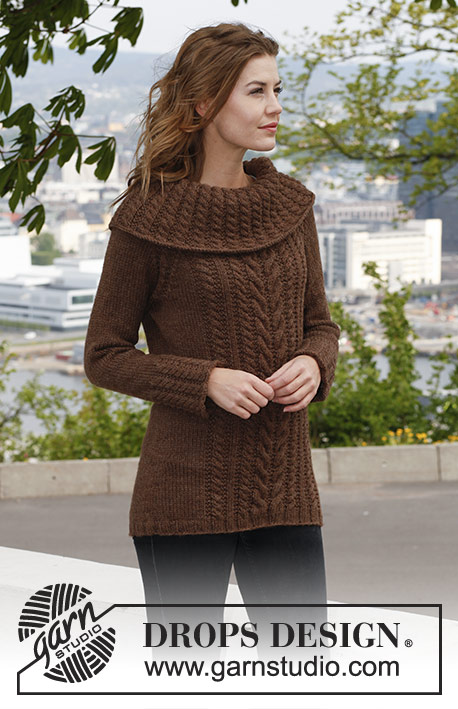
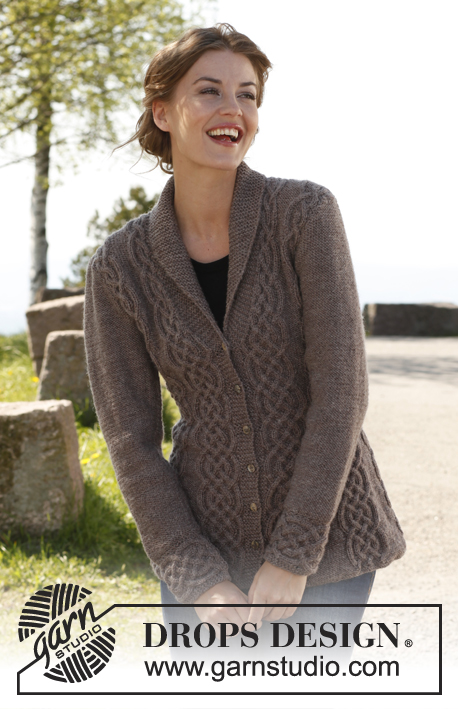
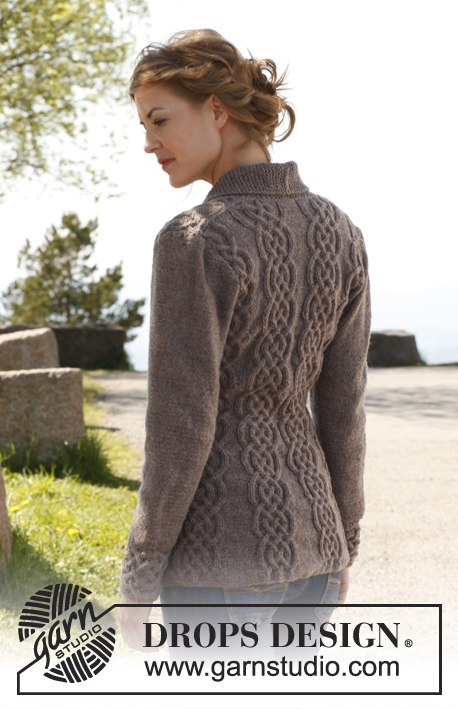
Knitted DROPS fitted jacket with cables and shawl collar in ”Lima”. Size: S - XXXL.
DROPS 143-1 |
|||||||||||||||||||||||||
|
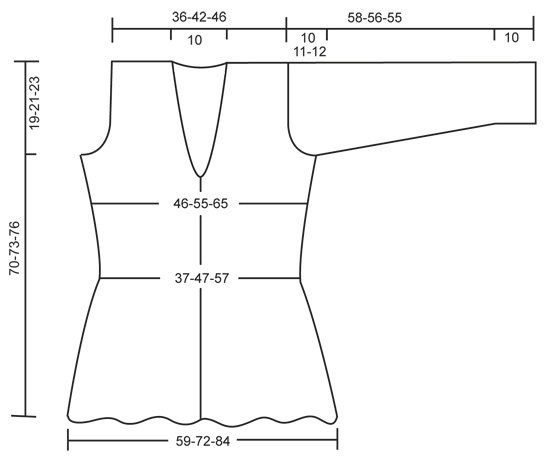
GARTER ST (back and forth on needle): K sts on all rows. 1 ridge = 2 K rows. PATTERN: See diagram A-1, diagram shows pattern from RS. First row = RS. BUTTONHOLES: bind off for buttonholes on right band. 1 buttonhole = K 3rd and 4th st from mid front tog and make 1 YO. Bind off for buttonholes when piece measures: SIZE S/M: 7, 14, 21, 28, 35 and 42 cm / 2¾", 5½", 8¼", 11", 13¾" and 16½". SIZE L/XL: 8, 15, 22, 29, 36 and 43 cm / 3⅛", 6", 8¾", 11⅜", 14¼" and 17". SIZE XXL/XXXL: 9, 16, 23, 30, 37 and 44 cm / 3½", 6¼", 9", 11¾", 14½" and 17¼". INCREASE TIP (applies to collar): Inc by making 1 YO inside outermost st - on next row K YO twisted to avoid holes. DECREASE TIP (applies to neck): Dec for neck inside all sts in garter st (i.e. band + the sts inc for collar). All dec are done from RS! Dec as follows AFTER sts in garter st: Slip 1 st as if to K, K 1, psso. Dec as follows BEFORE sts in garter st: K 2 tog. On all WS rows P sts after/before sts in garter st while dec. -------------------------------------------------------- BODY: Worked back and forth on circular needle from mid front. Cast on 254-309-360 sts (includes 6 band sts in each side towards mid front) on circular needle size 4 mm / US 6 with Lima. K 5 rows (1st row = WS). Then work as follows (seen from RS): 6 band sts in GARTER ST – see explanation above, [* P 2, K 2 in each of the next 2 sts (= K 4), P 2 *, repeat from *-* 2 more times, P 14-13-12], repeat from [-] 6-8-10 more times, then from *-* 3 more times and 6 band sts in garter st = 302-369-432 sts. Work K over K and P over P and band sts in garter st. Continue as follows (seen from from RS): 6 sts in garter st, [diagram A-1 (= 24 sts), P 14-13-12], repeat from [-] 6-8-10 more times, A-1 and 6 sts in garter st. Insert a marker after 75-92-108 sts in from each side (= 152-185-216 sts between markers on back piece). REMEMBER THE GAUGE! When piece measures approx. 5-7-9 cm / 2"-2¾"-3½" (adjust so that next row is worked from RS), dec 1 st in every P-section by P the first 2 sts tog (i.e. dec 7-9-11 sts on row). Repeat dec every 6th row 11-10-9 more times – NOTE: Dec alternately at the end and beg of every P-section. AT THE SAME TIME when piece measures 7-8-9 cm / 2¾"-3⅛"-3½", bind off for BUTTONHOLES - see explanation above. After all dec in P-sections, 218-270-322 sts remain on needle and only 2 P sts between every A-1 (piece now measures approx. 29 cm / 11½"). Continue until piece measures approx. 33-35-36 cm / 13"-13¾"-14¼" (adjust so that next row is worked from RS), now inc 1 st in every P-section by making 1 YO after last P st in every P-section, on next row (from WS) K YOs twisted to avoid holes. Repeat inc every 6th row 3-2-2 more times – NOTE: Inc alternately before and after all P sts by making 1 YO. When all inc are done, there are 6-5-5 P sts in every P-section and 246-297-355 sts in total on needle. READ UNTIL LEFT FRONT PIECE BEFORE CONTINUING! COLLAR: When piece measures 41-42-43 cm / 16⅛"-16½"-17", inc 1 st in each side towards mid front for collar - SEE INCREASE TIP. Repeat inc every other row 11 more times and then every 4th row 6 times = 18 sts inc for collar and 24 sts in garter st in total. NECKLINE: At the same time, 2 cm / ¾" after beg inc for collar, dec 1 st in each side for neck - SEE DECREASE TIP. Repeat dec every other row 5 more times and then every 4th row 6 times (i.e. half of A-1 in each side has been dec, continue with K 2 in the middle of diagram where there used to be a cable over 4 sts). ARMHOLES: At the same time when piece measures approx. 51-52-53 cm / 20"-20½"-21" (make sure that next row is worked from RS), bind off for armholes as follows: Size S/M and L/XL: bind off 6 sts in the side (i.e. 3 sts on each side of markers in the sides). SIZE XXL/XXXL: bind off 7 sts in the side, i.e. the 5 P sts where marker is + 1 st on each side of these. Finish each part separately. LEFT FRONT PIECE: Then bind off for armhole at beg of every row from the side: 3 sts 0-1-3 times, 2 sts 3-3-4 times and 1 st 5-4-6 times. After all bind offs for armhole, dec for neck and inc for collar, 55-66-70 sts remain on shoulder. There is now ½ repetition of A-1 towards the neck before collar in all sizes, there is also ½ repetition towards the armhole in the smallest size. Continue the pattern as before with 1 edge st in garter st towards armhole. When piece measures approx. 70-73-76 cm / 27½"-28¾"-30", stop after one whole or half repetition of A-1 vertically, dec 3 sts evenly over the half repetitions and 6 sts evenly over the whole ones (i.e. dec 6-9-9 sts in total) = 49-57-61 sts. On next row from RS, bind off the first 25-33-37 sts for shoulder, K the last 24 sts in garter st. Then work back and forth in garter st over these sts for collar as follows: * 2 rows over all sts, 2 rows over only the outermost 18 sts (towards mid front) *, repeat from *-* until collar measures approx. 5½ cm / 2¼" at the inside on the most narrow part, bind off. RIGHT FRONT PIECE: Work as left front piece but reversed. After sts for shoulder have been bound off (from RS so that same no of rows have been worked on both front pieces), cut the yarn at the end of row. Continue working the collar starting from WS. BACK PIECE: = 114-139-167 sts. Continue to bind off for armholes at beg of every row in each side as on front piece = 92-113-121 sts. Continue the pattern with 1 edge st in garter st in each side. When piece measures approx. 68-71-74 cm / 26¾"-28"-29" (make sure that last row worked is 1 of the rows marked with 1 arrow in diagram), then on next row (= RS), bind off the middle 24-23-23 sts for neck, work the rest of row, finish each shoulder separately in pattern. LEFT SHOULDER: Work 1 row from WS, bind off 2 sts at beg of next row (= towards neck) = 32-43-47 sts. K 1 row from WS. On next row (= RS), dec 3 sts evenly over the half repetitions of A-1 and 6 sts evenly over the whole repetitions of A-1 (i.e. dec 6-9-9 sts in total) = 26-34-38 sts. Bind off on next row (= WS). There is 1 st more on shoulder on back piece than on front piece, this is because the collar is to be sewn inside 1 st on back piece. RIGHT SHOULDER: Beg mid back, i.e. from WS, bind off 2 sts at beg of row (= 32-43-47 sts remain on shoulder). Work 1 row from RS and 1 row from WS. On next row (= RS), dec 3 sts evenly over the half repetitions of A-1 and 6 sts evenly over the whole repetitions of A-1 (i.e. dec 6-9-9 sts in total) = 26-34-38 sts. Bind off on next row (= WS). SLEEVE: First work the cuff sideways, back and forth on circular needle. CUFF: Cast on 22 sts on needle size 4 mm / US 6 with Lima. K 1 row from WS. Work next row as follows: 1 st in GARTER ST – see explanation above, * P 2, K 2 in each of the next 2 sts (= K 4), P 2 *, repeat from *-* 2 more times, finish with 3 sts in garter st = 28 sts. Work 1 row from WS with K over K and P over P with 1 st in garter st in one side and 3 sts in garter st in the other side. Continue with A-1 until 4-4-5 repetitions have been worked vertically, then work the first 2 rows in A-1 one more time (piece measures approx. 24-24-30 cm / 9½"-9½"-11¾"). Work next row as follows (= RS): 1 st in garter st, * P 2, K 2 tog, K 2 tog, P 2 *, repeat from *-* 2 more times, finish with 3 sts in garter st = 22 sts. K 1 row from WS over all sts, then bind off. Edge is approx. 10 cm / 4" wide, continue with sleeve. SLEEVE: Worked back and forth on circular needle size 4 mm / US 6. Pick up along the edge where there is only 1 garter st - pick up 1 st in every ridge (= 2 K rows). K 1 row from WS while at the same time adjusting no of sts to 52-54-62. Then K 1 row from RS, the continue in reverse stockinette st. When piece measures 15 cm / 6" in total, inc 1 st in each side. Repeat inc every 3-2-2 cm / 1⅛"-¾"-¾", 10-13-13 more times = 74-82-90 sts. When piece measures 48-45-43 cm / 19"-17¾"-17" (shorter measurements in the larger sizes because of longer sleeve cap and wider shoulders), bind off for sleeve cap at beg of every row in each side: 4 sts 1 time, 2 sts 3 times and 1 st 6-7-9 times, then bind off 2 sts in each side until piece measures 57-55-54 cm / 22½"-21½"-21¼", now bind off 3 sts 1 time in each side. Bind off the remaining sts, piece measures approx. 58-56-55 cm / 22¾"-22"-21½". ASSEMBLY: Sew the shoulder seams. Sew collar tog mid back and sew it on to neck line inside 1 edge st. Sew sleeve seams – sew cuff edge to edge (cast on edge against bind off edge) to avoid a chunky seam, sew the rest of sleeve inside 1 edge st. Sew sleeves in body and sew on buttons. |
|||||||||||||||||||||||||
Diagram explanations |
|||||||||||||||||||||||||
|
|||||||||||||||||||||||||
 |
|||||||||||||||||||||||||
 |
|||||||||||||||||||||||||
Have you finished this pattern?Tag your pictures with #dropspattern #celticacardigan or submit them to the #dropsfan gallery. Do you need help with this pattern?You'll find 16 tutorial videos, a Comments/Questions area and more by visiting the pattern on garnstudio.com. © 1982-2026 DROPS Design A/S. We reserve all rights. This document, including all its sub-sections, has copyrights. Read more about what you can do with our patterns at the bottom of each pattern on our site. |
|||||||||||||||||||||||||


With over 40 years in knitting and crochet design, DROPS Design offers one of the most extensive collections of free patterns on the internet - translated to 17 languages. As of today we count 324 catalogs and 12290 patterns - 12280 of which are translated into English (US/in).
We work hard to bring you the best knitting and crochet have to offer, inspiration and advice as well as great quality yarns at incredible prices! Would you like to use our patterns for other than personal use? You can read what you are allowed to do in the Copyright text at the bottom of all our patterns. Happy crafting!
Post a comment to pattern DROPS 143-1
We would love to hear what you have to say about this pattern!
If you want to leave a question, please make sure you select the correct category in the form below, to speed up the answering process. Required fields are marked *.