
Popular categories
Looking for a yarn?


Comments / Questions (474)
![]() S. Schouten wrote:
S. Schouten wrote:
Bij de beschrijving van het LIJF staat: ‘Minder bij een hoogte van ongeveer 5-7-9 cm...’ Maar wat is het beginpunt voor die 5 cm? Begin ik te meten vanaf de opzet-naald, na de eerste 5 naalden recht, of na de eerste naald in het telpatroon A.1?
27.12.2017 - 09:43DROPS Design answered:
Hallo S. Schouten, Dat is inderdaad vanaf het beginpunt, dus de opzetnaald, gemeten.
29.12.2017 - 20:14
![]() S. Schouten wrote:
S. Schouten wrote:
Bij de beschrijving van het LIJF staat: ‘Minder bij een hoogte van ongeveer 5-7-9 cm...’ Maar wat is het beginpunt voor die 5 cm? Begin ik te meten vanaf de opzet-naald, na de eerste 5 naalden recht, of na de eerste naald in het telpatroon A.1?
26.12.2017 - 18:05
![]() Giusy wrote:
Giusy wrote:
Ciao, sono arrivata a lavorare la spalla sinistra. Ho lavorato il ferro sul rovescio, al successivo ho diminuito le 2 maglie, ora le spiegazioni dicono: “lavorare 1 ferro a dritto sul rovescio del lavoro” e io ho lavorato le maglie al contrario di come si presentavano. Ora devo diminuire 6 maglie ma come devo lavorare questo ferro.? Lavoro le maglie come si presentano o seguo lo schema? Grazie.
03.12.2017 - 19:29DROPS Design answered:
Buonasera Giusy. Cerchi, se possibile, di seguire lo schema. P.es: se vuole diminuire 1 maglia dove ci sono 3 maglie rovescio, può diminuire lavorando 2 m insieme a rovescio. Analogamente per le altre diminuzioni. Buon lavoro!
03.12.2017 - 20:23
![]() Katinka wrote:
Katinka wrote:
Vol enthousiasme ben ik begonnen aan dit verschrikkelijk moeilijk te breien vest. Helaas had ik niet goed naar de maat gekeken. naar nu blijkt is mijn heupbreedte S/M(108cm) en mijn taille ongeveer L(90 cm) in. Nu wil ik het patroon aanpassen maar als ik start met Small(254 st=108cm) kan ik na minderen nooit op 94 cm Large uitkomen(volgens patroon 270 steken!! en dus meer dan de 108cm waar ik mee begon)
20.10.2017 - 14:12DROPS Design answered:
Hallo Katinka, Wat jammer dat je er nu pas achter komt. Het is een goed idee om van te voren de maat op te nemen of er een bestaande trui of vest bij te pakken die goed past en aan de hand daarvan de maat te kiezen die het meest overeenkomt. Onderaan het patroon staat altijd een maattekening. Eventueel kun je daarna het patroon aanpassen door meer of minder minderingen dan wel meerderingen te maken. Je kunt ook altijd hulp en tip vragen bij de winkel waar je het garen hebt gekocht.
03.11.2017 - 13:14
![]() Anja wrote:
Anja wrote:
Beste, Worden de knoopsgaten op een heengaande of teruggaande naald gebreid? Of heeft dit geen invloed op het zicht? Dank u wel voor alle hulp. Mvg
28.07.2017 - 21:09DROPS Design answered:
Hoi Anja, Zelf vind het ik het het mooist om het knoopsgat op de goede kant van het werk te maken, dus op de heengaande naald het samenbreien en de omslag. Je kunt het ook op een teruggaande naald doen, maar ik zou het wel voor alle knoopsgaten hetzelfde doen.
01.08.2017 - 20:08
![]() Anja wrote:
Anja wrote:
Hallo, Ik heb net de naald gebreid om tot 302 steken te komen, dit aan de goede kant. Bij de volgende naald moet ik de teltekening volgen, maar dit is ook de goede kant als ik de tekst begrijp? Ik moet toch rechtsonder beginnen naar links werken? En dit is mijn averechtse kant? Kan U mij helpen met deze eerste naald van de teltekening te begrijpen? Of moet ik eerst een naald recht boven recht en averecht boven averecht breien, om zo weer aan de goede kant te beginnen? Dank u
16.07.2017 - 23:24DROPS Design answered:
Hoi Anja, In de zin nadat je op 302 steken bent staat er: Brei dan recht boven recht en averecht boven averecht en de voorbies st in ribbelst en ga verder in patroon als volgt . Dat is dus de een naald op de verkeerde kant. Daarna begin je met het telpatroon.
17.07.2017 - 18:23Christine Figueiredo wrote:
I need help understanding A1 14-13-12 pattern on alternate rows. The pattern isn't matching up. I can't work out how to have stocking stitch in the sections between the cable, using the A1 14-13-12purl. Is this purl on every row?
28.05.2017 - 11:13DROPS Design answered:
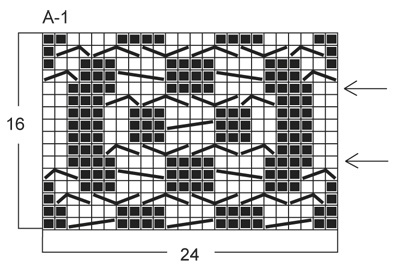
Dear Mrs Figueiredo, you work as follows: 6 sts in garter st, [diagram A-1 (= 24 sts), P 14-13-12], repeat from [-] 6-8-10 more times, A-1 and 6 sts in garter st. The sts in A.1 are worked as shown in diagram and the P sts are P from RS and K from RS. Happy knitting!
29.05.2017 - 09:50
![]() Giusy wrote:
Giusy wrote:
La maglia di vivagno per lo scalfo va eseguita subito appena si iniziano gli scalfi, cioè il ferro successivo a quando si intrecciano le 3 m. prima e dopo il segno?
05.05.2017 - 15:30DROPS Design answered:
Buongiorno Giusy. Lavora la maglia vivagno dopo aver completato tutte le diminuzioni per lo scalfo. Buon lavoro!
05.05.2017 - 16:20
![]() Giusy wrote:
Giusy wrote:
Ciao, ho bisogno del Vostro aiuto per realizzare gli scalfi perché non riesco a capire le spiegazioni. Sono al 154° ferro, 3° ferro del 10° motivo, 51 cm di altezza. Grazie.
02.05.2017 - 17:50DROPS Design answered:
Buonasera Giusy. A seconda della taglia, deve seguire le indicazioni riportate sotto il paragrafo Scalfi. Trova indicato quante maglie intrecciare prima e dopo il segno. Buon lavoro!
02.05.2017 - 20:08Regina wrote:
Buongiorno, grazie per la risposta, ma io ho ancora dei dubbi: nei ferri 4-5-6 e 12-13-14, quando si lavora metà dello schema, le due maglie centrali saranno dunque a rovescio nel diritto del lavoro? Grazie mille
10.04.2017 - 14:42DROPS Design answered:
Buongiorno Regina. Sì è corretto come ha scritto. Buon lavoro!
10.04.2017 - 14:58
|
|||||||||||||||||||||||||
Celtica#celticacardigan |
|||||||||||||||||||||||||
 |
 |
||||||||||||||||||||||||
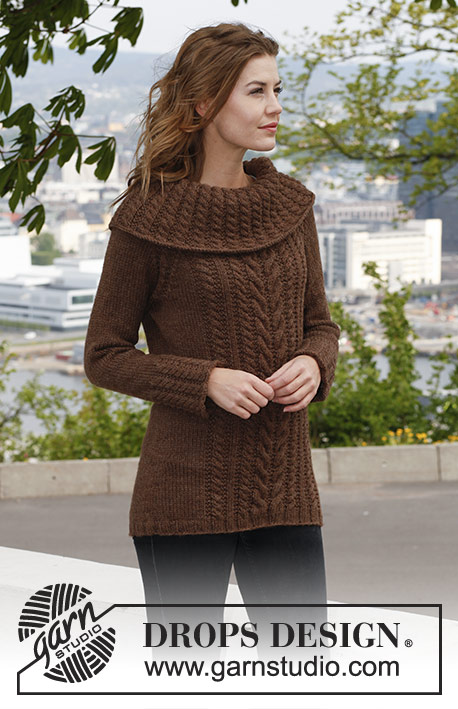
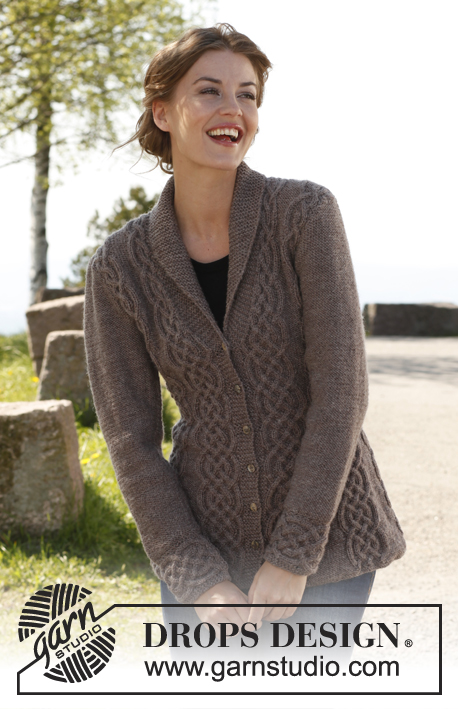
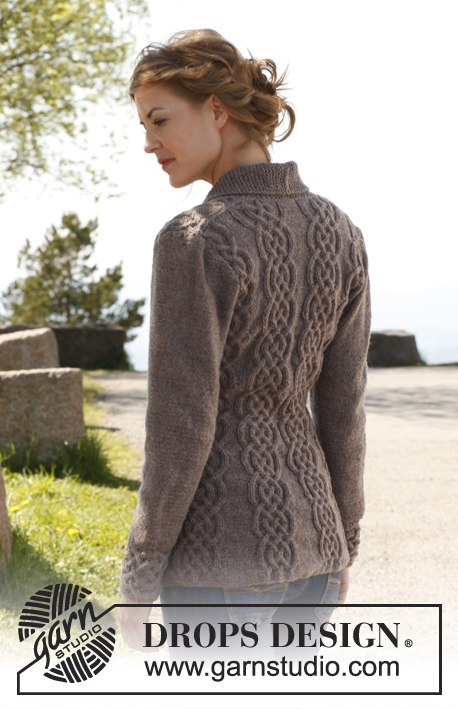
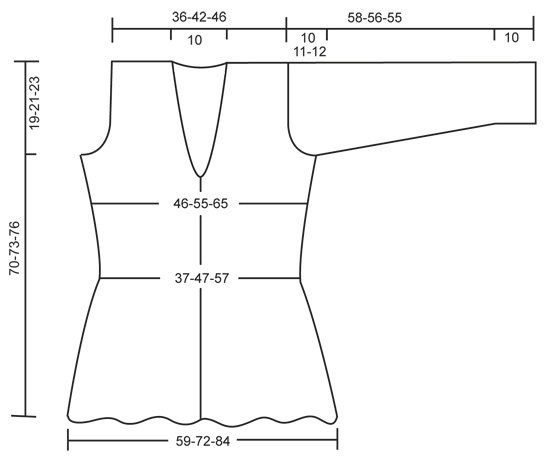
Knitted DROPS fitted jacket with cables and shawl collar in ”Lima”. Size: S - XXXL.
DROPS 143-1 |
|||||||||||||||||||||||||
|
GARTER ST (back and forth on needle): K sts on all rows. 1 ridge = 2 K rows. PATTERN: See diagram A-1, diagram shows pattern from RS. First row = RS. BUTTONHOLES: bind off for buttonholes on right band. 1 buttonhole = K 3rd and 4th st from mid front tog and make 1 YO. Bind off for buttonholes when piece measures: SIZE S/M: 7, 14, 21, 28, 35 and 42 cm / 2¾", 5½", 8¼", 11", 13¾" and 16½". SIZE L/XL: 8, 15, 22, 29, 36 and 43 cm / 3⅛", 6", 8¾", 11⅜", 14¼" and 17". SIZE XXL/XXXL: 9, 16, 23, 30, 37 and 44 cm / 3½", 6¼", 9", 11¾", 14½" and 17¼". INCREASE TIP (applies to collar): Inc by making 1 YO inside outermost st - on next row K YO twisted to avoid holes. DECREASE TIP (applies to neck): Dec for neck inside all sts in garter st (i.e. band + the sts inc for collar). All dec are done from RS! Dec as follows AFTER sts in garter st: Slip 1 st as if to K, K 1, psso. Dec as follows BEFORE sts in garter st: K 2 tog. On all WS rows P sts after/before sts in garter st while dec. -------------------------------------------------------- BODY: Worked back and forth on circular needle from mid front. Cast on 254-309-360 sts (includes 6 band sts in each side towards mid front) on circular needle size 4 mm / US 6 with Lima. K 5 rows (1st row = WS). Then work as follows (seen from RS): 6 band sts in GARTER ST – see explanation above, [* P 2, K 2 in each of the next 2 sts (= K 4), P 2 *, repeat from *-* 2 more times, P 14-13-12], repeat from [-] 6-8-10 more times, then from *-* 3 more times and 6 band sts in garter st = 302-369-432 sts. Work K over K and P over P and band sts in garter st. Continue as follows (seen from from RS): 6 sts in garter st, [diagram A-1 (= 24 sts), P 14-13-12], repeat from [-] 6-8-10 more times, A-1 and 6 sts in garter st. Insert a marker after 75-92-108 sts in from each side (= 152-185-216 sts between markers on back piece). REMEMBER THE GAUGE! When piece measures approx. 5-7-9 cm / 2"-2¾"-3½" (adjust so that next row is worked from RS), dec 1 st in every P-section by P the first 2 sts tog (i.e. dec 7-9-11 sts on row). Repeat dec every 6th row 11-10-9 more times – NOTE: Dec alternately at the end and beg of every P-section. AT THE SAME TIME when piece measures 7-8-9 cm / 2¾"-3⅛"-3½", bind off for BUTTONHOLES - see explanation above. After all dec in P-sections, 218-270-322 sts remain on needle and only 2 P sts between every A-1 (piece now measures approx. 29 cm / 11½"). Continue until piece measures approx. 33-35-36 cm / 13"-13¾"-14¼" (adjust so that next row is worked from RS), now inc 1 st in every P-section by making 1 YO after last P st in every P-section, on next row (from WS) K YOs twisted to avoid holes. Repeat inc every 6th row 3-2-2 more times – NOTE: Inc alternately before and after all P sts by making 1 YO. When all inc are done, there are 6-5-5 P sts in every P-section and 246-297-355 sts in total on needle. READ UNTIL LEFT FRONT PIECE BEFORE CONTINUING! COLLAR: When piece measures 41-42-43 cm / 16⅛"-16½"-17", inc 1 st in each side towards mid front for collar - SEE INCREASE TIP. Repeat inc every other row 11 more times and then every 4th row 6 times = 18 sts inc for collar and 24 sts in garter st in total. NECKLINE: At the same time, 2 cm / ¾" after beg inc for collar, dec 1 st in each side for neck - SEE DECREASE TIP. Repeat dec every other row 5 more times and then every 4th row 6 times (i.e. half of A-1 in each side has been dec, continue with K 2 in the middle of diagram where there used to be a cable over 4 sts). ARMHOLES: At the same time when piece measures approx. 51-52-53 cm / 20"-20½"-21" (make sure that next row is worked from RS), bind off for armholes as follows: Size S/M and L/XL: bind off 6 sts in the side (i.e. 3 sts on each side of markers in the sides). SIZE XXL/XXXL: bind off 7 sts in the side, i.e. the 5 P sts where marker is + 1 st on each side of these. Finish each part separately. LEFT FRONT PIECE: Then bind off for armhole at beg of every row from the side: 3 sts 0-1-3 times, 2 sts 3-3-4 times and 1 st 5-4-6 times. After all bind offs for armhole, dec for neck and inc for collar, 55-66-70 sts remain on shoulder. There is now ½ repetition of A-1 towards the neck before collar in all sizes, there is also ½ repetition towards the armhole in the smallest size. Continue the pattern as before with 1 edge st in garter st towards armhole. When piece measures approx. 70-73-76 cm / 27½"-28¾"-30", stop after one whole or half repetition of A-1 vertically, dec 3 sts evenly over the half repetitions and 6 sts evenly over the whole ones (i.e. dec 6-9-9 sts in total) = 49-57-61 sts. On next row from RS, bind off the first 25-33-37 sts for shoulder, K the last 24 sts in garter st. Then work back and forth in garter st over these sts for collar as follows: * 2 rows over all sts, 2 rows over only the outermost 18 sts (towards mid front) *, repeat from *-* until collar measures approx. 5½ cm / 2¼" at the inside on the most narrow part, bind off. RIGHT FRONT PIECE: Work as left front piece but reversed. After sts for shoulder have been bound off (from RS so that same no of rows have been worked on both front pieces), cut the yarn at the end of row. Continue working the collar starting from WS. BACK PIECE: = 114-139-167 sts. Continue to bind off for armholes at beg of every row in each side as on front piece = 92-113-121 sts. Continue the pattern with 1 edge st in garter st in each side. When piece measures approx. 68-71-74 cm / 26¾"-28"-29" (make sure that last row worked is 1 of the rows marked with 1 arrow in diagram), then on next row (= RS), bind off the middle 24-23-23 sts for neck, work the rest of row, finish each shoulder separately in pattern. LEFT SHOULDER: Work 1 row from WS, bind off 2 sts at beg of next row (= towards neck) = 32-43-47 sts. K 1 row from WS. On next row (= RS), dec 3 sts evenly over the half repetitions of A-1 and 6 sts evenly over the whole repetitions of A-1 (i.e. dec 6-9-9 sts in total) = 26-34-38 sts. Bind off on next row (= WS). There is 1 st more on shoulder on back piece than on front piece, this is because the collar is to be sewn inside 1 st on back piece. RIGHT SHOULDER: Beg mid back, i.e. from WS, bind off 2 sts at beg of row (= 32-43-47 sts remain on shoulder). Work 1 row from RS and 1 row from WS. On next row (= RS), dec 3 sts evenly over the half repetitions of A-1 and 6 sts evenly over the whole repetitions of A-1 (i.e. dec 6-9-9 sts in total) = 26-34-38 sts. Bind off on next row (= WS). SLEEVE: First work the cuff sideways, back and forth on circular needle. CUFF: Cast on 22 sts on needle size 4 mm / US 6 with Lima. K 1 row from WS. Work next row as follows: 1 st in GARTER ST – see explanation above, * P 2, K 2 in each of the next 2 sts (= K 4), P 2 *, repeat from *-* 2 more times, finish with 3 sts in garter st = 28 sts. Work 1 row from WS with K over K and P over P with 1 st in garter st in one side and 3 sts in garter st in the other side. Continue with A-1 until 4-4-5 repetitions have been worked vertically, then work the first 2 rows in A-1 one more time (piece measures approx. 24-24-30 cm / 9½"-9½"-11¾"). Work next row as follows (= RS): 1 st in garter st, * P 2, K 2 tog, K 2 tog, P 2 *, repeat from *-* 2 more times, finish with 3 sts in garter st = 22 sts. K 1 row from WS over all sts, then bind off. Edge is approx. 10 cm / 4" wide, continue with sleeve. SLEEVE: Worked back and forth on circular needle size 4 mm / US 6. Pick up along the edge where there is only 1 garter st - pick up 1 st in every ridge (= 2 K rows). K 1 row from WS while at the same time adjusting no of sts to 52-54-62. Then K 1 row from RS, the continue in reverse stockinette st. When piece measures 15 cm / 6" in total, inc 1 st in each side. Repeat inc every 3-2-2 cm / 1⅛"-¾"-¾", 10-13-13 more times = 74-82-90 sts. When piece measures 48-45-43 cm / 19"-17¾"-17" (shorter measurements in the larger sizes because of longer sleeve cap and wider shoulders), bind off for sleeve cap at beg of every row in each side: 4 sts 1 time, 2 sts 3 times and 1 st 6-7-9 times, then bind off 2 sts in each side until piece measures 57-55-54 cm / 22½"-21½"-21¼", now bind off 3 sts 1 time in each side. Bind off the remaining sts, piece measures approx. 58-56-55 cm / 22¾"-22"-21½". ASSEMBLY: Sew the shoulder seams. Sew collar tog mid back and sew it on to neck line inside 1 edge st. Sew sleeve seams – sew cuff edge to edge (cast on edge against bind off edge) to avoid a chunky seam, sew the rest of sleeve inside 1 edge st. Sew sleeves in body and sew on buttons. |
|||||||||||||||||||||||||
Diagram explanations |
|||||||||||||||||||||||||
|
|||||||||||||||||||||||||
 |
|||||||||||||||||||||||||
 |
|||||||||||||||||||||||||
Have you finished this pattern?Tag your pictures with #dropspattern #celticacardigan or submit them to the #dropsfan gallery. Do you need help with this pattern?You'll find 16 tutorial videos, a Comments/Questions area and more by visiting the pattern on garnstudio.com. © 1982-2026 DROPS Design A/S. We reserve all rights. This document, including all its sub-sections, has copyrights. Read more about what you can do with our patterns at the bottom of each pattern on our site. |
|||||||||||||||||||||||||


With over 40 years in knitting and crochet design, DROPS Design offers one of the most extensive collections of free patterns on the internet - translated to 17 languages. As of today we count 324 catalogs and 12290 patterns - 12280 of which are translated into English (US/in).
We work hard to bring you the best knitting and crochet have to offer, inspiration and advice as well as great quality yarns at incredible prices! Would you like to use our patterns for other than personal use? You can read what you are allowed to do in the Copyright text at the bottom of all our patterns. Happy crafting!
Post a comment to pattern DROPS 143-1
We would love to hear what you have to say about this pattern!
If you want to leave a question, please make sure you select the correct category in the form below, to speed up the answering process. Required fields are marked *.