
Popular categories
Looking for a yarn?


Comments / Questions (152)
![]() Sina wrote:
Sina wrote:
Hallo, Der Bolero gefällt mir auf den Bildern super und ich würde den gern arbeiten. Nur leider kann ich gar nicht häkeln. Gibt es eine Möglichkeit, die Häkelpartien durch Stricktechniken zu ersetzen?
24.03.2025 - 10:32DROPS Design answered:
Liebe Sina, hier finden Sie ähnliche Modellen, ein von Ihnen kann Ihnen inspirieren, um die Häkelpartien anstatt zu stricken. Viel Spaß beim Stricken!
25.03.2025 - 08:34
![]() Denise Rabau wrote:
Denise Rabau wrote:
Ik kan nergens de gewijzigde online versie van 7 maart 2012 van dit patroon vinden kan u mij hierbij helpen aub? mvg denise rabau
28.04.2022 - 14:53
![]() Kirsi Kangas wrote:
Kirsi Kangas wrote:
Hei! Todella kaunis bolero. Olen neulomassa oikeaa hihaa, (koko S/M), ja nyt olen aloittamassa mallikertaa M1. Silmukkamäärä on nyt 82. Pitääkö kavennukset aloittaa heti M1 alussa molemmissa reunoissa??
29.05.2021 - 14:25DROPS Design answered:
Hei, kavennukset aloitetaan piirroksen M.1 9.kerroksella, ja ne tehdään työn molemmissa reunoissa.
25.08.2021 - 16:58
![]() Kerstin Van Der Horst wrote:
Kerstin Van Der Horst wrote:
Opgelost. heb het patroon goed bekeken en ik begrijp dat ik gewoon verder moet breien met de rechtermouw dus geen nieuwe steken opzetten.
12.03.2021 - 11:56DROPS Design answered:
Dag Kerstin,
Fijn om te horen dat het opgelost is. Veel breiplezier!
22.03.2021 - 21:10
![]() Kerstin Van Der Horst wrote:
Kerstin Van Der Horst wrote:
Ik heb de rug gebreid. Nu moet ik met de rechter mouw gaan beginnen. zet ik nu gewoon weer 80 steken los op via de haken.. als ik het patroon nu bekijk op de foto ziet mijn rugpand er toch anders uit
12.03.2021 - 11:38DROPS Design answered:
Dag Kerstin,
Nee, je haakt het achterpand en de rechtermouw in een stuk. Als je klaar bent met het achterpand meet het werk ongeveer 35 cm, je hebt dan 80 steken op de naald (voor de kleinste maat) en je breit gewoon verder over de steken op de naald volgens de beschrijving voor de RECHTER MOUW. Pas als je de linker mouw gaat breien, zet je de opgezette steken van het begin terug op de naald.
27.03.2021 - 15:16
![]() Rossana wrote:
Rossana wrote:
Mi potete dire a quanti cm va posizionato il segnapunti per la chiusura della manica? Sto usando un filato diverso e non vorrei sbagliare. Grazie
26.09.2020 - 09:13DROPS Design answered:
Buonasera Rosanna, per essere sicura di ottenere lo stesso risultato deve lavorare un campione con il filato che intende utilizzare e verificare che corrisponda a quello indicato. Buon lavoro!
27.09.2020 - 23:08
![]() Joe wrote:
Joe wrote:
Merci à toute votre équipe pour votre travail et ces merveilleux modèles. Je viens de terminer l'ensemble top et boléro en drops safran et je suis vraiment satisfaite. Cordialement
01.07.2019 - 13:54
![]() Frida W wrote:
Frida W wrote:
Hej. Jag är ganska van att sticka, men har nästan inte virkat förut. Finns någon instruktionsvideo för ST-GRUPP till det här mönstret? Vad innebär ”2st om samma lm-båge”? Tack!
28.06.2019 - 09:27DROPS Design answered:
Hej Frida. Tyvärr inte på just detta mönster, men kanske denna video kan vara till någon hjälp. Lycka till!
04.07.2019 - 07:42
![]() Thiron wrote:
Thiron wrote:
Ik heb problemen met de rand van de mouw. Ik krijg een opstaande mouw in plaats van een aansluitende mouw. Kan iemand mij hier mee helpen?
10.05.2018 - 20:29DROPS Design answered:
Hallo Thiron, Helaas kan ik vanaf hier niet goed zien hoe het eruit ziet en wat er gebeurt waardoor het een opstaande rand wordt. Misschien is het nodig om een kleinere haaknaald te gebruiken. Voor hulp kun je ook altijd naar de winkel gaan waar je het garen gekocht hebt.
14.05.2018 - 19:41
![]() Dominique wrote:
Dominique wrote:
Bonjour, ce modèle est vraiment très beau. cependant j'ai des doutes quand aux dimensions au fur et à mesure de l'ouvrage. en effet en respectant à la lettre les explications - diagrame représentant les rangs endroit donc par exemple diagramme m4a 10 rgs représentés = au total 20 rgs - j'ai un ouvrage qui fait beaucoup plus que les 32 cm indiqués j'ai peur qu'au final mon tricot soit largement trop grand. est-ce normal merci
31.05.2016 - 08:34DROPS Design answered:
Bonjour Dominique, les diagrammes montrent tous les rangs des diagrammes, c'est-à-dire ceux sur l'endroit ainsi que ceux sur l'envers, mais vus sur l'endroit (ex. une case blanche = 1 m jersey end à tricoter à l'end sur l'end et à l'env sur l'env), ainsi M.4 se tricote sur 10 rangs et non 20 - voir également ici. Bon tricot!
31.05.2016 - 09:00
|
||||||||||||||||||||||
Akropolis#akropolisbolero |
||||||||||||||||||||||
 |
 |
|||||||||||||||||||||
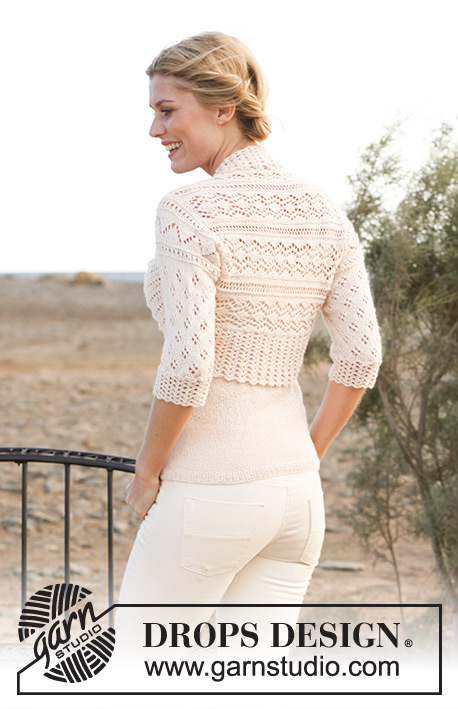
Knitted DROPS bolero with crochet edge in ”BabyAlpaca Silk”. Size: S - XXXL.
DROPS 139-5 |
||||||||||||||||||||||
|
TEMPORARY CAST ON EDGE: Crochet a row with ch - unravel this row afterwards to get the cast on sts on needle again. Cut the yarn - do not fasten. Use a new strand to pick up sts in ch-row. GARTER ST (back and forth on needle): K all rows. PATTERN: See diagrams M.1 to M.4B. The diagrams show the pattern from RS. DECREASE TIP: Dec 1 st in each side as follows: 1 edge st in garter st, work the next 2 sts tog, work until 3 sts remain on needle, work the next 2 sts tog, 1 edge st in garter st. Make sure that pattern in M.1 is correct when dec, adjust when there are fewer sts, i.e. sometimes there is no room to work pattern at beg and end of row. Make sure that pattern in the rest of diagram is correctly above each other as before. DC-GROUPS: 1 dc-group = 2 dc, ch 2, 2 dc in same ch-space. Replace 1st dc on round with ch 3, then work 1 dc-group in every ch-space, finish with 1 sl st in 3rd ch from beg of round, work sl st until next ch-space to beg next round. ---------------------------------------------------------- BOLERO: Worked back and forth on needle. Worked sideways, first from left shoulder to the bottom of right sleeve, and then from cast on edge to bottom of left sleeve. BACK PIECE: Crochet a TEMPORARY CAST ON EDGE - Read explanation above - with BabyAlpaca Silk on hook size 3.5 mm/E/4 as follows: Loosely ch 80-96-101, then use a new strand and needle size 3.5 mm / US 4 to pick up 1 st in every ch on ch-row = 80-96-101 sts (1st row = RS). Work next row from WS as follows: 2 edge sts in garter st, P until 2 sts remain and finish with 2 edge sts in garter st. REMEMBER THE GAUGE! SIZE S/M and XXL/XXXL: = 80-101 sts. On next row from RS work as follows: 2 edge sts in garter st, * diagram M.4A, diagram M.4B *, repeat from *-* a total of 3-4 times, then diagram M.4A 1 more time, finish with 2 edge sts in garter st. Continue in pattern with 2 sts in garter st in each side until piece measures approx. 32-39 cm / 12½"-15 ¼"" - finish after a full repeat of diagram M.4A - AT THE SAME TIME inc 0-1 st on last row = 80-102 sts. SIZE L/XL: = 96 sts. On next row from RS work as follows: 2 edge sts in garter st, * diagram M.4B, diagram M.4A *, repeat from *-* a total of 4 times, then diagram M.4B 1 more time, finish with 2 edge sts in garter st. Continue in pattern with 2 sts in garter st in each side until piece measures approx. 35 cm / 13 ¾", finish after a full repeat of diagram M.4A. RIGHT SLEEVE: = 80-96-102 sts. Then work diagram M.2 1 time vertically with 2 sts in garter st in each side - AT THE SAME TIME on last row in diagram M.2 adjust no of sts to 84-94-104. Then work diagram M.3 (= 8-9-10 repetitions of diagram M.3 with 2 sts in garter st in each side), and then diagram M.2 1 time vertically with 2 sts in garter st in each side. NOTE: On last row in the second repetition of diagram M.2 adjust no of sts to 82-98-106 (= 10-12-13 repetitions of diagram M.1 with 1 st in garter st in each side). Insert a marker in each side of piece (sleeve seam ends here). Then work diagram M.1 with 1 st in garter st in each side. When diagram M.1 has been worked 8 rows vertically, dec on next row (= 9th row in diagram M.1) 1 st inside 1 edge st in each side - Read DECREASE TIP above. Repeat dec on every 6th-3rd-3rd row a total of 8-16-16 times = 66-66-74 sts (= 8-8-9 repetitions of diagram M.1 with 1 st in garter st in each side). Work M.1 3 times vertically and then work rows 1-8 in M.1 1 more time (= 56 rows M.1 in total). Then work 2 rows in stockinette st before loosely casting/binding off all sts (piece measures approx. 61-64-68 cm / 24"-25¼"-26¾"" from cast on edge). LEFT SLEEVE: Worked back and forth on needle size 3.5 mm / US 4. Worked from left shoulder to the bottom of left sleeve. Unravel the ch-row on the temporary cast on edge and slip cast on sts back on needle = 80-96-101 sts. Then work diagram M.2, beg on 3rd row (instead of 1st row) in pattern - AT THE SAME TIME inc 0-0-1 st on same row = 80-96-102 sts. Then work as on right sleeve. ASSEMBLY: Fold the piece double so that the longest sides of the bolero (markers on each sleeve) are place towards each other. Sew the sleeve seams inside 1 edge st as follows: Beg at the bottom of sleeve, sew towards mid front until markers (or desired length), repeat on the other sleeve. CROCHET EDGE: Crochet from RS on hook size 3.5 mm/E/4 with BabyAlpaca Silk as follows: ROUND 1: Beg mid under one sleeve, crochet along the opening between the sleeves (approx. 15 sc on 5 cm / 2", or approx. 10 sc on every repetition of diagram M.4A, no of sts must be divisible by 5), finish round with 1 sl st in 1st sc. NOTE: Make sure to work enough sc to avoid a tight edge. ROUND 2: ch 1, in 1st sc work ch 3, 1 dc, ch 2 and 2 dc, * skip the next 4 sc, in next sc work 2 dc, ch 2 and 2 dc *, repeat from *-* the entire round, finish with 1 sl st in 3rd ch from beg of round. ROUND 3: Read DC-GROUPS above! In every ch-space on round work 1 dc-group. Repeat 3RD ROUND until edge measures approx. 6 cm / 2 ⅜". On next round work in every ch-space as follows: 3 dc, ch 2, 3 dc. Repeat this round until edge measures approx. 10-11-12 cm / 4"-4½"-4 ¾", fasten off. CROCHET EDGE - SLEEVE: Crochet an edge from RS at the bottom of sleeve on hook size 3.5 mm/E/4 with BabyAlpaca Silk as follows: ROUND 1: Beg mid under sleeve, work approx. 15 sc on 5 cm / 2" (no of sts must be divisible by 5), finish round with 1 sl st in 1st sc. NOTE: Make sure to work enough sc to avoid a tight edge. Then work ROUNDS 2 and 3 as on the bolero edge, repeat 3RD ROUND for approx. 6-7-8 cm / 2 ⅜"-2¾"-3 1/8, fasten off. Repeat on the edge of the other sleeve. |
||||||||||||||||||||||
Diagram explanations |
||||||||||||||||||||||
|
||||||||||||||||||||||
 |
||||||||||||||||||||||
 |
||||||||||||||||||||||
Have you finished this pattern?Tag your pictures with #dropspattern #akropolisbolero or submit them to the #dropsfan gallery. Do you need help with this pattern?You'll find 12 tutorial videos, a Comments/Questions area and more by visiting the pattern on garnstudio.com. © 1982-2026 DROPS Design A/S. We reserve all rights. This document, including all its sub-sections, has copyrights. Read more about what you can do with our patterns at the bottom of each pattern on our site. |
||||||||||||||||||||||


With over 40 years in knitting and crochet design, DROPS Design offers one of the most extensive collections of free patterns on the internet - translated to 17 languages. As of today we count 324 catalogs and 12290 patterns - 12280 of which are translated into English (US/in).
We work hard to bring you the best knitting and crochet have to offer, inspiration and advice as well as great quality yarns at incredible prices! Would you like to use our patterns for other than personal use? You can read what you are allowed to do in the Copyright text at the bottom of all our patterns. Happy crafting!
Post a comment to pattern DROPS 139-5
We would love to hear what you have to say about this pattern!
If you want to leave a question, please make sure you select the correct category in the form below, to speed up the answering process. Required fields are marked *.