
Popular categories
Looking for a yarn?


Comments / Questions (286)
![]() Annie-france wrote:
Annie-france wrote:
Je pense qu'il y a une erreur dans l'explication du devant droit. J'ai tricoté en 1° le devant gauche et ai fait le droit en sens inverse.l'erreur est :continuer mousse puis M2.Les 10 premieres mailles de M2 ne sont pas au début mais à la fin. Bonne journée
10.05.2014 - 20:18DROPS Design answered:
Bonjour Annie-France, les explications sont correctes ainsi, on commence le devant droit par 1 rang sur l'envers, puis on tricote d'abord les mailles de bordure, et on termine par les mailles au point mousse, donc vu sur l'envers, on commence par les mailles point mousse et on termine par M.2 (sur l'endroit, on commence par M.2). Bon tricot!
12.05.2014 - 09:55
![]() Annie-france wrote:
Annie-france wrote:
Je ne comprends pas bien les devants.faut il tricoter un col apres avoir tricoté les devants? je suis entrain de faire le devant droit mais j'aimerais ne pas avoir à défaire. Merci de votre aide
29.04.2014 - 21:42DROPS Design answered:
Bonjour Annie-france, le col se tricote à la fin de chaque devant après avoir rabattu les mailles de l'épaule: vous continuez avec des rangs raccourcis jusqu'à la hauteur indiquée (milieu encolure dos). Les 2 moitiés du col sont ensuite assemblées entre elles puis le col est cousu le long de l'encolure dos. Bon tricot!
30.04.2014 - 13:00
![]() Brigitte wrote:
Brigitte wrote:
Bonjour, en fait j'ai compris. j'ai oublié de dire que je tricote de la main gauche. Comment alors, interpréter les diagrammes? Merci pour la réponse.
02.04.2014 - 19:41DROPS Design answered:
Bonjour Brigitte, les diagrammes se lisent de la même façon: 1 case = 1 m x 1 rang, le 1er rang des diagrammes ici se fait sur l'envers (on commence en bas à gauche et on lit de gauche droite - tous les rangs sur l'envers se lisent de gauche à droite) et tous les rangs sur l'endroit se lisent de droite à gauche. Le 1er rang du dos se fait sur l'endroit (cf début "dos"). La plupart de nos vidéos ont été faites avec le fil dans la main gauche, n'hésitez pas à les consulter. Bon tricot!
03.04.2014 - 08:40
![]() Brigitte wrote:
Brigitte wrote:
En fait,pourrais-je avoir au moins une adresse mail d'une dame française (qui a travaillé sur ce modèle là bien sûr) afin de pouvoir communiquer rapidement?. Cordialement.
01.04.2014 - 12:55
![]() Birgitte wrote:
Birgitte wrote:
Je suis vraiment étonnée. Vos réponses ne me satisfont pas. Je crois vraiment qu'il y a un problème avec les explications données sur ce modèle! Presque rien ne correspond :( . Cela fait 7 fois que je defais mon ouvrage au bout de 20 rangs. Avec qui puis je avoir une conversation téléphonique cela ira plus vite.!!!
01.04.2014 - 12:43DROPS Design answered:
Bonjour Brigitte, le 1er rang sur l'end se tricote ainsi(en S): 10 m point mousse, *6 m env, tricoter 2 fois à l'end chacune des 4 m suivantes (= on obtient 8 m end), 6 m env*, répéter de *-* 3 fois au total, 10m point mousse. Puis au rang suivant sur l'envers, on commence le diagramme M1A : 10 m point mousse, M1A (sur l'env = 6 m end, 8 m env (torsade), etc...), 10 m point mousse. Puis sur l'end: 10 m point mousse, M1A (6 m env, 8 m end, 12 m env...), 10 m point mousse et ainsi de suite.
01.04.2014 - 14:03
![]() Brigitte wrote:
Brigitte wrote:
Pouvez vous me dire si, lorsque je commence le premier rang de M1A, je suis sur l'endroit où sur l'envers du dos.
31.03.2014 - 18:16DROPS Design answered:
Bonjour Brigitte, le 1er rang du diagramme M1A se fait sur l'envers (cf § "Point fantaisie" au début des explications). Bon tricot!
01.04.2014 - 09:08
![]() Brigitte wrote:
Brigitte wrote:
J'ai bien noté cela. Ma question est que les 6 m envers du premier rang de M1A qui sont à tricoter en m. envers apparaissent sur la photo en jersey endroit justememt.Pouvez vous m'en dire plus? Cordialement.
31.03.2014 - 13:16DROPS Design answered:
Bonjour Brigitte, avant et après M.1, vous tricotez 10-13-16-20-25-30 m au point mousse, ce sont ces mailles qui sont de chaque côté du motif que l'on voit sur la photo. Vous avez donc par ex en taille S: 10 m point mousse, M.1A (= 6 m jersey env, 8 m jersey end, etc.. 8 m jersey env), 10 m point mousse. Bon tricot!
31.03.2014 - 13:33
![]() Brigitte wrote:
Brigitte wrote:
J'ai bien noté cela. Ma question est que les 6 m envers du premier rang de M1A qui sont à tricoter en m. envers apparaissent sur la photo en jersey endroit justememt.Pouvez vous m'en dire plus? Cordialement.
31.03.2014 - 13:16
![]() Brigitte wrote:
Brigitte wrote:
Bonjour, je n'arrive pas à reproduire le motif du dos:les torsades sont elles tricotées en jersey envers(aspect point mousse) sur fond de mailles tricotées en jersey endroit?help!!!
30.03.2014 - 20:59DROPS Design answered:
Bonjour Brigitte, dans chaque diag, 1 case = 1 m x 1 rang (vus sur l'end), et on lit les diag en commençant en bas à droite vers la gauche (sur l'endroit) et de gauche à droite (sur l'envers). Ainsi, au 1er rang de M.1, on a: 6 m env, 8 m end (torsade), 12 m env, 8 m end (torsade), 12 m env, 8 m end, 6 m env. Bon tricot!
31.03.2014 - 09:23
![]() Jane Mack wrote:
Jane Mack wrote:
This is a gorgeous sweater and I completed it but it was a very difficult sweater pattern. The directions need to be much cleared. Because this pattern is so complex, rather then using syntax ..."reverse for other side", ... just write out the pattern. The sweater came out beautiful, but I'm having second thoughts knitting it again for my other daughter.
01.01.2014 - 15:44
|
|||||||||||||||||||||||||
Chocolate Passion#chocolatepassioncardigan |
|||||||||||||||||||||||||
 |
 |
||||||||||||||||||||||||
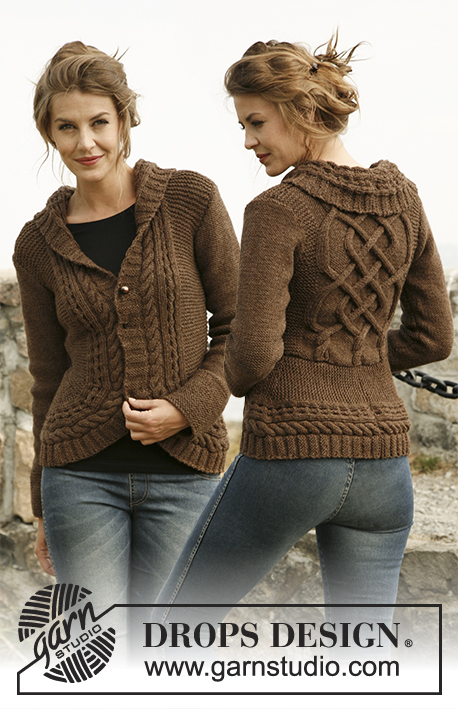
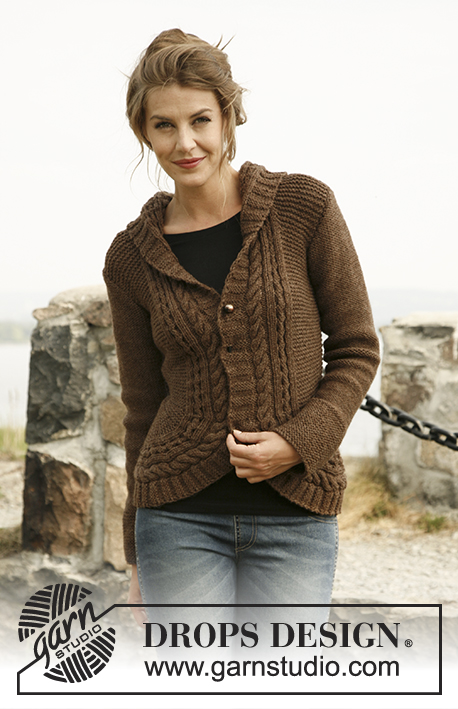
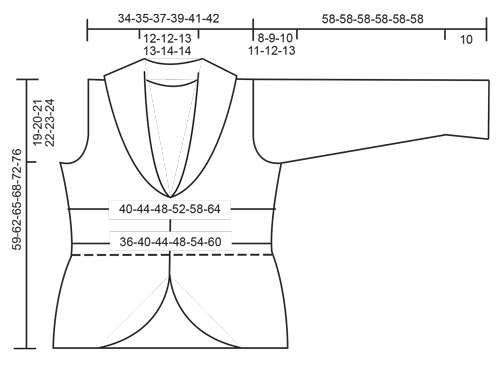
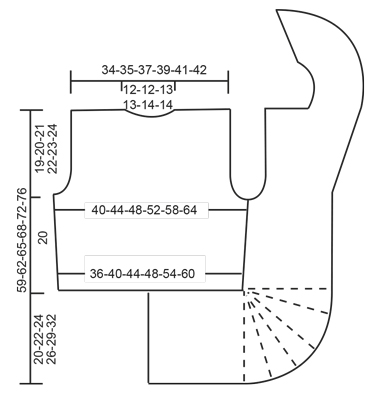
Knitted DROPS jacket with rounded front pieces and cables in ”Alaska”. Size: S to XXXL.
DROPS 134-55 |
|||||||||||||||||||||||||
|
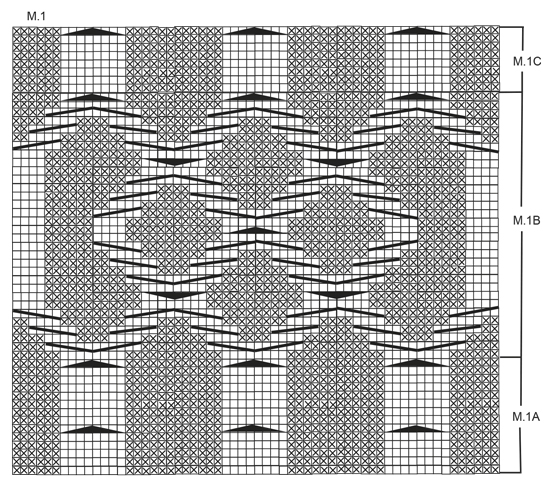
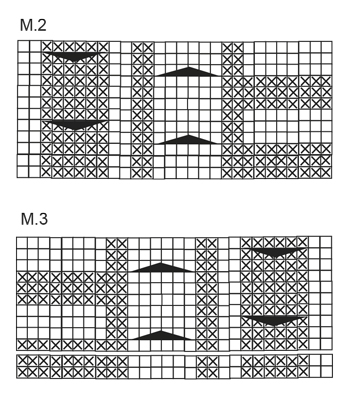
GARTER ST (back and forth on needle): K all rows. PATTERN: See diagrams M.1, M.2 and M.3 – diagrams shows all rows in pattern seen from RS. 1st row in diagrams is worked from WS. DECREASE TIP (applies to armhole): Dec from RS inside 3 sts. Dec AFTER 3 sts as follows: K 2 tog. Dec BEFORE 3 sts as follows: K 2 twisted tog. SHORT ROWS: Work short rows on front piece to get a rounded edge on the piece. Also work short rows between the cables in the pattern. This can make it difficult to read the diagram - make sure to work 5 rows between every cable. Work short rows as follows: Row 1 and 2: Work 10 sts in all sizes, turn and work back. Row 3 and 4: Work 16 sts in all sizes, turn and work back. Row 5 and 6: Work 20 sts in all sizes, turn and work back. Row 7 and 8: Work 26 sts in all sizes, turn and work back. Row 9 and 10: Work 28-28-29-29-31-30 sts, turn and work back. Row 11 and 12: Work 31-31-32-32-34-33 sts, turn and work back. Continue to work 3 sts more on every turn until all sts have been worked. 18-20-22-24-26-30 rows in garter st have been worked at the outer side and 2 rows in garter st have been worked on the inside. Repeat from 1st row a total of 5 times. The rounded edge now measures approx. 28-31-34-37-41-46 cm / 11"-12¼"-13⅜"-14½"-16⅛"-18" on the outer side and 3 cm / 1⅛" on the inside. -------------------------------------------------------- -------------------------------------------------------- BACK PIECE: Worked back and forth on needle. Cast on 68-74-80-88-98-108 sts on needle size 5 mm / US 8 with Alaska. K 1 row from WS. Work next row from RS as follows: 10-13-16-20-25-30 sts in GARTER ST – see explanation above, * P 6, K 2 sts in each of the next 4 sts (= K 8), P 6 *, repeat from *-* a total of 3 times, 10-13-16-20-25-30 sts in garter st. There are now 80-86-92-100-110-120 sts on needle. Then work as follows (1st row = WS): 10-13-16-20-25-30 sts in garter st, diagram M.1A (= 60 sts) and 10-13-16-20-25-30 sts in garter st. After M.1A continue with M.1B 2 times vertically, then repeat M.1C until finished measurements. REMEMBER THE GAUGE! When piece measures 7 cm / 2¾", inc 1 st in each side by working 1 YO inside outermost st – on next row K YO twisted (i.e. work in back loop of st instead of front) to avoid holes. Repeat inc every 5 cm / 2" a total of 3 times = 86-92-98-106-116-126 sts. When piece measures 20 cm / 8" in all sizes, bind off 3-4-5-6-7-8 sts at beg of the next 2 rows for armholes. Then dec 1 st in each side on every row from RS: 2-3-4-5-7-10 times– SEE DECREASE TIP! There are now 76-78-80-84-88-90 sts on needle. When piece measures 37-38-39-41-42-43 cm / 14½"-15"-15¼"-16⅛"-16½"-17", work the 8 sts over the middle cable tog 2 by 2. On next row bind off the middle 20-20-22-22-24-24 sts for neck = 26-27-27-29-30-31 sts remaining on each shoulder. Then work 3 rows over these as before, on next row work the 8 sts over the cable tog 2 by 2 = 22-23-23-25-26-27 sts. Then bind off all sts on next row. Piece measures approx. 39-40-41-42-43-44 cm / 15¼"-15¾"-16⅛"-16½"-17"-17¼" vertically. RIGHT EDGE PIECE/FRONT PIECE: All measurements should be done on the shorter side! Cast on 34-37-41-44-49-54 sts on needle size 5 mm / US 8 with Alaska. K 1 row from WS. Work next row from RS as follows: K 8, P 2, K 2 sts in each of the next 3 sts (= K 6), P 2, K 2, P 2 sts in each of the next 3 sts (= P 6), K 2, 12-15-19-22-27-32 sts in garter st. There are now 40-43-47-50-55-60 sts on needle. Continue like this: 12-15-19-22-27-32 sts in garter st and diagram M.2 (= 28 sts) – 1st row = WS. When piece measures 17-19-21-23-26-29 cm / 6¾"-7½"-8¼"-9"-10¼"-11⅜", work SHORT ROWS - see explanation above – 1st row is worked from RS! When all short rows have been worked, insert a marker. NOW MEASURE PIECE FROM HERE! Continue to work over all sts as before. When piece measures 7 cm / 2¾", beg to inc in the side as on back piece (i.e. the shorter side). After all inc, there are 43-46-50-53-58-63 sts on needle. When piece measures 20 cm / 8", bind off and dec for armhole in the side as on back piece (bind off and dec in same side as inc). At the same time when piece measures 23 cm / 9", beg to inc for collar. Inc inside diagram M.2 by making 1 YO, on next row K YO twisted (i.e. work in back loop of st instead of front) to avoid holes. Repeat inc every other row a total of 10-10-12-13-14-14 times - work inc sts in garter st. After all bind offs and dec for armhole and inc for collar, there are 48-49-53-55-58-59 sts on needle. When piece measures approx. 39-40-41-42-43-44 cm / 15¼"-15¾"-16⅛"-16½"-17"-17¼", adjust so that next row is worked from WS, bind off the first 22-23-23-25-26-27 sts in garter st = 26-26-30-30-32-32 sts remain on needle for collar. Continue to work as follows: * Work 2 rows over all sts, work 2 row only over the outermost 18-18-20-20-26-26 sts *, repeat from *-* until collar measures approx. 7-7-7½-7½-8-8 cm / 2¾"-2¾"-2⅞"-2⅞"-3⅛"-3⅛" on the inside (it will then be twice as long at the outer side). On next row work all 6 sts over both cables tog 2 by 2 = 20-20-24-24-26-26 sts. Bind off. LEFT EDGE PIECE/FRONT PIECE: Cast on and work as right front piece but reversed. I.e. work 2nd row as follows: 12-15-19-22-27-32 sts in garter st, K 2, P 2 sts in each of the next 3 sts (= P 6), K 2, P 2, K 2 sts in each of the next 3 sts (= K 6), P 2 and K 8. There are now 40-43-47-50-55-60 sts on needle. Continue as follows (1st row = WS): Diagram M.3 (= 28 sts), 12-15-19-22-27-32 sts in garter st. Continue as on right front piece but when working short rows work 1st row from WS! bind off shoulder sts from RS to avoid cutting the thread to work the collar. SLEEVE: Worked back and forth on needle. Cast on 42-42-44-44-46-48 sts (includes 1 edge st in each side) on needle size 5 mm / US 8 with Alaska. Work 10 cm / 4" in garter st. Continue in stockinette st. When piece measures 15 cm / 6", inc 1 st in each side. Repeat inc every 4-3-3-2½-2-2 cm / 1½"-1⅛"-1⅛"-⅞"-¾"-¾" a total of 9-11-11-13-14-15 times = 60-64-66-70-74-78 sts. When piece measures 50-49-48-47-46-45 cm / 19¾"-19¼"-19"-18½"-18"-17¾" (shorter measurements in the larger sizes because of longer sleeve cap and wider shoulder width) bind off for sleeve cap at beg of every row in each side: 3 sts 1 time, 2 sts 3 times and 1 st 1-2-3-4-5-6 times, then bind off 2 sts in each side until sleeve measures 57 cm / 22½", then bind off 3 sts 1 time in each side, bind off remaining sts. The piece measures approx. 58 cm / 22¾". ASSEMBLY: Sew cast on edge on edge pieces tog mid back - sew edge to edge to avoid a chunky seam. Then sew edge to bottom edge of back piece. Sew the shoulder seams. Sew side seam edge to edge. Sew the collar tog mid back and sew it to the neckline. Sew sleeve seams inside 1 edge st - sew so that WS is on the outside and sew sleeves on body. Close jacket with a pin or similar. |
|||||||||||||||||||||||||
Diagram explanations |
|||||||||||||||||||||||||
|
|||||||||||||||||||||||||
 |
|||||||||||||||||||||||||
 |
|||||||||||||||||||||||||
 |
|||||||||||||||||||||||||
 |
|||||||||||||||||||||||||
Have you finished this pattern?Tag your pictures with #dropspattern #chocolatepassioncardigan or submit them to the #dropsfan gallery. Do you need help with this pattern?You'll find 22 tutorial videos, a Comments/Questions area and more by visiting the pattern on garnstudio.com. © 1982-2026 DROPS Design A/S. We reserve all rights. This document, including all its sub-sections, has copyrights. Read more about what you can do with our patterns at the bottom of each pattern on our site. |
|||||||||||||||||||||||||


With over 40 years in knitting and crochet design, DROPS Design offers one of the most extensive collections of free patterns on the internet - translated to 17 languages. As of today we count 325 catalogs and 12298 patterns - 12288 of which are translated into English (US/in).
We work hard to bring you the best knitting and crochet have to offer, inspiration and advice as well as great quality yarns at incredible prices! Would you like to use our patterns for other than personal use? You can read what you are allowed to do in the Copyright text at the bottom of all our patterns. Happy crafting!
Post a comment to pattern DROPS 134-55
We would love to hear what you have to say about this pattern!
If you want to leave a question, please make sure you select the correct category in the form below, to speed up the answering process. Required fields are marked *.