
Popular categories
Looking for a yarn?


Comments / Questions (286)
![]() Anna-Karin wrote:
Anna-Karin wrote:
Hej, Hur många gånger ska varv 1-12 stickas för vändningarna? Det står först hur det ska stickas, sen en uppmaning att upprepa 5 gånger. Avser det 5 eller 6 gånger? När man sen tittar på diagrammet är det 5 gånger. Tack på förhand! Med vänlig hälsning Anna-Karin
14.11.2016 - 18:27DROPS Design answered:
Hej Anna-Karin. Hvis der staar du skal gentage 5 ganger, saa er det 5 ganger
15.11.2016 - 14:53
![]() Braud Hélène wrote:
Braud Hélène wrote:
Bonsoir, Je suis normalement sur le point de finir le bord droit mais j'ai un doute. Mon arrondi col côté court mesure 7 cm mais côté long il est à 11 et non pas 14. De plus, le "virage" du col que l'on voit sur le haut du croquis n'est pas aussi grand que le votre. Je ne comprends pas comment il peut être si marqué alors que les rangs raccourcis du col ne commencent que si tard. Pourriez-vous m'éclairer svp ? Merci beaucoup !
09.11.2016 - 22:47DROPS Design answered:
Bonjour Mme Braud, quand vous tricotez les rangs raccourcis pour le col, vous avez 2 x fois plus de rangs sur l'extérieur (= où on tricote les premières mailles tous les rangs) que sur l'intérieur (où l'on tricote les mailles tous les 2 rangs seulement). La partie la plus courte sera ensuite cousue le long de l'encolure dos, vérifiez bien que la vôtre correspond bien (à partir de l'épaule jusqu'au milieu encolure dos pour chaque col). Bon tricot!
10.11.2016 - 08:50
![]() Elisabeth wrote:
Elisabeth wrote:
Bonjour! Pour la pièce du dos, une fois les mailles de dèpart monté il faut y allez en endroit ou envers?
28.01.2016 - 13:50DROPS Design answered:
Bonjour Elisabeth, après avoir monté les mailles du dos, tricotez 1 rang endroit (= toutes les mailles à l'endroit), ce 1er rang sera sur l'envers. Tricotez ensuite le rang suivant cette fois sur l'endroit, comme indiqué avec les augmentations). Bon tricot!
28.01.2016 - 16:13
![]() Tina wrote:
Tina wrote:
Hallo! Die Jacke ist toll - und ich will auch so eine :) Nur leider habe ich gerade 2 Probleme beim Armloch. (1. Rückenteil, Beispiel rechte Seite) --> nach 20cm 1x 3-4-5-6-7-8 M abketten und danach in jeder HINreihe 1 M abnehmen (keine Abnahme in der Rückreihe). Ist das so richtig? (2. Vorderteil rechts) --> nach 23cm in jeder HINreihe 1x Umschlag, in der RÜCKreihe rechts stricken, neue Masche als Krausrippe behandeln. Ist das so richtig? Liebe Grüße, Tina
21.09.2015 - 23:07DROPS Design answered:
Beim Rückenteil müssen Sie beidseitig je 1x 3-4-5-6-7-8 M abketten und dann nehmen Sie ebenfalls beidseitig, also am Anfang und am Ende jeder Hin-R 1 M ab, so oft wie beschrieben. Die Armausschnitte müssen beide gleich sein. - Die Zunahmen am Vorderteil können Sie machen, wie von Ihnen beschrieben. Sie können die Umschläge aber auch in Rück-R machen und in Hin-R VERSCHRÄNKT abstricken (das ist in jedem Fall wichtig, um ein Loch zu vermeiden). Das ist egal, da Sie ja kraus rechts stricken.
28.09.2015 - 10:25
![]() Cynthia wrote:
Cynthia wrote:
Bonjour, relativement au dos et aux bordures, je me demandais si le nombre de mailles inscrit dans le patron (et non sur les diagrammes) comprend les mailles lisières ou non. Également, quel point utiliser pour les mailles lisières ? Merci.
27.08.2015 - 14:56DROPS Design answered:
Bonjour Cynthia, montez bien le nombre de mailles indiqué pour votre taille et suivez les indications, soit d'abord 1 rang end sur l'envers puis 1 rang avec des augmentations (8 m end, 2 m env, tricoter 2 fois à l'end chacune des 3 m suivantes (= 6 m end), 2 m env, 2 m end, tricoter 2 fois à l'envers chacune des 3 m suivantes (= 6 m env), 2 m end, 12-32 m point mousse - cf taille). Puis ainsi sur l'envers: 12-32 m point mousse et M.2 (= 28 m). Ainsi d'un côté la 1ère m (vu sur l'endroit) est tricotée au point mousse, et la dernière (vu sur l'endroit) en suivant M.2. Bon tricot!
27.08.2015 - 16:36
![]() Natacha Béchu wrote:
Natacha Béchu wrote:
Bonjour pouvez voous m expliquez comment faire tricoter 2 fois la maille envers de plus en fesant comme vous dite sa parait moche 2 torsade differente merci de vos conseils sur la partie devant droite
07.05.2015 - 16:59
![]() Matthieu wrote:
Matthieu wrote:
Bonjour, je commence à tricoter la bordure devant droit, et la remarque "Mesurer sur le côté le plus court" m'interpelle : quand on nous dit de commencer les rangs raccourcis "à 21 cm de hauteur totale", cela veut-il dire qu'il faut mesurer 21 cm du côté le plus court, c'est-à-dire de point mousse ? Car à ce moment-là, cela veut dire que la partie torsadée sera plus longue que 21 cm... Est-ce normal ? Merci de m'éclairer sur ce point.
24.02.2015 - 21:48DROPS Design answered:
Bonjour Matthieu, quand vous tricotez les rangs raccourcis, vous avez un côté plus haut que l'autre (celui où vous tricotez davantage de rangs), on va alors mesurer de l'autre côté (celui où on tricote moins de rangs). Quand vous commencez les rangs raccourcis, mesurez effectivement côté point mousse. Bon tricot!
25.02.2015 - 09:25
![]() Inge Peters wrote:
Inge Peters wrote:
Heeft u al gelegenheid gehad naar mijn vraag te kijken?
22.01.2015 - 20:05DROPS Design answered:
Hoi Inge. De vraag is beantwoord op 14/1. Kijk hieronder!
23.01.2015 - 15:59
![]() Inge Peters wrote:
Inge Peters wrote:
Okee, dat zou geweldig zijn! Alvast bedankt!
14.01.2015 - 21:15
![]() Inge Peters wrote:
Inge Peters wrote:
Goedemorgen! Op 31-12 heb ik een vraag gesteld over het meerderen/minderen van het re-voorpand. Ik ben inmiddels al naar de plaatselijke handwerkwinkel geweest, maar die konden mij ook niet verder helpen. Intussen heb ik wel 2 mouwen gebreid, maar ik zou het vest graag afmaken. Ik hoop dat u snel de tijd vindt om even naar mijn probleem te kijken? Met vriendelijke groet, Inge
14.01.2015 - 07:41DROPS Design answered:
Hoi Inge. Ik zal proberen zsm te reageren. Ik ben al vrij ver door de vragen heen van de vakantie, dus het zou niet al te lang meer duren.
14.01.2015 - 14:33
|
|||||||||||||||||||||||||
Chocolate Passion#chocolatepassioncardigan |
|||||||||||||||||||||||||
 |
 |
||||||||||||||||||||||||
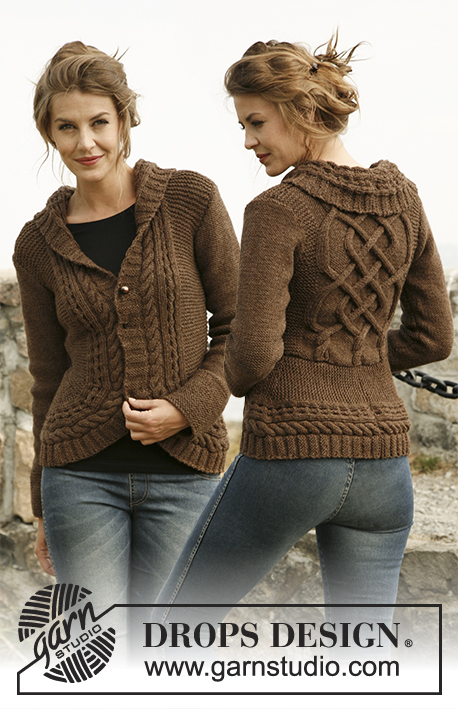
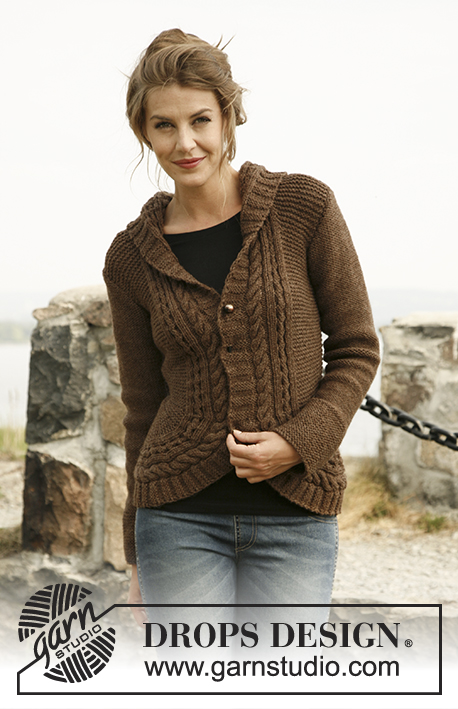
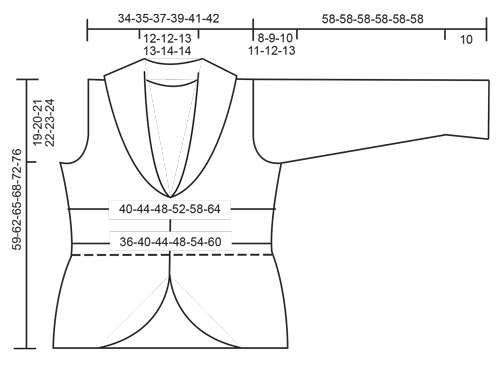
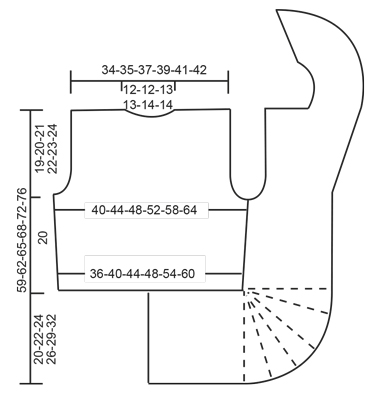
Knitted DROPS jacket with rounded front pieces and cables in ”Alaska”. Size: S to XXXL.
DROPS 134-55 |
|||||||||||||||||||||||||
|
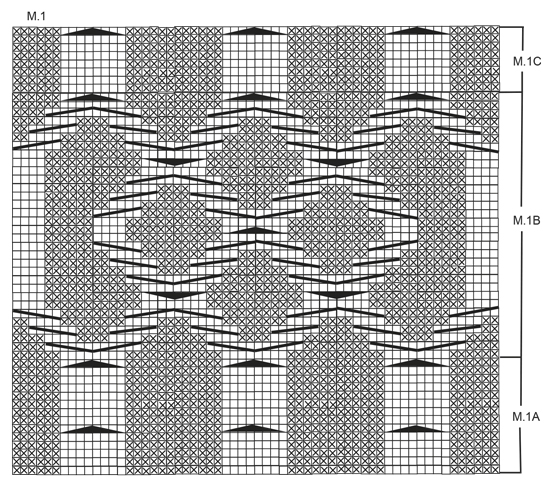
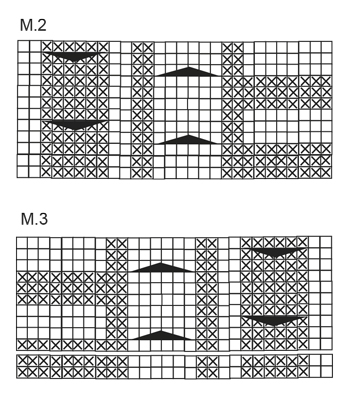
GARTER ST (back and forth on needle): K all rows. PATTERN: See diagrams M.1, M.2 and M.3 – diagrams shows all rows in pattern seen from RS. 1st row in diagrams is worked from WS. DECREASE TIP (applies to armhole): Dec from RS inside 3 sts. Dec AFTER 3 sts as follows: K 2 tog. Dec BEFORE 3 sts as follows: K 2 twisted tog. SHORT ROWS: Work short rows on front piece to get a rounded edge on the piece. Also work short rows between the cables in the pattern. This can make it difficult to read the diagram - make sure to work 5 rows between every cable. Work short rows as follows: Row 1 and 2: Work 10 sts in all sizes, turn and work back. Row 3 and 4: Work 16 sts in all sizes, turn and work back. Row 5 and 6: Work 20 sts in all sizes, turn and work back. Row 7 and 8: Work 26 sts in all sizes, turn and work back. Row 9 and 10: Work 28-28-29-29-31-30 sts, turn and work back. Row 11 and 12: Work 31-31-32-32-34-33 sts, turn and work back. Continue to work 3 sts more on every turn until all sts have been worked. 18-20-22-24-26-30 rows in garter st have been worked at the outer side and 2 rows in garter st have been worked on the inside. Repeat from 1st row a total of 5 times. The rounded edge now measures approx. 28-31-34-37-41-46 cm / 11"-12¼"-13⅜"-14½"-16⅛"-18" on the outer side and 3 cm / 1⅛" on the inside. -------------------------------------------------------- -------------------------------------------------------- BACK PIECE: Worked back and forth on needle. Cast on 68-74-80-88-98-108 sts on needle size 5 mm / US 8 with Alaska. K 1 row from WS. Work next row from RS as follows: 10-13-16-20-25-30 sts in GARTER ST – see explanation above, * P 6, K 2 sts in each of the next 4 sts (= K 8), P 6 *, repeat from *-* a total of 3 times, 10-13-16-20-25-30 sts in garter st. There are now 80-86-92-100-110-120 sts on needle. Then work as follows (1st row = WS): 10-13-16-20-25-30 sts in garter st, diagram M.1A (= 60 sts) and 10-13-16-20-25-30 sts in garter st. After M.1A continue with M.1B 2 times vertically, then repeat M.1C until finished measurements. REMEMBER THE GAUGE! When piece measures 7 cm / 2¾", inc 1 st in each side by working 1 YO inside outermost st – on next row K YO twisted (i.e. work in back loop of st instead of front) to avoid holes. Repeat inc every 5 cm / 2" a total of 3 times = 86-92-98-106-116-126 sts. When piece measures 20 cm / 8" in all sizes, bind off 3-4-5-6-7-8 sts at beg of the next 2 rows for armholes. Then dec 1 st in each side on every row from RS: 2-3-4-5-7-10 times– SEE DECREASE TIP! There are now 76-78-80-84-88-90 sts on needle. When piece measures 37-38-39-41-42-43 cm / 14½"-15"-15¼"-16⅛"-16½"-17", work the 8 sts over the middle cable tog 2 by 2. On next row bind off the middle 20-20-22-22-24-24 sts for neck = 26-27-27-29-30-31 sts remaining on each shoulder. Then work 3 rows over these as before, on next row work the 8 sts over the cable tog 2 by 2 = 22-23-23-25-26-27 sts. Then bind off all sts on next row. Piece measures approx. 39-40-41-42-43-44 cm / 15¼"-15¾"-16⅛"-16½"-17"-17¼" vertically. RIGHT EDGE PIECE/FRONT PIECE: All measurements should be done on the shorter side! Cast on 34-37-41-44-49-54 sts on needle size 5 mm / US 8 with Alaska. K 1 row from WS. Work next row from RS as follows: K 8, P 2, K 2 sts in each of the next 3 sts (= K 6), P 2, K 2, P 2 sts in each of the next 3 sts (= P 6), K 2, 12-15-19-22-27-32 sts in garter st. There are now 40-43-47-50-55-60 sts on needle. Continue like this: 12-15-19-22-27-32 sts in garter st and diagram M.2 (= 28 sts) – 1st row = WS. When piece measures 17-19-21-23-26-29 cm / 6¾"-7½"-8¼"-9"-10¼"-11⅜", work SHORT ROWS - see explanation above – 1st row is worked from RS! When all short rows have been worked, insert a marker. NOW MEASURE PIECE FROM HERE! Continue to work over all sts as before. When piece measures 7 cm / 2¾", beg to inc in the side as on back piece (i.e. the shorter side). After all inc, there are 43-46-50-53-58-63 sts on needle. When piece measures 20 cm / 8", bind off and dec for armhole in the side as on back piece (bind off and dec in same side as inc). At the same time when piece measures 23 cm / 9", beg to inc for collar. Inc inside diagram M.2 by making 1 YO, on next row K YO twisted (i.e. work in back loop of st instead of front) to avoid holes. Repeat inc every other row a total of 10-10-12-13-14-14 times - work inc sts in garter st. After all bind offs and dec for armhole and inc for collar, there are 48-49-53-55-58-59 sts on needle. When piece measures approx. 39-40-41-42-43-44 cm / 15¼"-15¾"-16⅛"-16½"-17"-17¼", adjust so that next row is worked from WS, bind off the first 22-23-23-25-26-27 sts in garter st = 26-26-30-30-32-32 sts remain on needle for collar. Continue to work as follows: * Work 2 rows over all sts, work 2 row only over the outermost 18-18-20-20-26-26 sts *, repeat from *-* until collar measures approx. 7-7-7½-7½-8-8 cm / 2¾"-2¾"-2⅞"-2⅞"-3⅛"-3⅛" on the inside (it will then be twice as long at the outer side). On next row work all 6 sts over both cables tog 2 by 2 = 20-20-24-24-26-26 sts. Bind off. LEFT EDGE PIECE/FRONT PIECE: Cast on and work as right front piece but reversed. I.e. work 2nd row as follows: 12-15-19-22-27-32 sts in garter st, K 2, P 2 sts in each of the next 3 sts (= P 6), K 2, P 2, K 2 sts in each of the next 3 sts (= K 6), P 2 and K 8. There are now 40-43-47-50-55-60 sts on needle. Continue as follows (1st row = WS): Diagram M.3 (= 28 sts), 12-15-19-22-27-32 sts in garter st. Continue as on right front piece but when working short rows work 1st row from WS! bind off shoulder sts from RS to avoid cutting the thread to work the collar. SLEEVE: Worked back and forth on needle. Cast on 42-42-44-44-46-48 sts (includes 1 edge st in each side) on needle size 5 mm / US 8 with Alaska. Work 10 cm / 4" in garter st. Continue in stockinette st. When piece measures 15 cm / 6", inc 1 st in each side. Repeat inc every 4-3-3-2½-2-2 cm / 1½"-1⅛"-1⅛"-⅞"-¾"-¾" a total of 9-11-11-13-14-15 times = 60-64-66-70-74-78 sts. When piece measures 50-49-48-47-46-45 cm / 19¾"-19¼"-19"-18½"-18"-17¾" (shorter measurements in the larger sizes because of longer sleeve cap and wider shoulder width) bind off for sleeve cap at beg of every row in each side: 3 sts 1 time, 2 sts 3 times and 1 st 1-2-3-4-5-6 times, then bind off 2 sts in each side until sleeve measures 57 cm / 22½", then bind off 3 sts 1 time in each side, bind off remaining sts. The piece measures approx. 58 cm / 22¾". ASSEMBLY: Sew cast on edge on edge pieces tog mid back - sew edge to edge to avoid a chunky seam. Then sew edge to bottom edge of back piece. Sew the shoulder seams. Sew side seam edge to edge. Sew the collar tog mid back and sew it to the neckline. Sew sleeve seams inside 1 edge st - sew so that WS is on the outside and sew sleeves on body. Close jacket with a pin or similar. |
|||||||||||||||||||||||||
Diagram explanations |
|||||||||||||||||||||||||
|
|||||||||||||||||||||||||
 |
|||||||||||||||||||||||||
 |
|||||||||||||||||||||||||
 |
|||||||||||||||||||||||||
 |
|||||||||||||||||||||||||
Have you finished this pattern?Tag your pictures with #dropspattern #chocolatepassioncardigan or submit them to the #dropsfan gallery. Do you need help with this pattern?You'll find 22 tutorial videos, a Comments/Questions area and more by visiting the pattern on garnstudio.com. © 1982-2026 DROPS Design A/S. We reserve all rights. This document, including all its sub-sections, has copyrights. Read more about what you can do with our patterns at the bottom of each pattern on our site. |
|||||||||||||||||||||||||


With over 40 years in knitting and crochet design, DROPS Design offers one of the most extensive collections of free patterns on the internet - translated to 17 languages. As of today we count 325 catalogs and 12298 patterns - 12288 of which are translated into English (US/in).
We work hard to bring you the best knitting and crochet have to offer, inspiration and advice as well as great quality yarns at incredible prices! Would you like to use our patterns for other than personal use? You can read what you are allowed to do in the Copyright text at the bottom of all our patterns. Happy crafting!
Post a comment to pattern DROPS 134-55
We would love to hear what you have to say about this pattern!
If you want to leave a question, please make sure you select the correct category in the form below, to speed up the answering process. Required fields are marked *.