
Popular categories
Looking for a yarn?


Comments / Questions (286)
![]() Nicole wrote:
Nicole wrote:
Kann man die wellige, knotige Kante neben M2 ( neben dem sich abwechselnden 3 Re. u.li. Reihen irgendwie vermeiden? Muss man dort eine Randmasche stricken oder ist das so gewollt?
22.01.2019 - 15:47DROPS Design answered:
Liebe Nicole, diese Maschen sind die "Kante", es gibt hier keine Randmasche, diese Maschen sollen abwechselnd links und rechts gestrickt werden. Sie bilden so wie ein Rippenmuster unten am Rückenteil, an den Vorderteilen und bei dem Kragen. Viel Spaß beim stricken!
22.01.2019 - 16:03
![]() Nicole wrote:
Nicole wrote:
Ich nochmal. Ich bin jetzt beim Vorderteil angelangt und komme mit M2 nicht zurecht. Bei mir sehen die Zöpfe nicht so aus wie auf dem Bild. Ist es korrekt, daß die Vorderseite von Re nach Li und die Rückseite von Li nach Re gelesen wird? Bei mir sehen die Zöpfe aus wie bei M1 C. Was mache ich falsch? Oder täuscht das Licht auf dem Bild?
22.01.2019 - 14:00DROPS Design answered:
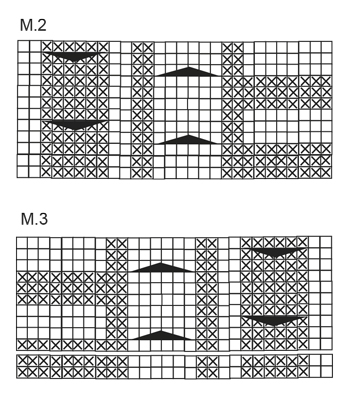
Liebe Nicole, es stimmt ja, in M.2 und M.3 sind es 2 Zöpfe, der eine wird von der Vorderseite gestrickt und die andere von der Rückseite gestrickt, - dh genauso wie im Diagram gezeigt. Viel Spaß beim stricken!
22.01.2019 - 15:12
![]() Nicole wrote:
Nicole wrote:
Ich bin am Ende des Rückenteils angelangt. Dort ist ja angegeben, dass die mittleren 20 M (Gr.M) angekettet werden sollen und danach 27 übrig sind. Das betrifft aber doch nur die linke Seite (neben dem Kragen). Soll ich dann die rechte Seite solange auf eine Hilfsnadel legen, nach Abschluss der linken Seite mit neuem Faden beginnen und dann genauso stricken?
20.01.2019 - 13:20DROPS Design answered:
Liebe Nicole, ja genau, nachdem Sie die mittleren 20 M für den Halsausschnitt abgekettet haben, werden beiden Schulter separat gestrickt. Nach 3 Reihen über die 27 M von einem Schulter ketten Sie die Maschen ab, den Faden abschneiden und jetzt den 2. Schulter wie der 1. stricken (mit neuen Faden). Viel Spaß beim stricken!
21.01.2019 - 10:57
![]() RANI Hothi wrote:
RANI Hothi wrote:
On the very first row in back you state pearl 6 knit 2 in the same stich.... yet only increases one how do you do this?
26.12.2018 - 20:41DROPS Design answered:
Dear Rani Hothi, please see the following video HERE. Happy knitting!
27.12.2018 - 15:00
![]() G.Kluitenberg wrote:
G.Kluitenberg wrote:
Kan ik de lengte van het patroon aanpassen zou maar 57 cm moeten zijn bij maat L
14.12.2018 - 11:55DROPS Design answered:
Dag G. Kluitenberg,
Helaas is dat bij dit patroon erg lastig, omdat je vast zit aan de ronde vorm en de kabel op de rug.
18.12.2018 - 10:18
![]() M. Angeles Diez wrote:
M. Angeles Diez wrote:
Buenos días, no dice nada de los ojales y los botones. No hay que hacer ojales?
01.12.2018 - 09:46DROPS Design answered:
Hola M.Angeles. Este modelo no tiene ojales. Se cierra con un broche o un pin.
01.12.2018 - 16:50
![]() Priscillia wrote:
Priscillia wrote:
Bonjour, je ne comprend pas le devant gauche. Je fini le rang 2 sur 8 mailles endroit. si je commence le diagramme en me basant sur le côté droit, je suis sur un rang envers. hors je dois donc tricoter les 8 mailles en endroit. mais je fini donc avec du mousse ou lieu du jersey alterné. comment commencer M3... rang envers ou rang endroit?
18.11.2018 - 17:43DROPS Design answered:
Bonjour Priscillia, quand vous avez tricotez le 2ème rang (avec les augmentations) = sur l'endroit, continuez ainsi en commençant sur l'envers: M.3, 12-32 m point mousse - continuez comme pour le devant droit mais tricotez les rangs raccourcis sur l'envers. Bon tricot!
19.11.2018 - 09:26
![]() Bérène wrote:
Bérène wrote:
Merci de votre réponse. Mon ouvrage est réalisé en aiguille 6 pour avoir le bon échantillon. A quel adresse mail puis-je envoyer des photos ? Si je comprends bien, après les rangs raccourcis, les torsades sont decalés ?
31.07.2018 - 16:36DROPS Design answered:
Bonjour Mme Bérène, votre échantillon doit être de 17 m x 22 rangs en jersey = 10 x 10 cm ; si vous avez conservé cette tension, vous devriez avoir la bonne forme (arrondi et hauteur après les rangs raccourcis), n'hésitez pas à ajuster la taille des aiguilles si besoin. Vous pouvez montrer vos photos au magasin où vous avez acheté votre laine - même par mail, ils pourront ainsi mieux voir. Si vos torsades sont décalées, ce n'est pas forcément grave vu qu'il y en a une sur l'endroit et une sur l'envers, mais si votre échantillon n'est pas juste, vous risquez d'avoir une forme et des dimensions différentes de celles du schéma. Bon tricot!
01.08.2018 - 08:39
![]() Bérène wrote:
Bérène wrote:
Bonjour, J'ai fini les rangs raccourcis mais je ne retombe pas pile poil sur le graphique m2. J'ai un décalage entre mes torsades. Me suis-je tromper ? Faut-il que je démonte ce que j'ai fait ? J'ai pourtant dessiner un graphique de rang raccourci pour bien respecter les 5 rangs entre les torsades... j'ai fait les rangs raccourcis 5 fois, j'ai 44cm sur l'extérieur alors que je devrais avoir 31cm Que dois-je faire ? Merci de votre aide
30.07.2018 - 11:02DROPS Design answered:
Bonjour Mme Bérène, pensez à bien vérifier votre tension en hauteur aussi bien qu'en largeur (= 17 m x 22 rangs jersey = 10 x 1 0 cm). En même temps que les rangs raccourcis, continuez à suivre les diagrammes rang après rang (les torsades ne vont pas se croiser automatiquement au même rang, mais il doi tbien y avoir le même nombre de rangs entre chaque torsade). N'hésitez pas à montrer votre ouvrage à votre magasin (même par mail si besoin), on pourra vous y aider plus facilement en regardant ce que vous avez fait. Bon tricot!
31.07.2018 - 09:39
![]() Bérène wrote:
Bérène wrote:
Bonjour, Je suis entrain de réaliser le devant droit. Je me demande si j'ai bien compris les explications. Il y a bien une torsade sur l'envers de l'ouvrage et une sur l'endroit ? Je n'ai pas l'impression d'avoir le même résultat que vous... ma torsade sur l'envers ne ressort pas Merci de votre réponse
20.07.2018 - 11:35DROPS Design answered:
Bonjour Mme Bérène, tout à fait, on a bien 2 torsades, une que l'on tricote en mailles endroit sur l'endroit et dont les mailles se croisent sur l'endroit et l'autre que l'on tricote en jersey envers (vu sur l'endroit) et dont les mailles se croisent sur l'envers. Bon tricot!
20.07.2018 - 14:54
|
|||||||||||||||||||||||||
Chocolate Passion#chocolatepassioncardigan |
|||||||||||||||||||||||||
 |
 |
||||||||||||||||||||||||
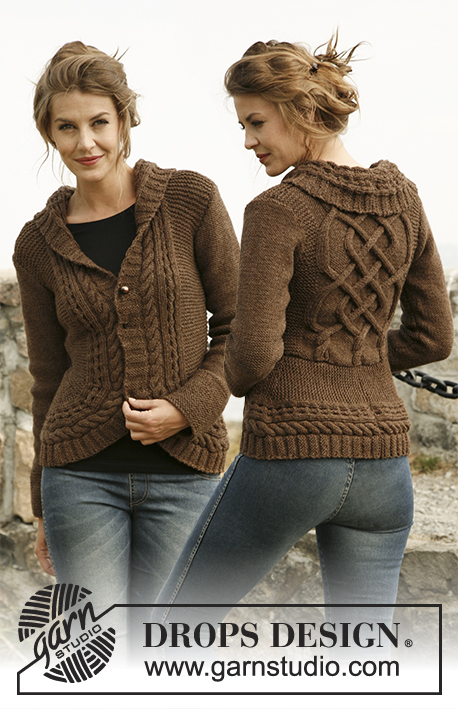
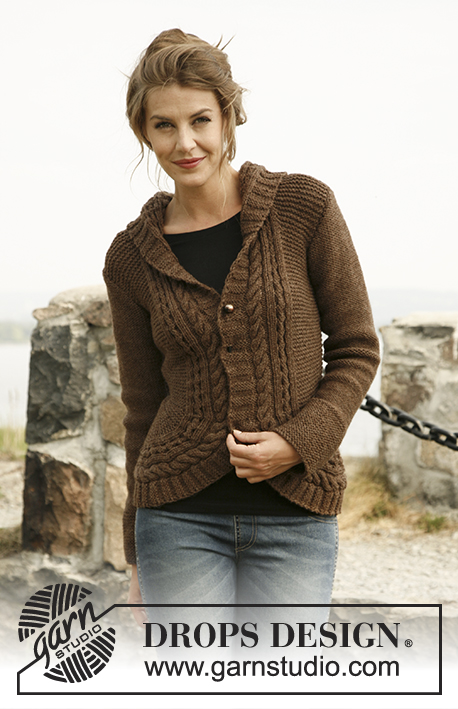
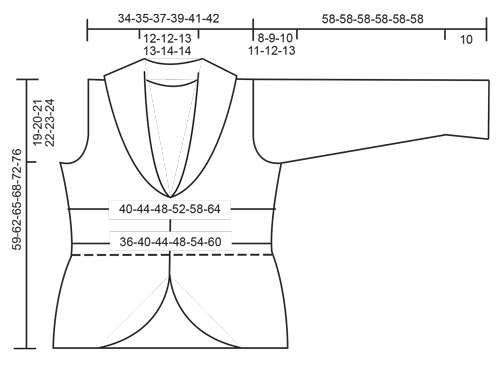
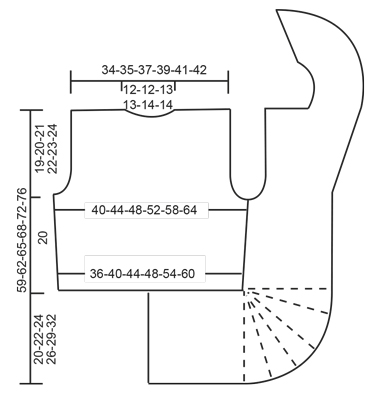
Knitted DROPS jacket with rounded front pieces and cables in ”Alaska”. Size: S to XXXL.
DROPS 134-55 |
|||||||||||||||||||||||||
|
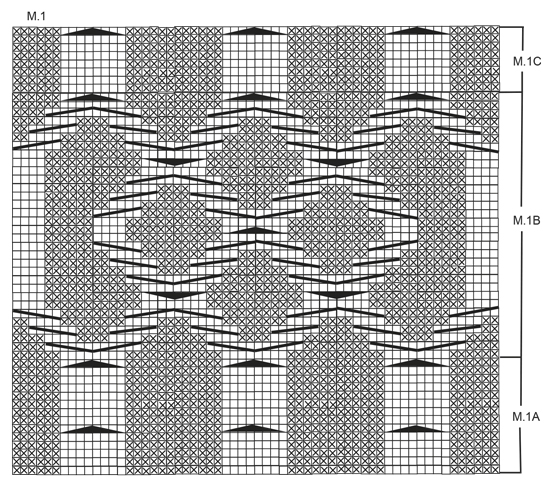
GARTER ST (back and forth on needle): K all rows. PATTERN: See diagrams M.1, M.2 and M.3 – diagrams shows all rows in pattern seen from RS. 1st row in diagrams is worked from WS. DECREASE TIP (applies to armhole): Dec from RS inside 3 sts. Dec AFTER 3 sts as follows: K 2 tog. Dec BEFORE 3 sts as follows: K 2 twisted tog. SHORT ROWS: Work short rows on front piece to get a rounded edge on the piece. Also work short rows between the cables in the pattern. This can make it difficult to read the diagram - make sure to work 5 rows between every cable. Work short rows as follows: Row 1 and 2: Work 10 sts in all sizes, turn and work back. Row 3 and 4: Work 16 sts in all sizes, turn and work back. Row 5 and 6: Work 20 sts in all sizes, turn and work back. Row 7 and 8: Work 26 sts in all sizes, turn and work back. Row 9 and 10: Work 28-28-29-29-31-30 sts, turn and work back. Row 11 and 12: Work 31-31-32-32-34-33 sts, turn and work back. Continue to work 3 sts more on every turn until all sts have been worked. 18-20-22-24-26-30 rows in garter st have been worked at the outer side and 2 rows in garter st have been worked on the inside. Repeat from 1st row a total of 5 times. The rounded edge now measures approx. 28-31-34-37-41-46 cm / 11"-12¼"-13⅜"-14½"-16⅛"-18" on the outer side and 3 cm / 1⅛" on the inside. -------------------------------------------------------- -------------------------------------------------------- BACK PIECE: Worked back and forth on needle. Cast on 68-74-80-88-98-108 sts on needle size 5 mm / US 8 with Alaska. K 1 row from WS. Work next row from RS as follows: 10-13-16-20-25-30 sts in GARTER ST – see explanation above, * P 6, K 2 sts in each of the next 4 sts (= K 8), P 6 *, repeat from *-* a total of 3 times, 10-13-16-20-25-30 sts in garter st. There are now 80-86-92-100-110-120 sts on needle. Then work as follows (1st row = WS): 10-13-16-20-25-30 sts in garter st, diagram M.1A (= 60 sts) and 10-13-16-20-25-30 sts in garter st. After M.1A continue with M.1B 2 times vertically, then repeat M.1C until finished measurements. REMEMBER THE GAUGE! When piece measures 7 cm / 2¾", inc 1 st in each side by working 1 YO inside outermost st – on next row K YO twisted (i.e. work in back loop of st instead of front) to avoid holes. Repeat inc every 5 cm / 2" a total of 3 times = 86-92-98-106-116-126 sts. When piece measures 20 cm / 8" in all sizes, bind off 3-4-5-6-7-8 sts at beg of the next 2 rows for armholes. Then dec 1 st in each side on every row from RS: 2-3-4-5-7-10 times– SEE DECREASE TIP! There are now 76-78-80-84-88-90 sts on needle. When piece measures 37-38-39-41-42-43 cm / 14½"-15"-15¼"-16⅛"-16½"-17", work the 8 sts over the middle cable tog 2 by 2. On next row bind off the middle 20-20-22-22-24-24 sts for neck = 26-27-27-29-30-31 sts remaining on each shoulder. Then work 3 rows over these as before, on next row work the 8 sts over the cable tog 2 by 2 = 22-23-23-25-26-27 sts. Then bind off all sts on next row. Piece measures approx. 39-40-41-42-43-44 cm / 15¼"-15¾"-16⅛"-16½"-17"-17¼" vertically. RIGHT EDGE PIECE/FRONT PIECE: All measurements should be done on the shorter side! Cast on 34-37-41-44-49-54 sts on needle size 5 mm / US 8 with Alaska. K 1 row from WS. Work next row from RS as follows: K 8, P 2, K 2 sts in each of the next 3 sts (= K 6), P 2, K 2, P 2 sts in each of the next 3 sts (= P 6), K 2, 12-15-19-22-27-32 sts in garter st. There are now 40-43-47-50-55-60 sts on needle. Continue like this: 12-15-19-22-27-32 sts in garter st and diagram M.2 (= 28 sts) – 1st row = WS. When piece measures 17-19-21-23-26-29 cm / 6¾"-7½"-8¼"-9"-10¼"-11⅜", work SHORT ROWS - see explanation above – 1st row is worked from RS! When all short rows have been worked, insert a marker. NOW MEASURE PIECE FROM HERE! Continue to work over all sts as before. When piece measures 7 cm / 2¾", beg to inc in the side as on back piece (i.e. the shorter side). After all inc, there are 43-46-50-53-58-63 sts on needle. When piece measures 20 cm / 8", bind off and dec for armhole in the side as on back piece (bind off and dec in same side as inc). At the same time when piece measures 23 cm / 9", beg to inc for collar. Inc inside diagram M.2 by making 1 YO, on next row K YO twisted (i.e. work in back loop of st instead of front) to avoid holes. Repeat inc every other row a total of 10-10-12-13-14-14 times - work inc sts in garter st. After all bind offs and dec for armhole and inc for collar, there are 48-49-53-55-58-59 sts on needle. When piece measures approx. 39-40-41-42-43-44 cm / 15¼"-15¾"-16⅛"-16½"-17"-17¼", adjust so that next row is worked from WS, bind off the first 22-23-23-25-26-27 sts in garter st = 26-26-30-30-32-32 sts remain on needle for collar. Continue to work as follows: * Work 2 rows over all sts, work 2 row only over the outermost 18-18-20-20-26-26 sts *, repeat from *-* until collar measures approx. 7-7-7½-7½-8-8 cm / 2¾"-2¾"-2⅞"-2⅞"-3⅛"-3⅛" on the inside (it will then be twice as long at the outer side). On next row work all 6 sts over both cables tog 2 by 2 = 20-20-24-24-26-26 sts. Bind off. LEFT EDGE PIECE/FRONT PIECE: Cast on and work as right front piece but reversed. I.e. work 2nd row as follows: 12-15-19-22-27-32 sts in garter st, K 2, P 2 sts in each of the next 3 sts (= P 6), K 2, P 2, K 2 sts in each of the next 3 sts (= K 6), P 2 and K 8. There are now 40-43-47-50-55-60 sts on needle. Continue as follows (1st row = WS): Diagram M.3 (= 28 sts), 12-15-19-22-27-32 sts in garter st. Continue as on right front piece but when working short rows work 1st row from WS! bind off shoulder sts from RS to avoid cutting the thread to work the collar. SLEEVE: Worked back and forth on needle. Cast on 42-42-44-44-46-48 sts (includes 1 edge st in each side) on needle size 5 mm / US 8 with Alaska. Work 10 cm / 4" in garter st. Continue in stockinette st. When piece measures 15 cm / 6", inc 1 st in each side. Repeat inc every 4-3-3-2½-2-2 cm / 1½"-1⅛"-1⅛"-⅞"-¾"-¾" a total of 9-11-11-13-14-15 times = 60-64-66-70-74-78 sts. When piece measures 50-49-48-47-46-45 cm / 19¾"-19¼"-19"-18½"-18"-17¾" (shorter measurements in the larger sizes because of longer sleeve cap and wider shoulder width) bind off for sleeve cap at beg of every row in each side: 3 sts 1 time, 2 sts 3 times and 1 st 1-2-3-4-5-6 times, then bind off 2 sts in each side until sleeve measures 57 cm / 22½", then bind off 3 sts 1 time in each side, bind off remaining sts. The piece measures approx. 58 cm / 22¾". ASSEMBLY: Sew cast on edge on edge pieces tog mid back - sew edge to edge to avoid a chunky seam. Then sew edge to bottom edge of back piece. Sew the shoulder seams. Sew side seam edge to edge. Sew the collar tog mid back and sew it to the neckline. Sew sleeve seams inside 1 edge st - sew so that WS is on the outside and sew sleeves on body. Close jacket with a pin or similar. |
|||||||||||||||||||||||||
Diagram explanations |
|||||||||||||||||||||||||
|
|||||||||||||||||||||||||
 |
|||||||||||||||||||||||||
 |
|||||||||||||||||||||||||
 |
|||||||||||||||||||||||||
 |
|||||||||||||||||||||||||
Have you finished this pattern?Tag your pictures with #dropspattern #chocolatepassioncardigan or submit them to the #dropsfan gallery. Do you need help with this pattern?You'll find 22 tutorial videos, a Comments/Questions area and more by visiting the pattern on garnstudio.com. © 1982-2026 DROPS Design A/S. We reserve all rights. This document, including all its sub-sections, has copyrights. Read more about what you can do with our patterns at the bottom of each pattern on our site. |
|||||||||||||||||||||||||


With over 40 years in knitting and crochet design, DROPS Design offers one of the most extensive collections of free patterns on the internet - translated to 17 languages. As of today we count 325 catalogs and 12298 patterns - 12288 of which are translated into English (US/in).
We work hard to bring you the best knitting and crochet have to offer, inspiration and advice as well as great quality yarns at incredible prices! Would you like to use our patterns for other than personal use? You can read what you are allowed to do in the Copyright text at the bottom of all our patterns. Happy crafting!
Post a comment to pattern DROPS 134-55
We would love to hear what you have to say about this pattern!
If you want to leave a question, please make sure you select the correct category in the form below, to speed up the answering process. Required fields are marked *.