
Popular categories
Looking for a yarn?


Comments / Questions (286)
![]() DROPS Design wrote:
DROPS Design wrote:
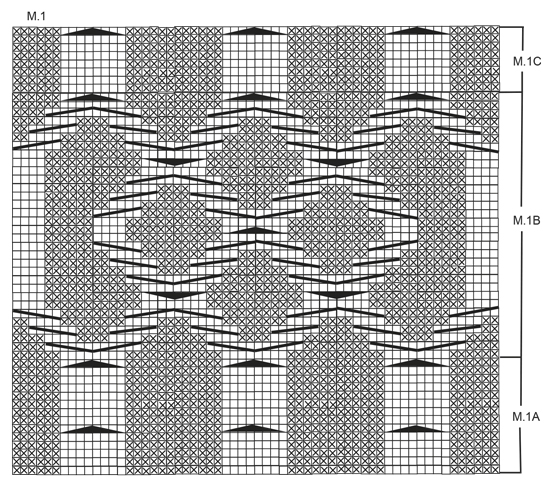
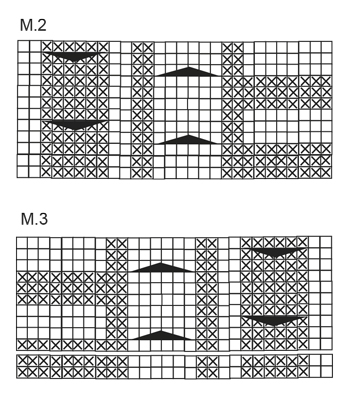
I tried printing and i works fin have you tried an other browser ore printer? M.2 and M.3 have 28 sts each.
13.01.2012 - 15:21
![]() Deborah wrote:
Deborah wrote:
I am having some trouble printing out the schematic, is there any way that someone can send it to me. thanks. There is also a problem with the charts M2 and m3. there are only 26 sts in the charts not 28. thanks. Deborah
13.01.2012 - 00:28
![]() Jutta wrote:
Jutta wrote:
In dem Rapport M2, den ich in den ersten 10 R. stricken muss, kommt Krausrippe gar nicht. erst die 12 M danach und die stricke ich erst in R. 11-18 so dass ich auf 4 Krausrippen komme(= 4 Hin+4Rückr.)
12.01.2012 - 19:10
![]() Jutta wrote:
Jutta wrote:
Ich verstehe es leider immer noch nicht. Ichmuss doch den äüßeren Bereich ,d.h. Bund und Zöpfe in den ersten 10 Reihen stricken. Dann kommen erst die M.von Krausrippe dazu. So sieht es auf der Zeichnung aus.
12.01.2012 - 19:07
![]() DROPS Deutsch wrote:
DROPS Deutsch wrote:
Wenn man z.b. gr. S strickt: 1. abdrehen nach 10 M., 2. abdrehen nach 16 M, 3. abdrehen nach 20 M, 4. abdrehen nach nach 26 M., 5. abdrehen nach nach 28 M., 6. abdrehen nach 31, 7. abdrehen nach 34, 8. abdrehen nach 37 und 9, abdrehen nach nach 40 M. Jedes Abdrehen ergibt 1 Krausrippe als sind es 9 Krausrippen pro Rapport.
12.01.2012 - 08:59
![]() Jutta wrote:
Jutta wrote:
Oder meinen Sie mit Krausmasche die Randmaschen?
12.01.2012 - 07:36
![]() Jutta wrote:
Jutta wrote:
Ich verstehe das mit immer 3 M mehr. der Mustersatz hat 28M in der Breite., so dass ich erst in R.11 die Krausrippen wieder mitstricke und bei R. 18 habe ich alle M. gestrickt(8R.). Da komme ich auf 4 Krausrippen aussen(2R.rechts=1Krausrippe). Wo liegt mein Fehler?.Bei welcher R. im Rapport sollte man denn überhaupt mit den verkürzten R.anfangen?
11.01.2012 - 14:02
![]() DROPS Deutsch wrote:
DROPS Deutsch wrote:
Man strickt bei jeder verkürzten Reihe über 3 Maschen mehr als bei der 13. R. über 34-34-35-35-37-36 M. usw. Das ergiebt nach einem Rapport 9-10-11-12-13-15 Kraussrippen (aussen) und 1 Kraussrippe (innen).
11.01.2012 - 07:47
![]() Jutta wrote:
Jutta wrote:
Hallo, ich verstehe bei den verkürzten Reihen nicht, was nach R.12 damit gemeint ist:immer 3M mehr dazu nehmen.?? Und warum 9 Krausrippn aussen? Die Krausrippe stricke ich doch erst in R11+12 das erste Mal.
10.01.2012 - 22:23
![]() Drops Design wrote:
Drops Design wrote:
Du tager ind til ærmegab således i S: 3m 1 gang i hver side = 6 m 1m 2 gange i hver side = 4 m = 76 m som der står i opskriften God fornøjelse!
05.01.2012 - 09:36
|
|||||||||||||||||||||||||
Chocolate Passion#chocolatepassioncardigan |
|||||||||||||||||||||||||
 |
 |
||||||||||||||||||||||||
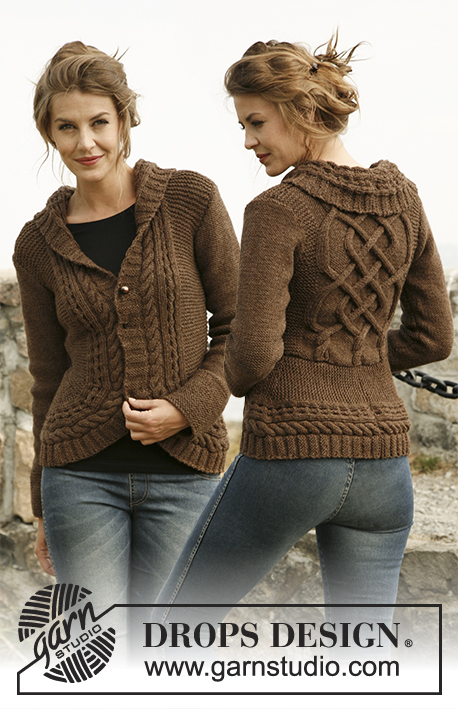
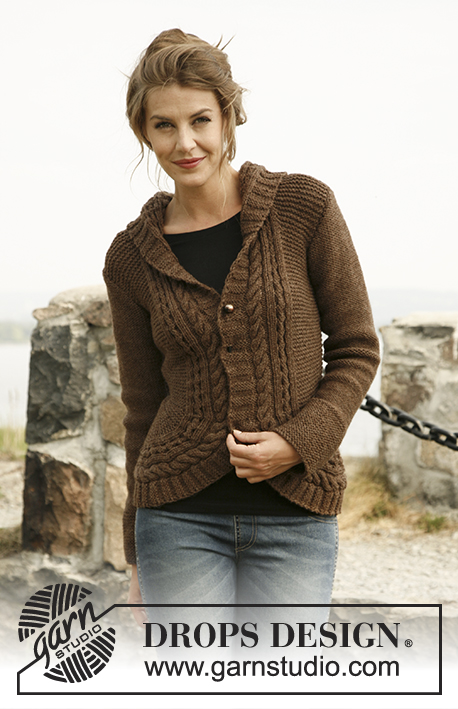
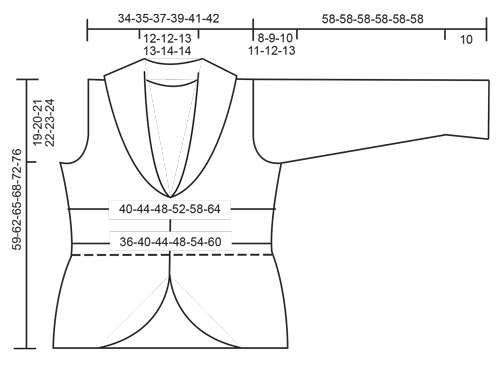
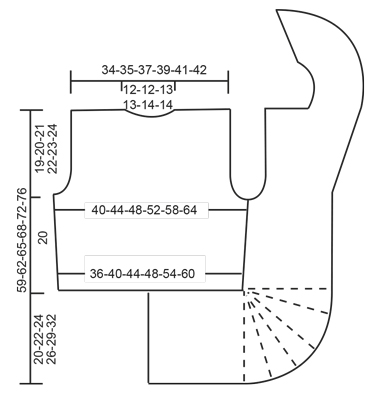
Knitted DROPS jacket with rounded front pieces and cables in ”Alaska”. Size: S to XXXL.
DROPS 134-55 |
|||||||||||||||||||||||||
|
GARTER ST (back and forth on needle): K all rows. PATTERN: See diagrams M.1, M.2 and M.3 – diagrams shows all rows in pattern seen from RS. 1st row in diagrams is worked from WS. DECREASE TIP (applies to armhole): Dec from RS inside 3 sts. Dec AFTER 3 sts as follows: K 2 tog. Dec BEFORE 3 sts as follows: K 2 twisted tog. SHORT ROWS: Work short rows on front piece to get a rounded edge on the piece. Also work short rows between the cables in the pattern. This can make it difficult to read the diagram - make sure to work 5 rows between every cable. Work short rows as follows: Row 1 and 2: Work 10 sts in all sizes, turn and work back. Row 3 and 4: Work 16 sts in all sizes, turn and work back. Row 5 and 6: Work 20 sts in all sizes, turn and work back. Row 7 and 8: Work 26 sts in all sizes, turn and work back. Row 9 and 10: Work 28-28-29-29-31-30 sts, turn and work back. Row 11 and 12: Work 31-31-32-32-34-33 sts, turn and work back. Continue to work 3 sts more on every turn until all sts have been worked. 18-20-22-24-26-30 rows in garter st have been worked at the outer side and 2 rows in garter st have been worked on the inside. Repeat from 1st row a total of 5 times. The rounded edge now measures approx. 28-31-34-37-41-46 cm / 11"-12¼"-13⅜"-14½"-16⅛"-18" on the outer side and 3 cm / 1⅛" on the inside. -------------------------------------------------------- -------------------------------------------------------- BACK PIECE: Worked back and forth on needle. Cast on 68-74-80-88-98-108 sts on needle size 5 mm / US 8 with Alaska. K 1 row from WS. Work next row from RS as follows: 10-13-16-20-25-30 sts in GARTER ST – see explanation above, * P 6, K 2 sts in each of the next 4 sts (= K 8), P 6 *, repeat from *-* a total of 3 times, 10-13-16-20-25-30 sts in garter st. There are now 80-86-92-100-110-120 sts on needle. Then work as follows (1st row = WS): 10-13-16-20-25-30 sts in garter st, diagram M.1A (= 60 sts) and 10-13-16-20-25-30 sts in garter st. After M.1A continue with M.1B 2 times vertically, then repeat M.1C until finished measurements. REMEMBER THE GAUGE! When piece measures 7 cm / 2¾", inc 1 st in each side by working 1 YO inside outermost st – on next row K YO twisted (i.e. work in back loop of st instead of front) to avoid holes. Repeat inc every 5 cm / 2" a total of 3 times = 86-92-98-106-116-126 sts. When piece measures 20 cm / 8" in all sizes, bind off 3-4-5-6-7-8 sts at beg of the next 2 rows for armholes. Then dec 1 st in each side on every row from RS: 2-3-4-5-7-10 times– SEE DECREASE TIP! There are now 76-78-80-84-88-90 sts on needle. When piece measures 37-38-39-41-42-43 cm / 14½"-15"-15¼"-16⅛"-16½"-17", work the 8 sts over the middle cable tog 2 by 2. On next row bind off the middle 20-20-22-22-24-24 sts for neck = 26-27-27-29-30-31 sts remaining on each shoulder. Then work 3 rows over these as before, on next row work the 8 sts over the cable tog 2 by 2 = 22-23-23-25-26-27 sts. Then bind off all sts on next row. Piece measures approx. 39-40-41-42-43-44 cm / 15¼"-15¾"-16⅛"-16½"-17"-17¼" vertically. RIGHT EDGE PIECE/FRONT PIECE: All measurements should be done on the shorter side! Cast on 34-37-41-44-49-54 sts on needle size 5 mm / US 8 with Alaska. K 1 row from WS. Work next row from RS as follows: K 8, P 2, K 2 sts in each of the next 3 sts (= K 6), P 2, K 2, P 2 sts in each of the next 3 sts (= P 6), K 2, 12-15-19-22-27-32 sts in garter st. There are now 40-43-47-50-55-60 sts on needle. Continue like this: 12-15-19-22-27-32 sts in garter st and diagram M.2 (= 28 sts) – 1st row = WS. When piece measures 17-19-21-23-26-29 cm / 6¾"-7½"-8¼"-9"-10¼"-11⅜", work SHORT ROWS - see explanation above – 1st row is worked from RS! When all short rows have been worked, insert a marker. NOW MEASURE PIECE FROM HERE! Continue to work over all sts as before. When piece measures 7 cm / 2¾", beg to inc in the side as on back piece (i.e. the shorter side). After all inc, there are 43-46-50-53-58-63 sts on needle. When piece measures 20 cm / 8", bind off and dec for armhole in the side as on back piece (bind off and dec in same side as inc). At the same time when piece measures 23 cm / 9", beg to inc for collar. Inc inside diagram M.2 by making 1 YO, on next row K YO twisted (i.e. work in back loop of st instead of front) to avoid holes. Repeat inc every other row a total of 10-10-12-13-14-14 times - work inc sts in garter st. After all bind offs and dec for armhole and inc for collar, there are 48-49-53-55-58-59 sts on needle. When piece measures approx. 39-40-41-42-43-44 cm / 15¼"-15¾"-16⅛"-16½"-17"-17¼", adjust so that next row is worked from WS, bind off the first 22-23-23-25-26-27 sts in garter st = 26-26-30-30-32-32 sts remain on needle for collar. Continue to work as follows: * Work 2 rows over all sts, work 2 row only over the outermost 18-18-20-20-26-26 sts *, repeat from *-* until collar measures approx. 7-7-7½-7½-8-8 cm / 2¾"-2¾"-2⅞"-2⅞"-3⅛"-3⅛" on the inside (it will then be twice as long at the outer side). On next row work all 6 sts over both cables tog 2 by 2 = 20-20-24-24-26-26 sts. Bind off. LEFT EDGE PIECE/FRONT PIECE: Cast on and work as right front piece but reversed. I.e. work 2nd row as follows: 12-15-19-22-27-32 sts in garter st, K 2, P 2 sts in each of the next 3 sts (= P 6), K 2, P 2, K 2 sts in each of the next 3 sts (= K 6), P 2 and K 8. There are now 40-43-47-50-55-60 sts on needle. Continue as follows (1st row = WS): Diagram M.3 (= 28 sts), 12-15-19-22-27-32 sts in garter st. Continue as on right front piece but when working short rows work 1st row from WS! bind off shoulder sts from RS to avoid cutting the thread to work the collar. SLEEVE: Worked back and forth on needle. Cast on 42-42-44-44-46-48 sts (includes 1 edge st in each side) on needle size 5 mm / US 8 with Alaska. Work 10 cm / 4" in garter st. Continue in stockinette st. When piece measures 15 cm / 6", inc 1 st in each side. Repeat inc every 4-3-3-2½-2-2 cm / 1½"-1⅛"-1⅛"-⅞"-¾"-¾" a total of 9-11-11-13-14-15 times = 60-64-66-70-74-78 sts. When piece measures 50-49-48-47-46-45 cm / 19¾"-19¼"-19"-18½"-18"-17¾" (shorter measurements in the larger sizes because of longer sleeve cap and wider shoulder width) bind off for sleeve cap at beg of every row in each side: 3 sts 1 time, 2 sts 3 times and 1 st 1-2-3-4-5-6 times, then bind off 2 sts in each side until sleeve measures 57 cm / 22½", then bind off 3 sts 1 time in each side, bind off remaining sts. The piece measures approx. 58 cm / 22¾". ASSEMBLY: Sew cast on edge on edge pieces tog mid back - sew edge to edge to avoid a chunky seam. Then sew edge to bottom edge of back piece. Sew the shoulder seams. Sew side seam edge to edge. Sew the collar tog mid back and sew it to the neckline. Sew sleeve seams inside 1 edge st - sew so that WS is on the outside and sew sleeves on body. Close jacket with a pin or similar. |
|||||||||||||||||||||||||
Diagram explanations |
|||||||||||||||||||||||||
|
|||||||||||||||||||||||||
 |
|||||||||||||||||||||||||
 |
|||||||||||||||||||||||||
 |
|||||||||||||||||||||||||
 |
|||||||||||||||||||||||||
Have you finished this pattern?Tag your pictures with #dropspattern #chocolatepassioncardigan or submit them to the #dropsfan gallery. Do you need help with this pattern?You'll find 22 tutorial videos, a Comments/Questions area and more by visiting the pattern on garnstudio.com. © 1982-2026 DROPS Design A/S. We reserve all rights. This document, including all its sub-sections, has copyrights. Read more about what you can do with our patterns at the bottom of each pattern on our site. |
|||||||||||||||||||||||||


With over 40 years in knitting and crochet design, DROPS Design offers one of the most extensive collections of free patterns on the internet - translated to 17 languages. As of today we count 325 catalogs and 12298 patterns - 12288 of which are translated into English (US/in).
We work hard to bring you the best knitting and crochet have to offer, inspiration and advice as well as great quality yarns at incredible prices! Would you like to use our patterns for other than personal use? You can read what you are allowed to do in the Copyright text at the bottom of all our patterns. Happy crafting!
Post a comment to pattern DROPS 134-55
We would love to hear what you have to say about this pattern!
If you want to leave a question, please make sure you select the correct category in the form below, to speed up the answering process. Required fields are marked *.