
Popular categories
Looking for a yarn?


Comments / Questions (106)
![]() Jette Etly Bindere wrote:
Jette Etly Bindere wrote:
Hej Jeg vil så gerne stikke den, men som bluse i stedet. Hvor mange masker skal jeg starte med, hvis jeg vil have den går til ca midt på hoften - dvs ca 25-30 cm kortere?
21.03.2020 - 11:36
![]() Cecilia wrote:
Cecilia wrote:
Jag blev fundersam över var jag ska avmaska för halsringen.
18.10.2019 - 15:08DROPS Design answered:
Hej Cecilia, se beskrivningen under HALSRINGNING OCH ÄRMHÅL innan du börjar med halsen. Lycka till :)
18.10.2019 - 15:23
![]() Thea wrote:
Thea wrote:
Deze jurk net afgemaakt. Voor de XL maar 310 gram gebruikt en ik ben een zeer losse breier.
15.05.2019 - 14:15
![]() Mia wrote:
Mia wrote:
Hej! jättefin men xs blir för stor för mig ska jag gå upp eller ner i stickstorlek eller är maskantalet delbart med något så jag kan gå ner i antal maskor så att mönstren ändå stämmer? tacksam för förslag
15.06.2017 - 21:00
![]() Andrea T. wrote:
Andrea T. wrote:
Hallo nochmal! Außerdem ist mir in der Anleitung folgendes unklar. 2.) Bei der Anleitung für den Halsausschnitt steht, dass gleichzeitig auf beiden Seiten 1 Masche gegen den Hals abgenommen werden soll. Beim "TIPP ZUM ABNEHMEN -2 - NACH 4 M" steht 1 M re abheben, 2 re. zusammen, abgehobene über die gestrickte ziehen -- da werden aber dann 2 Maschen abgenommen.... Oder verstehe ich das falsch... Danke für eure rasche Antwort, damit ich weiterstricken kann ;-) Liebe Grüße, Andrea
04.04.2016 - 11:38DROPS Design answered:
Liebe Andrea, vielen Dank für den Hinweis, da haben Sie wirklich einen Fehler in der Übersetzung entdeckt. Wir werden es gleich korrigieren und entschuldigen uns für die Unannehmlichkeiten.
05.04.2016 - 13:45
![]() Andrea T. wrote:
Andrea T. wrote:
Hallo an alle! Ich bin Strickanfängerin und versuche mich gerade an diesem wunderschönen Kleid... In der Anleitung verstehe ich jedoch etwas nicht. 1.) Beim TIPP ZUM ABNEHMEN-1 steht, dass die linken Maschen durch die Abnahmen nicht verschoben werden dürfen --- Wann nehme ich dann im M2 ab?? In der Reihe wo die linken Maschen zu stricken werden, oder davor bzw. danach?? Danke für eure rasche Antwort, damit ich weiterstricken kann ;-) Liebe Grüße Andrea
04.04.2016 - 11:36DROPS Design answered:
Liebe Andrea, vielleicht nehmen Sie der Einfachheit halber in den Reihen ab, in denen keine linken Maschen gestrickt werden. Achten Sie darauf, dass zwischen den Abnahmenn das Muster weiterhin so übereinanderkommt wie vorher.
05.04.2016 - 13:42Lilyj wrote:
This model is beautiful (and looks easy-ish): are you going to translate it in Italian? thanks.
22.11.2015 - 17:57DROPS Design answered:
Hello Lilyj. The pattern will be translated into Italian as soon as possible. Happy knitting!
22.11.2015 - 19:51
![]() Regina wrote:
Regina wrote:
Hallo, leider noch ein Fehler in Anleitung. Ziemlich am Anfang, wo die Markierungsfäden eingezogen werden, muss es heißen: "Markierungsfaden -6 einziehen (=Seite)." Es können nicht 2 Markierungsfäden -1 sein, später in der Anleitung wird auf -6 Bezug genommen.
30.06.2015 - 19:26DROPS Design answered:
Das ist richtig und es wird gleich korrigiert. Vielen Dank für den Hinweis!
05.07.2015 - 08:59
![]() Anette wrote:
Anette wrote:
Hei! Når jeg begynner økning i side på M4 får jeg ikke mønsteret til å stemme overens etter at jeg begynner økningen. Har sett og telt over flere ganger, men får det ikke til å stemme. På første runde med mønster etter økningen skal det være igjen 4 rette på slutten av ommg, men jeg får bare 2... Samtidig som at hullene ikke er der de skal være i forhold til 1.rad med hull...
26.07.2013 - 19:14DROPS Design answered:
Sørg for at mønsteret stemmer, de økte m i siderne strikkes i glatstrik til du har nok for at fortsætte ifølge M4.
10.10.2013 - 08:15
![]() Pernilla wrote:
Pernilla wrote:
Får inte mönstret att stämma. Vid första hålvarvet så får jag 3 maskor kvar efter en hel mönster rep. Fel antal maskor i xl storleken???
01.06.2013 - 12:48DROPS Design answered:
Mönstret er korrekt. Du strikker de sidste 3 m da som de förste 3 af M.1 altsaa: 3 rett eller 1 omslag, lyft 1 m som om den skulle stickas rät, 2 rm tills, drag den lyfta m över, 1 omslag naar du er saa vidt :-)
20.06.2013 - 12:17
|
|||||||||||||
Cookie Crush#cookiecrushdress |
|||||||||||||
|
|
|||||||||||||
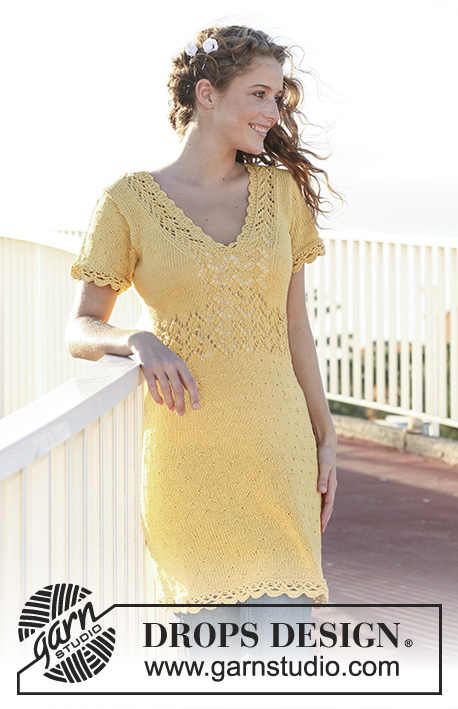
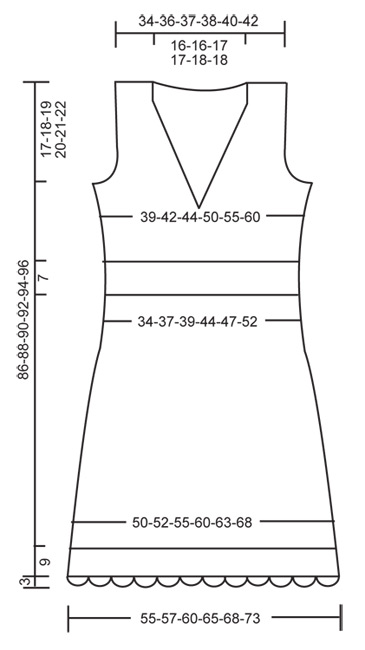
DROPS tailored dress in ”Safran” with lace pattern and crochet borders.
DROPS 111-3 |
|||||||||||||
|
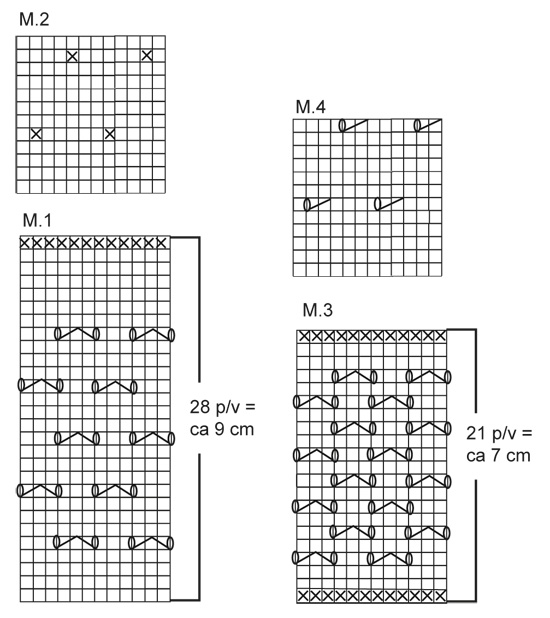
GARTER ST (back and forth on needle): K all rows. GARTER ST (in the round): K 1 round, P 1 round. PATTERN: See diagram M.1 to M.4 – the diagrams show the pattern from the RS. INCREASING TIP: Inc 1 st by working 2 sts in 1 st on each side of marker. DECREASING TIP-1: Dec as follows before marker: K2 tog. Dec as follows after marker: slip 1 st as if to K, K1, psso. NOTE: Make sure not to shift the P sts in M.2 when decreasing. DECREASING TIP-2: Make all dec from RS inside 4 garter sts. Dec as follows after 4 garter sts: slip 1 st as if to K, K1, psso Dec as follows before 4 garter sts: K2 tog. ------------------------------------------------------------------------------------------------------------------------ DRESS: Worked in the round on circular needle from bottom edge towards the top. Cast on 252-264-276-300-312-336 sts on circular needle size 3.5 mm / US 4 with beige. P 1 round and continue in M.1. REMEMBER THE KNITTING GAUGE! After 1 vertical repeat of M.1 change to pink and K 1 round, AT THE SAME TIME dec 24 sts evenly = 228-240-252-276-288-312 sts. Continue in M.2. When piece measures 25-26-27-28-29-30 cm / 9¾"-10¼"-10⅝"-11"-11⅜"-11¾" insert 6 markers in piece as follows: Work 35-37-39-43-45-49 sts, insert Marker-1, work 44-46-48-52-54-58 sts insert Marker-2, work 35-37-39-43-45-49 sts insert Marker-3 (= the side), work 35-37-39-43-45-49 sts insert Marker-4, work 44-46-48-52-54-58 sts insert Marker-5, work 35-37-39-43-45-49 sts insert Marker-6 (= the side). On next round dec 1 st on each side of Marker-3 and -6 (i.e. at the sides) – SEE DECREASING TIP-1 – and repeat the dec on every 6th round a total of 12 times. AT THE SAME TIME when doing the 7th dec, also dec 1 st on each side of the other markers as follows: AFTER Marker-1 and Marker-4 and BEFORE Marker-2 and Marker-5 – SEE DECREASING TIP-1. Repeat these dec on every 6th round (i.e. on the same rounds as dec at the sides) a total of 6 times. When all dec are complete there are 156-168-180-204-216-240 sts on round. Now remove Marker-1, -2, -4 and -5. Continue in M.2 until piece measures 50-51-52-53-54-55 cm / 19¾"-20"-20½"-21"-21¼"-21⅝". Change to light beige, K 1 round and continue in M.3. After M.3 change back to pink and continue in M.4, AT THE SAME TIME inc 12-12-12-12-24-24 sts evenly on first round (= 6-6-6-12-12-12 sts on front and back piece) – SEE INCREASING TIP = 168-180-192-216-240-264 sts. After 8 rounds inc 1 st on each side of both markers at the sides – SEE INCREASING TIP – and repeat the inc on every 6th round a total of 3 times = 180-192-204-228-252-276 sts – work the inc sts in stockinette st until they fit into M.4. NOW READ ALL OF THE FOLLOWING SECTION BEFORE CONTINUING! NECKLINE: When piece measures approx 65-66-67-68-69-70 cm / 25½"-26"-26⅜"-26¾"-27⅛"-27½" (adjust to at least 2 rounds stockinette st after a lace-round) work 2 rounds garter st – see above – on 2 sts mid front (work remaining sts as before), then 2 rounds garter st on 4 sts mid front, then 2 rows garter st on 6 sts mid front and then 2 rounds garter st on 8 sts mid front. Now divide the piece for neck in the middle of the garter sts and continue back and forth on needle from mid front. Continue in M.4 with 4 garter sts each side towards mid front. AT THE SAME TIME dec 1 st each side to shape the neckline – SEE DECREASING TIP-2, on every other row a total of 12-12-13-13-14-14 times and then on every 4th row a total of 6-6-6-6-7-7 times. ARMHOLE: When piece measures 68-69-70-71-72-73 cm / 26¾"-27⅛"-27½"-28"-28⅜"-28¾" work 4 rows garter st on 14-14-16-20-24-28 sts each side (= 7-7-8-10-12-14 sts on each side of marker), work remaining sts as before. Now bind off the middle 6-6-8-12-16-20 of these sts each side for armhole and complete each piece separately. RIGHT FRONT PIECE: Continue in M.4 with 4 garter sts each side – continue dec for neck – AT THE SAME TIME bind off for armhole at the side on every other row as follows: 1 st a total of 3-4-4-7-9-11 times – SEE DECREASING TIP-2. When all dec are complete there are 21-23-24-25-25-27 sts left on shoulder. Bind off when piece measures approx 86-88-90-92-94-96 cm / 33⅞"-34⅝"-35½"-36¼"-37"-37¾" – adjust to after at least 2 rows stockinette st. LEFT FRONT PIECE: Like right front piece, but mirrored. BACK PIECE: = 84-90-94-102-110-118 sts. Continue in M.4 with 4 garter sts each side, AT THE SAME TIME bind off for armhole each side as described for front piece = 78-82-86-88-92-96 sts. When piece measures 83-85-87-89-91-93 cm / 32¾"-33½"-34¼"-35"-35¾"-36⅝" work 4 rows garter st on the middle 40-40-42-42-46-46 sts (work remaining sts as before). Now bind off the middle 32-32-34-34-38-38 sts for neck and complete each shoulder separately. Bind off 1 st towards neckline on every other row 2 times – SEE DECREASING TIP-2 = 21-23-24-25-25-27 sts left on each shoulder. Bind off when piece measures approx 86-88-90-92-94-96 cm / 33⅞"-34⅝"-35½"-36¼"-37"-37¾" - adjust to after at least 2 rows stockinette st. ASSEMBLY: Sew shoulder seams. LACE BORDER: Worked in the round along cast on row, with light brown and crochet hook size 3.5 mm / US E/4. ROUND 1: 1 sc in each st = 252-264-276-300-312-336 sc. ROUND 2: 1 ch, 1 sc in each of the first 5 sc, * 3 ch, skip 2 sc, 1 sc in each of the next 10 sc *, repeat from *-* until 7 sc remain, work 3 ch, skip 2 sc, 1 sc in each of the last 5 sc. ROUND 3: 2 ch, skip 1 sc, 1 sc in each of the next 2 sc, 1 ch, skip 2 sc, * crochet as follows in ch-loop: 1 dc, 1 ch, 1 dc, 1 ch, 1 dc, 1 ch, 1 dc, 1 ch, then skip 2 sc, 1 sc in each of the next 2 sc, 3 ch, skip 2 sc, 1 sc in each of the next 2 sc, 1 ch, skip 2 sc *, repeat from *-* until 1 ch-loop and 5 sc remain, crochet as follows in ch-loop: 1 dc, 1 ch, 1 dc, 1 ch, 1 dc, 1 ch, 1 dc, 1 ch, skip 2 sc, 1 sc in each of the next 2 sc, and finish with 1 ch and 1 sl st in first ch from beg of round. ROUND 4: 3 ch, skip 1 ch and 2 sc, * 1 bobble in next ch (1 bobble = crochet 3 dc tog. i.e. wait with the last pull through in each dc until all 3 dc have been crochet, yarn over hook, pull thread through all 4 sts on hook), / 1 ch, 1 bobble in next ch repeat from / - a total of 4 times (= 5 bobbles in total), 2 ch, 1 sc in 3-ch-loop, 2 ch *, repeat from *-* until 5 ch with dc between each + 2 sc and 1 ch remain, crochet 1 bobble + 1 ch in each of the first 5 ch, after the last ch work 1 ch, then skip 2 sc, and finish with 1 sl st in first ch on round. ROUND 5: 1 ch, * 2 sc in ch-loop, / 1 picot (= 3 ch, 1 sc in first ch), 1 sc in next ch-loop , repeat from / - a total of 5 times, 1 sc in the same ch-loop *, repeat from *-*, and finish with 1 sl st in first sc on round. Cut and fasten thread. PICOT BORDER: Crochet with light brown and crochet hook size 3.5 mm / US E/4 in first P round on dress – the picot border sits over the lace border. Hold garment with cast on row facing away from you and crochet the picot border in the lower loop of P sts as follows: 1 sc in first st, * 1 picot (= 3 ch, 1 sc in first ch), skip 2 sts, 1 sc in next st *, repeat from *-*. Also crochet a picot border in the top P row in M.1. Hold garment with the cast on row facing away and crochet in the lower loop of P sts. Also crochet a picot border on each side of M.3 – when crocheting in the lower P row hold the cast on row facing away from you and when crocheting in the upper P row turn piece so that the top part of piece is facing away from you. Crochet a similar picot border round neckline and armholes. |
|||||||||||||
Diagram explanations |
|||||||||||||
|
|||||||||||||
 |
|||||||||||||
 |
|||||||||||||
Have you finished this pattern?Tag your pictures with #dropspattern #cookiecrushdress or submit them to the #dropsfan gallery. Do you need help with this pattern?You'll find 24 tutorial videos, a Comments/Questions area and more by visiting the pattern on garnstudio.com. © 1982-2026 DROPS Design A/S. We reserve all rights. This document, including all its sub-sections, has copyrights. Read more about what you can do with our patterns at the bottom of each pattern on our site. |
|||||||||||||


With over 40 years in knitting and crochet design, DROPS Design offers one of the most extensive collections of free patterns on the internet - translated to 17 languages. As of today we count 324 catalogs and 12290 patterns - 12280 of which are translated into English (US/in).
We work hard to bring you the best knitting and crochet have to offer, inspiration and advice as well as great quality yarns at incredible prices! Would you like to use our patterns for other than personal use? You can read what you are allowed to do in the Copyright text at the bottom of all our patterns. Happy crafting!
Post a comment to pattern DROPS 111-3
We would love to hear what you have to say about this pattern!
If you want to leave a question, please make sure you select the correct category in the form below, to speed up the answering process. Required fields are marked *.