
Popular categories
Looking for a yarn?


Comments / Questions (33)
![]() Laura McMullen wrote:
Laura McMullen wrote:
HELP! I love this pattern but cannot determine what weight yarn to use from the listed yarns. It would appear to be a bulky yarn if it uses size 10 US needles and 2 yarns. I would like it as a summer top in cotton but don't know what weight yarn to use. And it might be too heavy using 2 strands. Thank you.
15.04.2019 - 01:50DROPS Design answered:
Dear Laura, the pattern uses DROPS Alpaca, and DROPS Cotton Viscose (discontinued). Both yarns are sport / sock weight yarns, belonging to the yarn group A. You can substitute either yarn from other yarns from this yar group. Also you can use the yarn converter on out site. But please always knit a swatch, check your gauge, stitch counts and calculate changes accodingly. Happy Knitting!
15.04.2019 - 21:26
![]() Sabine wrote:
Sabine wrote:
Hallo liebes Drops Team, vielen Dank für die schnelle Antwort. Ich verstehe nur leider immer noch nicht was genau bei jeder 2.ten Reihe für das Armloch abketten bedeutet. Ich habe nun die ersten abnahmen (3 Maschen am Anfang der Hinreihe und ebenso 3 Maschen am Anfang der Rückreihe) gemacht. Muss ich jetzt gleich wieder in der folgenden Hinreihe abnehmen oder stricke ich eine Hin und eine Rückreihe ohne abnahmen dazwischen und dann erst wieder die nächsten abnahmen?
12.04.2018 - 14:55DROPS Design answered:
Liebe Sabine, je nach der Größe sollen Sie jetzt am Anfang jeder Reihe (= Hin sowie Rückreihen): 2 M. 1-2-1-2-3 Mal und 1 M. 2-2-3-4-6 Mal abketten. Z. B in der 1. Größe werden jetzt 2 M am Anfang beider nächsten Reihen und dann 1 M am Anfang jeder 4 nächsten Reihen (= 2 M auf beiden Seiten) abgkettet. Viel Spaß beim stricken!
12.04.2018 - 15:29
![]() Sabine wrote:
Sabine wrote:
Nach 47-48-49-50-51 cm, auf beiden Seiten, bei jeder 2. R. für das Armloch abk. Wie muss ich das - bei jeder 2. R. für das Armloch abk. - verstehen, ich kette ja jeweils am Anfang der Reihe ab, also am Anfang der Hinreihe und am Anfang der Rückreihe. Muss ich danach eine Hin- und Rückreihe ohne Abnahmen stricken oder gleich bei der nächsten Hinreihe wieder abketten?
12.04.2018 - 14:25DROPS Design answered:
Liebe Sabine, beim Rückenteil sollen Sie die Maschen für das Armloch am Anfang jeder Reihe abketten, dh bei der Hin- sowie der Rückreihe: 3 M am Anfang beide Reihen. Die abgeketteten Maschenanzahl muss die gleiche am Anfang jeder Reihe sein (= auf beiden Seiten). Viel Spaß beim stricken!
12.04.2018 - 14:32
![]() Vittoria wrote:
Vittoria wrote:
Grazie per la rapida risposta. Ora mi è più chiaro come procedere. Cordiali saluti Vittoria
11.04.2018 - 14:02
![]() Vittoria De Pascale wrote:
Vittoria De Pascale wrote:
Buongiorno non riesco a capire bene le diminuzioni per lo scalfo. Sto facendo il dietro e si intende intrecciare 3 maglie al 1 giro, 0 maglie al 2 e 3 giro e, 1 maglia al 4 e 5 giro per una volta e poi proseguire con lo stesso principio con le altre indicazioni? GRazie e cordiali saluti Vittoria
11.04.2018 - 08:58DROPS Design answered:
Buongiorno Vittoria. Diminuisce per lo scalfo in questo modo: p.es per la taglia L: intreccia, da ciascun lato del dietro, all’inizio del ferro: 3 m 1 volta, 2 maglie 1 volta e 1 maglia 3 volte. Quindi ferro 1 (diritto del lavoro) intreccia le prime 3 m; f 2 (rovescio del lavoro) intreccia le prime 3 m; ferri 3 e 4 intreccia le prime 2 maglie e così via. Nelle taglie S e M, intreccia 2 m 1 volta nella taglia S (2 volte nella taglia M) e poi 1 m 2 volte. Buon lavoro!
11.04.2018 - 09:41
![]() Gaelle wrote:
Gaelle wrote:
Bonjour, j'ai un souci pour l'augmentation des mailles au point de riz. J'ai commencé sur un rang end, j'ai fait la maille du milieu à l'env, puis le rang suivant tout à l'env. Vous dites qu'il faut faire le 3ème rang de la sorte : 1m env, 1m end, 1 m env etc. mais en faisant cela ça ne fait pas un vrai point de riz. ne vaut il pas mieux augmenter à chaque rang ? en plus, je n'aurais pas les 21 mailles au point de riz avant de rabattre la maille centrale. Merci
07.01.2017 - 20:55DROPS Design answered:
Bonjour Gaelle, vous tricotez ces mailles au point de riz mais augmentez 2 m point de riz tous les 2 rangs, soit au 1er rang, vous aurez 1 m env, au 2ème rang, 1 m end, au 3ème rang 1 m env, 1 m end, 1 m env, au 4ème rang, 1 m end, 1 m env, 1 m end, au 5ème rang, 1 m env, 1 m end, 1 m env, 1 m end, 1 m env et ainsi de suite jusqu'à ce que vous ayez 21 m point de riz. Bon tricot!
09.01.2017 - 09:17
![]() Tatiana wrote:
Tatiana wrote:
Je ne comprend pas comment augmenter le point de riz sur le devant J'ai tricoté la maille du milieu sur le devant à l'envers, le rang suivant j'ai tout fait à l'envers, le rang suivant je fais comment? Merci pour votre aide
03.11.2015 - 00:00DROPS Design answered:
Bonjour Tatiana, vous allez tricoter tous les 2 rangs 1 m point de riz en plus de chaque côté de cette m env, donc au rang 1, on a 1 m env (sur l'endroit), au rang 3, tricotez jusqu'à ce qu'il reste 1 m avant cette m, et tricotez 1 m env, 1 m end (la m centrale de la pointe), 1 m env. Continuez ainsi en tricotant 1 m point de riz en plus tous les rangs sur l'endroit jusqu'à ce que vous ayez 21 m point de riz (= 10 m point de riz, 1 m centrale (= la pointe), 10 m point de riz). Bon tricot!
03.11.2015 - 09:44
![]() Claudia wrote:
Claudia wrote:
In ihrer Anleitung schreiben Sie, das man nach 48cm beidseitig Maschen für den Armausschnitt vornehmen soll und zwar bei der Größe M insgesamt 8M bei einer Maschenanzahl von 69M. Da ergibt sich für mich eine Maschenzahl von 61M und nicht wie angegeben 57M Weiterhin kann die Angabe von, Armausschnitt in 48 cm nicht stimmen, da in der Skizze diese mit 68cm (Größe M) angegeben wird und die Halsöffnung (mit 66cm?) die laut Skizze vor dem Armausschnitt erfolgen muss???????????
05.07.2015 - 20:44DROPS Design answered:
Sie nehmen bei Größe M nicht 8 M ab, sondern insgesamt 12 M, d.h. beidseitig je 6 M: 2 M bedseitig je 2 x (= 8 M insgesamt) und 1 M beidseitig je 2 x (= 4 M insgesamt). Dann passt das mit 57 M. Die 68 cm sind die Gesamthöhe, nicht die Höhe für die Armausschnitte. Wenn Sie diese ermitteln möchten, müssen Sie 68 cm minus Armausschnitthöhe rechnen, also 20 cm, 68 cm - 20 cm = 48 cm, das stimmt dann also mit der Anleitung überein.
06.07.2015 - 11:05
![]() Titili wrote:
Titili wrote:
Bonjour. Il y a une petite erreur je pense dans les explications de la version française. L'échantillon doit être réalisé avec des aiguilles n°6 alors que l'on demande des n°5 pour l'ouvrage... Merci d'harmoniser les tailles s'il y a effectivement une erreur de frappe ^^
24.05.2014 - 19:40DROPS Design answered:
Bonjour Titili, il s'agissait effectivement d'une faute de frappe (corrigée), la tunique se réalise bien avec des aiguilles 6 ou la taille nécessaire pour avoir 15 m x 19 rangs = 10 x 10 cm. Bon tricot!
26.05.2014 - 10:03
![]() Belinda Christ wrote:
Belinda Christ wrote:
Liebes Drops-Team, habe eine Frage zum Modell 100-8. Mir ist nicht klar, ob das gesamte Teil im Perlmuster gestrickt wird oder glatt mit jeweils 3 M Perlmuster am Reihenanfang und -ende? Beim Rückenteil fehlt die cm-Angabe (15 cm) wann die erste Masche zugenommen wird. Was heißt: "die 10M. gegen die Mitte in Perlmuster stricken". Bedeutet das "die mittleren 10M im Perlmuster stricken? Danke für Ihre Hilfe. Mit freundlichen Grüßen Belinda Christ
18.02.2013 - 10:51DROPS Design answered:
Liebe Belinda, das Perlmuster wird nur im oberen Bereich gestrickt, die 3 M unten sind kraus re gestrickt Die Angaben wann wie viele M im Perlmuster gestrickt werden (ist am Rücken und Vorderteil unterschiedlich) finden Sie genau in der Anleitung. Die Angabe der 15 cm werden wir gleich ergänzen, das hat unsere Übersetzerin leider übersehen. Und die 10 M zur Mitte sind nicht die mittleren 10 M, es sind die 10 M am Rand zum Halsausschnitt und nicht zum Ärmel.
19.02.2013 - 09:43
|
|
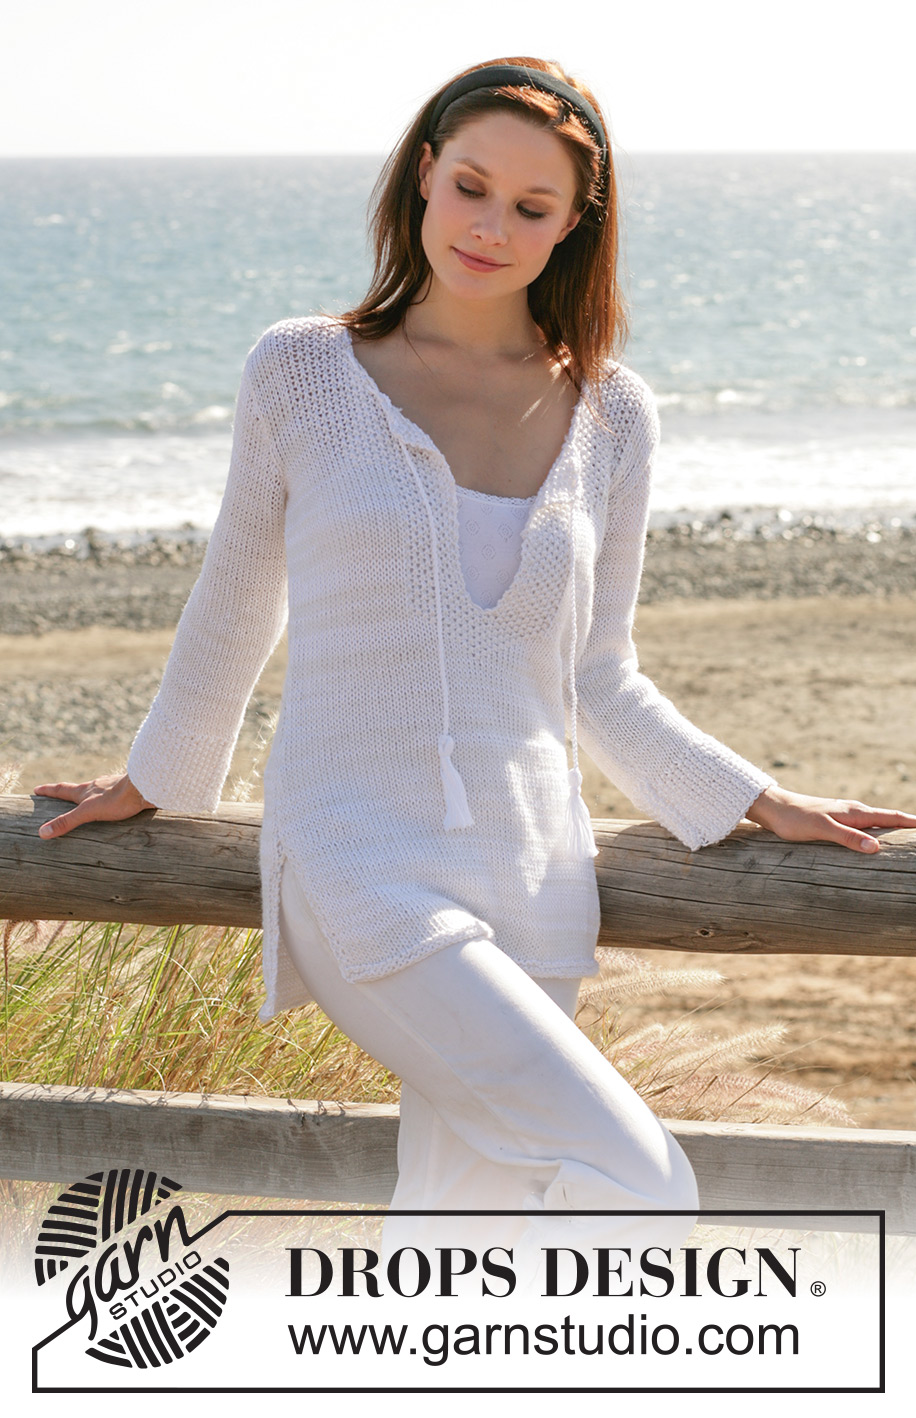
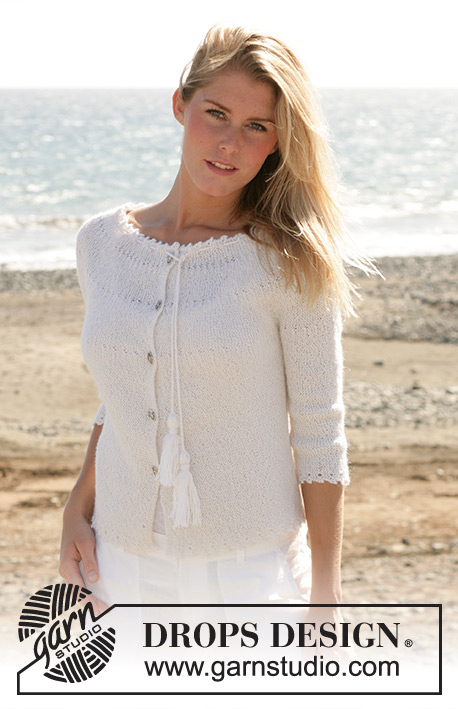
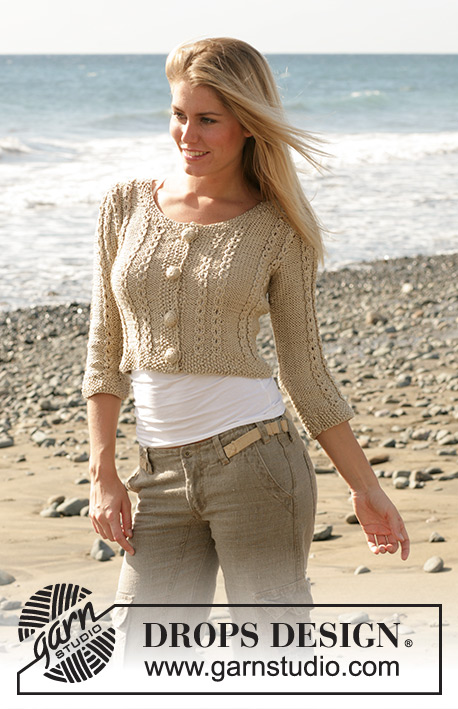
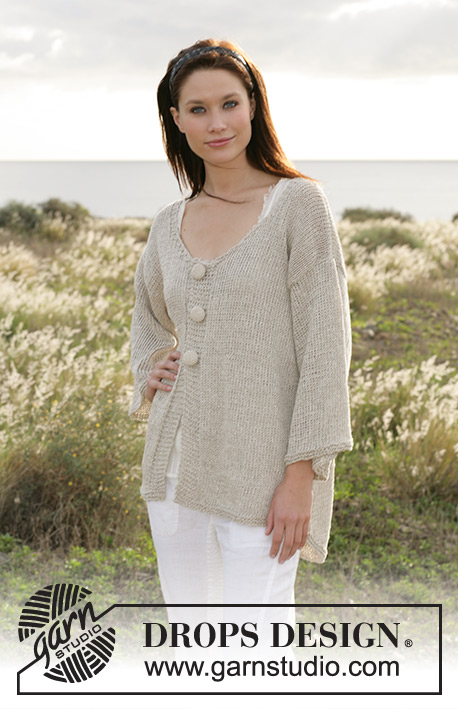
Love Notes#lovenotessweater |
|
|
|
|
DROPS tunic in seed stitch in Cotton Viscose and Alpaca or only Alpaca.
DROPS 100-8 |
|
|
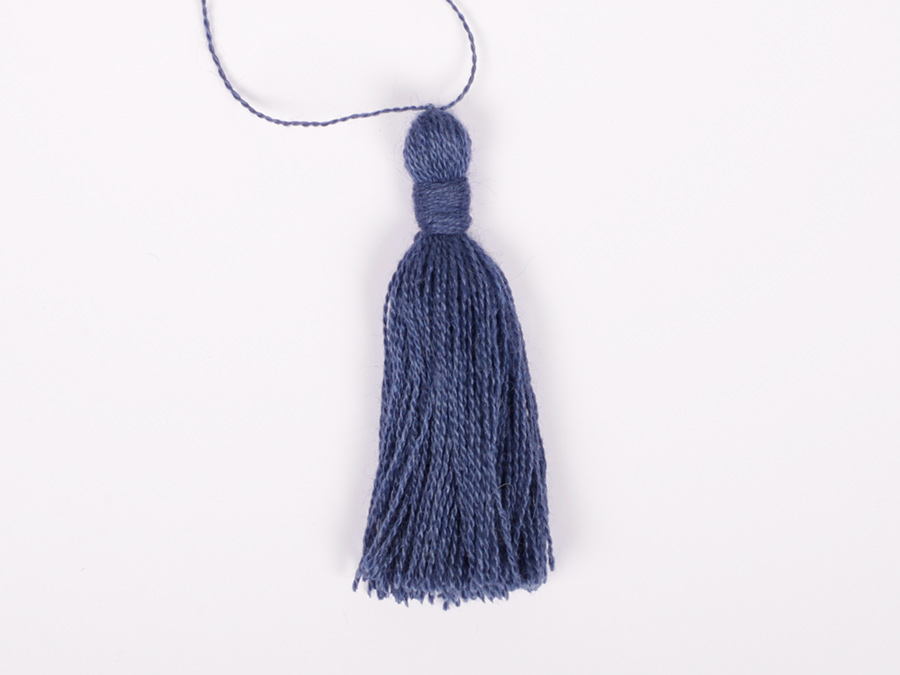
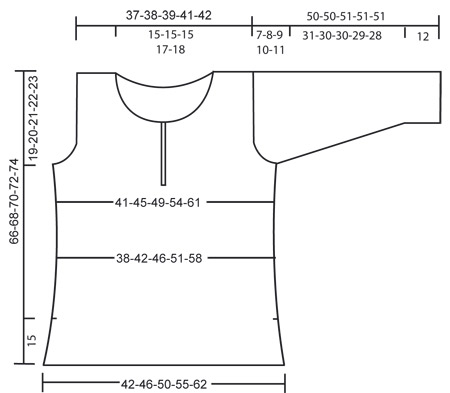
Knitting gauge: 15 sts x 19 rows on needles size 6 mm / US 10 with 1 thread of each quality (double thread)/ or two threads Alpaca = 4" x 4" (10 x 10 cm). Garter st, back and forth on needle: Knit all rows. Seed st: 1st row: *K1, P1*, repeat from *-*. 2nd row: P over K, K over P. Repeat 2nd row. Increasing tip (apply to section in seed st): Inc no of sts in seed st section by incorporating stockinette sts in seed st pattern. Number of sts on row will remain the same. With use Cotton Viscose and Alpaca: Measuring tip: Because of the weight of the yarn, make all measurements whilst the garment is hanging. ------------------------------------------------------------- Back piece: Read Measuring tip! Cast on 63-69-75-83-93 sts on needle size 6 mm / US 10 with 1 thread Alpaca and 1 thread Cotton Viscose (double thread)or 2 threads Alpaca and knit 4 rows garter st. Continue in stockinette st with 3 sts each side in seed st – see explanation above. When piece measures 15 cm / 6" cast on 1 new st each side (seam st) = 65-71-77-85-95 sts and continue in stockinette st on all sts. When piece measures 18-19-20-21-22 cm / 7"-7½"-8"-8¼"-8¾" bind off 1 st each side on every 5 cm / 2" a total of 3 times = 59-65-71-79-89 sts. When piece measures 34-35-36-37-38 cm/13½"-13¾"-14¼"-14½"-15" and 39-40-41-42-43 cm / 15¼"-15¾"-16"-16½"-17" inc 1 st each side = 63-69-75-83-93 sts. When piece measures 47-48-49-50-51 cm / 18½"-19"-19¼"-19¾"-20" bind off for armhole each side on every other row: 3 sts 0-0-1-1-1 time, 2 sts 1-2-1-2-3 times and 1 st 2-2-3-4-6 times = 55-57-59-61-63 sts. When piece measures 62-64-66-68-70 cm / 24⅜"-25¼"-26"-26¾"-27½" knit 2 cm / ¾" seed st on the middle 43-43-43-45-47 sts (remaining sts in stockinette st). Now bind off the middle 23-23-23-25-27 sts for neck = 16-17-18-18-18 sts left on each shoulder. Continue in stockinette st with 10 sts in seed st towards neckline and bind off when piece measures 66-68-70-72-74 cm / 26"-26¾"-27½"-28½"-29". Front piece: Cast on and knit as back piece until piece measures 27-28-29-30-31 cm / 10½"-11"-11½"-11¾"-12¼". Continue dec at sides, at the same time knit the middle st in seed st (remaining sts in stockinette st) and inc number of sts in seed st section on every row as follows – see Increasing tip: 1 st on each side of the middle st until there are 21 sts in seed st mid front. When piece measures 33-34-35-36-37 cm / 13"-13½"-13¾"-14¼"-14½" bind off the middle st. Put sts on one side on a thread or a stitch holder and finish each side separately. Read the whole following section before knitting it! Side-1: Continue in stockinette st with 10 sts in seed st towards mid front. At the same time inc at side as described for back piece = 31-34-37-41-46 sts. When piece measures 47-48-49-50-51 cm / 18½"-19"-19¼"-19¾"-20" bind off for armhole as described for back piece. At the same time when piece measures 48-50-52-52-54 cm / 19"-19¾"-20½"-20½"-21¼" inc number of sts in seed st section on every other row as follows – see Increasing tip: 5 sts 1 time, 1 st 6-6-6-6-8 times. At the same time when piece measures 54-56-58-58-60 cm / 21¼"-22"-22¾"-22¾"-23½" bind off to shape the neckline on every other row: 8 sts 1 time, 1 st 3-3-3-4-5 times = 16-17-18-18-18 sts left on shoulder. Continue in stockinette st with 10 sts in seed st towards neckline until piece measures 66-68-70-72-74 cm / 26"-26¾"-27½"-28½"-29". Bind off. Side-2: Put sts from thread back on needle and knit as Side-1, but mirrored. Note! Beg mid front, and to avoid a "notch" pick up a st (the bind off st mid front) and knit this tog with first st on row. Sleeve: Cast on 40-42-42-44-46 sts (includes 1 edge st each side) on needle size 6 mm / US 10 with 1 thread Alpaca and 1 thread Cotton Viscose (double thread) or 2 threads Alpaca and knit 12 cm / 4¾" seed st - see explanation above. Continue in stockinette st. When piece measures 15 cm / 6" inc 1 st each side on every 6-5-4-3-2.5 cm / 2½"-2"-1½"-1"-¾" a total of 5-6-7-8-10 times = 50-54-56-60-66 sts. When piece measures 43-42-42-41-40 cm / 17"-16½"-16½"-16"-15¾" bind off for sleeve cap each side on every other row: 3 sts 1-1-1-1-2 times, 2 sts 3 times, 1 st 0-1-2-3-2 times and then 2 sts each side until piece measures 49-49-50-50-50 cm / 19¼"-19¼"-19¾"-19¾"-19¾". Now bind off 3 sts each side 1 time and bind off remaining sts, piece measures 50-50-51-51-51 cm /19¾"-19¾"-20"-20"-20". Assembly: Sew shoulder seams. Set in sleeves and sew sleeve and side seams down to the slit. Ribbon: Cut 4 threads of Cotton Viscose or Alpaca, measuring approx 300 cm / 120" each. Twist them until they resist and fold them double. Tie a knot each end approx 5 cm / 2" from the end of ribbon. Pull ribbon through neckline. Make a tassel for each end of the ribbon as follows: Cut 20 threads of Cotton Viscose or Alpaca measuring 25 cm / 9¾" each. Divide the ribbon just above the knot and pull the threads through. Tie them tog and wind one of the threads round the top of tassel to keep it in place. Cut and sew the thread end. |
|
 |
|
Have you finished this pattern?Tag your pictures with #dropspattern #lovenotessweater or submit them to the #dropsfan gallery. Do you need help with this pattern?You'll find 20 tutorial videos, a Comments/Questions area and more by visiting the pattern on garnstudio.com. © 1982-2026 DROPS Design A/S. We reserve all rights. This document, including all its sub-sections, has copyrights. Read more about what you can do with our patterns at the bottom of each pattern on our site. |


With over 40 years in knitting and crochet design, DROPS Design offers one of the most extensive collections of free patterns on the internet - translated to 17 languages. As of today we count 324 catalogs and 12290 patterns - 12280 of which are translated into English (US/in).
We work hard to bring you the best knitting and crochet have to offer, inspiration and advice as well as great quality yarns at incredible prices! Would you like to use our patterns for other than personal use? You can read what you are allowed to do in the Copyright text at the bottom of all our patterns. Happy crafting!
Post a comment to pattern DROPS 100-8
We would love to hear what you have to say about this pattern!
If you want to leave a question, please make sure you select the correct category in the form below, to speed up the answering process. Required fields are marked *.