
Popular categories
Looking for a yarn?


Comments / Questions (49)
![]() Marion wrote:
Marion wrote:
Guten Morgen, wie viel Wolle benötige ich, wenn ich den Pullover einfarbig stricke?
03.03.2020 - 08:10DROPS Design answered:
Liebe Marion, leider haben wir diese Garnmenge nicht, gerne können Sie sich aber von ähnlichen Modellen inspirieren - Ihr DROPS Laden hilft Ihnen gerne damit weiter. Viel Spaß beim stricken!
03.03.2020 - 10:13
![]() Nina wrote:
Nina wrote:
Erst durch die Antwort auf den Kommentar von Dolina habe ich verstanden, dass die "einzelnen" Runden im Muster eigentlich zwei Runden sind. Ich hatte es so verstanden, dass die einzelne Rd rechts und die darauf folgende andersfarbige Rd links gestrickt werden soll. Ich finde, wenn zwei Rd gestrickt werden sollen, sollte das auch im Muster zu sehen sein, mit einem entsprechenden Kommentar, die zweite Rd links zu stricken. So wie jetzt ist es sehr missverständlich.
03.08.2019 - 17:59
![]() Gro Voldner Birkeland wrote:
Gro Voldner Birkeland wrote:
Lue,mønster 3, ser at det skal strikkes rett med noen vrange. Men hvilken farge. For meg sert det ut som kamel, stemmer det ?
19.01.2019 - 20:03DROPS Design answered:
Hei Gro. Ja. Du bytter til Kamel, strikker 1 omgang rett og 1 omgang vrang, og så strikker du M.3, fortsatt i Kamel. God fornøyelse
28.01.2019 - 12:55
![]() Maarit Bäcklander wrote:
Maarit Bäcklander wrote:
Hej! var tydligen inte tillräckligt tydlig i min fråga. Först skall man minska 8 maskor under ärmen i del ÄRM i beskrivningen. I del Axelparti skall man minska 3 maskor på var sida av märktråden vid" raglanöppningen". Frågan gäller om dessa tre maskor skall användas när man plockar 32-41 längs raglanöppningen eller inte.
11.12.2018 - 10:21DROPS Design answered:
Hei Maarit. De 3 maskene du feller før du begynner på raglanen er for å gi plass til raglanstolpen, så du plukker ikke opp masker over disse. God fornøyelse
12.12.2018 - 09:16
![]() Maarit Bäcklander wrote:
Maarit Bäcklander wrote:
Hej! Jag skall börja sticka resåren vid raglanöppningen, jag undrar om man skall även använda de tre maskorna vid raglanöppningen eller inte till resåren?
07.12.2018 - 13:54DROPS Design answered:
Hei Maarit. Hvilke 3 masker sikter du til? Du skal sette alle maskene langs halsen på en tråd, disse strikkkes det halskant over senere. Så plukker du opp masker langs raglanåpningen på armen (pass på at antall masker er delelig med 3+2). Videre strikker du vrangbord over disse maskene, med 1 kantmaske i hver side, til vrangborden måler 2 cm. Gjør det samme langs raglanåpningen på forstykket, men her legges inn knappehull. Når begeg stolpene er ferdige settes maskene rundt halsen tilbake på pinnen, det plukkes opp masker på toppen av hver av raglanstolpene du akkurat strikket, også strikkes halskanten oppover. God fornøyelse.
11.12.2018 - 08:54
![]() Anne-Berit Eriksen wrote:
Anne-Berit Eriksen wrote:
Skal raglan-fellingen begynne på 1. omgang etter at alle maskene er samlet på pinnen? Hvis den skal, da blir det jo åpent fra under ermet. Er det rett?
04.05.2017 - 20:45DROPS Design answered:
Hei Anne-Berit, Åpningen skal syes sammen til slutt, under montering. Mvh, Deirdre
08.05.2017 - 09:08
![]() Elaine Hébert wrote:
Elaine Hébert wrote:
Je crois qu'il s'est glissé une erreur dans le nombre de mailles, dans la création du chandail. Lorsque l'on ajoute les manches sur la broche circulaire avec le dos et le devant, le nombre de mailles totales pour la grandeur 12-18 mois ne devrait-il pas être 240 ?
20.03.2016 - 12:51DROPS Design answered:
Bonjour Mme Hébert, vous avez tout à fait raison, la correction a été faite, on doit bien avoir 240 m en taille 12/18 mois. Merci. Bon tricot!
21.03.2016 - 13:32
![]() Susan wrote:
Susan wrote:
Hallo, ich benötige Hilfe bei der Zunahme der Hose. ich kann leider mit folgendem Satz nichts anfangen: Jetzt 1 M auf jeder Seite der 4 M in der Mitte vorne aufnehmen. Was bedeutet: 4 M?
29.10.2015 - 13:46DROPS Design answered:
Sie haben ja vorne und hinten je 1 Markierer zur Kennzeichnung der vorderen und hinteren Mitte angebracht. Nun soll beidseitig von 4 M, die sich an der vorderen Mitte befinden, je 1 M zugenommen werden. D.h. Sie arbeiten wie folgt: Stricken, bis noch 2 M vor dem Markierer an der vorderen Mitte übrig sind, 1 M zu nehmen, 4 M stricken (der Markierer liegt genau in der Mitte davon), 1 M zunehmen.
05.11.2015 - 12:35
![]() ConnyT wrote:
ConnyT wrote:
Leider habe ich meine Frage vom 27.07. noch keine Antwort erhalten, deshalb formuliere ich sie nochmal. Wo beginne ich die Raglanöffnung? An welcher Stelle nehme ich jeweils die drei Maschen ab? Direkt am Übergang zwischen Ärmel und Körper und wie verfahre ich dann mit den Raglanabnahmen an dieser Stelle?
30.07.2014 - 14:34DROPS Design answered:
Leider ist es nicht immer möglich, kurzfristig auf alle Fragen zu antworten. Sie stricken die Raglanpasse in Hin- und Rück-R. Die R beginnt direkt am Markierer rechts vorne. Sie stricken direkt 2 M re zusammen, dann stricken Sie so weit, bis noch 3 M vor dem nächsten Markierer übrig sind, dann 2 M re zus., 2 M re (der Markierer liegt dazwischen), 2 M überzogen zus. An den folgenden Markierern wdh und am Ende der R 2 M re zus. D.h. Sie nehmen beidseitig jedes Markierers je 1 M ab = 8 M abgen.
31.07.2014 - 11:46
![]() ConnyT wrote:
ConnyT wrote:
Beginne ich die Raglanöffnung direkt am Übergang zwischen Ärmel und Körper, nachdem ich jeweils die 3 Maschen für die Öffnung abgenommen habe? Wenn ja, wie verfahre ich dann mit den Raglanabnahmen an dieser Stelle?
27.07.2014 - 10:58
|
|||||||||||||||||||||||||
Swab the Deck#swabthedeckset |
|||||||||||||||||||||||||
 |
 |
||||||||||||||||||||||||
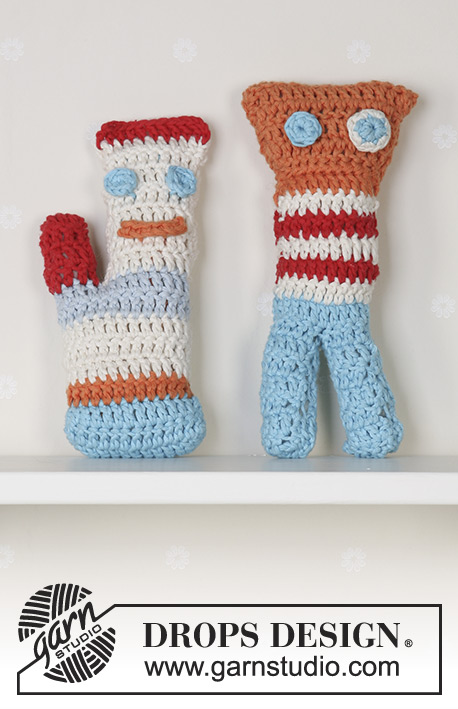
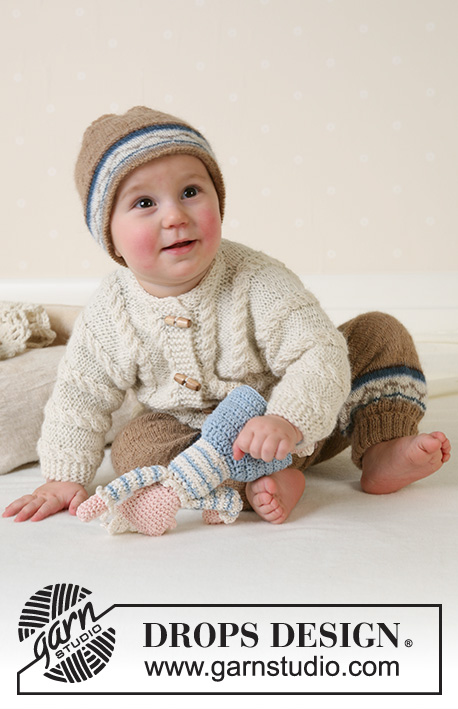
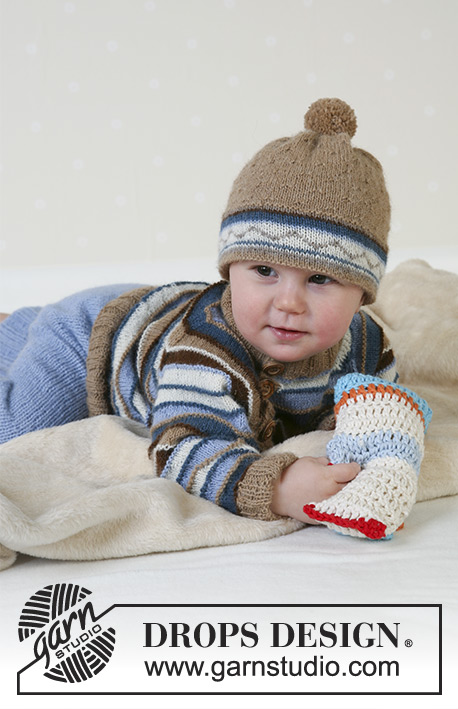
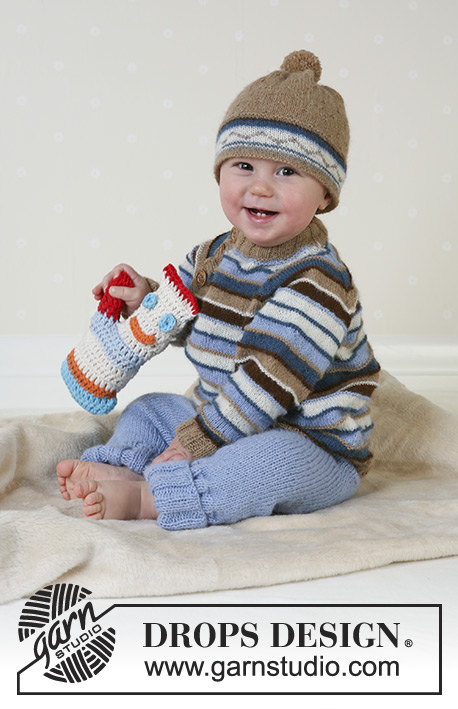
DROPS Jumper, pants, hat and soft toy in Alpaca
DROPS Baby 13-12 |
|||||||||||||||||||||||||
|
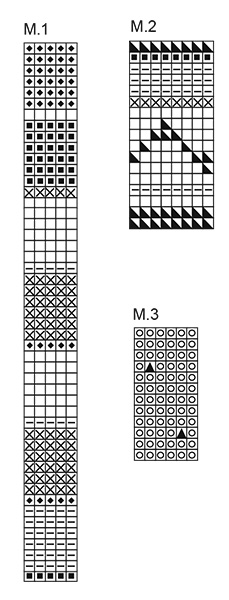
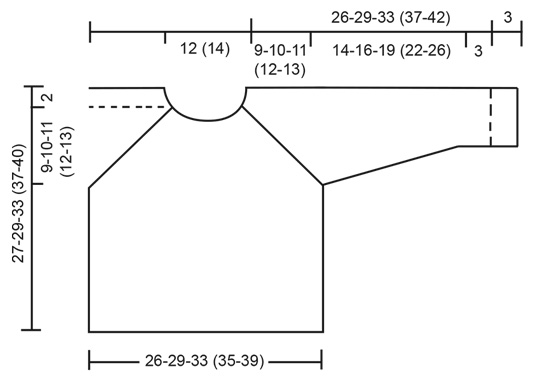
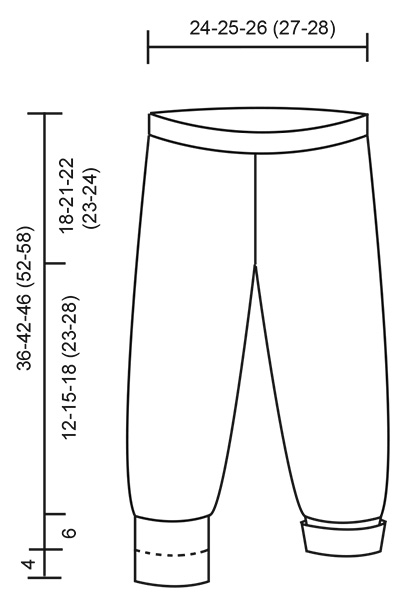
JUMPER: Knitting gauge: 24 sts x 32 rows on needle size 3 mm / US 2.5 in stockinette sts = 10 x 10 cm / 4" x 4" Rib: *K3, P3*, repeat from *-*. Pattern: See diagrams M.1. Repeat the diagram until finished measurements. Note! The pattern is knitted in stockinette sts but the "single" rows, i.e. rows 1, 8, 15 etc = 2 rounds of garter sts. I.e. knit 2 rounds garters sts as follows: knit 1 round, purl 1 round. Decreasing tips (applies to raglan): Dec as follows from the right side: Start and finish the row with K2 tog. By the 3 other markers dec as follows (start 3 sts before marker): K2 tog, K2, slip 1 st as if to knit, K1, psso. Dec as follows from the wrong side: Start and finish the row with P2 tog. By the 3 other markers dec as follows (start 3 sts before marker): P2 tog into back of st, P2, P2 tog. Front and back piece: Cast on 126-138-156 (168-186) sts on circular needle size 2.5 mm / US 1.5 with camel. Knit 3 cm / 1 ⅛" Rib. Change to needle size 3 mm / US 2.5 and knit 1 round with camel. Continue in stripes according to M.1 – see explanation above. When piece measures approx 16-17-20 (23-25) cm / 6¼"-6¾"-8" (9"-9¾") (adjust so that there is 1 round left of a whole stripe) knit next round as follows: bind off 8 sts for armhole, knit 55-61-70 (76-85) sts (= front piece), bind off 8 sts for armhole, knit 55-61-70 (76-85) sts (= back piece). Put the piece aside and knit the sleeves. Sleeve: Knit round on double pointed needles size 2.5 mm / US 1.5. Cast on 36-42-42 (48-48) sts with camel. Knit 3 cm / 1 ⅛" Rib (= turn-up). Insert a marker and measure piece from here from now on. Knit another 3 cm / 1 ⅛" Rib. Change to needle size 3 mm / US 2.5, knit 1 round with camel and continue in stripes according to M.1. At the same time, when sleeve measures 5 cm / 2" inc 2 sts mid under arm a total of 6-5-8 (7-9) times on every 2-3-2 (3-2.5) cm = 48-52-58 (62-66) sts. When sleeve measures 17-19-22 (25-29) bind off 8 sts mid under arm (adjust to last row in a stripe) = 40-44-50 (54-58) sts. Put the piece aside and knit the other sleeve. Yoke: Put sleeves in on the same needle as back and front pieces where you bind off for armholes = 190-210-240 (260-286) sts. Insert a marker in all transitions between body pieces and sleeves = 4 markers. Knit back and forth on needle, starting by the right raglan seam and start by dec 3 sts on each side of this marker. Continue in M.1 following on from the stripe pattern on front and back pieces. At the same time, dec for raglan – see Decreasing tip – on every other row: 14-16-18 (20-22) times. When all dec are complete there are 72-76-90 (94-104) sts left. Put sts on a holder and knit the raglan edge before the neck. Raglan edge: Pick up approx 32 to 41 sts (divisable by 4 + 2) along the raglan seam on the sleeve with double pointed needle size 2.5 mm / US 1.5 and camel. Knit Rib with 1 edge st each side in garter sts. When Rib measures 2 cm / ¾", bind off loosely. Repeat along raglan opening on front piece, but after 2 rows make 3 buttonholes evenly distributed (there will be a buttonhole on neckline as well). 1 buttonhole = bind off 2 sts and cast on 2 new sts on next row. Neck: Put sts from holder on neck back on double pointed needles size 2.5 mm / US 1.5 and pick up 7-8-7 (8-6) sts on each raglan edge with camel = 86-92-104 (110-116) sts. Knit back and forth on needle from the open raglan seam as follows: knit 1 row from wrong side, knit 1 row from right side. Next row from wrong side: 1 edge st in garter sts, *K3, P3*, repeat from *-* and finish with 1 edge st in garter sts. Continue in Rib with 1 edge st each side in garter sts. At the same time, after 1 row in Rib, make a buttonhole over the others and repeat when Rib measures 4-4-4 (5-5) cm. bind off loosely when Rib measures 5-5-5 (6-6) cm. Fold neckline towards wrong side and attach with neat sts. Assembly: Place raglan edges on top of each other with buttonholes at the top and join in lower edge. Sew the openings under the arms. Sew on buttons. Fold Rib at sleeve edges towards the wrong side and attach neatly. -------------------------------------------------------- PANTS: Knitting gauge: 19 sts x 25 rows with double thread Alpaca on needle size 4 mm / US 6 in stockinette sts = 10 x 10 cm / 4" x 4". Rib: *K3, P3*, repeat from *-* Start at the top and knit downwards. Cast on 92-96-98 (102-106) sts with 2 threads light blue (= double thread) and circular needle size 4 mm / US 6. Knit 2 cm / ¾" stockinette sts and insert a marker (= folding edge). Measure piece from marker. Insert a marker mid front and mid back (= 46-48-49 (51-53) sts between markers. Continue in stockinette sts until piece measures 12-14-15 (15-15) cm. Now inc 1 st on each side of the 4 middle sts mid front (inc by picking up st from previous row and knit this) on every other row a total of 8-9-9 (10-11) times = 108-114-116 (122-128) sts. On next row dec 6 sts mid front and mid back (i.e. 3 sts on each side of both markers) = 48-51-52 (55-58) sts for each leg. The piece measures approx 18-21-22 (23-24) cm = 7"-8¼"-8¾" (9"-9½") Legs: Put sts from one leg on a thread and sts from the other leg on double pointed needles size 4 mm / US 6. Insert a marker on inner side of leg and knit stockinette sts. When leg measures 2 cm / ¾" dec 1 st on both sides of marker on every 2-3-4 (5½-7) cm = ¾"-1⅛"-1½" (2⅛"-2¾") a total of 3 times = 40-43-44 (47-50) sts. When leg measures 12-15-18 (23-28) cm inc evenly on row to 48-48-54 (54-60) sts. Continue in Rib and bind off loosely when Rib measures 10 cm / 4". Knit the other leg in the same way. Assembly: Sew opening between legs. Fold the edge at top, sew to wrong side (leave a little opening for the elastic) and pull the elastic through. Fold the rib at bottom of legs. -------------------------------------------------------- HAT: Size: 1/3 – 6/9 months – (12/18 months – 2 years) To fit head circumference: 40/42 – 43/45 – (48/50 – 50/52) cm Knitting gauge: 26 sts x 35 rows on needle size 2.5 mm / US 1.5 in stockinette sts = 10 x 10 cm / 4" x 4" Pattern: see diagrams M.2 and M.3. Decreasing tips: Dec as follows before the marker: K2 tog Dec as follows after the marker: slip 1 st as if to knit, K1, psso. Knit round on double pointed needles size 2.5 mm / US 1.5. Cast on 96-104 (112-120) sts with camel. Knit 6 cm / 2 ⅜" stockinette sts, purl 1 round (= folding edge) and knit 1 round. Now knit 1 repeat of M.2. Change to camel, knit 1 round and purl 1 round. Now knit M.3, at the same time adjusting number of sts to 96-102 (108-120) on first row. When piece measures 13-15 (16-17) cm from folding edge adjust number of sts to 90-100 (110-120). Insert 5 markers in piece with 18-20 (22-24) sts in between each. Continue in stockinette sts, at the same time dec 1 st on each side of all markers on every row until there are 10 sts left – see Decreasing tips. Cut the thread, pull through remaining sts and attach. Fold lower edge towards the wrong side and attach with neat sts – make sure the seam doesn’t pull. Pompon: Make a pompon with a diameter of approx 4 cm / 1½" and attach to top of hat. |
|||||||||||||||||||||||||
Diagram explanations |
|||||||||||||||||||||||||
|
|||||||||||||||||||||||||
 |
|||||||||||||||||||||||||
 |
|||||||||||||||||||||||||
 |
|||||||||||||||||||||||||
Have you finished this pattern?Tag your pictures with #dropspattern #swabthedeckset or submit them to the #dropsfan gallery. Do you need help with this pattern?You'll find 28 tutorial videos, a Comments/Questions area and more by visiting the pattern on garnstudio.com. © 1982-2026 DROPS Design A/S. We reserve all rights. This document, including all its sub-sections, has copyrights. Read more about what you can do with our patterns at the bottom of each pattern on our site. |
|||||||||||||||||||||||||


With over 40 years in knitting and crochet design, DROPS Design offers one of the most extensive collections of free patterns on the internet - translated to 17 languages. As of today we count 324 catalogs and 12290 patterns - 12280 of which are translated into English (US/in).
We work hard to bring you the best knitting and crochet have to offer, inspiration and advice as well as great quality yarns at incredible prices! Would you like to use our patterns for other than personal use? You can read what you are allowed to do in the Copyright text at the bottom of all our patterns. Happy crafting!
Post a comment to pattern DROPS Baby 13-12
We would love to hear what you have to say about this pattern!
If you want to leave a question, please make sure you select the correct category in the form below, to speed up the answering process. Required fields are marked *.