
Popular categories
Looking for a yarn?


Comments / Questions (5)
![]() Miki wrote:
Miki wrote:
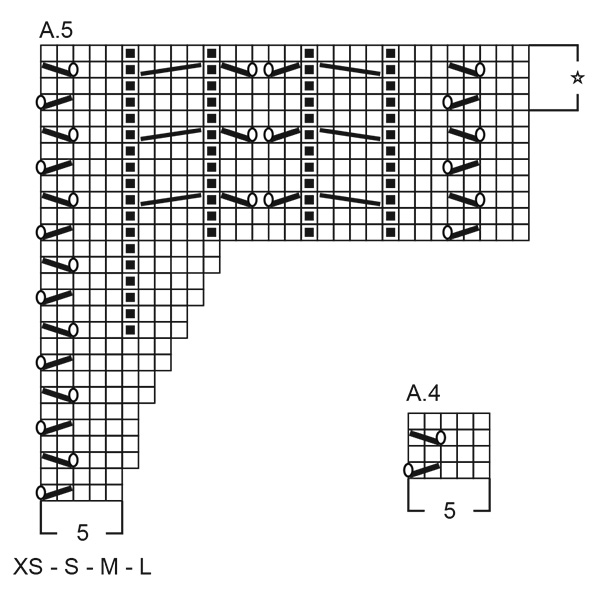
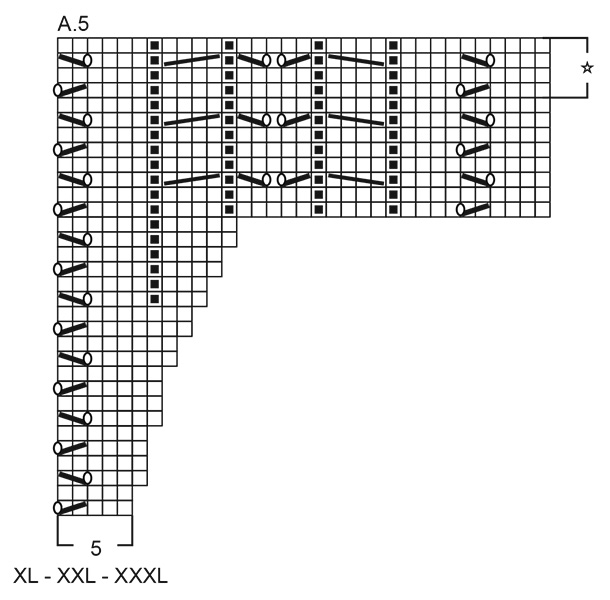
Hi. About A5, shouldn't there be an increased column on wrong-side rows just same as A3?
16.05.2026 - 13:58DROPS Design answered:
Dear Miki, diagram A.5 has been updated - it might be a good idea to print it again. Happy knitting!
19.05.2026 - 16:16
![]() Ewa wrote:
Ewa wrote:
När framstyckets ökningar är klara står det att det mäter 12 cm från markören, sen ska man sticka A3 i 12 varv och upprepa de sista 4 varven och då ska det bli 13 cm? Måste vara nåt jag missar eller så står det fel....
26.03.2026 - 23:07DROPS Design answered:
Hej Ewa, har du ikke allerede strikket næsten hele A.3? Det er kun de sidste 4 varv du skal gentage, til arbejdet måler 13 cm (4 pinde i højden = ca 3,5 pind) :)
09.04.2026 - 10:36
![]() HOURDEBAIGT wrote:
HOURDEBAIGT wrote:
Bonjour. Je suis en train de tricoter le devant et j’ai fait toutes les augmentations. Puis vous dites de tricoter le devant jusqu’à ce qu’il mesure 12cm à partir du marqueur. M’aide quel marqueur parles vous? Parce que après avoir tricoté 7cm1/2 après la 1ere boutonnière je suis à 21cm du marqueur de l’encolure. Je ne comprends pas. Pourriez vous m’éclairer ? Merci.
25.03.2026 - 16:39DROPS Design answered:
Bonjour Mme Hourdebaigt, les mesures des devants sont prises à partir du marqueur placé encolure = à partir des mailles relevées, autrement dit 1 à 2 cm (selon la taille) après la fin des augmentations de l'encolure. Bon tricot!
26.03.2026 - 08:56
![]() Marta wrote:
Marta wrote:
Dzień dobry, mam pytanie: kiedy należy odciąć nitkę po przerobieniu pierwszej części prawego przodu? Chodzi mi konkretnie o tę część opisu: "Dodawanie oczek na dekolt jest zakończone. Długość robótki od markera wynosi 11 cm (M) (...) Przerabiać aż długość przodu od markera wynosi 12cm." Czy to znaczy, że po dodaniu 26 oczek i zakończeniu dekoltu trzeba przerobić 1cm i już odciąć nitkę, nie kończąc schematu A5? Z góry dziękuję za odpowiedź :)
13.03.2026 - 23:07DROPS Design answered:
Witaj Marto, przerabiasz aż długość przodu od markera wynosi 12 cm, zatrzymać się za rzędem na lewej stronie robótki. Teraz odcinasz nitkę i zdejmujesz oczka na nitkę lub drut pomocniczy. Schemat A.5 może nie być zakończony. Pozdrawiamy!
16.03.2026 - 17:08
![]() Carol McMillan wrote:
Carol McMillan wrote:
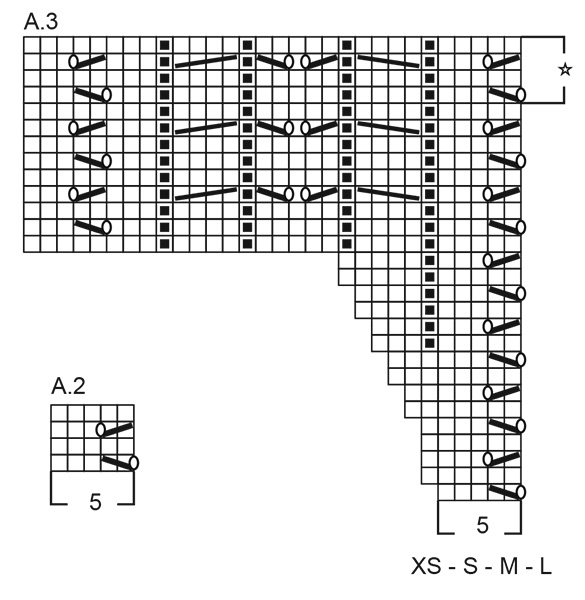
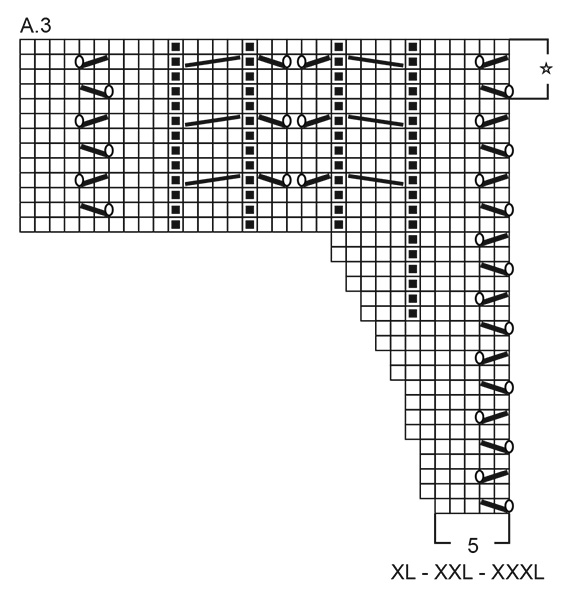
Shouldn't there be a A.3 chart for sizes XL-XXL-XXL?
10.03.2026 - 19:13DROPS Design answered:
Dear Mrs McMillan, thanks for noticing, A.3 for larger size is now visible. Happy knitting!
11.03.2026 - 07:35
|
|||||||||||||||||||||||||
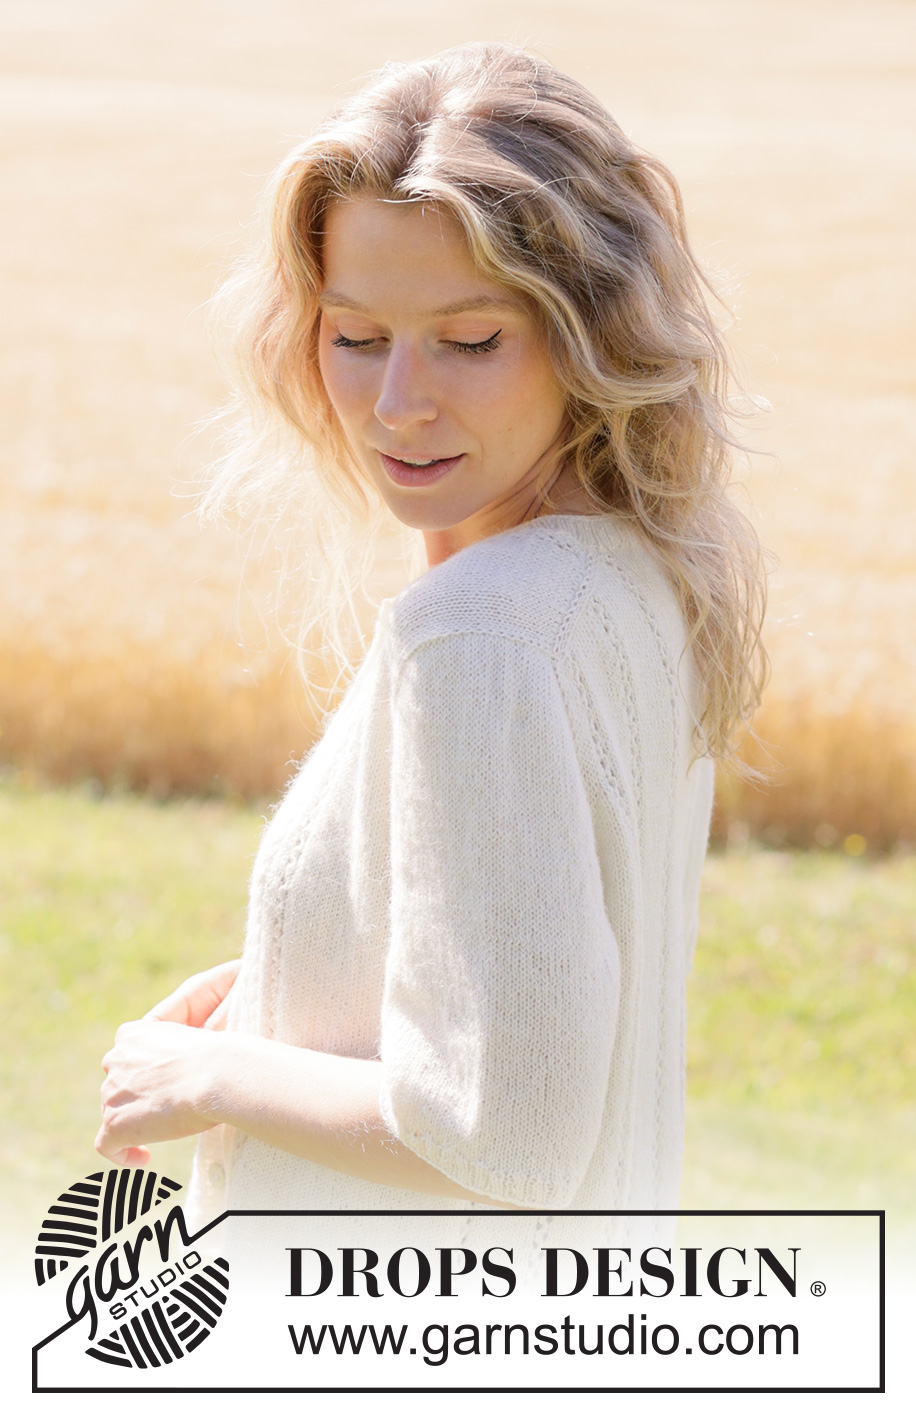
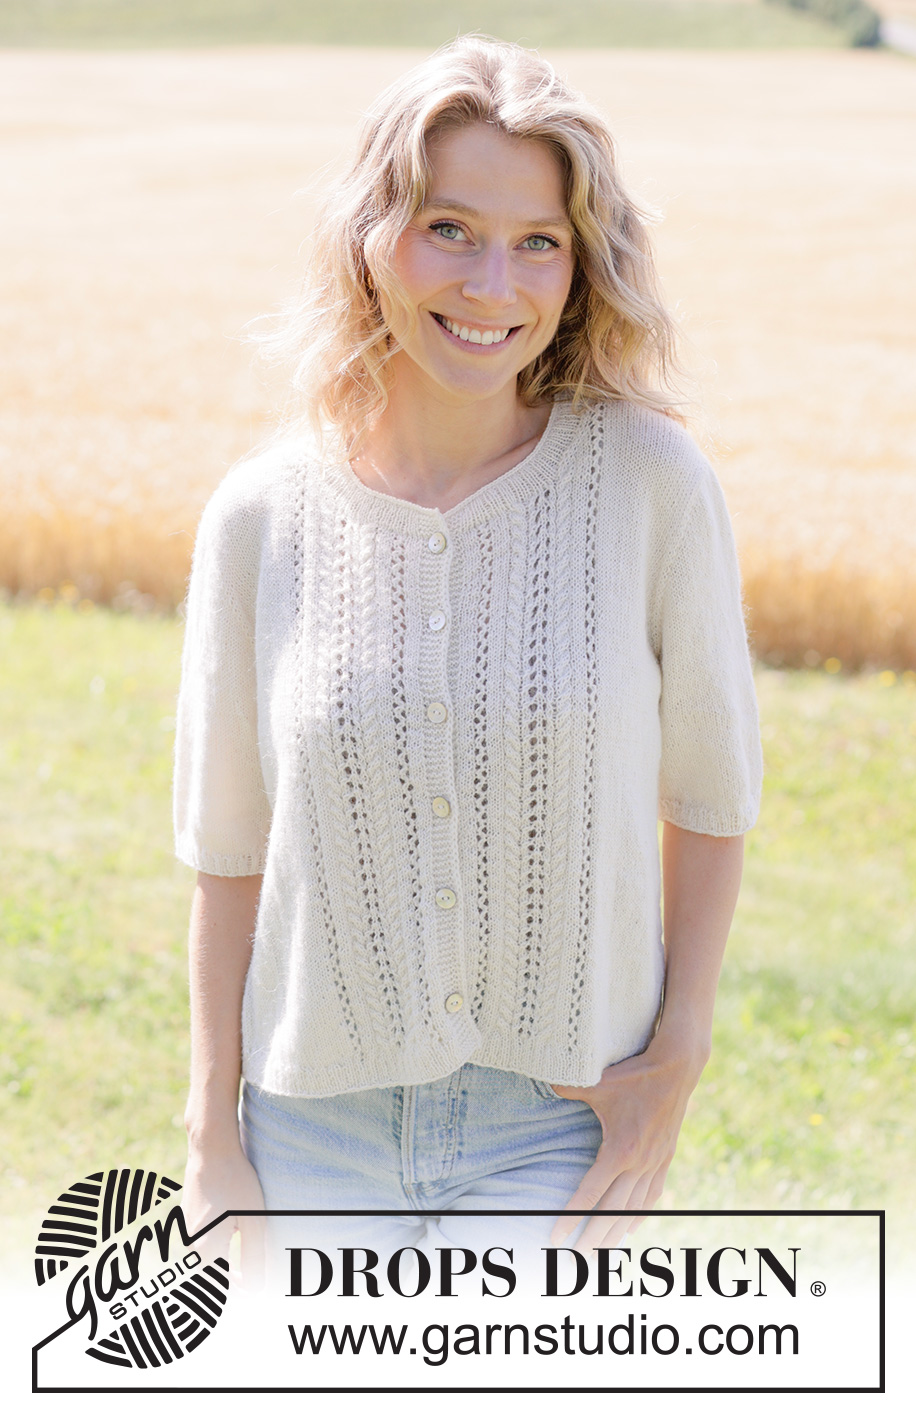
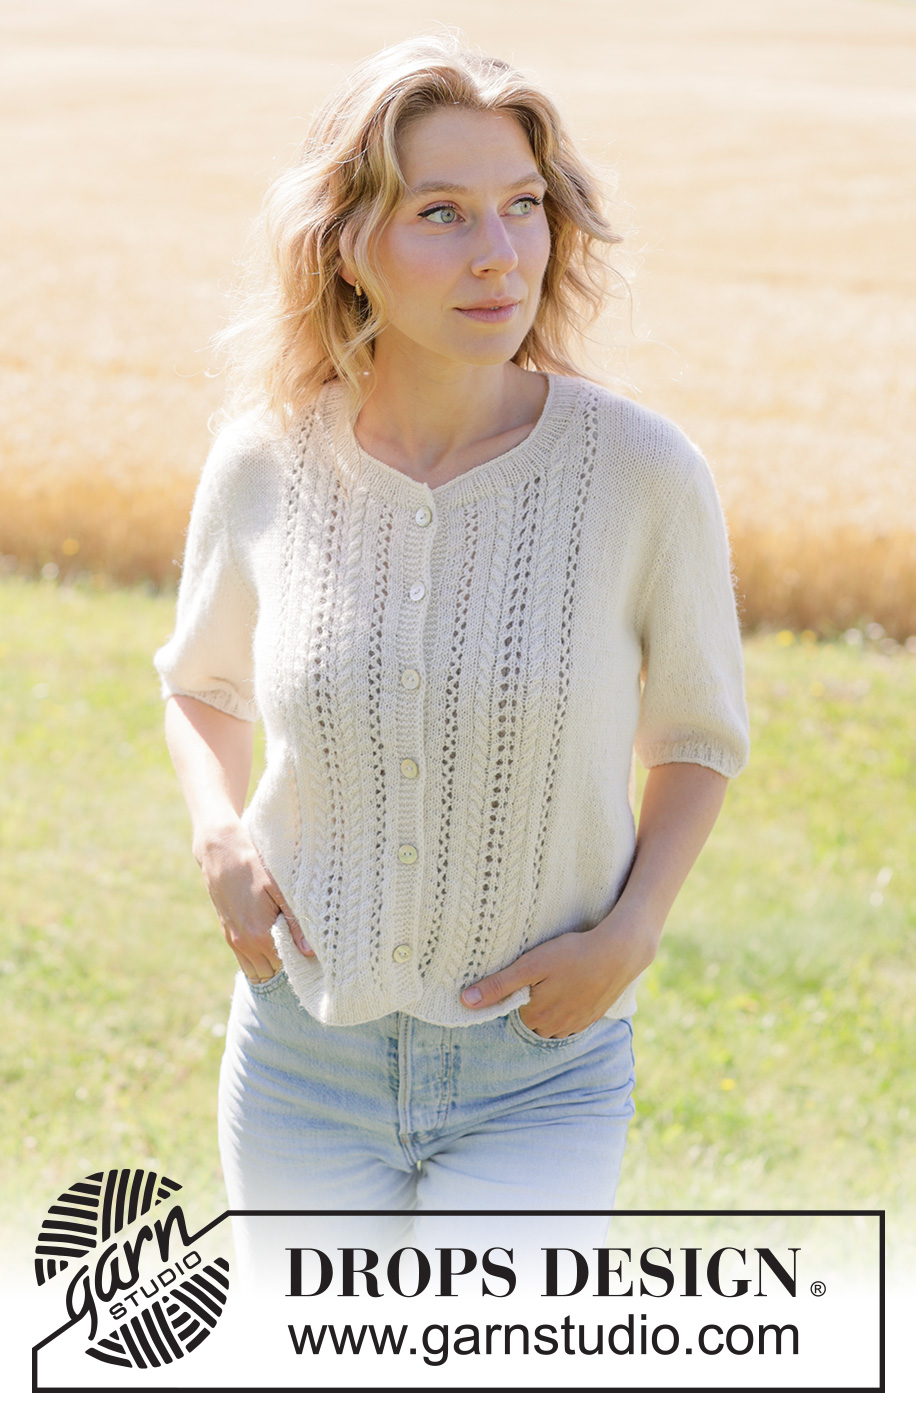
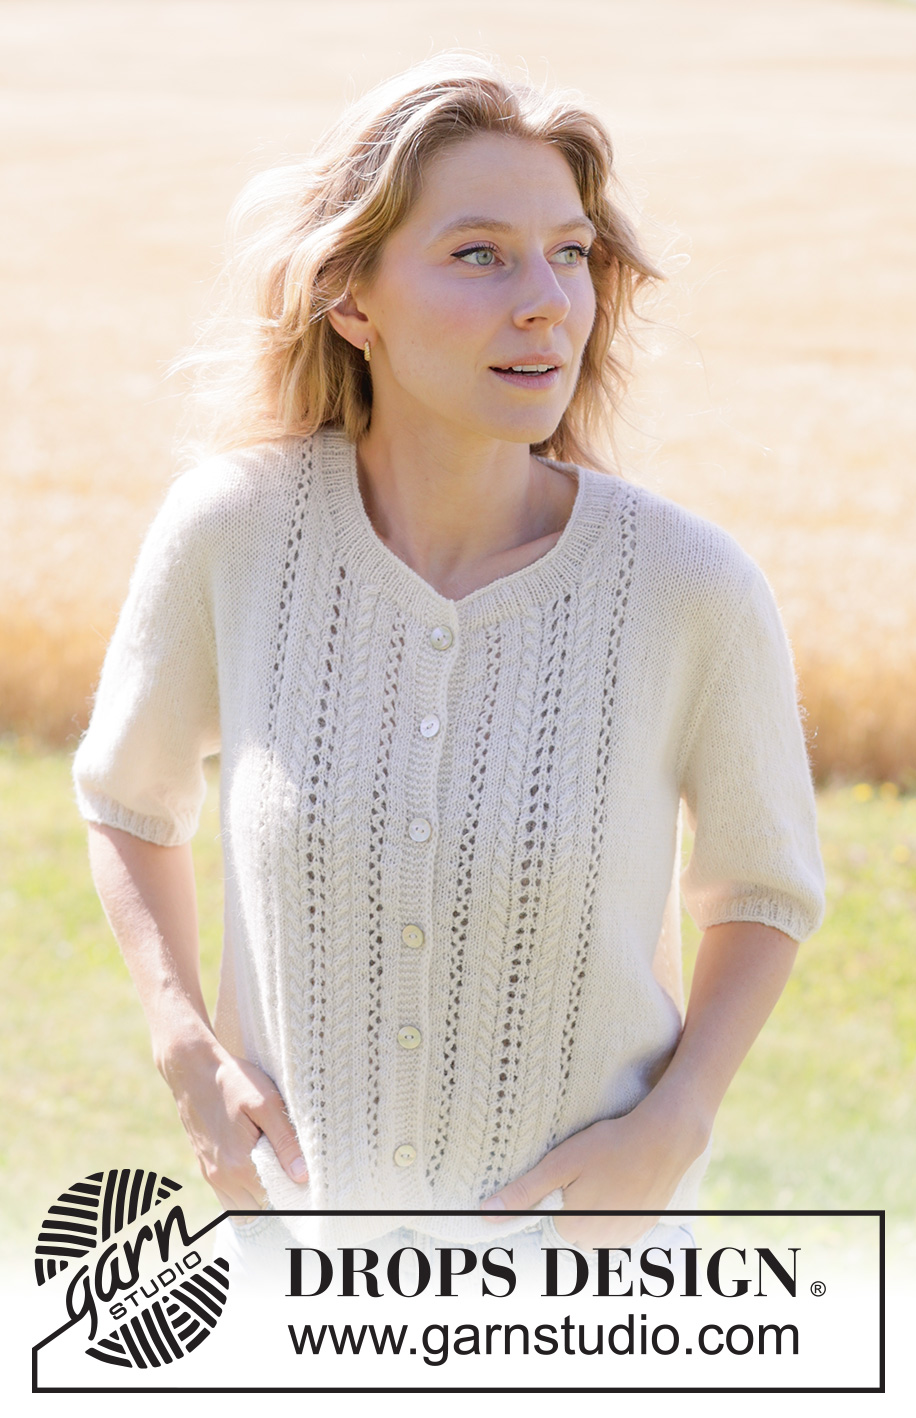
Blooming Lace Cardigan#bloominglacecardigan |
|||||||||||||||||||||||||
 |
 |
||||||||||||||||||||||||
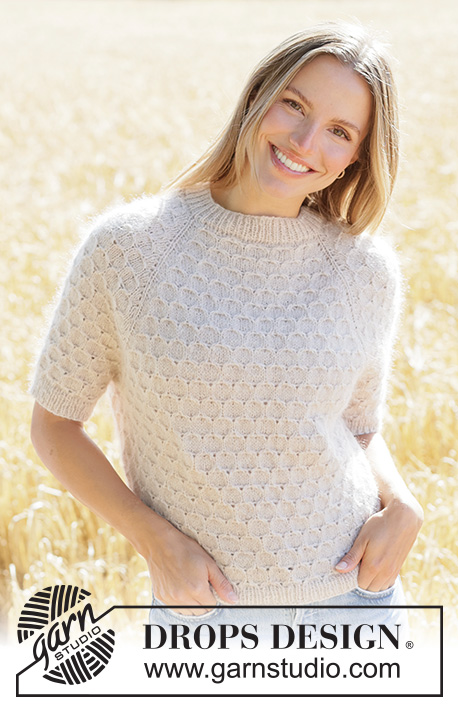
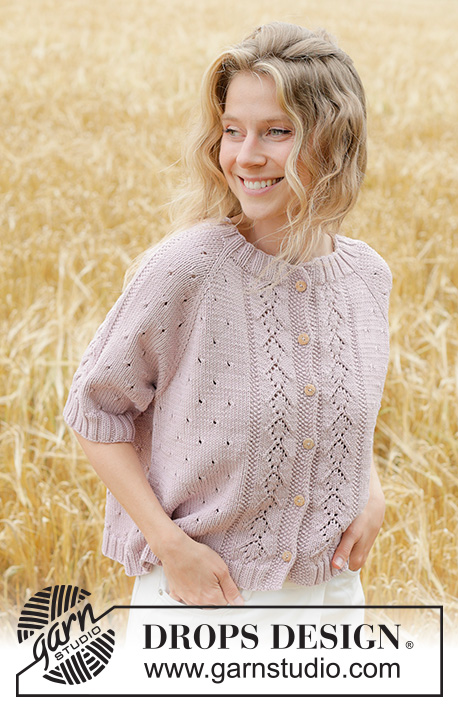
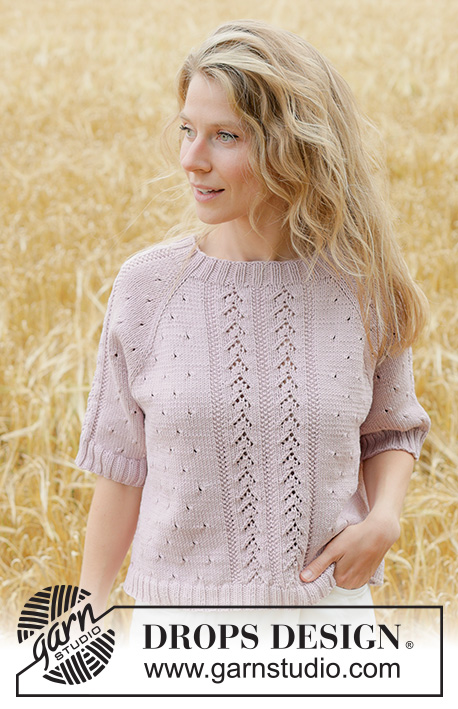
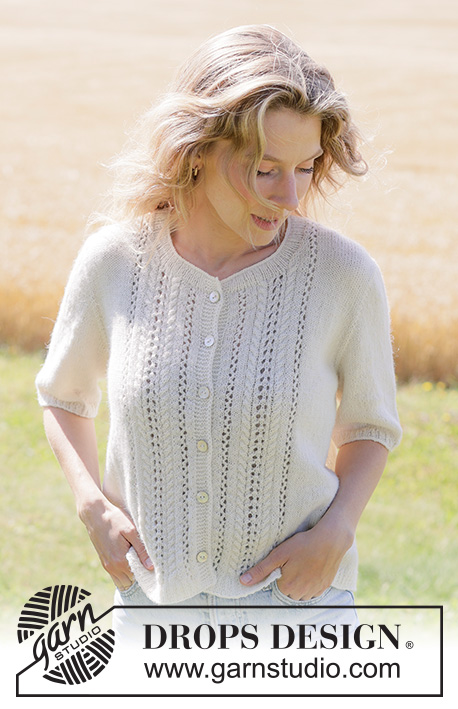
Knitted jacket in DROPS Nord. The piece is worked top down with European yoke, lace pattern, I-cord and short sleeves. Sizes XS - XXXL.
DROPS 267-23 |
|||||||||||||||||||||||||
|
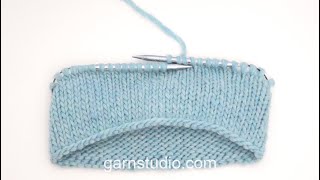
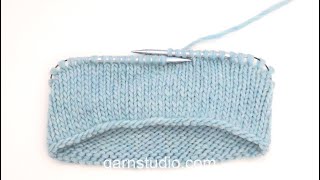
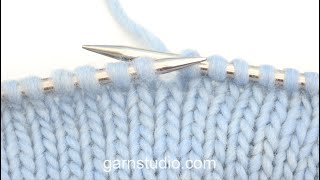
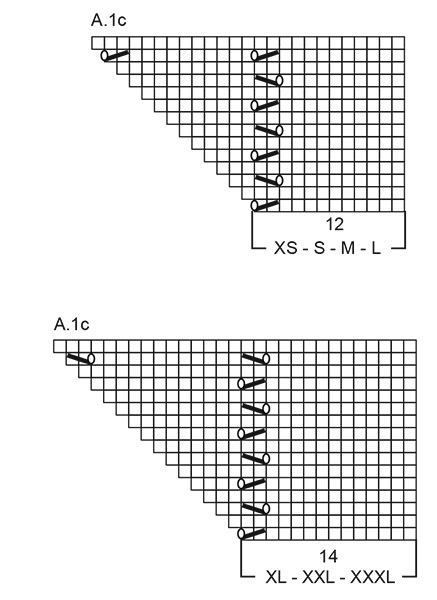
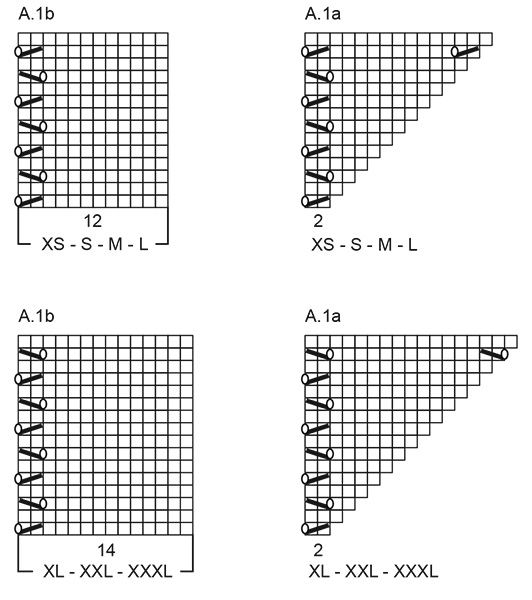
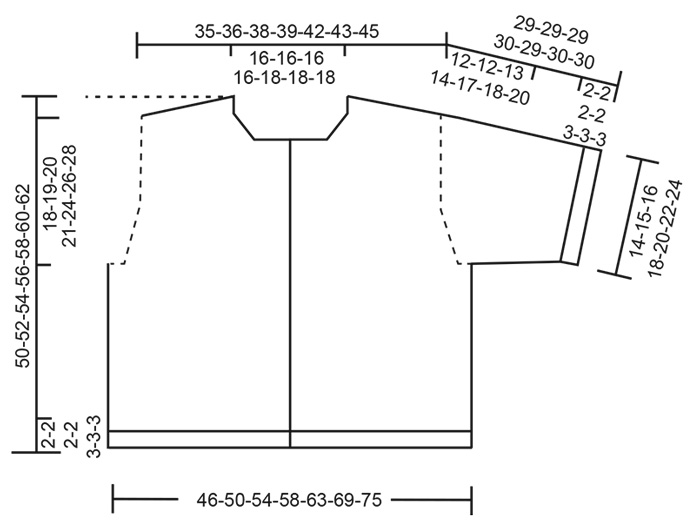
------------------------------------------------------- EXPLANATIONS FOR THE PATTERN: ------------------------------------------------------- PATTERN: See diagrams A.1 to A.5. Choose diagram for your size (applies to A.1, A.3 and A.5). The diagrams are read from right to left when working from the right side and left to right when working from the wrong side. INCREASE TIP-1: INCREASE 1 STITCH TOWARDS LEFT – from RIGHT SIDE: Use the left needle to pick up the strand between 2 stitches from the row below, pick up the strand from the front and knit through the stitch-loop that lies on the back of the needle. INCREASE 1 STITCH TOWARDS THE RIGHT- from RIGHT SIDE): Use the left needle to pick up the strand between 2 stitches from the row below, pick up the strand from the back and knit through the stitch-loop that lies on the front of the needle. INCREASE TIP-2: INCREASE 1 STITCH TOWARDS THE RIGHT- from WRONG SIDE: Use the left needle to pick up the strand between 2 stitches from the row below, pick up the strand from the back and purl through the stitch-loop that lies on the front of the needle. INCREASE 1 STITCH TOWARDS LEFT – from WRONG SIDE: Use the left needle to pick up the strand between 2 stitches from the row below, pick up the strand from the front and purl through the stitch-loop that lies on the back of the needle. INCREASE TIP-3: When increasing evenly on the first row of rib, it is important to increase in the stitches that will subsequently be purled, so the knitted stitches continue neatly from the stockinette stitch. GARTER STITCH: Knit all rows, from both the right and wrong side. 1 ridge in height = knit 2 rows. BANDS WITH I-CORD: BEGINNING OF ROW: Work the band as follows (7 stitches): Slip 1 stitch purl-wise with yarn in front, knit 1, work 5 garter stitches. END OF ROW: Work the band as follows (7 stitches): Work until there are 7 stitches left on the row, work 5 garter stitches, slip 1 stitch purl-wise with yarn in front, knit 1. Work like this from both the right and wrong side. BUTTONHOLES: Work the buttonholes on the right band (when the garment is worn) from the right side, when there are 5 stitches left on the row as follows: ROW 1 (right side): Make 1 yarn over, knit 2 together, knit 1, slip 1 stitch purl-wise with the strand in front, knit 1. ROW 2 (wrong side): Work the band as before, knitting the yarn over to leave a hole. The first buttonhole is worked on the first row from the right side after the neck is finished. Then work the other 5-5-5-5-5-6-6 buttonholes with 7½-7½-8-8-8-7½-7½ cm = 2⅞"-2⅞"-3⅛"-3⅛"-3⅛"-2⅞"-2⅞" between each one. SLEEVE TIP: When knitting up stitches under the sleeve, you can get a small hole in the transition between stitches on the body and sleeve. This hole can be closed by picking up the strand between 2 stitches and working this strand twisted together with the first stitch between body and sleeve. DECREASE TIP: Decrease 1 stitch on each side of the marker-thread as follows: Work until there are 3 stitches left before the marker-thread, knit 2 together, knit 2 (marker-thread sits between these 2 stitches), slip 1 stitch knit-wise, knit 1 and pass the slipped stitch over the knitted stitch (2 stitches decreased). ------------------------------------------------------- START THE PIECE HERE: ------------------------------------------------------- JACKET – SHORT OVERVIEW OF THE PIECE. The pattern uses both long and short needles; start with the length which fits the number of stitches and change when necessary. Work according to points 1 – 5. 1. BACK PIECE: Cast on stitches for the back of the neck. Work the back piece back and forth, increasing stitches on each side until the shoulder stitch count has been achieved. The back piece has slightly diagonal shoulder. 2. FRONT PIECES: Start by knitting up stitches along one back shoulder, working downwards and increasing for the neckline. Repeat on the other shoulder. 3. YOKE: Join the front and back pieces, working first 1 front piece, knitting up stitches for the sleeve along the side of the front piece, working the back piece, knitting up stitches for the sleeve along the side of the second front piece, then working this front piece. The yoke is continued back and forth from mid-front. 4. INCREASE FOR BODY AND SLEEVES: While working the yoke, you increase stitches first for the sleeves, then for the sleeves and front pieces and finally for the sleeves, front pieces and back piece. 5. BODY AND SLEEVES: When all the increases are finished and the yoke is the correct length, it is divided for the body and sleeves. The body is continued back and forth while the sleeves wait. Then the sleeves are worked in the round, top down. Stitches are knitted up around the neckline and the neck is worked back and forth to finish. BACK PIECE: The piece is worked back and forth. Cast on 44-44-44-44-50-50-50 stitches with circular needle size 3 MM = US 2.5 and DROPS Nord. ROW 1 (wrong side): Purl. ROW 2 (right side): Read INCREASE TIP-1. Knit 3, increase 1 stitch towards the left, work PATTERN – read explanation above, as follows: A.1a, then A.1b 2 times, A.1c, increase 1 stitch towards the right, knit 3. ROW 3 (wrong side): Read INCREASE TIP-2. Purl 3, increase 1 stitch towards the right, work A.1c, then A.1b 2 times, A.1a, increase 1 stitch towards the left, purl 3. AFTER ROW 3: Work ROWS 2 and 3 a total of 12-13-14-15-15-16-17 times (24-26-28-30-30-32-34 rows worked). NOTE: The increased stitches are worked into the pattern, i.e., alternately 10-10-10-10-12-12-12 stockinette stitches and 2 lace-pattern stitches, making sure that the 3 outermost stitches on each side are always worked in stockinette stitch. After the last increase there are 92-96-100-104-110-114-118 stitches. Remember to maintain the knitting gauge. Cut the strand and place the stitches on a stitch holder. RIGHT FRONT PIECE: Find the right back shoulder as follows: Lay the back piece flat, right side up, with the stitch holder/thread towards you; right-hand side of piece = right shoulder. Start from the right side by the armhole on the right back shoulder and knit up 1 stitch in the outermost stitch (edge stitch), then 1 stitch in each row worked (knitting up inside the outermost stitch) as far as the neckline (24-26-28-30-30-32-34 stitches) = 25-27-29-31-31-33-35 shoulder-stitches. Insert 1 marker by the neck. All measurements on the front piece are taken from this marker, measured in the knitting direction. Purl 1 row from the wrong side, then work pattern as follows: ROW 1 (right side): Knit 20-22-24-26-26-28-30, work A.2. ROW 2 (wrong side): Work A.2, purl 20-22-24-26-26-28-30. Repeat ROWS 1 and 2 until the front piece measures 5-6-7-8-6-8-9 cm = 2"-2⅜"-2¾"-3⅛"-2⅜"-3⅛"-3½" from the marker, finishing after a complete repeat of A.2 in height, so the pattern continues correctly. Now increase for the neckline as follows: ROW 1 (right side): Knit 20-22-24-26-26-28-30, work A.3 until there are 3 stitches left, increase 1 stitch towards the right – remember INCREASE TIP-1, knit 3 (the last 3 stitches in A.3). ROW 2 (wrong side): Work A.3 (the increased stitches are drawn into the diagram), purl 20-22-24-26-26-28-30. ROW 3 (right side): Knit 20-22-24-26-26-28-30, work A.3. ROW 4 (wrong side): Work A.3, purl 20-22-24-26-26-28-30. Work ROWS 1 to 4 a total of 1-1-1-1-2-2-2 times (4-4-4-4-8-8-8 rows worked) = 26-28-30-32-33-35-37 stitches. Continue increasing for the neckline as follows: ROW 1 (right side): Knit 20-22-24-26-26-28-30, work A.3 until there are 3 stitches left, increase 1 stitch towards the right, knit 3 (the last 3 stitches in A.3). ROW 2 (wrong side): Work A.3, purl 20-22-24-26-26-28-30. Work ROWS 1 and 2 a total of 5 times (10 rows worked) = 31-33-35-37-38-40-42 stitches. At the end of the next row from the right side, cast on 26-26-26-26-28-28-28 stitches for the neckline = 57-59-61-63-66-68-70 stitches. The neckline increases are finished. The piece measures 9-10-11-12-12-14-15 cm = 3½"-4"-4⅜"-4¾"-4¾"-5½"-6" from the marker. 2-2-2-2-2-3-3 cm = ¾"-¾"-¾"-¾"-¾"-1⅛"-1⅛" of the neck-depth will lie on the back piece. Continue as follows with the first row from the wrong side: Work 7 stitches according to BANDS WITH I-CORD – read explanation above, continue A.3, work 20-22-24-26-26-28-30 stockinette stitches. Continue this pattern, repeating the last 4 rows in A.3 onwards. Remember the first BUTTONHOLE on the right band – read explanation above. Work until the front piece measures 11-12-12-13-13-15-16 cm = 4⅜"-4¾"-4¾"-5⅛"-5⅛"-6"-6¼" from the marker, finishing after a row from the wrong side. Cut the strand and place the stitches on a stitch holder. Work the left front piece. LEFT FRONT PIECE: Start from the right side by the neck on the left back shoulder and knit up 1 stitch in each row worked (knitting up inside the outermost stitch) as far as the armhole (24-26-28-30-30-32-34 stitches) then knit up 1 stitch in the outermost stitch on the shoulder (edge stitch) = 25-27-29-31-31-33-35 shoulder-stitches. Insert 1 marker by the neck. All measurements on the front piece are taken from this marker, measured in the knitting direction. Purl 1 row from the wrong side, then work pattern as follows: ROW 1 (right side): Work A.4, knit 20-22-24-26-26-28-30. ROW 2 (wrong side): Purl 20-22-24-26-26-28-30, work A.4. Repeat ROWS 1 and 2 until the front piece measures 5-6-7-8-6-8-9 cm = 2"-2⅜"-2¾"-3⅛"-2⅜"-3⅛"-3½" from the marker, finishing after a complete repeat of A.4 in height so the pattern continues correctly. Now increase for the neckline as follows: ROW 1 (right side): Work the first 3 stitches in A.5, increase 1 stitch towards the left - remember INCREASE TIP-1, finish the row in A.5, knit 20-22-24-26-26-28-30. ROW 2 (wrong side): Purl 20-22-24-26-26-28-30, work A.5. ROW 3 (right side): Work A.5, knit 20-22-24-26-26-28-30. ROW 4 (wrong side): Purl 20-22-24-26-26-28-30, work A.5 Work ROWS 1 to 4 a total of 1-1-1-1-2-2-2 times (4-4-4-4-8-8-8 rows worked) = 26-28-30-32-33-35-37 stitches. Continue increasing for the neckline as follows: ROW 1 (right side): Work the first 3 stitches in A.5, increase 1 stitch towards the left, finish the row in A.5, knit 20-22-24-26-26-28-30. ROW 2 (wrong side): Purl 20-22-24-26-26-28-30, work A.5. Work ROWS 1 and 2 a total of 5 times (10 rows worked) = 31-33-35-37-38-40-42 stitches. At the end of the last row from the wrong side, cast on 26-26-26-26-28-28-28 stitches for the neckline = 57-59-61-63-66-68-70 stitches. The neckline increases are finished. The piece measures 9-10-11-12-12-14-15 cm = 3½"-4"-4⅜"-4¾"-4¾"-5½"-6" from the marker. 2-2-2-2-2-3-3 cm = ¾"-¾"-¾"-¾"-¾"-1⅛"-1⅛" of the neck-depth will lie on the back piece. Continue as follows with the first row from the wrong side: Work 7 stitches according to bands with I-cord, continue A.5, work 20-22-24-26-26-28-30 stockinette stitches. Continue this pattern, repeating the last 4 rows in A.5 onwards. Work until the left front piece measures 11-12-12-13-13-15-16 cm = 4⅜"-4¾"-4¾"-5⅛"-5⅛"-6"-6¼" from the marker, finishing after a row from the wrong side. The front and back pieces are now joined and stitches are knitted up for the sleeves. YOKE: ROW 1 (right side): Start from the right side on the left front piece, work the band-stitches as before, continue A.5, then knit until there are 2 stitches left on the front piece, slip 1 stitch, knit 1 and pass the slipped stitch over (1 stitch decreased), insert 1 marker, knit up 28-32-32-34-34-40-42 stitches along the side of the left front piece (= sleeve-stitches, knitted up inside the outermost stitch), insert 1 marker, knit together the first 2 stitches on the back piece (1 stitch decreased), continue A.1 until there are 2 stitches left on the back piece, slip 1 stitch, knit 1 and pass the slipped stitch over (1 stitch decreased), insert 1 marker, knit up 28-32-32-34-34-40-42 stitches along the side of the right front piece (= sleeve-stitches, knitted up inside the outermost stitch), insert 1 marker, knit together the first 2 stitches on the right front piece (1 stitch decreased), knit until there are 37-37-37-37-40-40-40 stitches left, work A.3 and the band-stitches as before = 258-274-282-294-306-326-338 stitches. ROW 2 (wrong side): Continue the bands, pattern and stockinette stitch as far as the first marker, move the marker onto the right needle, increase 1 stitch towards the left, purl to the next marker, increase 1 stitch towards the right, move the marker onto the right needle, continue A.1 to the next marker, move the marker onto the right needle, increase 1 stitch towards the left, purl to the next marker, increase 1 stitch towards the right, move the marker onto the right needle, work stockinette stitch, pattern and the band as before = 262-278-286-298-310-330-342 stitches. ROW 3 (right side): Work as before to the first marker, move the marker onto the right needle, increase 1 stitch towards the left, knit to the next marker, increase 1 stitch towards the right, move the marker onto the right needle, work as before to the next marker, move the marker onto the right needle, increase 1 stitch towards the left, knit to the next marker, increase 1 stitch towards the right, move the marker onto the right needle, work to end of row as before = 266-282-290-302-314-334-346 stitches. ROW 4 (wrong side): Work as before to the first marker, move the marker onto the right needle, increase 1 stitch towards the left, purl to the next marker, increase 1 stitch towards the right, move the marker onto the right needle, work as before to the next marker, move the marker onto the right needle, increase 1 stitch towards the left, purl to the next marker, increase 1 stitch towards the right, move the marker onto the right needle, work to end of row as before = 270-286-294-306-318-338-350 stitches. ROW 5 (right side): Work as before to the first marker, move the marker onto the right needle, increase 1 stitch towards the left, knit to the next marker, increase 1 stitch towards the right, move the marker onto the right needle, work as before to the next marker, move the marker onto the right needle, increase 1 stitch towards the left, knit to the next marker, increase 1 stitch towards the right, move the marker onto the right needle, work to end of row as before = 274-290-298-310-322-342-354 stitches. ROW 6 (wrong side): Work as before without increasing. AFTER ROW 6: Work ROWS 5 and 6 a total of 7-5-4-5-7-3-1 times (14-10-8-10-14-6-2 rows worked). A total of 10-8-7-8-10-6-4 increases in height on the sleeves: 48-48-46-50-54-52-50 stitches on each sleeve, 56-58-60-62-65-67-69 stitches on each front piece and 90-94-98-102-108-112-116 stitches on the back piece = 298-306-310-326-346-350-354 stitches. Now increase on both the sleeves and the body, increasing 2 stitches inside the markers on the body so there are 2 stitches between increases on the sleeves and body as follows: ROW 1 (right side): Work as before until there are 2 stitches left on the front piece before the first marker, increase 1 stitch towards the right, knit 2, move the marker onto the right needle, increase 1 stitch towards the left, knit to the next marker, increase 1 stitch towards the right, move the marker onto the right needle, knit 2, increase 1 stitch towards the left, continue A.1 until there are 2 stitches left on the back piece before the next marker, increase 1 stitch towards the right, knit 2, move the marker onto the right needle, increase 1 stitch towards the left, knit to the next marker, increase 1 stitch towards the right, move the marker onto the right needle, knit 2, increase 1 stitch towards the left, work to end of row (= 8 increased stitches, 1 on each side of 2 stitches in each transition between body and sleeves). ROW 2 (wrong side): Work as before without increasing. Work ROWS 1 and 2 a total of 12-14-16-18-21-26-31 times (24-28-32-36-42-52-62 rows worked). Remember the increased stitches on the back piece are worked into A.1 and the 3 outermost stitches on each side of the back piece are always worked in stockinette stitch. After the last increase, you have worked 22-22-23-26-31-32-35 increases in height on the sleeves and 12-14-16-18-21-26-31 increases in height on th body: 72-76-78-86-96-104-112 stitches on each sleeve, 68-72-76-80-86-93-100 stitches on each front piece and 114-122-130-138-150-164-178 stitches on the back piece = 394-418-438-470-514-558-602 stitches. The sleeves measure approx. 12-12-13-14-17-18-20 cm = 4¾"-4¾"-5⅛"-5½"-6¾"-7"-8". When the jacket is folded double at the shoulder, the piece measures approx. 18-18-19-21-24-26-28 cm = 7"-7"-7½"-8¼"-9½"-10¼"-11" from outermost on the shoulder and down the armhole Continue working without further increases if the yoke is shorter than this. Now divide for the body and sleeves. DIVIDE FOR BODY AND SLEEVES: Work the first 68-72-76-80-86-93-100 stitches as before (= front piece), place the next 72-76-78-86-96-104-112 stitches on a stitch holder for the sleeve, cast on 6-8-10-12-14-16-18 stitches (mid-under the sleeve), work the next 114-122-130-138-150-164-178 stitches as before (= back piece), place the next 72-76-78-86-96-104-112 stitches on a stitch holder for the sleeve, cast on 6-8-10-12-14-16-18 stitches (mid-under the sleeve), work the last 68-72-76-80-86-93-100 stitches as before (= front piece). The body and sleeves are finished separately. BODY: = 262-282-302-322-350-382-414 stitches. Insert 1 marker-thread in the middle of the 6-8-10-12-14-16-18 cast-on stitches under each sleeve. Continue A.5 and A.3 on the front pieces, work A.1 on the back piece as far as it will go within the marker-threads (3-8-1-6-2-10-4 stockinette stitches before marker-thread on each side), stockinette stitch across the other stitches and the bands as before. Work until the piece measures 46-48-50-52-52-54-56 cm = 18"-19"-19¾"-20½"-20½"-21¼"-22" from the cast-on edge, mid-back. On the next row from the right side begin the rib, AT THE SAME TIME increase 36-40-44-48-50-54-58 stitches evenly on the row (do not increase across the bands), working as follows: Change to circular needle size 2.5 MM = US 1.5, work the band as before, then rib (knit 2, purl 1) – remember to increase and read INCREASE TIP-3, until there are 9 stitches left, knit 2 and the band as before = 298-322-346-370-400-436-472 stitches. When the rib measures 2-2-2-2-3-3-3 cm = ¾"-¾"-¾"-¾"-1⅛"-1⅛"-1⅛", bind off slightly loosely with knit above knit and purl above purl. The jacket measures approx. 48-50-52-54-55-57-59 cm = 19"-19¾"-20½"-21¼"-21⅝"-22½"-23¼" from mid-back and 50-52-54-56-58-60-62 cm = 19¾"-20½"-21¼"-22"-22¾"-23⅝"-24⅜" from the shoulder. SLEEVES: Place the 72-76-78-86-96-104-1126-58-62 sleeve-stitches from one stitch holder onto circular needle size 3 MM = US 2.5 and knit up 1 stitch in each of the 6-8-10-12-14-16-18 stitches cast on under the sleeve – read SLEEVE TIP = 78-84-88-98-110-120-130 stitches. Insert a marker-thread in the middle of the 6-8-10-12-14-16-18 stitches under the sleeve. The round starts by the marker-thread. Work stockinette stitch in the round. AT THE SAME TIME, after 1 round, decrease mid-under the sleeve – read DECREASE TIP as follows: Decrease 2 stitches 2 times every 2 cm = ¾", then 2 stitches 1 time = 72-78-82-92-104-114-124 stitches. Continue working until the sleeve measures 15-15-14-14-9-9-7 cm = 6"-6"-5½"-5½"-3½"-3½"-2¾" from the division. Change to double pointed needles size 2.5 MM = US 1.5. Work rib (knit 2, purl 1), AT THE SAME TIME increase 12-12-14-16-16-18-20 stitches evenly on the first round = 84-90-96-108-120-132-144 stitches. When the rib measures 2-2-2-2-3-3-3 cm = ¾"-¾"-¾"-¾"-1⅛"-1⅛"-1⅛", bind off slightly loosely with rib. The sleeve measures approx. 29-29-29-30-29-30-30 cm = 11⅜"-11⅜"-11⅜"-11¾"-11⅜"-11¾"-11¾" from the shoulder. NECK: Using circular needle size 2.5 MM = US 1.5, start from the right side, mid-front and knit up 130-133-136-139-148-154-157 stitches along the neckline (making sure you knit up 1 stitch in each band-stitch). Purl 1 row, adjusting the stitch count if necessary (it should be divisible by 2 + 1 + band-stitches). Work the first row as follows from the right side: The band as before, rib (knit 2, purl 1) until there are 9 stitches left, knit 2 and the band as before. When the rib measures 2-2-2½-2½-3-3-3 cm = ¾"-¾"-1"-1"-1⅛"-1⅛"-1⅛", bind off slightly loosely with knit above knit and purl above purl. ASSEMBLY: Sew the buttons onto the left band. |
|||||||||||||||||||||||||
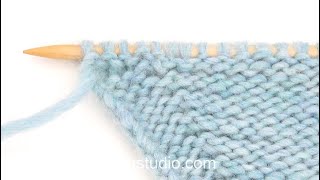
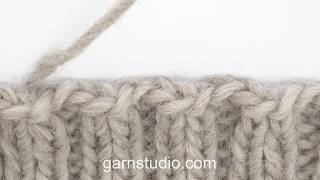
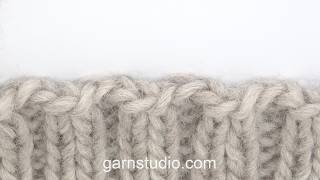
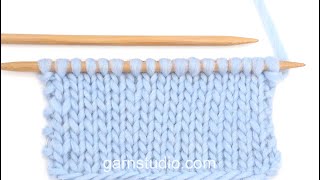
Diagram explanations |
|||||||||||||||||||||||||
|
|||||||||||||||||||||||||
 |
|||||||||||||||||||||||||
 |
|||||||||||||||||||||||||
 |
|||||||||||||||||||||||||
 |
|||||||||||||||||||||||||
 |
|||||||||||||||||||||||||
 |
|||||||||||||||||||||||||
 |
|||||||||||||||||||||||||
Have you finished this pattern?Tag your pictures with #dropspattern #bloominglacecardigan or submit them to the #dropsfan gallery. Do you need help with this pattern?You'll find 50 tutorial videos, a Comments/Questions area and more by visiting the pattern on garnstudio.com. © 1982-2026 DROPS Design A/S. We reserve all rights. This document, including all its sub-sections, has copyrights. Read more about what you can do with our patterns at the bottom of each pattern on our site. |
|||||||||||||||||||||||||


With over 40 years in knitting and crochet design, DROPS Design offers one of the most extensive collections of free patterns on the internet - translated to 17 languages. As of today we count 325 catalogs and 12298 patterns - 12288 of which are translated into English (US/in).
We work hard to bring you the best knitting and crochet have to offer, inspiration and advice as well as great quality yarns at incredible prices! Would you like to use our patterns for other than personal use? You can read what you are allowed to do in the Copyright text at the bottom of all our patterns. Happy crafting!
Post a comment to pattern DROPS 267-23
We would love to hear what you have to say about this pattern!
If you want to leave a question, please make sure you select the correct category in the form below, to speed up the answering process. Required fields are marked *.