
Popular categories
Looking for a yarn?


Comments / Questions (16)
![]() Yu Lan wrote:
Yu Lan wrote:
Where is the written instructions for the pattern ?
19.05.2026 - 18:33DROPS Design answered:
Hi Yu Lan, The instructions for working this garment are after Points 1 - 5, and begin with "Back Piece", about half way down the pattern. Regards, Drops Team
20.05.2026 - 06:38
![]() Jennifer wrote:
Jennifer wrote:
Bonjour, pour les augmentations en fin de rang au niveau de l'épaule (droite pour commencer) est-ce comme habituellement 3 mailles avant la fin de rang ou est ce que j'ajoute vraiment une maille à la fin? Cela fait un petit trou. Et qu'en est-il après quand je dois en ajouter 2 en fin de rang? Ceci n'est pas dans la vidéo. Merci beaucoup pour ce beau modèle et explications.
30.04.2026 - 07:49DROPS Design answered:
Bonjour Jennifer, les augmentations de l'encolure se font en fin de rang sur l'endroit pour l'épaule droite en montant les mailles en fin de rang, pas à 3 m du bord comme dans d'autres modèles (ou dans la vidéo qui ne monte que la technique standard, en fonction des modèles, on va parfois faire autrement comme c'est le cas ici). Pour l'épaule gauche, vous monterez ces mailles en fin de rang sur l'envers (côté encolure). Bon tricot!
30.04.2026 - 09:33
![]() Martine wrote:
Martine wrote:
Bonjour, Plutôt que de suivre le motif pour la partie du dos, si je le tricote en jersey est-ce que ça changera la largeur totale du chandail ?
03.04.2026 - 17:42DROPS Design answered:
Bonjour Martine, oui car il faut davantage de mailles pour les torsades que pour du jersey, il vaut mieux rester sur le motif identique dos, devant et manches ici, ou alors vous devriez tout recalculer. Bon tricot!
08.04.2026 - 07:50
![]() Gitte Jacobsen wrote:
Gitte Jacobsen wrote:
Jeg forstår ikke hvordan jeg skal starte på A4 og A5, der er ingen pil hvor starten er ?
22.03.2026 - 21:46DROPS Design answered:
Hej Gitte, du starter nederst i diagrammet, med 1 omslag og 1 maske ifølge A.4 og med 1 maske og 1 omslag ifølge A.5. På næste omgang består diagrammerne af 2 masker osv :)
08.04.2026 - 10:55
![]() Helena Gyllenberg wrote:
Helena Gyllenberg wrote:
Jag får inte beskrivningen av OK att stämma. Skall jag öka på vartannat varv både på ärmar och bak- och framstycket?
17.03.2026 - 12:44DROPS Design answered:
Hej, först ökar du en gång endast för ärmarna enligt beskrivningen, sedan ökas det både på ärmarna och framstycket/bakstycket enligt diagram A.4 och A.5. Alla ökningar görs på vartannat varv.
17.03.2026 - 18:11
![]() Susi wrote:
Susi wrote:
Passe: Beim Einrichten des Musters für die Ärmel: Wann fange ich denn mit der ersten Verzopfung an ? Direkt beim Einrichten geht es doch nicht. Soll ich also erst starten, wenn im Rücken die neue Verzopfung kommt? Oder wird das Ärmelmuster unabhängig vom Rumpf verzopft?
17.03.2026 - 09:55DROPS Design answered:
Liebe Susi, bei der 1. Runde der Passe stricken Sie die Maschen von den Ärmeln wie beschrieben: (6 re, 1 li, 4 re, 1 li), von (bis) wiederholen, dh diese 12 Maschen insgesamt 3 Mal stricken und mit 6 re enden (so hat man 12x3 + 6 = 42 Maschen). Die Zöpfe sollen gleichzeitig an den Ärmeln sowie beim Vorder- und Rückenteil gestrickt werden. Viel Spaß beim Stricken!
17.03.2026 - 16:04
![]() Susi wrote:
Susi wrote:
Außerdem wird bei den beiden Vorderteile die Randmaschen nicht mehr kraus rechts, sondern glatt rechts gestrickt. Ist das korrekt?
15.03.2026 - 11:11
![]() Susi wrote:
Susi wrote:
Außerdem wird bei den beiden Vorderteile die Randmaschen nicht mehr kraus rechts, sondern glatt rechts gestrickt. Ist das korrekt?
15.03.2026 - 11:10DROPS Design answered:
Liebe Susi, ja genau, die Randmaschen bei den beiden Vorderteile werden glattrechts gestrickt. Viel Spaß beim Stricken!
16.03.2026 - 10:14
![]() Susi wrote:
Susi wrote:
Rechte Schulter: Es heißt: " 2. REIHE (= Hin-Reihe): 1 Rand-Masche rechts, 2 Maschen rechts, 1 Masche links, A.2 bis Reihenende. " Wenn ich in Größe L mit dem Zopf beginne, habe ich am Ende nur 5 Maschen rechts. Wie kann ich da zopfen? Oder werden die letzten 5 Maschen ohne Zopf komplett rechts gestrickt?
15.03.2026 - 10:58DROPS Design answered:
Liebe Susi, die Zöpfe stricken Sie nur in den (6 Maschen rechts) Berech der vorigen Reihen. Solange Sie keine 6 Maschen rechts haben, dann stricken Sie die Zöpfe nicht. Viel Spaß beim Stricken!
16.03.2026 - 10:10
![]() Claudia wrote:
Claudia wrote:
Liebes Team, Bin gerade beim Beginn der rechten Schulter, Beginne ich mit dem Muster A2 wieder beim Pfeil=1.Reihe? Logisch wäre für mich Reihe 7, Denkfehler? VG Claudia
13.03.2026 - 01:49DROPS Design answered:
Liebe Claudia, in die 4 ersten Größe beginnt A.2 mit der 1. Reihe, dh mit einem Zopf. Viel Spaß beim Stricken!
13.03.2026 - 07:40
|
|||||||||||||||||||
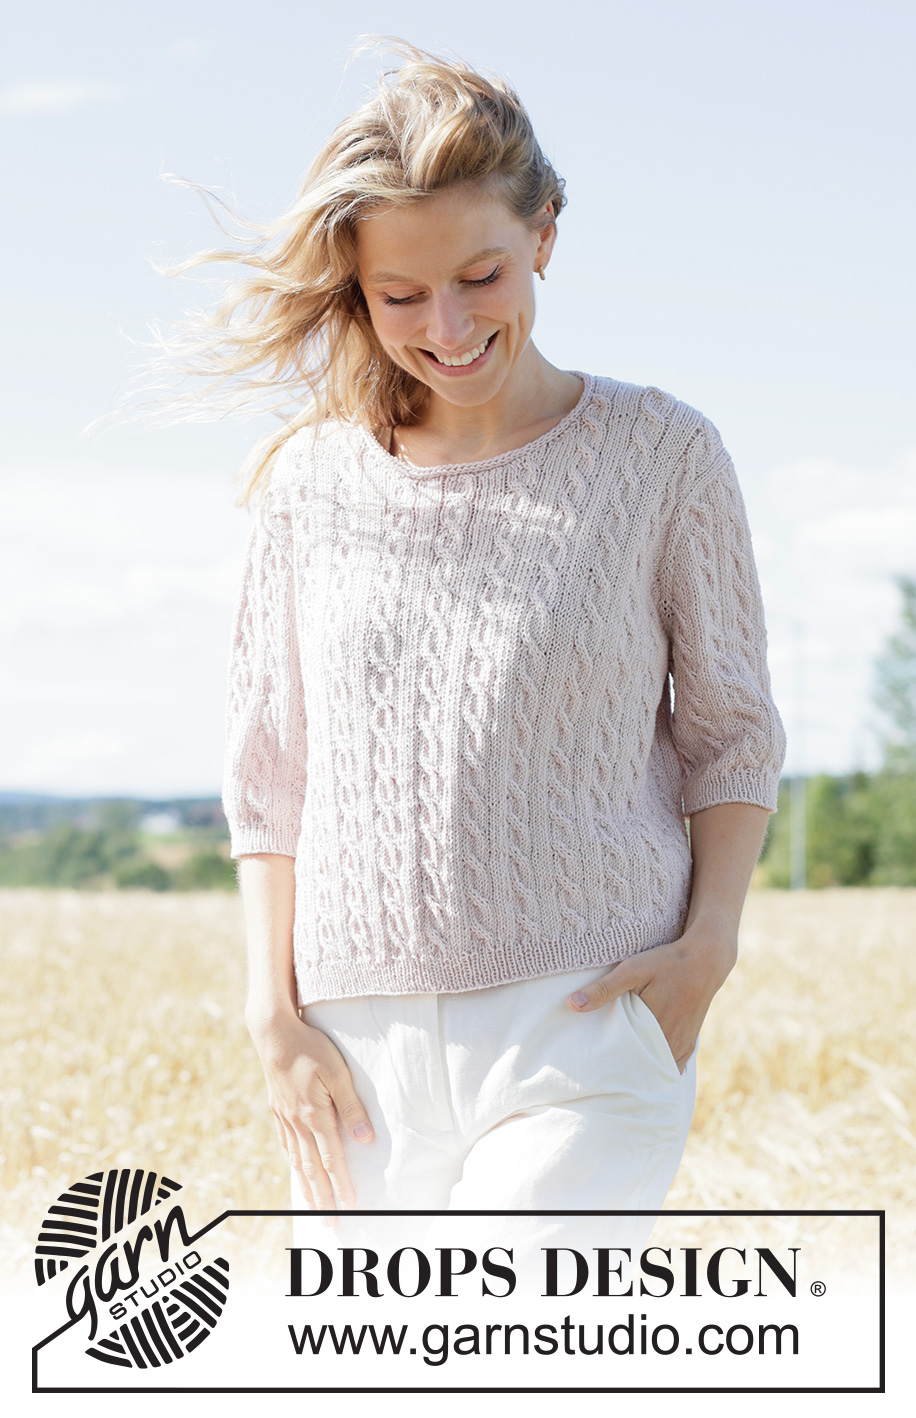
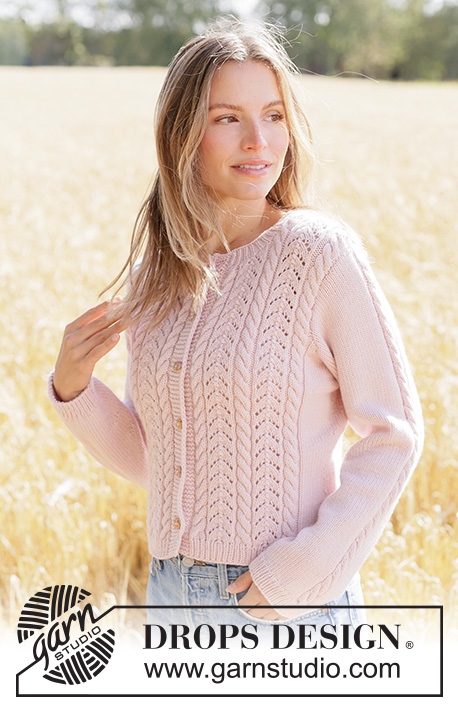
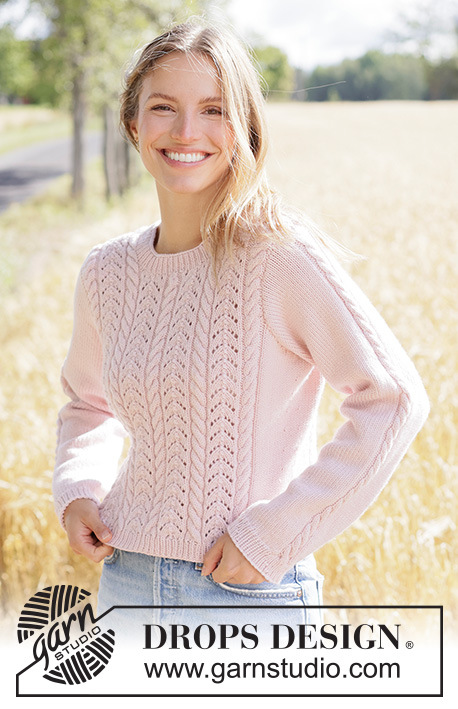
Country Vine Sweater#countryvinesweater |
|||||||||||||||||||
 |
 |
||||||||||||||||||
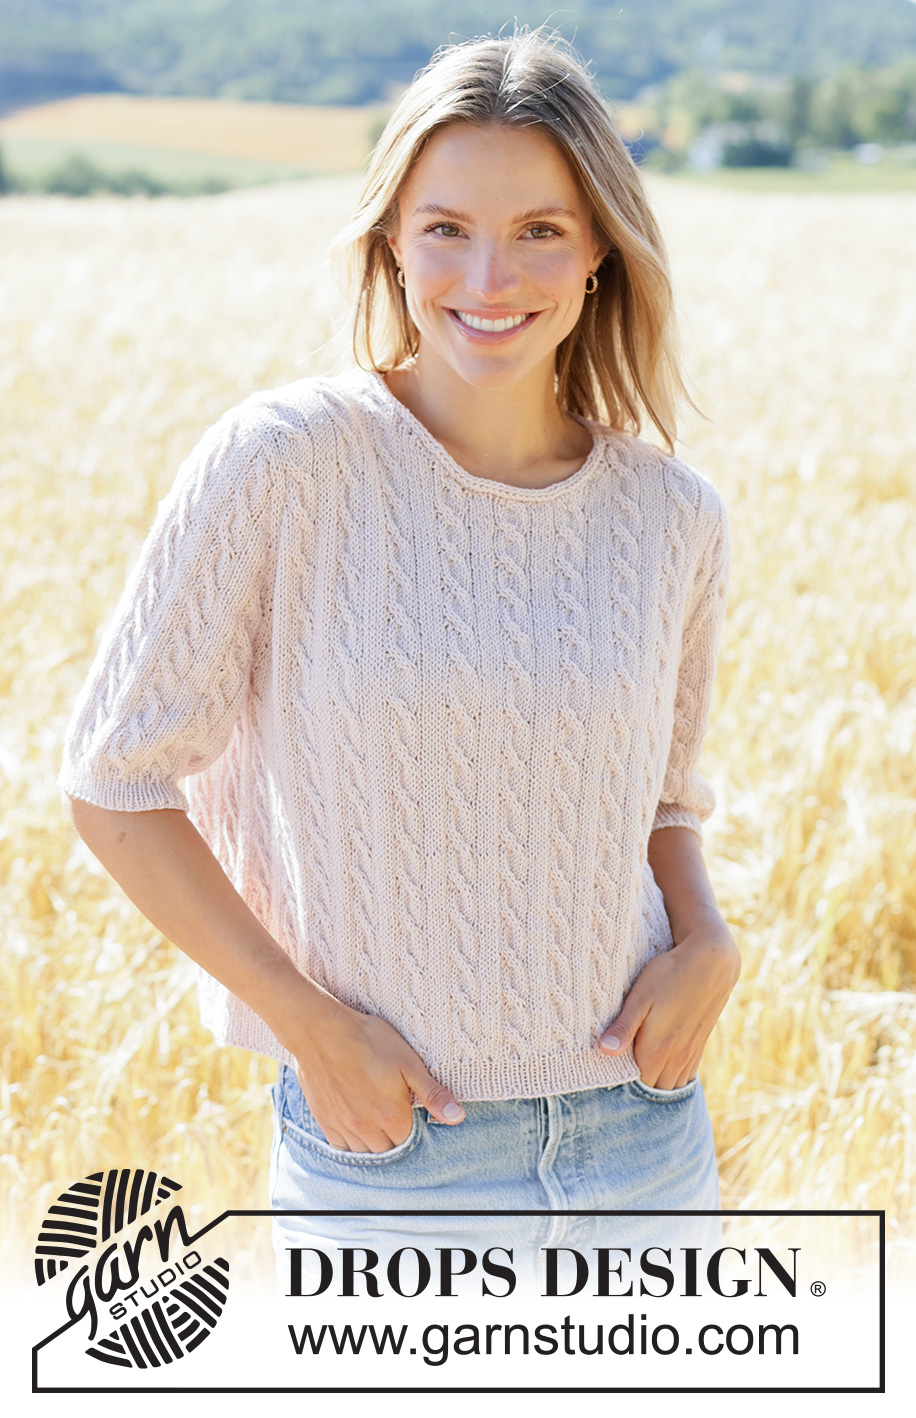
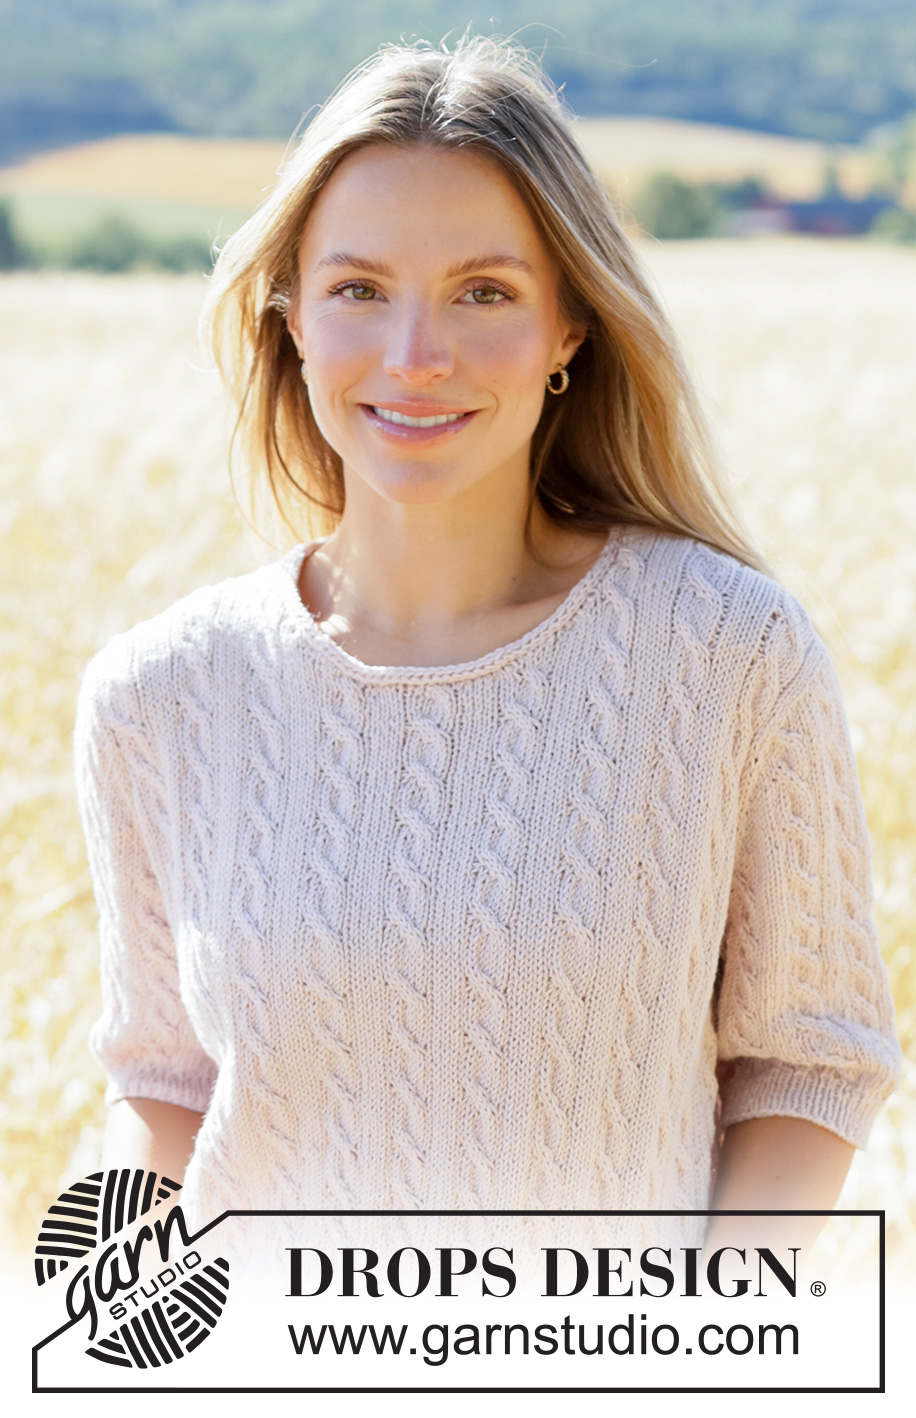
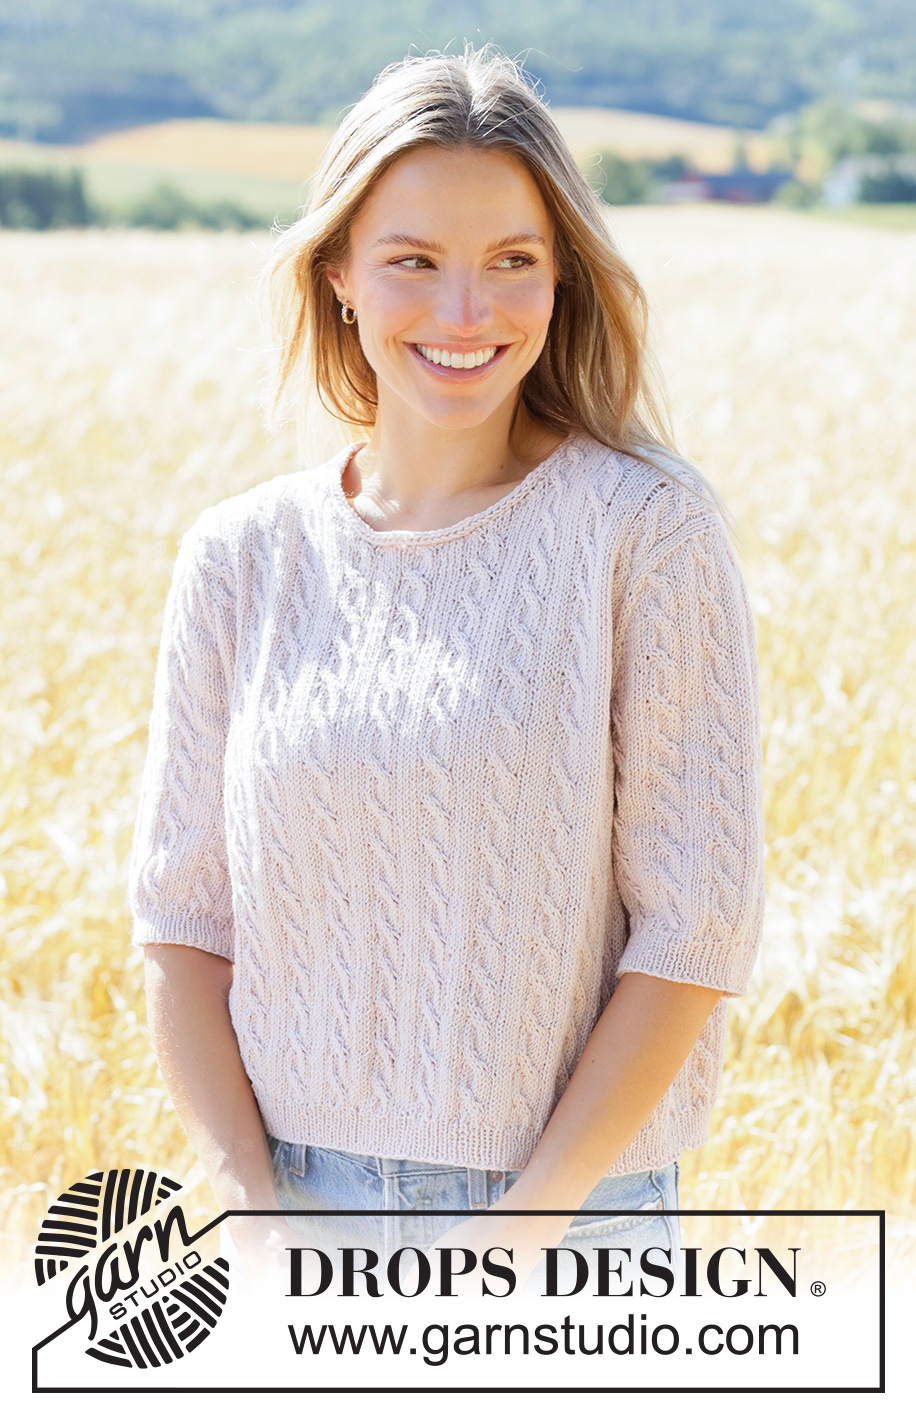
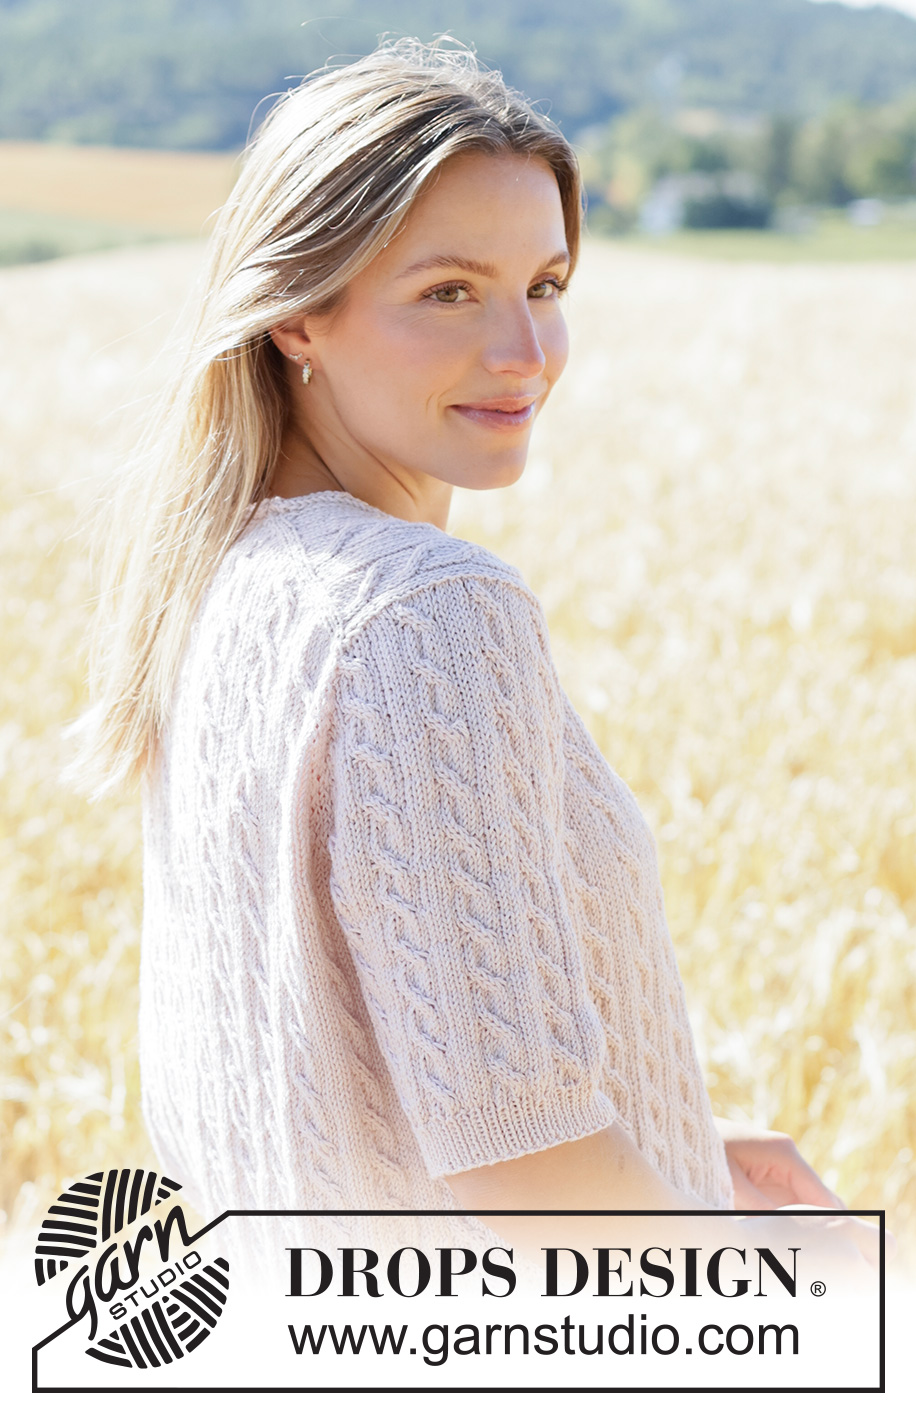
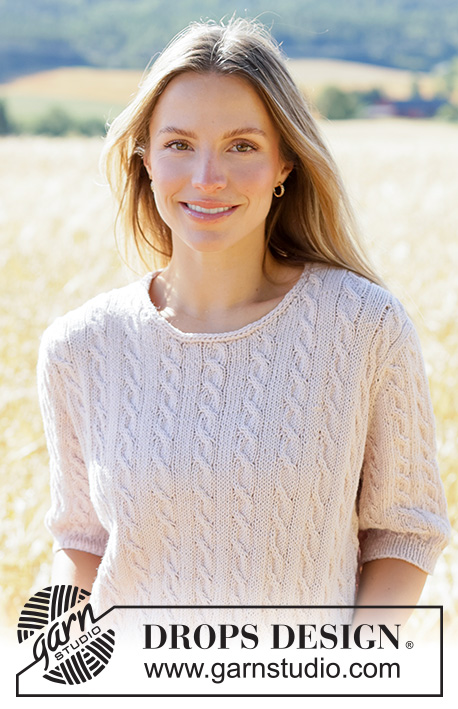
Knitted sweater in DROPS Cotton Merino or DROPS Belle. The piece is worked top down with European yoke, short sleeves, cables and I-cord. Sizes XS - XXXL.
DROPS 267-4 |
|||||||||||||||||||
|
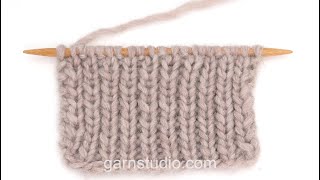
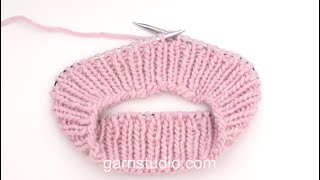
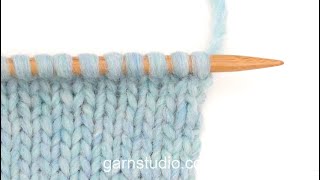
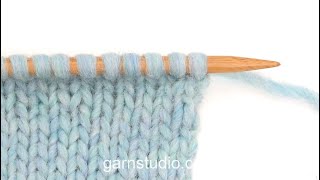
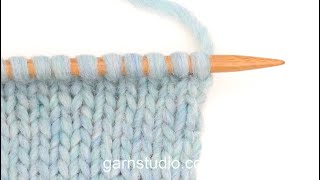
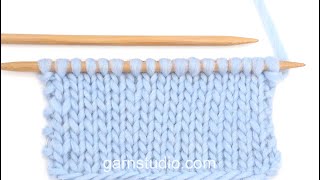
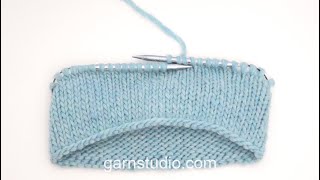
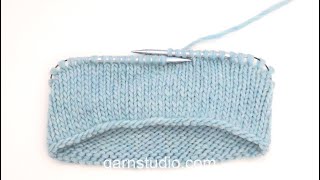
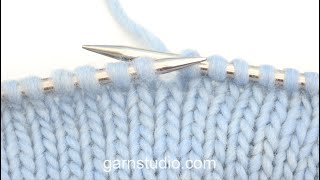
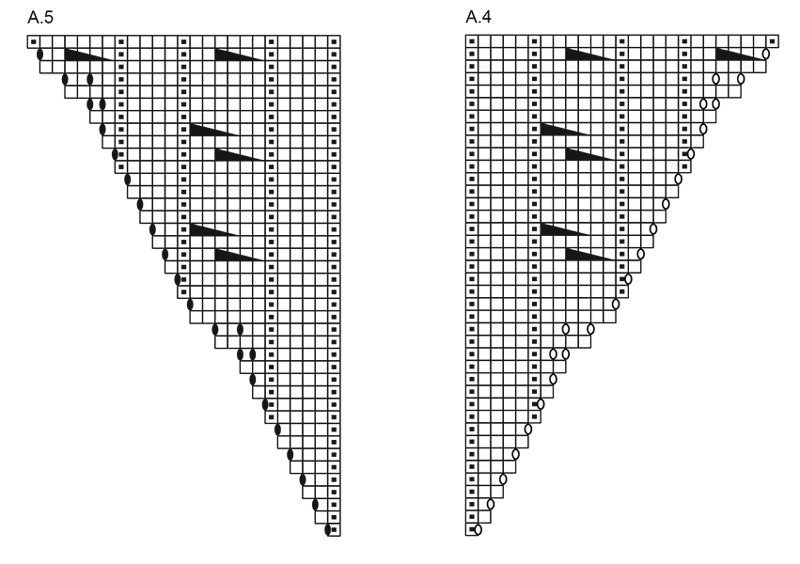
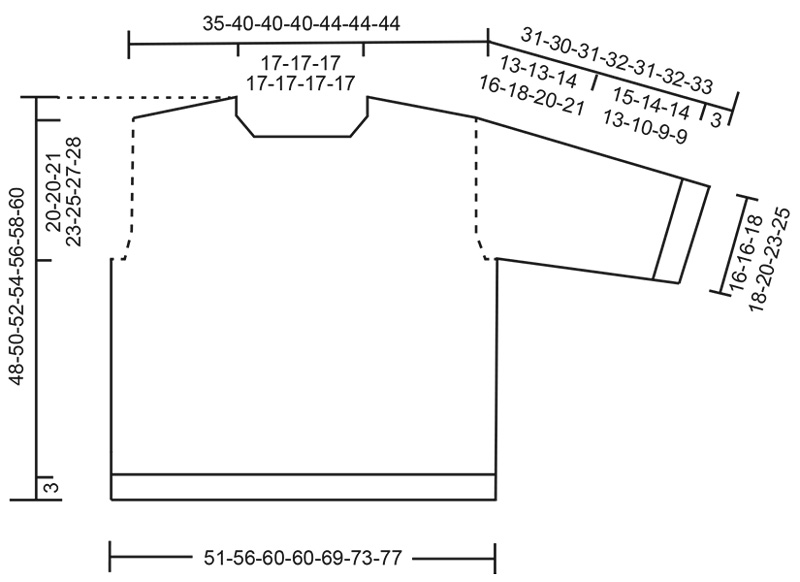
------------------------------------------------------- EXPLANATIONS FOR THE PATTERN: ------------------------------------------------------- PATTERN: See diagrams A.1 to A.5. Start at the arrow for your size (applies to A.1, A.2 and A.3). If there are not enough stitches to cable, work the stitches in stockinette stitch. The diagrams show the pattern from the right side. INCREASE TIP-1: INCREASE 1 STITCH TOWARDS LEFT – from RIGHT SIDE: Use the left needle to pick up the strand between 2 stitches from the row below, pick up the strand from the front and knit through the stitch-loop that lies on the back of the needle. INCREASE 1 STITCH TOWARDS THE RIGHT- from RIGHT SIDE: Use the left needle to pick up the strand between 2 stitches from the row below, pick up the strand from the back and knit through the stitch-loop that lies on the front of the needle. Work the new stitches into the pattern. INCREASE TIP-2: INCREASE 1 STITCH TOWARDS THE RIGHT- from WRONG SIDE: Use the left needle to pick up the strand between 2 stitches from the row below, pick up the strand from the back and purl through the stitch-loop that lies on the front of the needle. INCREASE 1 STITCH TOWARDS LEFT – from WRONG SIDE: Use the left needle to pick up the strand between 2 stitches from the row below, pick up the strand from the front and purl through the stitch-loop that lies on the back of the needle. SLEEVE TIP: When knitting up stitches under the sleeve, you can get a small hole in the transition between stitches on the body and sleeve. This hole can be closed by picking up the strand between 2 stitches and working this strand twisted together with the first stitch between body and sleeve. I-CORD BIND OFF: At the end of the round, after the last stitch is worked: Cast on 3 stitches onto the right needle, from the right side. Slip these 3 stitches onto the left needle, so the strand is 3 stitches in on the needle (the strand tightens when working to form a small tube). ROW 1 (right side): Knit 2, knit 2 twisted together. Slip the 3 stitches from the right needle onto the left needle. Do not turn. Repeat ROW 1 until there are 3 stitches left on the right needle. Slip these 3 stitches onto the left needle. Bind off. Sew a small stitch, joining the beginning and end of the I-cord. ------------------------------------------------------- START THE PIECE HERE: ------------------------------------------------------- SWEATER – SHORT OVERVIEW OF THE PIECE. The pattern uses both long and short needles; start with the length which fits the number of stitches and change when necessary. If there is a «0» in your chosen size, skip the information and go straight to the next instruction. Work according to points 1 – 5. 1. BACK PIECE: Cast on stitches for the back of the neck. Work the back piece back and forth, top down, increasing stitches on each side until the shoulder stitch-count has been achieved. The back piece has slightly diagonal shoulders. 2. FRONT PIECE: Worked in 2 sections (each side of neck). Start by knitting up stitches along one back shoulder, working downwards and increasing for the neckline. Repeat on the other shoulder. Then increase stitches for the neckline, joining the 2 front pieces and continuing back and forth to the correct length. 3. YOKE: Place all the stitches on the same circular needle, work first the front piece, knit up stitches for one sleeve along the side of the front piece, work the back piece, knit up stitches for the second sleeve along the other side of the front piece. The yoke is continued in the round. 4. INCREASE FOR BODY AND SLEEVES: While continuing the yoke, stitches are increased, first for the sleeves and later for both the body and sleeves. 5. BODY AND SLEEVES: When the increases and the yoke are finished, the yoke is divided for the body and sleeves. The body is finished in the round while the sleeves wait. Then the sleeves are worked in the round, top down. Stitches are knitted up around the neckline and the neck is bind off with I-cord. BACK PIECE: The piece is worked back and forth. Cast on 38-37-37-37-38-38-38 stitches with circular needle size 4 MM = US 6 and DROPS Cotton Merino or DROPS Belle. Purl 1 row from the wrong side, increasing 12-9-9-9-12-12-12 stitches evenly spaced = 50-46-46-46-50-50-50 stitches. Now increase on each side of each row as follows (inside 1 edge stitch and 2 stockinette stitches) as shown in the diagram. The new stitches are worked into the pattern. NOTE! Start by the arrow for your size in row 1; applies to A.1 (= 4-8-8-8-4-4-4 stitches), A.2 (= 12 stitches) and A.3 (= 3-7-7-7-3-3-3 stitches): ROW 1 (right side): Read INCREASE TIP-1. Work A.1, then A.2 across the next 43-31-31-31-43-43-43 stitches (i.e., 3-2-2-2-3-3-3 repeats of A.2, then work the first 7 stitches in A.2), work A.3 (2 increased stitches). ROW 2 (wrong side): Read INCREASE TIP-2. Work A.3, knit above knit and purl above purl across the next 43-31-31-31-43-43-43 stitches, work A.1 (2 increased stitches). Work ROWS 1 and 2 a total of 12-16-16-16-18-18-18 times (24-32-32-32-36-36-36 rows worked and 48-64-64-64-72-72-72 increased stitches). After the last increase there are 64-66-66-70-72-76-80 stitches. A.2 has been worked 3-4-4-4-4½-4½-4½ times in height = 98-110-110-110-122-122-122 stitches. The pattern is now established on the back piece. Remember to maintain the knitting gauge. There are 2 stockinette stitches and 1 edge stitch outermost on each side. Cut the strand and place the stitches on a stitch holder. The whole sweater is worked in rib (knit 4, purl 1, knit 6, purl 1 from the right side). Cables are worked in each section of 6 knitted stitches. RIGHT SHOULDER: Find the right back shoulder as follows: Lay the back piece flat, right side up, with the stitch holder towards you; right-hand side of piece = right shoulder. Start from the right side by the armhole on the right back shoulder and knit up 1 stitch outermost on the shoulder (edge stitch), then 1 stitch in each row worked, inside the outermost stitch as far as the neck (24-32-32-32-36-36-36 stitches) = 25-33-33-33-37-37-37 shoulder-stitches. Insert 1 marker by the neck. All measurements on the front piece are taken from this marker, measured in the knitting direction. Work as follows: ROW 1 (wrong side): Purl 2-0-0-0-2-2-2, knit 1-0-0-0-1-1-1, purl 6-5-5-5-6-6-6, knit 1, continue the rib (purl 4, knit 1, purl 6, knit 1) until there are 3 stitches left, purl 2, and purl 1 (= edge stitch). The pattern mirrors the back piece. ROW 2 (right side): Knit 1 (edge stitch), knit 2, purl 1, work A.2 to end of row. ROW 3 (wrong side): Knit above knit and purl above purl. Work ROWS 2 and 3 until the piece measures 5-5-6-6-7-7-8 cm = 2"-2"-2⅜"-2⅜"-2¾"-2¾"-3⅛", with the last row from the wrong side. Note down the last row worked in A.2, so the increases for the neckline on the left front piece start on the same row. Continue ROWS 2 and 3, AT THE SAME TIME cast on for the neckline at the end of each row from the right side as follows: 1 stitch 4 times, then 2 stitches 4 times (16 rows worked). The increased stitches are worked into A.2 = 37-45-45-45-49-49-49 stitches. When all the increases are finished, work the last row from the right side without increasing. The piece measures approx. 11-11-12-12-13-13-14 cm = 4⅜"-4⅜"-4¾"-4¾"-5⅛"-5⅛"-5½" from the marker. Approx. 2-1-1-1-1-1-1 cm = ¾"-⅜"-⅜"-⅜"-⅜"-⅜"-⅜" of the neckline-depth will lie on the back piece. Cut the strand and place the stitches on a stitch holder. Work the left front shoulder along the left back shoulder. LEFT SHOULDER: Start from the right side by the neck on the left back shoulder and knit up 1 stitch in each row worked, inside the outermost stitch as far as the armhole (24-32-32-32-36-36-36 stitches), then knit up 1 stitch outermost on the shoulder (edge stitch) = 25-33-33-33-37-37-37 shoulder-stitches. Insert 1 marker by the neck. All measurements on the front piece are taken from this marker, measured in the knitting direction. Work as follows: ROW 1 (wrong side): Purl 1 (edge stitch), purl 2, work rib (knit 1, purl 6, knit 1, purl 4) to end of row (finishing with purl 2-5-5-5-2-2-2). The pattern mirrors the back piece. ROW 2 (right side): Work A.2 until there are 3 stitches left on the row (NB: the diagram A.2 doesn't start with the first stitch in diagram, adjust so that it continues the established pattern), knit 2 and knit 1 (edge stitch). ROW 3 (wrong side): Knit above knit and purl above purl. Work ROWS 2 and 3 until the piece measures 5-5-6-6-7-7-8 cm = 2"-2"-2⅜"-2⅜"-2¾"-2¾"-3⅛" with the last row from the wrong side, matching the right shoulder, before increasing for the neckline. Continue ROWS 2 and 3, AT THE SAME TIME cast on for the neckline at the end of each row from the wrong side as follows: 1 stitch 4 times, then 2 stitches 4 times (16 rows worked). The increased stitches are worked into A.2, counting from the shoulder so the pattern continues as before = 37-45-45-45-49-49-49 stitches. When all the increases are finished, work the last row from the right side. Make sure the cables are the same length on each shoulder. The shoulders are now joined for the front piece and all the cables are continued on the same row. Do not cut the strand. FRONT PIECE: On the next row (wrong side) join the shoulders: Knit above knit and purl above purl across all stitches on the left shoulder (37-45-45-45-49-49-49 stitches), cast on 24-20-20-20-24-24-24 stitches, knit above knit and purl above purl across all stitches on the right shoulder (37-45-45-45-49-49-49 stitches) = 98-110-110-110-122-122-122 stitches. Continue the pattern. NOTE: Do not cable across the cast-on stitches on the first row but thereafter work the cables in A.2 on the same row across the whole front piece: ROW 1 (right side): Knit 1 (edge stitch), knit 2, purl 1, work A.2 until there are 3 stitches left (finishing with the first 7 stitches in A.2), knit 2 and knit 1 (edge stitch). ROW 2 (wrong side): Knit above knit and purl above purl. Continue the pattern back and forth until the piece measures 14 cm = 5½" from the marker, with the last row worked being the last row in A.2. Cut the strand and place the stitches on a stitch holder. The front and back pieces are now joined and stitches are knitted up for the sleeves. The pattern on the sleeves will not fit into the pattern on the front and back pieces. When the body is worked in the round later, the pattern will fit on the round. YOKE: Start from the right side: Knit together the first 2 stitches on the back piece (edge stitch decreased), continue A.2 until there are 2 stitches left on the back piece, slip 1 stitch knit-wise, knit 1 and pass the slipped stitch over the knitted stitch (edge stitch decreased), insert 1 marker, knit up 42 stitches along the right front piece (= sleeve-stitches, knitted up inside 1 edge stitch), insert 1 marker, knit the first 2 stitches on the front piece together (edge stitch decreased), continue A.2 until there are 2 stitches left on the front piece, slip 1 stitch knit-wise, knit 1 and pass the slipped stitch over the knitted stitch (edge stitch decreased), insert 1 marker, knit up 42 stitches along the left front piece (= sleeve-stitches, knitted up inside 1 edge stitch), insert 1 marker = 276-300-300-300-324-324-324 stitches. The round begins between the left sleeve and the back piece. When the yoke is continued in the round, cables are worked on the same round on both the sleeves and body. On the first round, pattern is established on the sleeves and continued on the body. Increases are begun on the sleeves: ROUND 1: Continue the pattern across the back piece, move the marker onto the right needle, increase 1 stitch towards the left, work rib across the sleeve (knit 6, purl 1, knit 4, purl 1) until there are 6 stitches left before the next marker, knit 6, increase 1 stitch towards the right (= 44 sleeve-stitches), move the marker onto the right needle, continue the pattern across the front piece, move the marker onto the right needle, increase 1 stitch towards the left, work rib across the sleeve (knit 6, purl 1, knit 4, purl 1) until there are 6 stitches left before the next marker, knit 6, increase 1 stitch towards the right (= 44 sleeve-stitches), move the marker onto the right needle = 280-304-304-304-328-328-328 stitches. Now increase on both the body and sleeves as shown in the diagram, increasing on each side of 2 knitted stitches as follows: * Knit 2, work A.4, continue A.2 across the next 90-102-102-102-114-114-114 stitches, work A.5, knit 2, move the marker onto the right needle, work A.4, continue A.2 across the next 42 stitches, work A.5 (= sleeve-stitches), move the marker onto the right needle, * work from *-* 1 more time. Work this pattern for 36-36-40-44-50-56-60 rounds. In sizes L, XL XXL and XXXL, when A.4 and A.5 are completed in height, continue increasing for the pattern according to the same diagram (168-168-192-208-232-264-288 increased stitches) = 448-472-496-512-560-592-616 stitches: 86-86-92-96-102-110-116 stitches on each sleeve and 138-150-156-160-178-186-192 stitches on the front and back pieces. The sleeve measures approx. 13-13-14-16-18-20-21 cm = 5⅛"-5⅛"-5½"-6¼"-7"-8"-8¼". When the sweater is folded double at the shoulder, the piece measures approx. 20-20-21-23-25-27-28 cm = 8"-8"-8¼"-9"-9¾"-10⅝"-11" from outermost on the shoulder and down the armhole. If the piece is shorter than this, continue working to the correct length without further increases. Now divide for the body and sleeves. DIVIDE FOR BODY AND SLEEVES: Work 138-150-156-160-178-186-192 stitches as before (= back piece), place the next 86-86-92-96-102-110-116 stitches on a stitch holder for the sleeve, cast on 6-6-12-8-14-18-24 stitches (mid-under the sleeve), work the next 138-150-156-160-178-186-192 stitches as before (= front piece), place the next 86-86-92-96-102-110-116 stitches on a stitch holder for the sleeve, cast on 6-6-12-8-14-18-24 stitches (mid-under the sleeve). The body and sleeves are finished separately. BODY: = 288-312-336-336-384-408-432 stitches. Continue A.2 on the round until the piece measures 43-46-48-50-52-54-56 cm = 17"-18"-19"-19¾"-20½"-21¼"-22" from the cast-on edge mid-back. The cast-on stitches under each sleeve will fit into the pattern (= 24-26-28-28-32-34-36 repeats). Change to circular needle size 3 MM = US 2.5. Work rib (knit 1, purl 1), AT THE SAME TIME decrease 30-28-32-32-34-38-42 stitches evenly on the first round = 258-284-304-304-350-370-390 stitches. When the rib measures 3 cm = 1⅛", bind off with rib. The sweater measures approx. 46-49-51-53-55-57-59 cm = 18"-19¼"-20"-21"-21⅝"-22½"-23¼" from mid-back and 48-50-52-54-56-58-60 cm = 19"-19¾"-20½"-21¼"-22"-22¾"-23⅝" from the shoulder. SLEEVES: Place the 86-86-92-96-102-110-116 sleeve-stitches from one stitch holder onto circular needle size 4 MM = US 6 and knit up 1 stitch in each of the 6-6-12-8-14-18-24 cast-on stitches under the sleeve – read SLEEVE TIP = 92-92-104-104-116-128-140 stitches. Insert a marker-thread in the middle of the 6-6-12-8-14-18-24 new stitches under the sleeve. The round starts by the marker-thread. Continue the established pattern in the round. The new stitches under the sleeve are knitted. Continue working until the sleeve measures 15-14-14-13-10-9-9 cm = 6"-5½"-5½"-5⅛"-4"-3½"-3½" from the division (approx. 28-27-28-29-28-29-30 cm = 11"-10⅝"-11"-11⅜"-11"-11⅜"-11¾" from the knitted-up row. Change to double pointed needles size 3 MM = US 2.5. Work rib (knit 1, purl 1), AT THE SAME TIME decrease 12-12-12-12-14-12-14 stitches evenly on the first round = 80-80-92-92-102-116-126 stitches. When the rib measures 3 cm = 1⅛", bind off with rib. The sleeve measures approx. 18-17-17-16-13-12-12 cm = 7"-6¾"-6¾"-6¼"-5⅛"-4¾"-4¾" from the division and 31-30-31-32-31-32-33 cm = 12¼"-11¾"-12¼"-12½"-12¼"-12½"-13" from the knitted-up row. NECK: Use circular needle size 3 MM = US 2.5. Start on one shoulder-line from the right side and knit up 98-98-102-102-104-104-106 stitches. Knit 1 round. Work I-CORD BIND-OFF – read explanation above. |
|||||||||||||||||||
Diagram explanations |
|||||||||||||||||||
|
|||||||||||||||||||
 |
|||||||||||||||||||
 |
|||||||||||||||||||
 |
|||||||||||||||||||
Have you finished this pattern?Tag your pictures with #dropspattern #countryvinesweater or submit them to the #dropsfan gallery. Do you need help with this pattern?You'll find 48 tutorial videos, a Comments/Questions area and more by visiting the pattern on garnstudio.com. © 1982-2026 DROPS Design A/S. We reserve all rights. This document, including all its sub-sections, has copyrights. Read more about what you can do with our patterns at the bottom of each pattern on our site. |
|||||||||||||||||||


With over 40 years in knitting and crochet design, DROPS Design offers one of the most extensive collections of free patterns on the internet - translated to 17 languages. As of today we count 325 catalogs and 12298 patterns - 12288 of which are translated into English (US/in).
We work hard to bring you the best knitting and crochet have to offer, inspiration and advice as well as great quality yarns at incredible prices! Would you like to use our patterns for other than personal use? You can read what you are allowed to do in the Copyright text at the bottom of all our patterns. Happy crafting!
Post a comment to pattern DROPS 267-4
We would love to hear what you have to say about this pattern!
If you want to leave a question, please make sure you select the correct category in the form below, to speed up the answering process. Required fields are marked *.