
Popular categories
Looking for a yarn?


Comments / Questions (88)
![]() Silja Lammintausta wrote:
Silja Lammintausta wrote:
Miten lisäys tehdään merkkilangan kohdalla
28.05.2025 - 13:13DROPS Design answered:
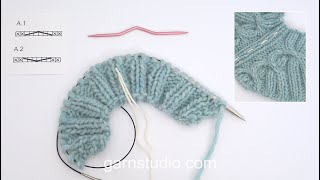
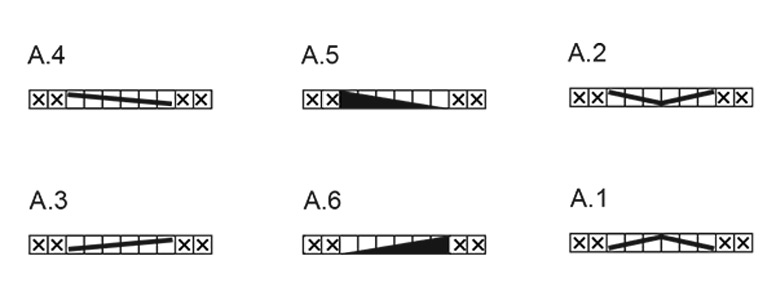
Lisäykset tehdään piirrosten A.1, A.2, A.3 ja A.4 mukaan, eli lisäykset tehdään palmikoiden kohdalla. Lue piirrosten merkkien selitykset.
28.05.2025 - 14:17
![]() Silja Lammintausta wrote:
Silja Lammintausta wrote:
Miten lisäys tehdää merkkilangan kohdalls
28.05.2025 - 13:13
![]() Dag wrote:
Dag wrote:
By "five ribbed stitches" do you mean five or ten single stitches? The Polish translation is very misleading and it suggests 5 single stitches.
25.05.2025 - 18:04DROPS Design answered:
Witaj, nie rozumiem czego dotyczy pytanie. Możesz odnieść się do konkretnego fragmentu we wzorze, który jest dla Ciebie niezrozumiały? Pozdrawiam
26.05.2025 - 07:42
![]() Laura Flames Roncal wrote:
Laura Flames Roncal wrote:
At the English instructions it mentions top down from mid-back both at summarize of the piece and placement of markers. But at the Spanish version (the one I'm following), it says "de arriba a abajo, desde el hombro derecho". Debería ser corregido. Gracias!
08.04.2025 - 17:25
![]() Anna wrote:
Anna wrote:
Hej Drops design Jeg vil gerne forstå det svar I giver til finske Kati. Efter første (A3/A4) snoning er der 208 m i en small. Efter de fem efterfølgende snoninger er der 208+(32*5)= 208+ 160 = 368 masker? I næste afsnit, strikkes der blot til 11 m før mærket? Gælder det også før A6? Tak for opklaringen.
10.03.2025 - 11:49DROPS Design answered:
Hei Anna. Du starter med 112 masker (str.S). Etter 1. økning / A.1/A.2 har du 112+64=176 masker. Så strikkes A.3/A.4 og det økes 32 masker på hver økeomgang = 176+32 =208+32 =240+32 =273+32=304. Du har nå flettet/økt TOTALT 5 ganger = 304 masker. Usikker på hvor du har 368 masker og 11 masker før merket i str. S. Har du økt totalt 6 ganger kanskje? mvh DROPS Design
17.03.2025 - 09:22
![]() Ylva wrote:
Ylva wrote:
Jag tittar på beskrivningen och A5 och A6, borde de inte vara lika, men en med flötsticka framför och en bakom. A6 sätter 4 maskor på flätstickan, men hämtar bara upp 2. Eller har jag missförstått? Tacksam för hjälp, Ylva
27.02.2025 - 22:31DROPS Design answered:
Hej Ylva, fletterne skal stemme... har du set videoen med fletterne, som vi har lavet til opskriften?
06.03.2025 - 11:56
![]() Martina Jordan wrote:
Martina Jordan wrote:
Hallo! Es steht, dass man sobald die Arbeit 32 cm misst mit den Zunahmen aufhört. Sind die 32 cm inklusive der 12 vom Kragen gerechnet? Vielen lieben Dank! TOLLE ANLEITUNG ÜBRIGENS 👍
21.02.2025 - 11:13DROPS Design answered:
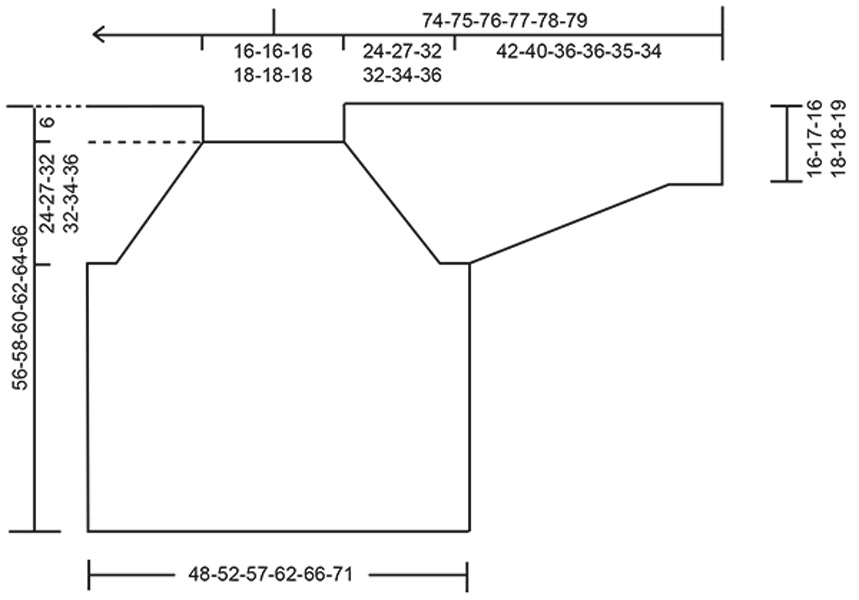
Liebe Frau Jordan, in 4. Größe messen Sie diese 32 cm nach dem Kragen (siehe auch Maßskizze). Viel Spaß beim Stricken!
21.02.2025 - 14:10
![]() Marion wrote:
Marion wrote:
Ich möchte mir gern diesen Pullover stricken, vermisse aber die Maßskizze . Mit freundlichem Gruß Marion
18.02.2025 - 10:55DROPS Design answered:
Liebe Marion, Maßskizzse finden Sie ganz unten, nach den Diagrammen. Hier lesen Sie mehr über Maßskizze. Viel Spaß beim Stricken!
18.02.2025 - 17:15
![]() Margaux wrote:
Margaux wrote:
J'ai compris mon erreur après avoir méticuleusement relu les diagramme. Le fait que les explications des diagrammes A1 et A2 ne prennent pas en compte les 2 mailles envers situées au début et à la fin des torsades n'est pas très intuitif et c'est ça qui m'a perdu, d'où le fait qu'il me manquait des mailles pour arriver au marqueur. Désolé encore !
17.02.2025 - 21:36
![]() Margaux wrote:
Margaux wrote:
Bonjour, j'essaie de faire ce chouette modèle mais il y a quelque chose que je ne saisis pas. Pour la taille 1, après mes 12cm de cols, on me dit de tricoter 5m en côtes (après le marqueur du milieu dos) puis faire A1 et tricoter 2m (le marqueur se trouvant entre ces 2m) or ceci étant fait, après avoir fait A1 il me reste encore 5m pour arriver à mon marqueur, donc si je tricote 2m je ne suis pas encore au marqueur . Qu'ai je raté ?
17.02.2025 - 20:57DROPS Design answered:
Bonjour Margaux, vous avez 16 mailles entre le milieu dos et le 1er fil marqueur soit; 5 m pour le dos, puis 10 mailles de A.1 et 1 maille endroit avant le fil marqueur soit: 5 +10+1=16. Bon tricot!
18.02.2025 - 09:46
|
||||||||||||||||||||||
White Heron#whiteheronsweater |
||||||||||||||||||||||
 |
 |
|||||||||||||||||||||
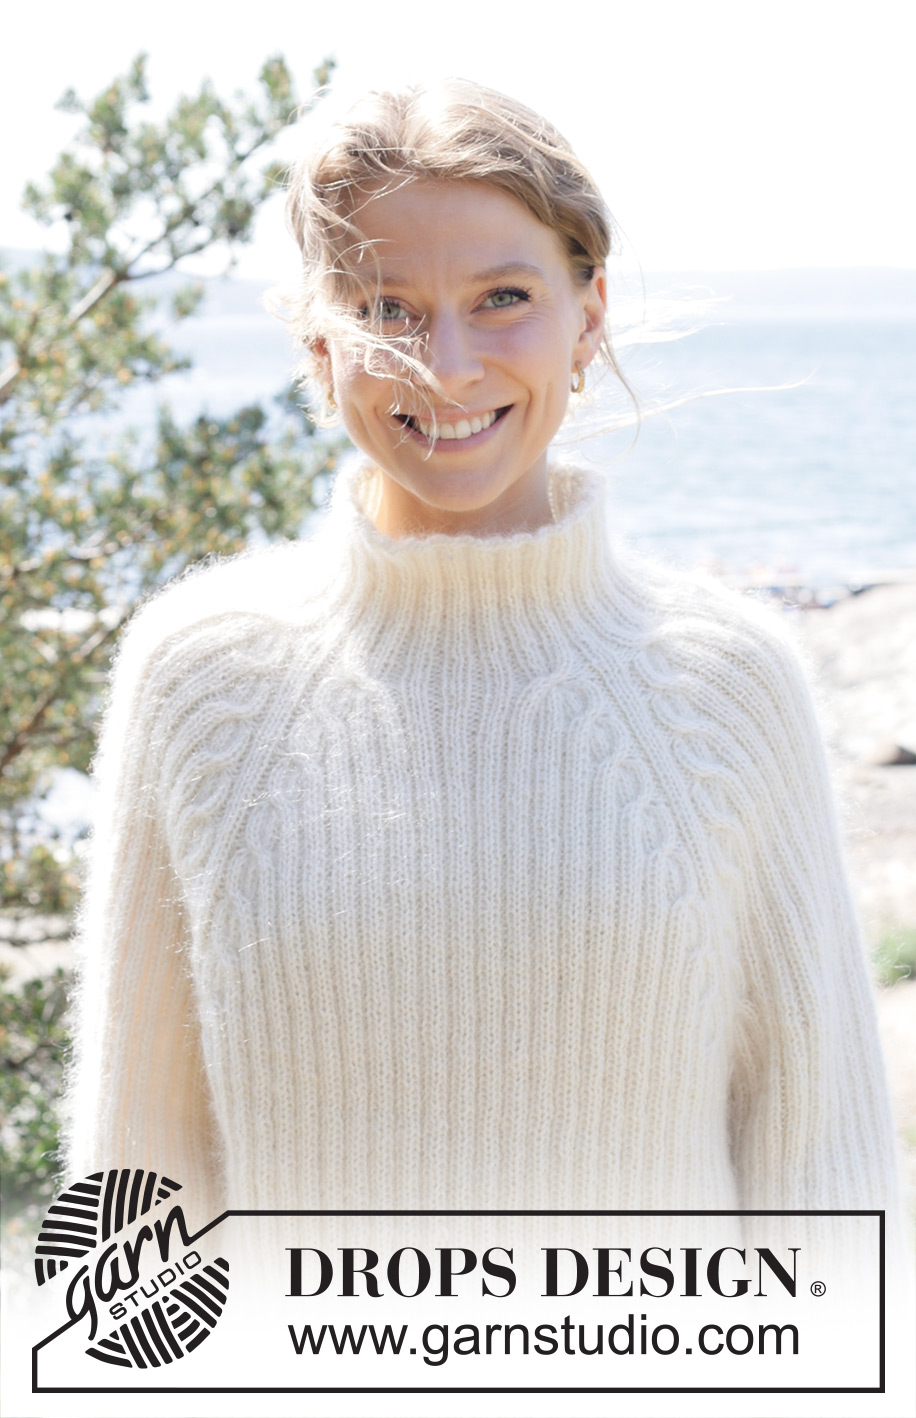
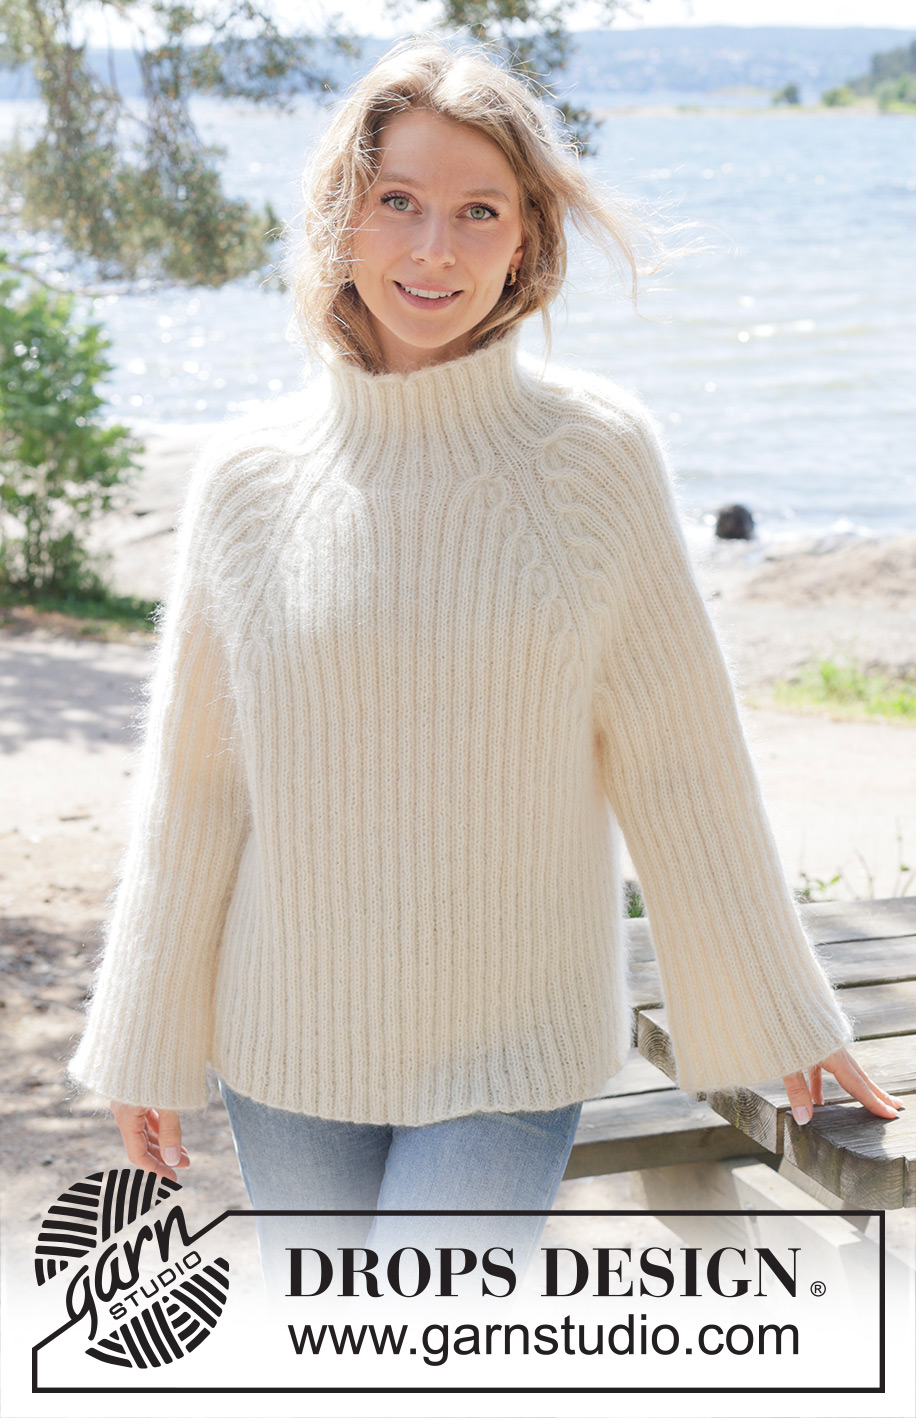
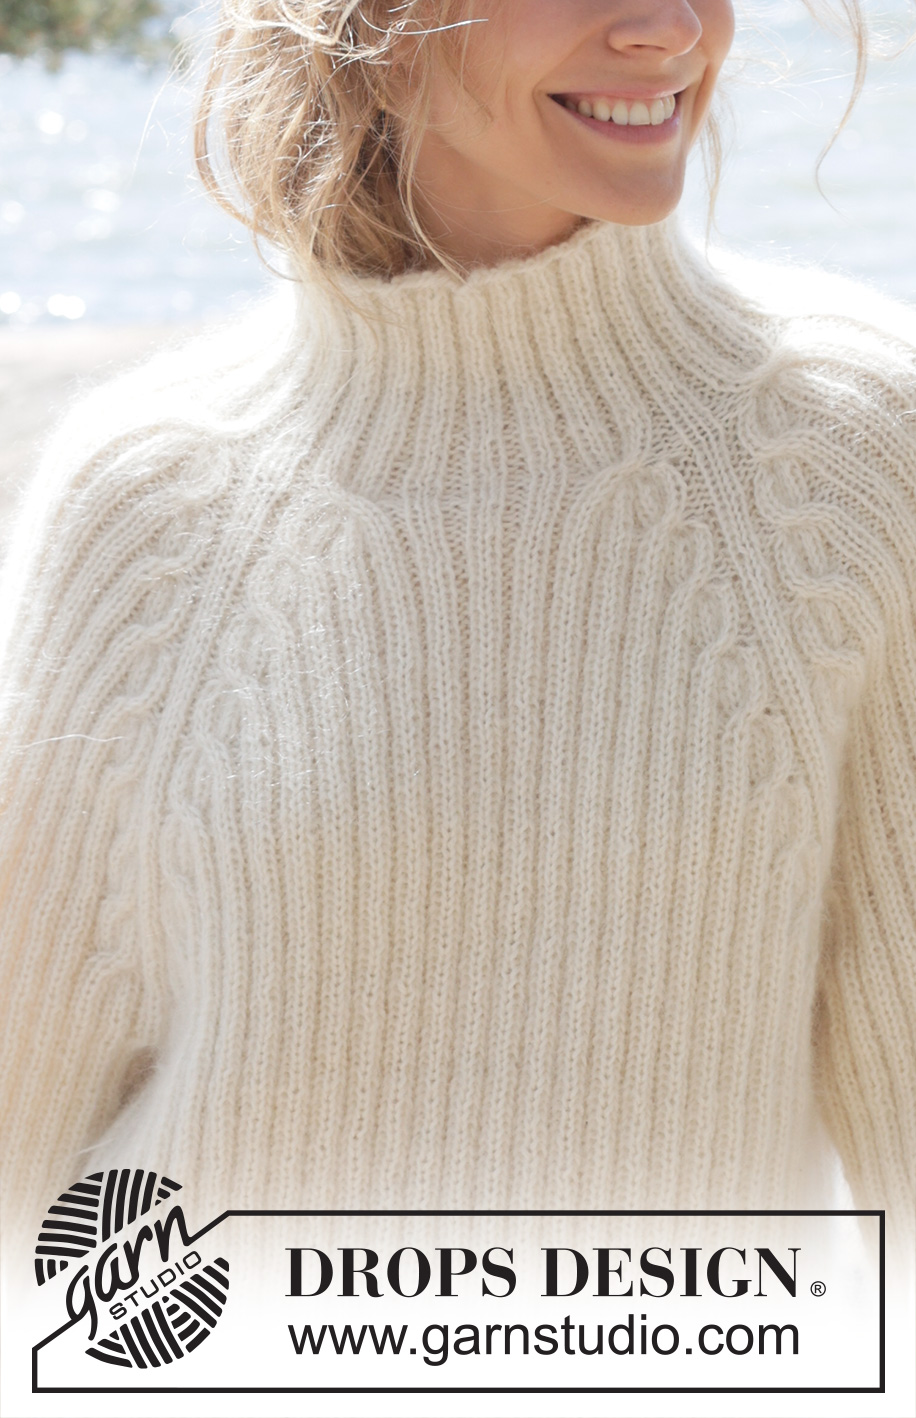
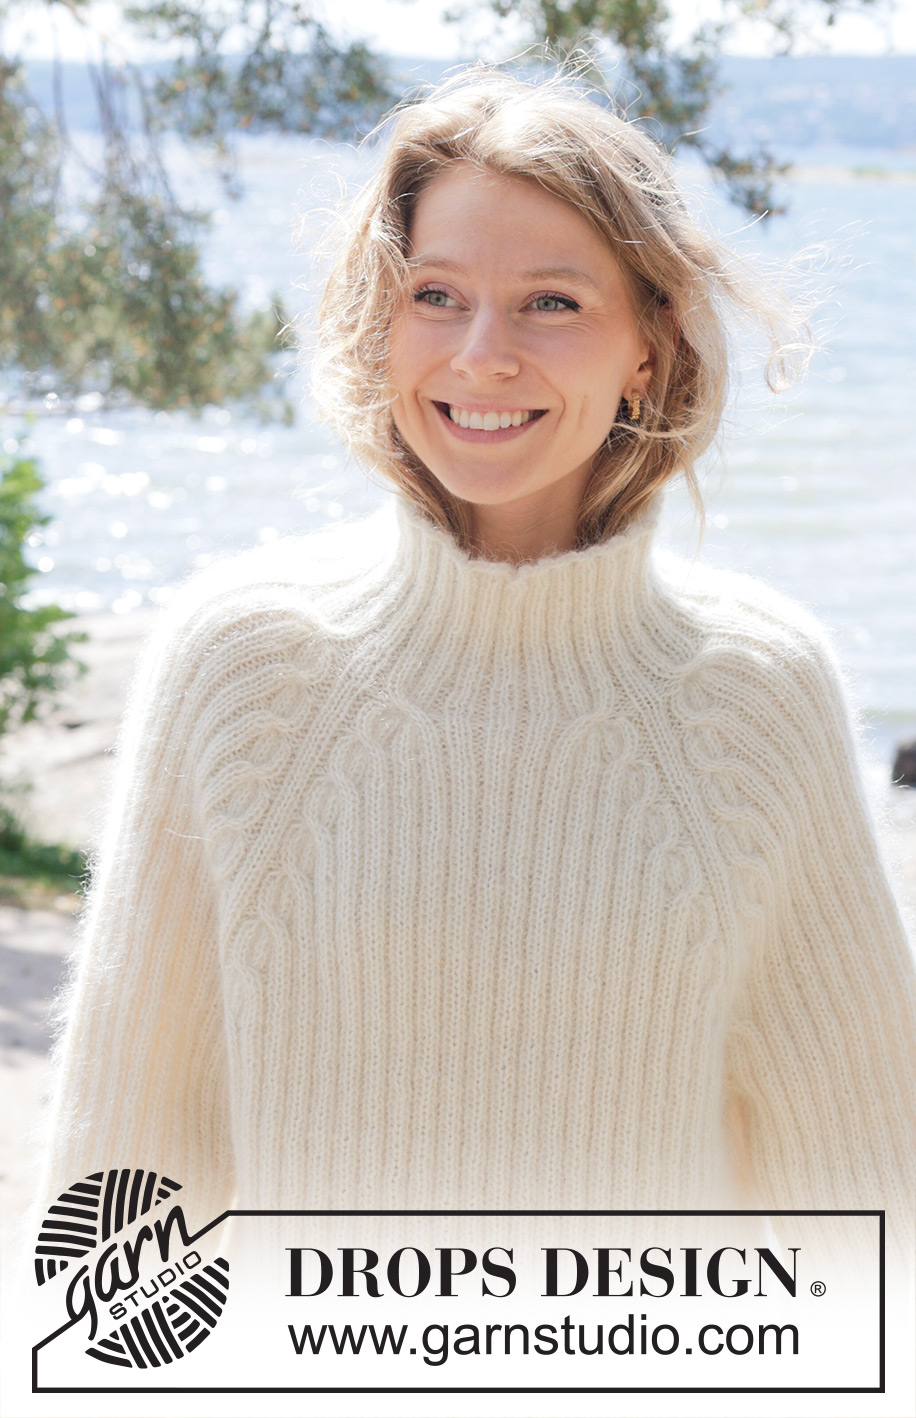
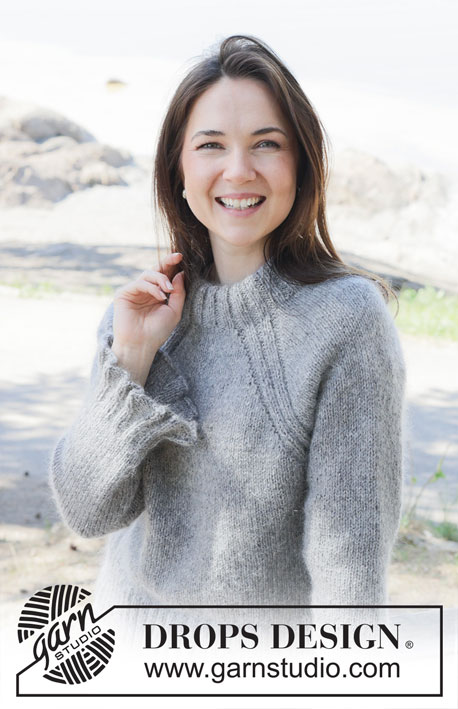
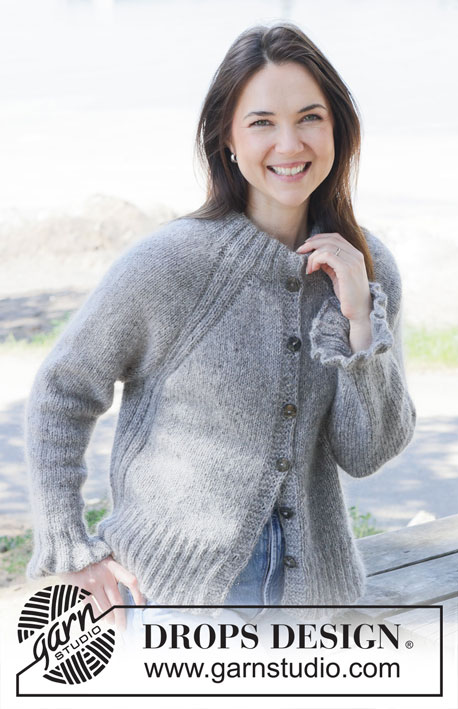
Knitted sweater in 1 strand DROPS Alpaca and 2 strands DROPS Kid-Silk. The piece is worked top down with cables, raglan and rib. Sizes S - XXXL.
DROPS 254-7 |
||||||||||||||||||||||
|
------------------------------------------------------- EXPLANATIONS FOR THE PATTERN: ------------------------------------------------------- PATTERN: See diagrams A.1 to A.6. DECREASE TIP (mid-under sleeve): Decrease alternately before and after the marker-thread. Decrease before marker-thread: Work until there are 6 stitches left before the marker-thread, slip 1 stitch, knit 4 together, pass the slipped stitch over = 4 decreased stitches. Decrease after marker-thread: Purl 1, knit 5 together = 4 decreased stitches. ------------------------------------------------------- START THE PIECE HERE: ------------------------------------------------------- SWEATER – SHORT OVERVIEW OF THE PIECE: The pattern uses both long and short needles; start with the length which fits the number of stitches and change when necessary. The neck and yoke are worked in the round with circular needle, top down and from mid back. When the yoke is finished, it is divided for the body and sleeves and the body continued in the round, while the sleeves wait. The sleeves are worked top down, in the round. NECK: Cast on 112-112-112-120-120-120 stitches with circular needle size 4,5 MM = US 7, 1 strand DROPS Alpaca and 2 strands DROPS Kid-Silk (= 3 strands). Knit 1 round then work rib as follows: Sizes S-M-L: Knit 1, * purl 2, knit 2 *, work from *-* until there are 3 stitches left, purl 2, knit 1. Sizes XL-XXL-XXXL: Purl 1, * knit 2, purl 2 *, work from *-* until there are 3 stitches left, knit 2, purl 1. Work this rib for 12 cm = 4¾". Insert 4 marker-threads, without working the stitches, as follows. The threads are used when increasing for raglan and each thread is inserted between 2 stitches. Count 16-16-16-18-18-18 stitches (half back piece) insert 1 marker-thread, count 24 stitches (sleeve), insert 1 marker-thread, count 32-32-32-36-36-36 stitches (front piece), insert 1 marker-thread, count 24 stitches (sleeve), insert 1 marker-thread, there are 16-16-16-18-18-18 stitches left after the last marker-thread (half back piece). The beginning of the round is mid-back. Insert 1 marker after the first 56-56-56-60-60-60 stitches (mid-front), the piece is measured from here. Now work rib, increase at each marker-thread and work cables in A.1 and A.2 as follows: Work 5-5-5-7-7-7 ribbed stitches, A.1, knit 2 (marker-thread sits between these 2 stitches) A.2, knit 2, A.1, knit 2 (marker-thread sits between these 2 stitches) A.2, 10-10-10-14-14-14 ribbed stitches, A.1, knit 2 (marker-thread sits between these 2 stitches) A.2, knit 2, A.1, knit 2 (marker-thread sits between these 2 stitches) A.2, 5-5-5-7-7-7 ribbed stitches. After this round you have increased 64 stitches - 8 increased stitches in each cable (on each side of each marker-thread) = 176-176-176-184-184-184 stitches. Work 6-6-6-5-5-5 rounds of rib as before, working the new stitches into the rib. Work 13-13-13-15-15-15 ribbed stitches, A.3, knit 2 (marker-thread sits between these 2 stitches) A.4, 18 ribbed stitches, A.3, knit 2 (marker-thread sits between these 2 stitches) A.4, 26-26-26-30-30-30 ribbed stitches, A.3, knit 2 (marker-thread sits between these 2 stitches), A.4, 18 ribbed stitches, A.3, knit 2 (marker-thread sits between these 2 stitches) A.4, 13-13-13-15-15-15 ribbed stitches. After this round you have increased 32 stitches - 4 increased stitches in each cable (on each side of the marker-threads) = 208-208-208-216-216-216 stitches. Work 6-6-6-5-5-5 rounds of rib as before, working the new stitches into the rib. Continue increasing according to A.3 and A.4, until you have cabled a total of 5-5-6-7-7-7 times (with 6-6-6-5-5-5 rounds of rib between each increase). There are 304-304-336-376-376-376 stitches. Work 6-6-6-5-5-5 rounds of rib as before, working the new stitches into the rib. Work 29-29-33-39-39-39 ribbed stitches as before, A.3, knit 2 (marker-thread sits between these 2 stitches) A.5, 50-50-58-66-66-66 ribbed stitches, A.6, knit 2 (marker-thread sits between these 2 stitches) A.4, 58-58-66-78-78-78 ribbed stitches, A.3, knit 2 (marker-thread sits between these 2 stitches) A.5, 50-50-58-66-66-66 ribbed stitches, A.6, knit 2 (marker-thread sits between these 2 stitches) A.4, 29-29-33-39-39-39 ribbed stitches. After this round you have increased 16 stitches - 4 increased stitches in each cable on the front and back pieces. The increases on the sleeves are finished and the cables have been worked on the sleeves without increases = 320-320-352-392-392-392 stitches. Work 6-6-6-5-5-5 rounds of rib as before, working the new stitches into the rib. Work 33-33-37-43-43-43 ribbed stitches as before, A.3, knit 2 (marker-thread sits between these 2 stitches) A.5, 50-50-58-66-66-66 ribbed stitches, A.6, knit 2 (marker-thread sits between these 2 stitches) A.4, 66-66-74-86-86-86 ribbed stitches, A.3, knit 2 (marker-thread sits between these 2 stitches) A.5, 50-50-58-66-66-66 ribbed stitches, A.6, knit 2 (marker-thread sits between these 2 stitches) A.4, 33-33-37-43-43-43 ribbed stitches. After this round you have increased 16 stitches - 4 increased stitches in each cable on the front and back pieces, none on the sleeves = 336-336-368-408-408-408 stitches. Work 6-6-6-5-5-5 rounds of rib as before, then increase 1-2-3-3-4-5 more times on the front and back pieces; no increases on the sleeves = 352-368-416-456-472-488 stitches. You have cabled a total of 8-9-11-12-13-14 times. Continue working rib and cables, without further increases until the yoke measures 24-27-32-32-34-36 cm = 9½"-10⅝"-12½"-12½"-13⅜"-14¼", finishing after at least 6-6-6-5-5-5 rounds of rib after the last cable-round. Now divide for the body and sleeves as follows: Work the first 52-56-64-70-74-78 stitches (half back piece), place the next 72-72-80-88-88-88 stitches on a thread for the sleeve, cast on 20-24-20-20-24-28 stitches (in side under sleeve), work 104-112-128-140-148-156 stitches (front piece), place the next 72-72-80-88-88-88 stitches on a thread for the sleeve, cast on 20-24-20-20-24-28 stitches (in side under sleeve), work the remaining 52-56-64-70-74-78 stitches (half back piece). BODY: = 248-272-296-320-344-368 stitches. Work rib in the round over all stitches, until the piece measures 50-52-54-56-58-60 cm = 19¾"-20½"-21¼"-22"-22¾"-23⅝" from the marker mid-front. Bind off. The sweater measures approx. 56-60-62-64-66-68 cm = 22"-23⅝"-24⅜"-25¼"-26"-26¾" from the shoulder. SLEEVES: Place the 72-72-80-88-88-88 sleeve-stitches from the thread on one side of the piece on circular needle size 4.5 MM = US 7 and knit up 1 stitch in each of the 20-24-20-20-24-28 stitches cast on under the sleeve = 92-96-100-108-112-116 stitches. Work rib in the round for 4 cm = 1½". Now decrease 4 stitches before the marker-thread. Repeat this decrease, alternately before and after the marker-thread every 8-8-6-6-6-6 cm = 3⅛"-3⅛"-2⅜"-2⅜"-2⅜"-2⅜" a total of 2-2-4-4-4-4 times - read DECREASE TIP = 84-88-84-92-96-100 stitches. Continue working until the sleeve measures 42-40-36-36-35-34 cm = 16½"-15¾"-14¼"-14¼"-13¾"-13⅜". Bind off. |
||||||||||||||||||||||
Diagram explanations |
||||||||||||||||||||||
|
||||||||||||||||||||||
 |
||||||||||||||||||||||
 |
||||||||||||||||||||||
Have you finished this pattern?Tag your pictures with #dropspattern #whiteheronsweater or submit them to the #dropsfan gallery. Do you need help with this pattern?You'll find 26 tutorial videos, a Comments/Questions area and more by visiting the pattern on garnstudio.com. © 1982-2026 DROPS Design A/S. We reserve all rights. This document, including all its sub-sections, has copyrights. Read more about what you can do with our patterns at the bottom of each pattern on our site. |
||||||||||||||||||||||


With over 40 years in knitting and crochet design, DROPS Design offers one of the most extensive collections of free patterns on the internet - translated to 17 languages. As of today we count 324 catalogs and 12290 patterns - 12280 of which are translated into English (US/in).
We work hard to bring you the best knitting and crochet have to offer, inspiration and advice as well as great quality yarns at incredible prices! Would you like to use our patterns for other than personal use? You can read what you are allowed to do in the Copyright text at the bottom of all our patterns. Happy crafting!
Post a comment to pattern DROPS 254-7
We would love to hear what you have to say about this pattern!
If you want to leave a question, please make sure you select the correct category in the form below, to speed up the answering process. Required fields are marked *.