
Popular categories
Looking for a yarn?


Comments / Questions (88)
![]() Mona Åström wrote:
Mona Åström wrote:
Stickar White Heron modell z-1039 och stickat första A3 och A4. I nästa stycke står att man ska fortsätta ökningarna som visas i A3, A4 men ska varvet startas med ökningarna/flätan direkt?? Tacksam för snabbt svar.
18.12.2025 - 11:44DROPS Design answered:
Hei Mona. Litt usikker på hva du mener. Du øker når A.3 og A.4 strikkes og det strikkes 6-6-6-5-5-5 omganger vrangbord mellom hver gang det strikkes fletter (A.3/A.4). Ta gjerne en titt på hjelpevideoen til denne genseren: Hur man ökar maskor i en fläta. mvh DROPS Design
22.12.2025 - 11:06
![]() Lucia wrote:
Lucia wrote:
Could I use instead 1 brushed alpaca strand instead of 2 kid silk ?
06.12.2025 - 09:05DROPS Design answered:
Hi Lucia, Yes, 1 strand from a yarn group C yarn (Brushed Alpaca Silk) is the same thickness as 2 strands from a yarn group A yarn (Kid Silk). Regards, Drops Team.
08.12.2025 - 08:06
![]() Krystyna wrote:
Krystyna wrote:
Dziękuję bardzo. Już wszystko pasuje. Pozdrawiam
04.12.2025 - 21:02
![]() Krystyna wrote:
Krystyna wrote:
W żaden sposób nie pasuja mi schematy. A1 pisze zdjąć cztery oczka i dwa przed i dwa po przerobić na lewo,to 8 oczek, a schemat pokazuje 10 i na robotce też wychodzi 10
04.12.2025 - 12:57DROPS Design answered:
Witaj Krystyno, schemat A.1 jest przerabiany na 10 oczkach. Po przerobieniu schematu A.1/A.2 będzie ich o 8 więcej w każdym schemacie (8 miejscu w okrążeniu). A.1 przerabiamy następująco: 2 o.p., zdjąć 4 oczka na drut do warkoczy z tyłu robótki, przerobić 2 oczka prawe, dalej przerabiać 3 razy na prawo każde z 4 oczek na drucie do warkoczy (przerabiać wkłuwając drut na przemian raz z przodu, raz z tyłu i jeszcze raz z przodu każdego z tych oczek) i 2 o.p. Zostanie dodanych 8 oczek. Dlatego po pierwszym okrążeniu będzie już o 64 oczka więcej w okrążeniu. Pozdrawiamy!
04.12.2025 - 15:48
![]() Ria Meurders wrote:
Ria Meurders wrote:
In het patroon wordt meteen met de kabels begonnen. Op de foto is eerst een boord gebreid. Hoeveel steken en Hoeveel naalden boord worden er gebreid voordat ik aan de kabels met meerderingen ga beginnen?
29.11.2025 - 22:52DROPS Design answered:
Dag Ria,
Je breit 12 cm boordsteek. Dit staat onder de paragraaf 'HALS' beschreven.
30.11.2025 - 15:55
![]() Laura wrote:
Laura wrote:
Hei! Miten A1 kuvio neulotaan? En tajua, että neulotaanko apupuikolla olevat kaikki 4 silmukkaa oikein vai sillä tavalla miten joustinneule menee eli 2 oikein ja 2 nurin? Miten nurjat silmukat neulotaan ensin etukautta, sitten takakautta ja sitten etukautta? Olisiko siihen videota jos niin täytyy tehdä?
24.09.2025 - 10:13
![]() FattyPotter wrote:
FattyPotter wrote:
Bonjour, j’en suis au passage « Tricoter les 52-56-64-70-74-78 premières mailles (demi-dos), mettre les 72-72-80-88-88-88 mailles suivantes en attente sur un fil pour la manche, monter 20-24-20-20-24-28 mailles (côté, sous la manche) » et je ne comprends pas ce que veut dire « monter 20 mailles » je les ai tricotées avec les autres mais ce n’est pas ça. Merci de vos explications .
19.09.2025 - 17:57DROPS Design answered:
Bonjour Mme Potter, ces 20 mailles sont les mailles des côtés du pull et vont "remplacer" celles des manches après la division; retrouvez cette étape dans cette leçon, photo 11) ; montez les mailles en utilisant par ex. cette technique. Bon tricot!
24.09.2025 - 07:09
![]() Mona wrote:
Mona wrote:
Hallo, ik zit aan het deel waar er staat: meerder twee keer op de voor en achterpanden, om zo aan de 368 steken te komen. Dit moet ook in kabels, maar moet ik tussen de twee meerderingen dan ook 6 rijen boordsteek doen? Ik vermoed dat het de zelfde kabels zijn die ik moet breien (namelijk A3 en A4) ? Volgens het stramien A3 - A5 - A6 - A4 - A3 - A5 - A6 - A4 ?
31.08.2025 - 15:59
![]() Karin wrote:
Karin wrote:
Hur många nystan garn behövs till storlek M om jag stickar med C garn
30.07.2025 - 18:45DROPS Design answered:
Hei Karin. Det kommer an på hvilken kvalitet i garngruppe C du ønsker å strikke med. Air har en lengre løpelengde enn f.eks Alaska. I str. M brukes det 8 nøster Alpaca, 1 nøste = 167 m x 8 = 1336 m. Del meter lengden på løpelengden på den kvaliteten i C du ønsker å strikke med, f.eks Air (150 m): 1336/150 = 8,9 =9 nøster. Du trenger ca 9 nøster Air, MEN: denne genseren er strikket med 3 tråder fra A, vanligvis gir 2 tråder fra A samme strikkefasthet som 1 tråd fra C, så skal du bruke en kvalitet fra C, må du være obs på at du får den strikkefastheten som er opplyst i oppskriften. mvh DROPS Design
25.08.2025 - 08:27
![]() Peggy wrote:
Peggy wrote:
Ich möchte diesen wunderschönen Pullover gerne mit einem weniger voluminösem Garn stricken. Wäre das Garn Drops Brushed Alpaca Silk (2 fähig) eine mögliche Alternative? Oder können Sie mir ein anderes Garn empfehlen?
04.07.2025 - 23:35DROPS Design answered:
Liebe Peggy, Sie können mit zwei Fäden DROPS Brushed Alpaca Silk arbeiten, das Reliefmuster ist dann aber nicht sichtbar. Sie können zum Beispiel mit drei Fäden DROPS Alpaca arbeiten. Viel Spaß beim Stricken!
19.07.2025 - 22:37
|
||||||||||||||||||||||
White Heron#whiteheronsweater |
||||||||||||||||||||||
 |
 |
|||||||||||||||||||||
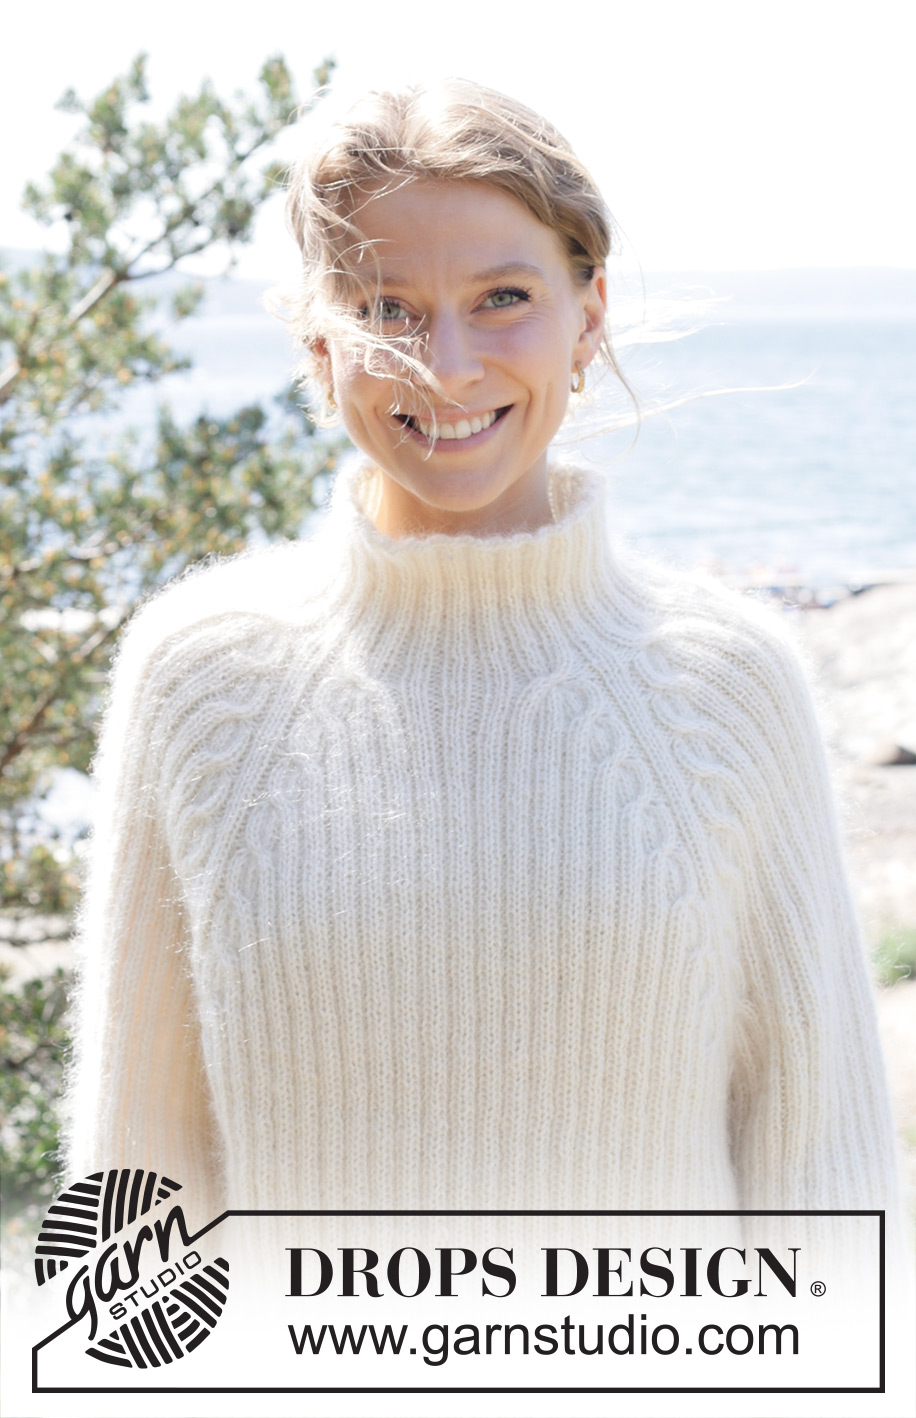
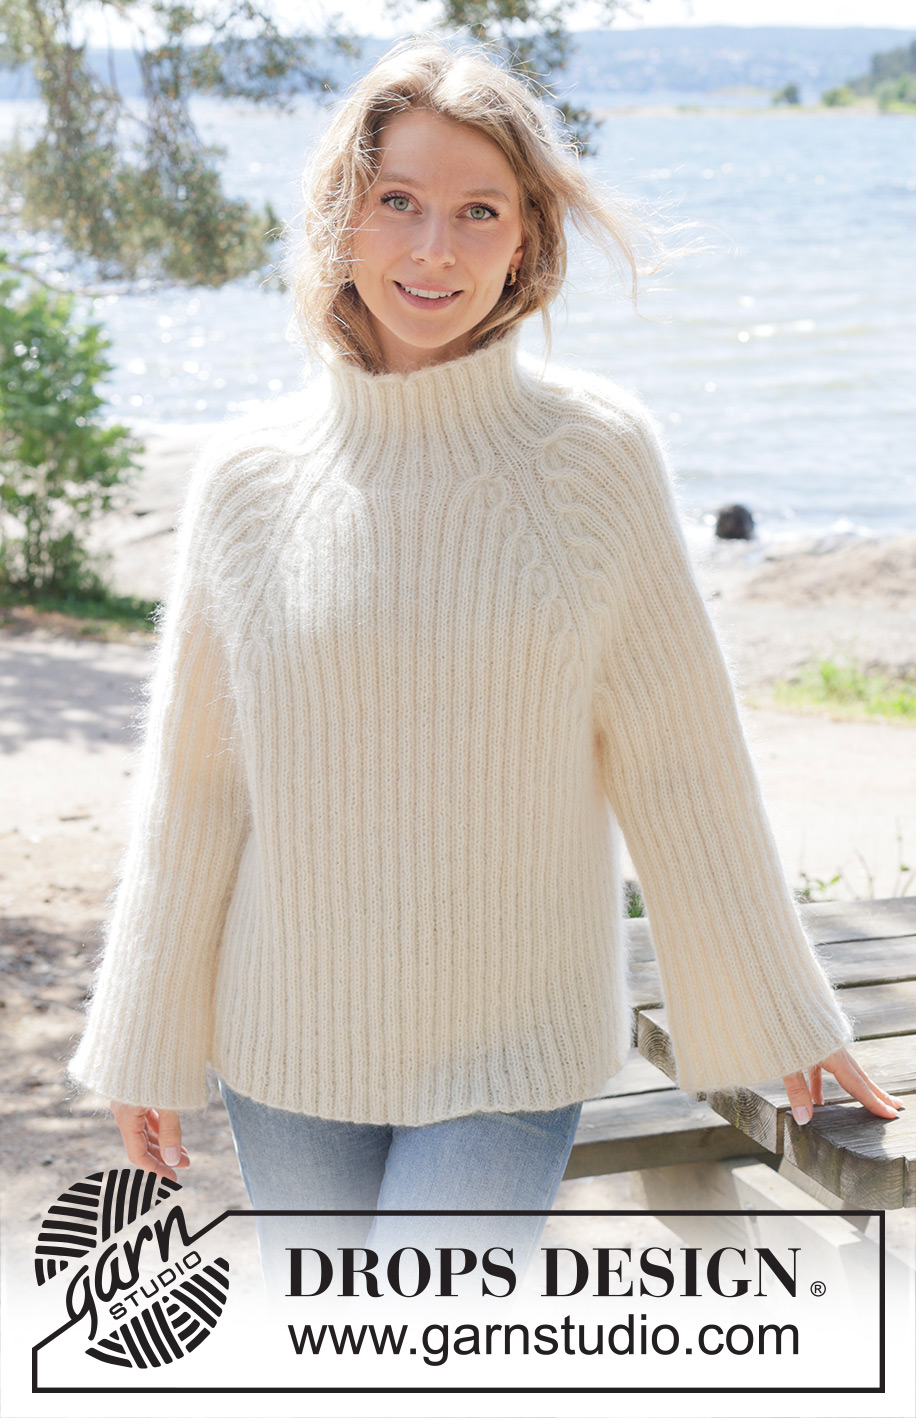
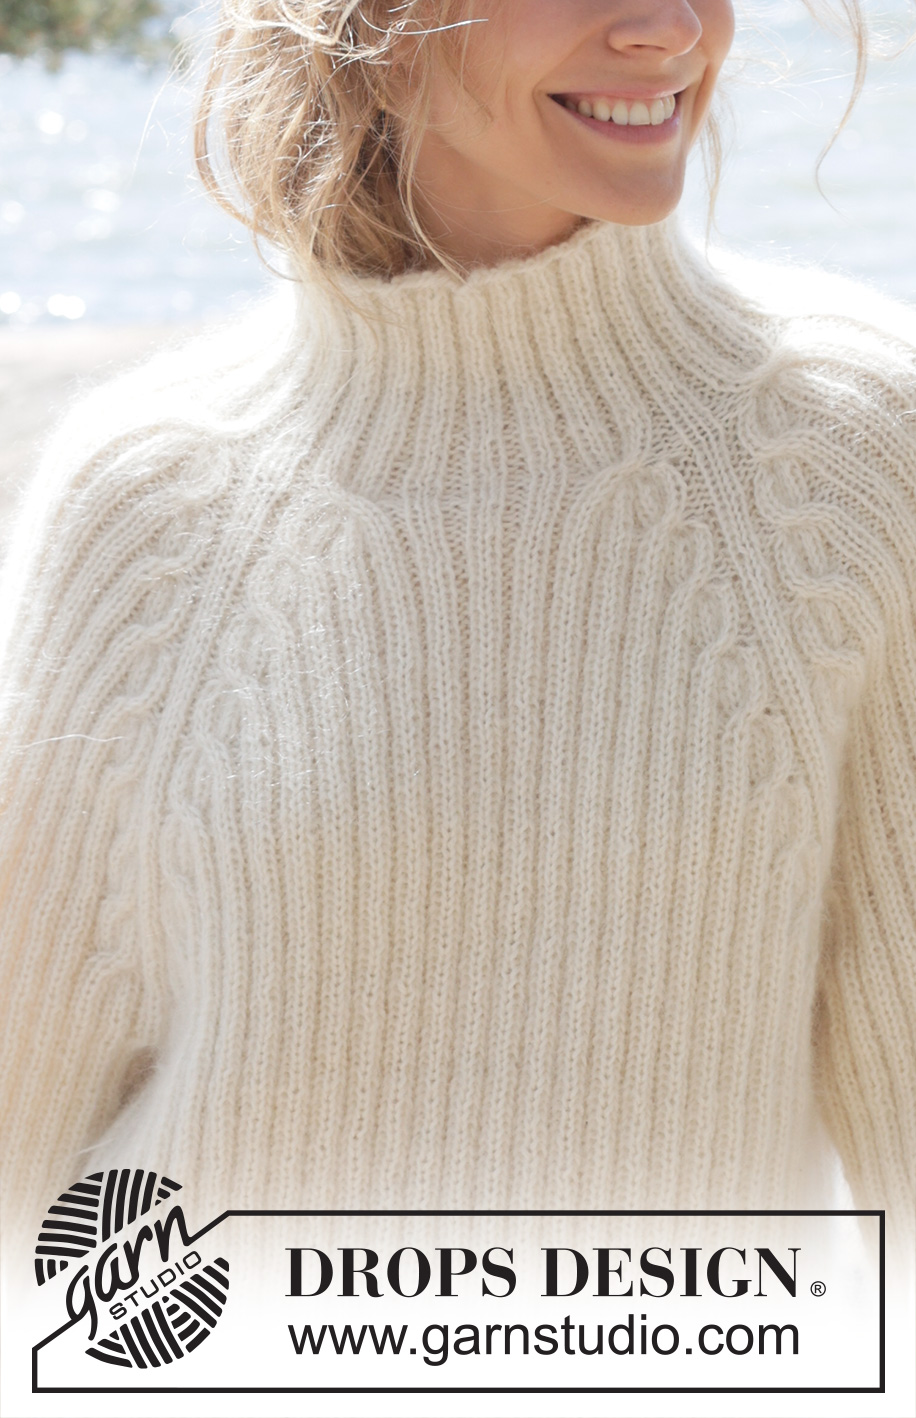
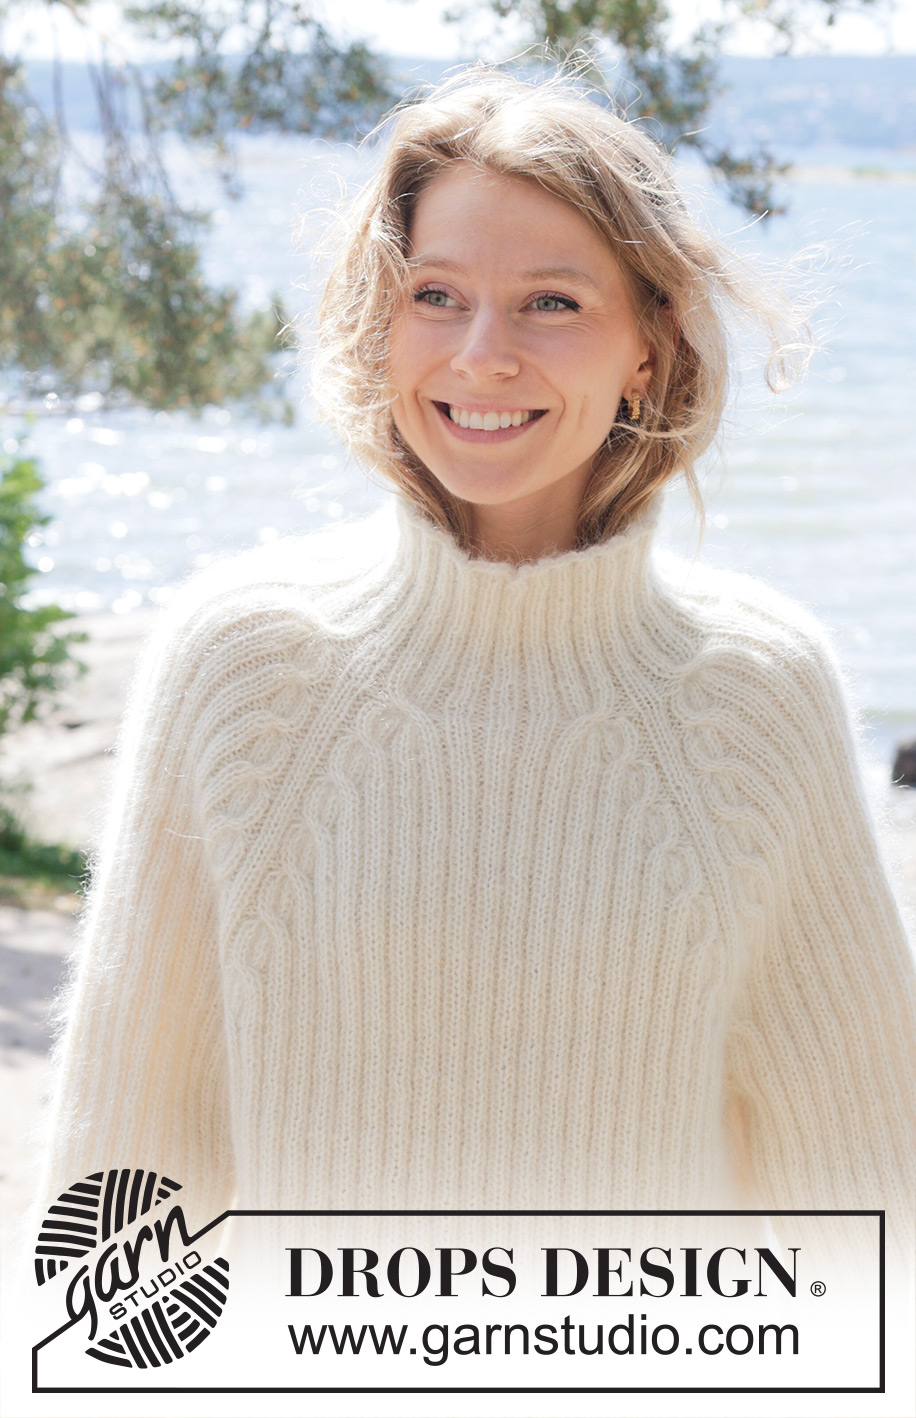
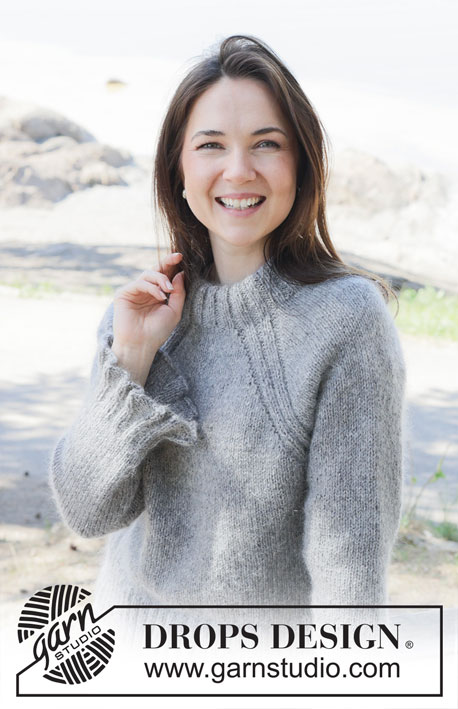
Knitted sweater in 1 strand DROPS Alpaca and 2 strands DROPS Kid-Silk. The piece is worked top down with cables, raglan and rib. Sizes S - XXXL.
DROPS 254-7 |
||||||||||||||||||||||
|
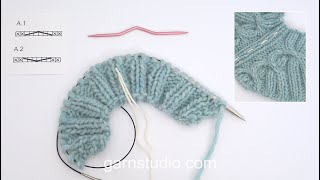
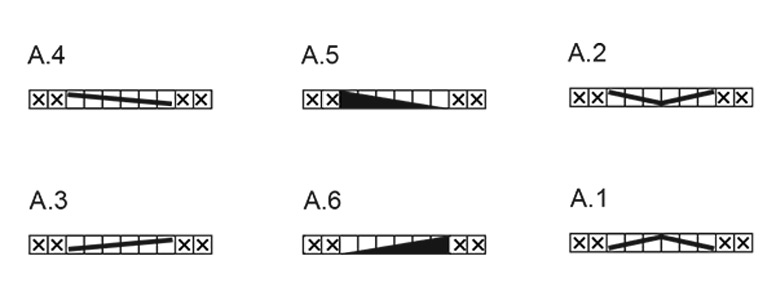
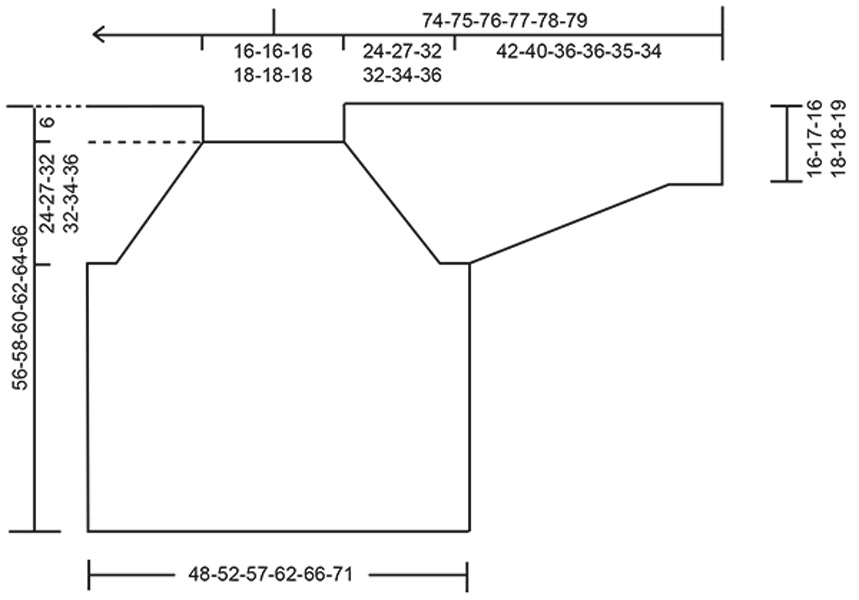
------------------------------------------------------- EXPLANATIONS FOR THE PATTERN: ------------------------------------------------------- PATTERN: See diagrams A.1 to A.6. DECREASE TIP (mid-under sleeve): Decrease alternately before and after the marker-thread. Decrease before marker-thread: Work until there are 6 stitches left before the marker-thread, slip 1 stitch, knit 4 together, pass the slipped stitch over = 4 decreased stitches. Decrease after marker-thread: Purl 1, knit 5 together = 4 decreased stitches. ------------------------------------------------------- START THE PIECE HERE: ------------------------------------------------------- SWEATER – SHORT OVERVIEW OF THE PIECE: The pattern uses both long and short needles; start with the length which fits the number of stitches and change when necessary. The neck and yoke are worked in the round with circular needle, top down and from mid back. When the yoke is finished, it is divided for the body and sleeves and the body continued in the round, while the sleeves wait. The sleeves are worked top down, in the round. NECK: Cast on 112-112-112-120-120-120 stitches with circular needle size 4,5 MM = US 7, 1 strand DROPS Alpaca and 2 strands DROPS Kid-Silk (= 3 strands). Knit 1 round then work rib as follows: Sizes S-M-L: Knit 1, * purl 2, knit 2 *, work from *-* until there are 3 stitches left, purl 2, knit 1. Sizes XL-XXL-XXXL: Purl 1, * knit 2, purl 2 *, work from *-* until there are 3 stitches left, knit 2, purl 1. Work this rib for 12 cm = 4¾". Insert 4 marker-threads, without working the stitches, as follows. The threads are used when increasing for raglan and each thread is inserted between 2 stitches. Count 16-16-16-18-18-18 stitches (half back piece) insert 1 marker-thread, count 24 stitches (sleeve), insert 1 marker-thread, count 32-32-32-36-36-36 stitches (front piece), insert 1 marker-thread, count 24 stitches (sleeve), insert 1 marker-thread, there are 16-16-16-18-18-18 stitches left after the last marker-thread (half back piece). The beginning of the round is mid-back. Insert 1 marker after the first 56-56-56-60-60-60 stitches (mid-front), the piece is measured from here. Now work rib, increase at each marker-thread and work cables in A.1 and A.2 as follows: Work 5-5-5-7-7-7 ribbed stitches, A.1, knit 2 (marker-thread sits between these 2 stitches) A.2, knit 2, A.1, knit 2 (marker-thread sits between these 2 stitches) A.2, 10-10-10-14-14-14 ribbed stitches, A.1, knit 2 (marker-thread sits between these 2 stitches) A.2, knit 2, A.1, knit 2 (marker-thread sits between these 2 stitches) A.2, 5-5-5-7-7-7 ribbed stitches. After this round you have increased 64 stitches - 8 increased stitches in each cable (on each side of each marker-thread) = 176-176-176-184-184-184 stitches. Work 6-6-6-5-5-5 rounds of rib as before, working the new stitches into the rib. Work 13-13-13-15-15-15 ribbed stitches, A.3, knit 2 (marker-thread sits between these 2 stitches) A.4, 18 ribbed stitches, A.3, knit 2 (marker-thread sits between these 2 stitches) A.4, 26-26-26-30-30-30 ribbed stitches, A.3, knit 2 (marker-thread sits between these 2 stitches), A.4, 18 ribbed stitches, A.3, knit 2 (marker-thread sits between these 2 stitches) A.4, 13-13-13-15-15-15 ribbed stitches. After this round you have increased 32 stitches - 4 increased stitches in each cable (on each side of the marker-threads) = 208-208-208-216-216-216 stitches. Work 6-6-6-5-5-5 rounds of rib as before, working the new stitches into the rib. Continue increasing according to A.3 and A.4, until you have cabled a total of 5-5-6-7-7-7 times (with 6-6-6-5-5-5 rounds of rib between each increase). There are 304-304-336-376-376-376 stitches. Work 6-6-6-5-5-5 rounds of rib as before, working the new stitches into the rib. Work 29-29-33-39-39-39 ribbed stitches as before, A.3, knit 2 (marker-thread sits between these 2 stitches) A.5, 50-50-58-66-66-66 ribbed stitches, A.6, knit 2 (marker-thread sits between these 2 stitches) A.4, 58-58-66-78-78-78 ribbed stitches, A.3, knit 2 (marker-thread sits between these 2 stitches) A.5, 50-50-58-66-66-66 ribbed stitches, A.6, knit 2 (marker-thread sits between these 2 stitches) A.4, 29-29-33-39-39-39 ribbed stitches. After this round you have increased 16 stitches - 4 increased stitches in each cable on the front and back pieces. The increases on the sleeves are finished and the cables have been worked on the sleeves without increases = 320-320-352-392-392-392 stitches. Work 6-6-6-5-5-5 rounds of rib as before, working the new stitches into the rib. Work 33-33-37-43-43-43 ribbed stitches as before, A.3, knit 2 (marker-thread sits between these 2 stitches) A.5, 50-50-58-66-66-66 ribbed stitches, A.6, knit 2 (marker-thread sits between these 2 stitches) A.4, 66-66-74-86-86-86 ribbed stitches, A.3, knit 2 (marker-thread sits between these 2 stitches) A.5, 50-50-58-66-66-66 ribbed stitches, A.6, knit 2 (marker-thread sits between these 2 stitches) A.4, 33-33-37-43-43-43 ribbed stitches. After this round you have increased 16 stitches - 4 increased stitches in each cable on the front and back pieces, none on the sleeves = 336-336-368-408-408-408 stitches. Work 6-6-6-5-5-5 rounds of rib as before, then increase 1-2-3-3-4-5 more times on the front and back pieces; no increases on the sleeves = 352-368-416-456-472-488 stitches. You have cabled a total of 8-9-11-12-13-14 times. Continue working rib and cables, without further increases until the yoke measures 24-27-32-32-34-36 cm = 9½"-10⅝"-12½"-12½"-13⅜"-14¼", finishing after at least 6-6-6-5-5-5 rounds of rib after the last cable-round. Now divide for the body and sleeves as follows: Work the first 52-56-64-70-74-78 stitches (half back piece), place the next 72-72-80-88-88-88 stitches on a thread for the sleeve, cast on 20-24-20-20-24-28 stitches (in side under sleeve), work 104-112-128-140-148-156 stitches (front piece), place the next 72-72-80-88-88-88 stitches on a thread for the sleeve, cast on 20-24-20-20-24-28 stitches (in side under sleeve), work the remaining 52-56-64-70-74-78 stitches (half back piece). BODY: = 248-272-296-320-344-368 stitches. Work rib in the round over all stitches, until the piece measures 50-52-54-56-58-60 cm = 19¾"-20½"-21¼"-22"-22¾"-23⅝" from the marker mid-front. Bind off. The sweater measures approx. 56-60-62-64-66-68 cm = 22"-23⅝"-24⅜"-25¼"-26"-26¾" from the shoulder. SLEEVES: Place the 72-72-80-88-88-88 sleeve-stitches from the thread on one side of the piece on circular needle size 4.5 MM = US 7 and knit up 1 stitch in each of the 20-24-20-20-24-28 stitches cast on under the sleeve = 92-96-100-108-112-116 stitches. Work rib in the round for 4 cm = 1½". Now decrease 4 stitches before the marker-thread. Repeat this decrease, alternately before and after the marker-thread every 8-8-6-6-6-6 cm = 3⅛"-3⅛"-2⅜"-2⅜"-2⅜"-2⅜" a total of 2-2-4-4-4-4 times - read DECREASE TIP = 84-88-84-92-96-100 stitches. Continue working until the sleeve measures 42-40-36-36-35-34 cm = 16½"-15¾"-14¼"-14¼"-13¾"-13⅜". Bind off. |
||||||||||||||||||||||
Diagram explanations |
||||||||||||||||||||||
|
||||||||||||||||||||||
 |
||||||||||||||||||||||
 |
||||||||||||||||||||||
Have you finished this pattern?Tag your pictures with #dropspattern #whiteheronsweater or submit them to the #dropsfan gallery. Do you need help with this pattern?You'll find 26 tutorial videos, a Comments/Questions area and more by visiting the pattern on garnstudio.com. © 1982-2026 DROPS Design A/S. We reserve all rights. This document, including all its sub-sections, has copyrights. Read more about what you can do with our patterns at the bottom of each pattern on our site. |
||||||||||||||||||||||


With over 40 years in knitting and crochet design, DROPS Design offers one of the most extensive collections of free patterns on the internet - translated to 17 languages. As of today we count 324 catalogs and 12290 patterns - 12280 of which are translated into English (US/in).
We work hard to bring you the best knitting and crochet have to offer, inspiration and advice as well as great quality yarns at incredible prices! Would you like to use our patterns for other than personal use? You can read what you are allowed to do in the Copyright text at the bottom of all our patterns. Happy crafting!
Post a comment to pattern DROPS 254-7
We would love to hear what you have to say about this pattern!
If you want to leave a question, please make sure you select the correct category in the form below, to speed up the answering process. Required fields are marked *.