
Popular categories
Looking for a yarn?


Comments / Questions (69)
![]() Rosanna wrote:
Rosanna wrote:
Grazie!
16.12.2024 - 10:12
![]() Rosanna wrote:
Rosanna wrote:
Buonasera team di Drop Design . Sono arrivata alla divisione fra corpo e maniche e non riesco ad andare avanti con il motivo. Ho 192maglie (L) incluse le 7 maglie . Ho messo il segnapunti in mezzo a queste 7 sette maglie quindi ho 3 maglie a dx . E'possibile che il motivo inizi dopo 6 maglie anziché le 4 quando facevo gli aumenti ? Grazie infinitamente per il vostro prezioso aiuto .Rosanna
11.12.2024 - 02:43DROPS Design answered:
Buonasera Rosanna, deve continuare il motivo dallo sprone. Buon lavoro!
13.12.2024 - 23:00
![]() Claire CASSAN wrote:
Claire CASSAN wrote:
Pour le modèle 249/4 -N'y a t'il pas une erreur sur les points indiqués en début d'explication : mousse au lieu de jersey ? -Le diagramme des points "fantaisie" est il indiqué en aller retour ?ou en jersey circulaire ? Merci
26.11.2024 - 13:29DROPS Design answered:
Bonjour Mme Cassan, au début des explications, on explique comment tricoter du point mousse en allers et retours (= à l'endroit tous les rangs) - quand on divise le dos et le devant pour les fentes côtés, on tricote en côtes avec 1 m point mousse de chaque côté. Les diagrammes du point fantaisie se tricote comme indiqué dans la légende des diagrammes = en jersey ajouré. Le pull se tricote en rond jusqu'aux côtes, on va lire les diagrammes tous les tours de droite à gauche. Bon tricot!
26.11.2024 - 16:39
![]() Jeanette wrote:
Jeanette wrote:
Hvordan skal dette forståes Tag ud til raglan på hver 2.omgang på forstykke og bagstykke, men på ærmerne tages der nu kun ud på hver 4.omgang (= skiftevis 4 og 8 masker taget ud). Gentag denne udtagning totalt 4-8-10-6-8-20 gange på forstykke og bagstykke og 2-4-5-3-4-10 gange på ærmerne.
13.11.2024 - 19:14DROPS Design answered:
Hei Jeanette. Jo, nå økes det på hver 2. omgang (som tidligere) på for og bakstykket, mens det på ermene økes det kun på hver 4. omgang. Da blir det slik: Strikk en omgang der det økes både på for og bakstykket og ermene, strikk en omgang der kastene strikker rett. Strikk en omgang der det kun økes på for-og bakstykket. Strikk en omgang der kastene strikkes rett. Strikk en omgang der det økes både på for og bakstykket og ermene, strikk en omgang der kastene strikker rett. Strikk en omgang der det kun økes på for-og bakstykket. Strikk en omgang der kastene strikkes rett, osv. mvh DROPS Design
18.11.2024 - 13:57
![]() Alicja wrote:
Alicja wrote:
Dzień dobry. Czy nie brakuje informacji, aby podczas przerabiania ściegu fantazyjnego nie wliczać w schemat 4 oczek z markerem, tylko przerabiać je po prostu na prawo? Pozdrawiam.
09.11.2024 - 16:36DROPS Design answered:
Witaj Alicjo, te oczka nie są wliczane do schematów i jest to wyjaśnione w części KARCZEK w 2-gim paragrafie. Masz rację, że można dodawać informację, że oczka reglanów (czyli oczka z markerem) są przerabiane na prawo w każdym okrążeniu. Uzupełnimy to. Pozdrawiamy!
12.11.2024 - 09:36
![]() Martine wrote:
Martine wrote:
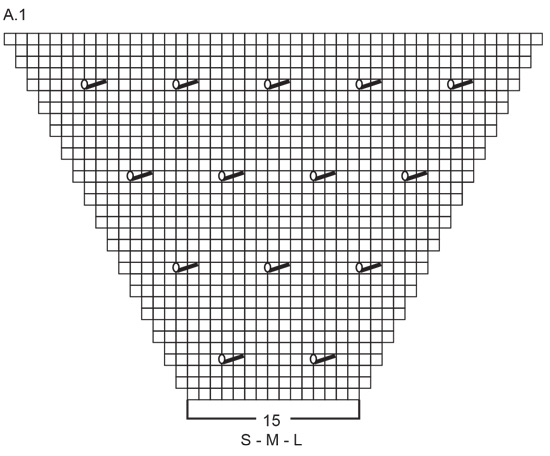
Er det feil i skjemaet A1? Det er ikke med mønsteret som lager "2 hull" på det.
30.10.2024 - 14:12DROPS Design answered:
Hej Martine, jo diagrammet med de 3 huller finder du nedenfor de andre diagrammer, nederst i opskriften :)
31.10.2024 - 08:45
![]() Ell Vahtramäe wrote:
Ell Vahtramäe wrote:
Silmuste arv on märgitud juhendis valesti: kui passet on kasvatatud 18 korda , on öeldud, et L suuruses peab olema vardal 280silmust. Sama ka M-suurusel. Õige oleks 240 silmust. ja pärast passe valmimist on siis vardal 300 silma - see klapib.
23.10.2024 - 19:03
![]() Kerstin Irehjelm wrote:
Kerstin Irehjelm wrote:
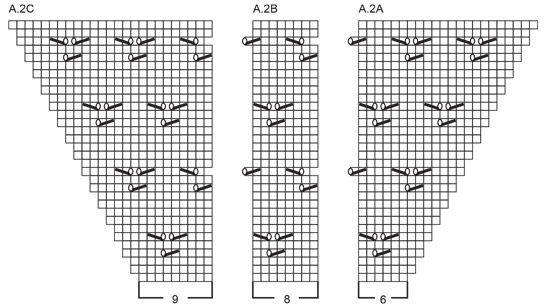
I mönstret står det "Sticka slätstickning fram till första markören, varvet startar här och det stickas runt. Fortsätt A.2 runt över alla maskorna". Det finns inget diagram som heter bara A2, de heter A2A, A2B och A2C. Hur ska jag sticka?
25.09.2024 - 16:45DROPS Design answered:
Hei Kerstin. A.2 er en samlebetegnelse for A.2A, A.2B og A.2C. Altså du fortsetter å strikke etter diagram A.2 (A.2A, A.2B og A.2C) over alle maskene som før. Pass på at mønsteret fortsettes riktig over maskene fra bærestykket. mvh DROPS Design
30.09.2024 - 13:49
![]() Iben Marie Jørgensen wrote:
Iben Marie Jørgensen wrote:
Hvilken størelse bære modellen?
05.09.2024 - 13:37DROPS Design answered:
Hej Iben, Medium, men nederst i opskriften finder du måleskitsen, vælg størrelsen med de mål som passer dig :)
06.09.2024 - 12:39
![]() Julie Gontcharoff wrote:
Julie Gontcharoff wrote:
Bonjour, Je ne comprends pas pourquoi le grammage nécessaire n'est pas le même si on prend de la laine Air ou Paris puisqu'il s'agit du même groupe de fil? Je souhaiterai réaliser ce modèle avecdu Brushed Alpaca silk (groupe C), mais du coup je ne sais pas combien de gramme prendre... Merci d'avance. Bonne journée.
03.09.2024 - 12:25DROPS Design answered:
Bonjour Mme Gontcharoff, le poids total est différent pour ces 2 laines car elles ont un métrage différent pour 50 g; utilisez notre convertisseur pour connaître la quantité Brushed Alpaca Silk nécessaire pour votre taille (notez qu'il vous faudra diviser le poids total par 25, poids d'une pelote de Brushed Alpaca Silk). Bon tricot!
04.09.2024 - 08:21
|
|||||||||||||
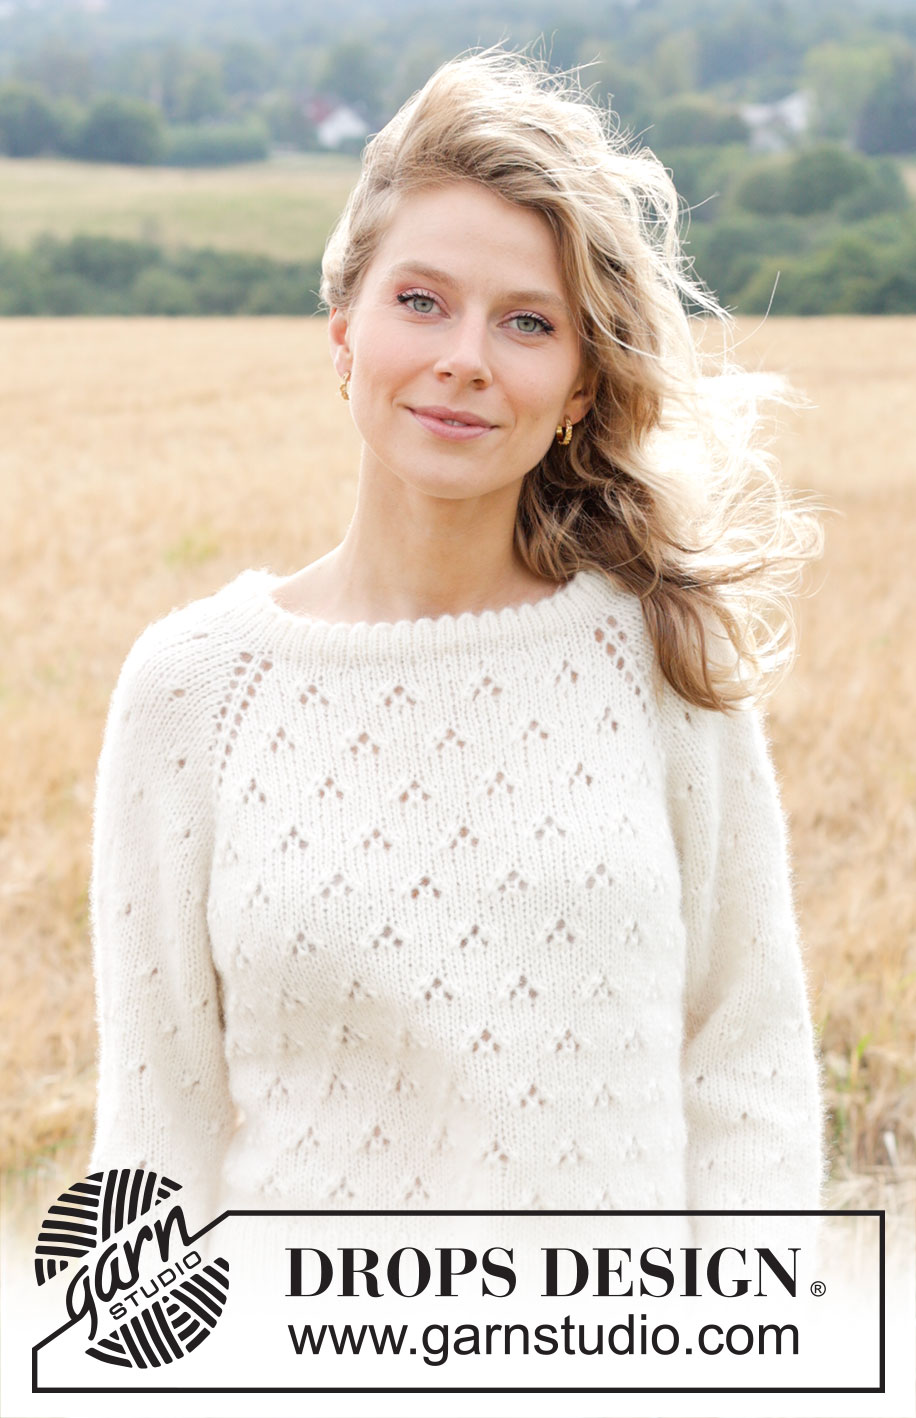
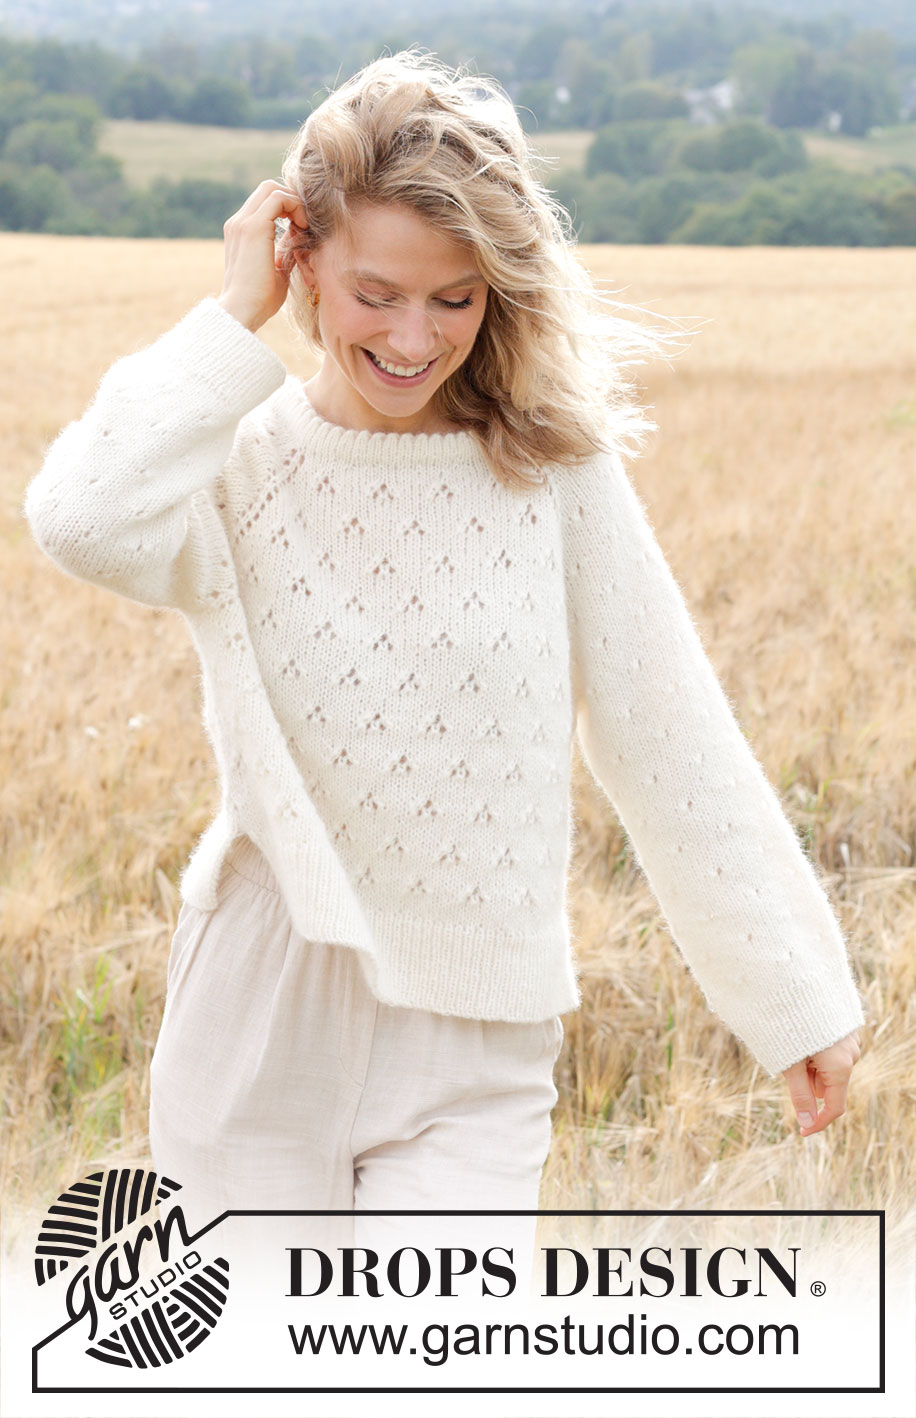
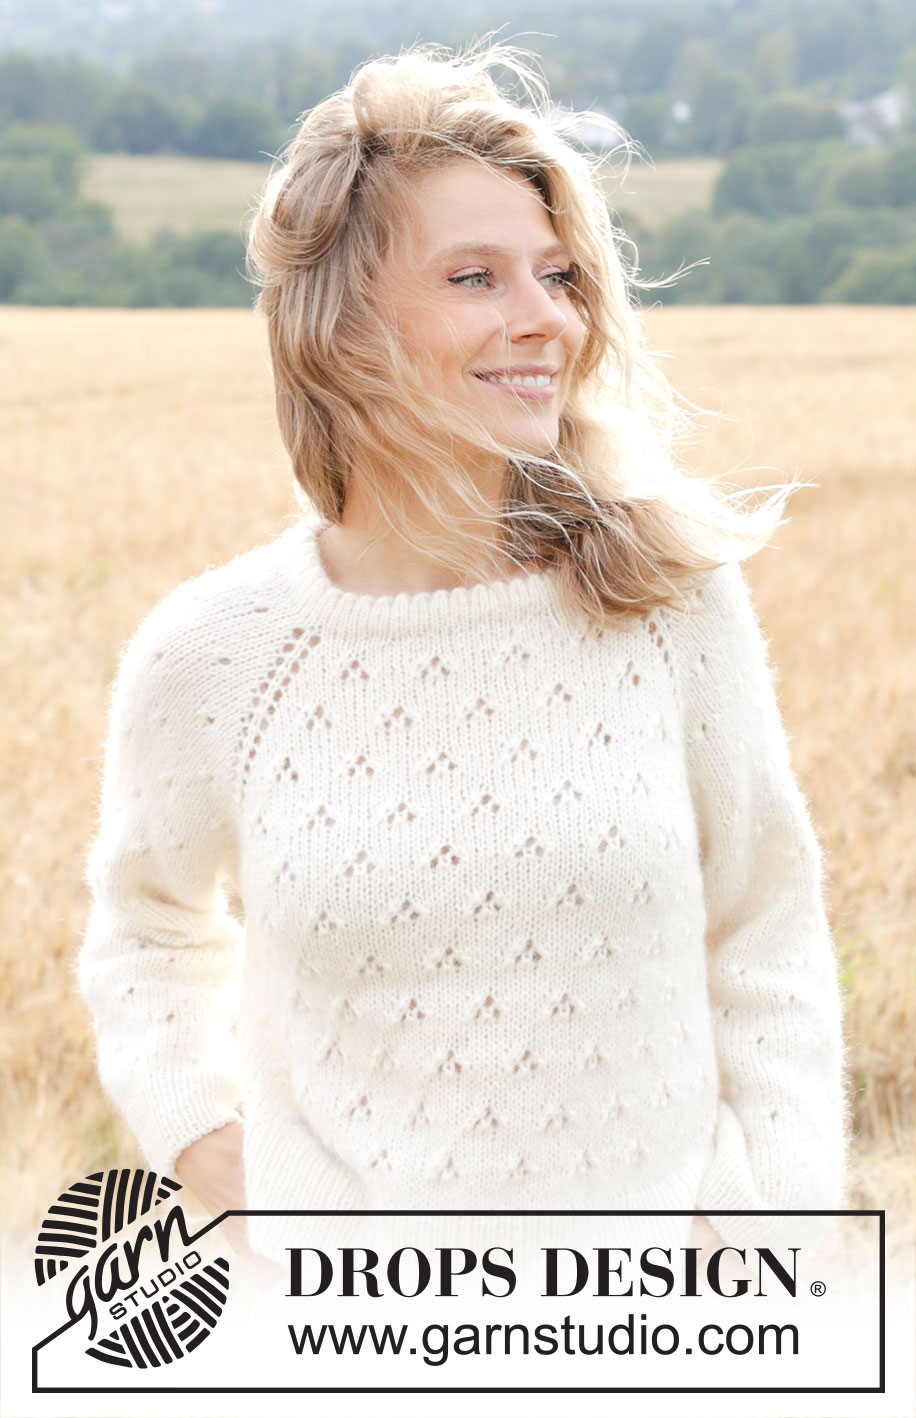
Spring Snowflake#springsnowflakesweater |
|||||||||||||
 |
 |
||||||||||||
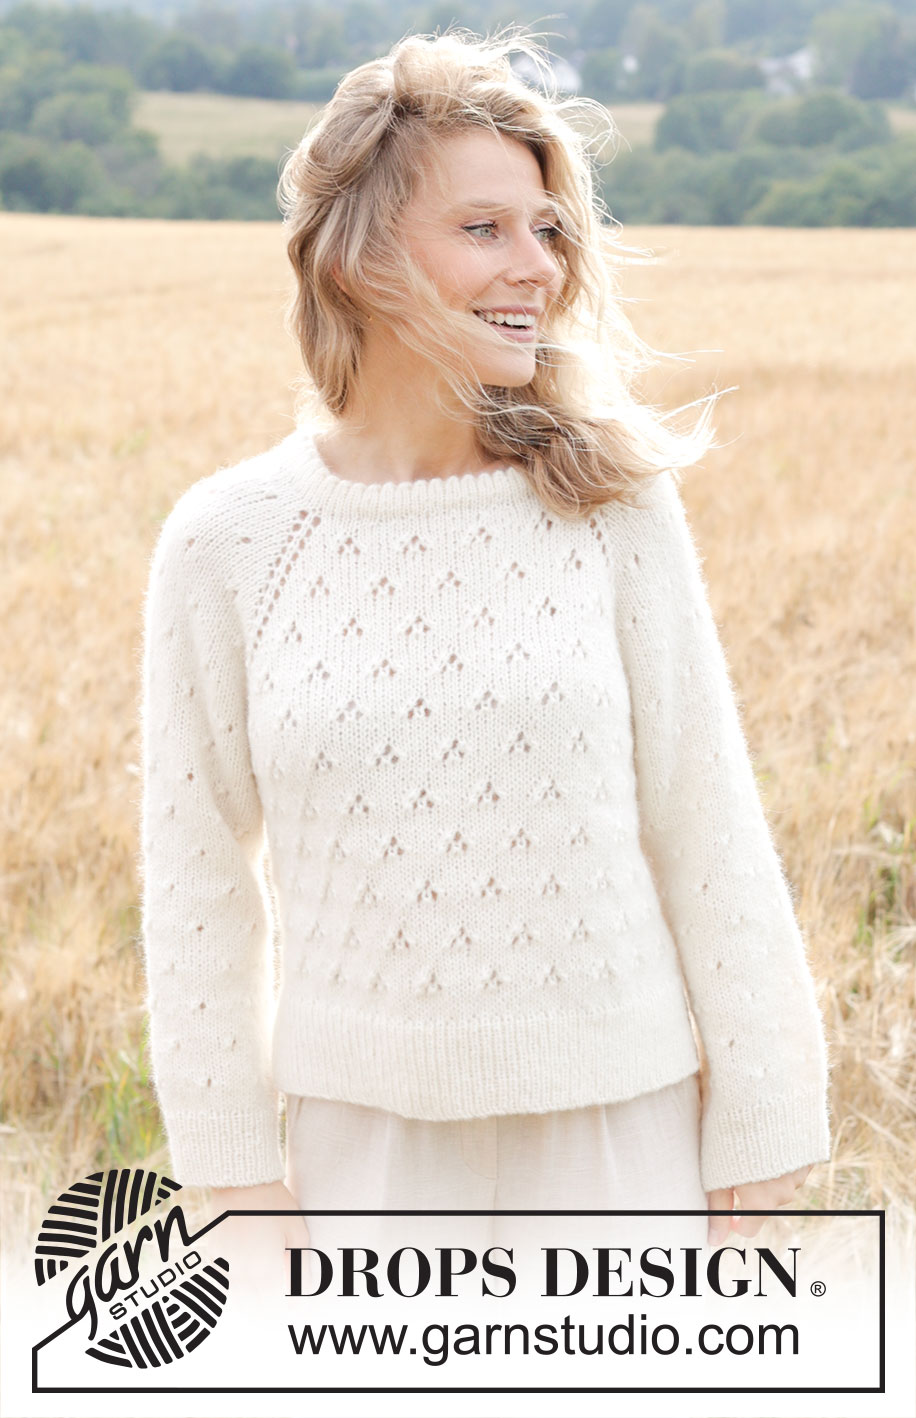
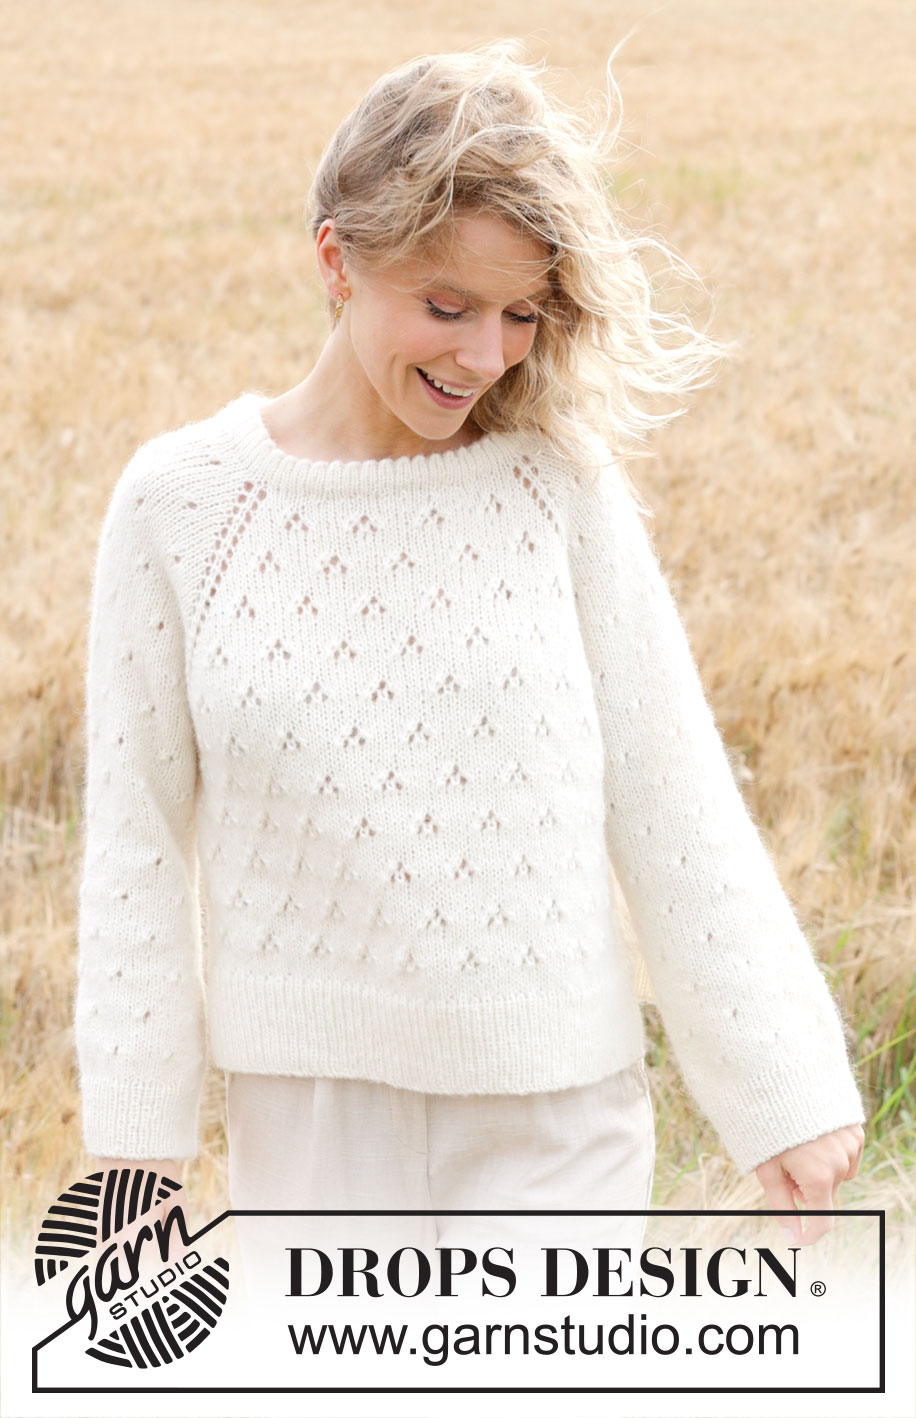
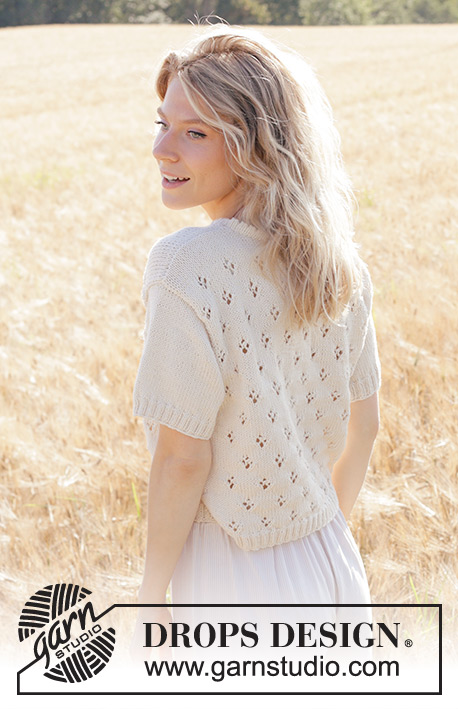
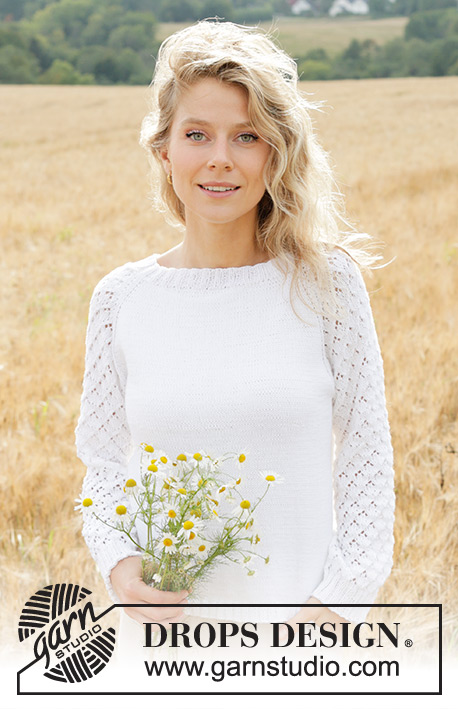
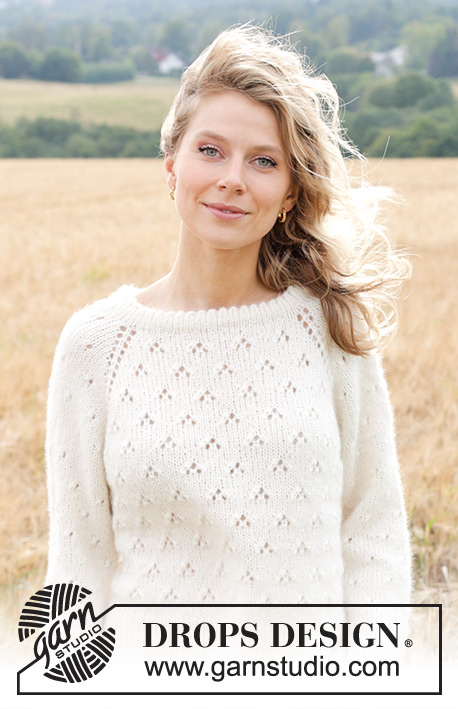
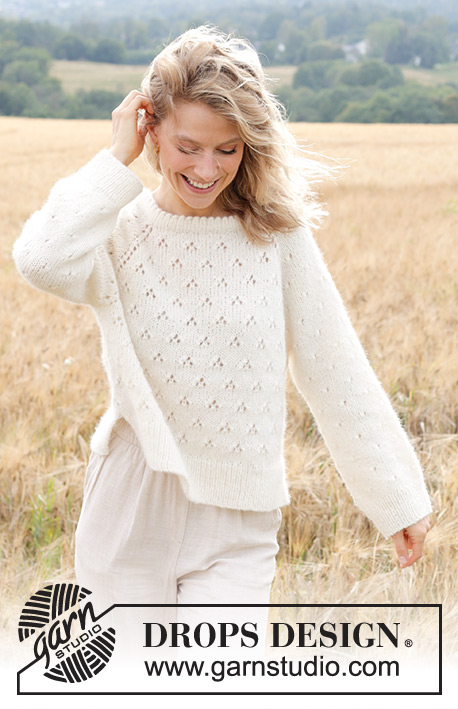
Knitted sweater in DROPS Air or DROPS Paris. The piece is worked top down with double neck, raglan, lace pattern and split in sides. Sizes S - XXXL.
DROPS 249-4 |
|||||||||||||
|
------------------------------------------------------- EXPLANATIONS FOR THE PATTERN: GARTER STITCH (worked back and forth): Knit all rows. 1 ridge = knit 2 rows. PATTERN: See diagrams A.1 (sleeve) and A.2 (front and back pieces). Choose diagram for your size (applies to A.1). As stitches are increased for raglan, work the new stitches into the pattern as shown in A.1 and A.2, i.e., work the new stitches in stockinette stitch until there is room for a complete repeat of the pattern. Any stitches which do not fit into the pattern as you increase are worked in stockinette stitch. INCREASE TIP (evenly spaced): Increase 1 stitch by making 1 yarn over, which is worked twisted on the next round to avoid a hole. RAGLAN: Increase 1 stitch after/before 1 knitted stitch in each transition between body and sleeves (4 marker-stitches called raglan-stitches in the text). Increase 1 stitch by making 1 yarn over, which is knitted on the next round to leave a hole. DECREASE TIP (for sleeves): Decrease 2 stitches on the round by decreasing 1 stitch on each side of the marker-stitch as follows: Work until there are 3 stitches left before the marker-stitch, knit 2 together, knit 3 (marker-stitch is the middle stitch), slip 1 stitch knit-wise, knit 1 and pass the slipped stitch over the knitted stitch (2 stitches decreased). ------------------------------------------------------- START THE PIECE HERE: ------------------------------------------------------- SWEATER – SHORT OVERVIEW OF THE PIECE: The pattern uses both long and short needles; start with the length which fits the number of stitches and change when necessary. The piece is worked top down, from the right back shoulder, in the round with circular needle. The double neck is worked first, then the yoke. When the yoke is finished, it is divided for body and sleeves, the body is continued in the round while the sleeves wait. The body is divided for the split in each side and each piece is finished separately, back and forth. The sleeves are worked in the round, top down. NECK: Cast on 90-94-94-102-106-112 stitches with circular needle size 5 MM = US 8 and DROPS Air or DROPS Paris. Change to circular needle size 3.5 MM = US 4 (casting on with a larger needle size makes the cast-on edge elastic). Work stockinette stitch in the round for 3 cm = 1⅛". On the next round work a row of holes (= folding edge) as follows: (Knit 2 together, 1 yarn over) to end of round. Continue with stockinette stitch until the neck measures 7 cm = 2¾" from the cast-on edge. Fold the neck double to the inside and work 1 more round of stockinette stitch, working every 4th stitch together with its corresponding stitch on the cast-on edge. You now have a double neck of approx. 3 cm = 1⅛". Insert 1 marker-thread in this round; the yoke is measured from here. YOKE: Change to circular needle size 5 MM = US 8, knit 1 round and increase 6-2-2-14-10-4 stitches evenly spaced – read INCREASE TIP = 96-96-96-116-116-116 stitches. Insert 4 markers, without working the stitches, which will be used when increasing for raglan. Count 15-15-15-17-17-17 stitches (= sleeve), insert marker-1 in the next stitch, count 31-31-31-39-39-39 stitches (= front piece), insert marker-2 in the next stitch, count 15-15-15-17-17-17 stitches (= sleeve), insert marker-3 in the next stitch, count 31-31-31-39-39-39 stitches (= back piece), insert marker-4 in the last stitch. Now work PATTERN at the same time as increasing for RAGLAN, working the first round as follows: Increase 1 stitch for RAGLAN after marker-4 – read description above, work PATTERN A.1 – read description above (= sleeve), increase 1 stitch for raglan on each side of marker-1, work A.2A, then A.2B, 2-2-2-3-3-3 times in width, A.2C (= front piece), increase 1 stitch for raglan on each side of marker-2, work A.1 (= sleeve), increase 1 stitch for raglan on each side of marker-3, work A.2A, then A.2B, 2-2-2-3-3-3 times in width, A.2C (= back piece), increase 1 stitch for raglan before marker-4, knit marker-stitch-4. Continue this pattern and increase for raglan on each side of the 4 raglan-stitches every 2nd round a total of 16-16-18-22-20-12 times (including the first increase described above) = 224-224-240-292-276-212 stitches. REMEMBER THE KNITTING GAUGE! Continue increasing as follows: Increase for raglan on the front and back pieces every 2nd round but only increase on the sleeves every 4th round (= alternately 4 and 8 increased stitches). Increase like this a total of 4-8-10-6-8-20 times on the front and back pieces (2-4-5-3-4-10 times on the sleeves). After the last increase there are 248-272-300-328-324-332 stitches. The yoke measures approx. 18-22-25-25-25-29 cm = 7"-8¾"-9¾"-9¾"-9¾"-11⅜" from the marker-thread on the neck. Continue working without further increases until the yoke measures 20-22-25-25-26-29 cm = 8"-8¾"-9¾"-9¾"-10¼"-11⅜" from the marker-thread. DIVIDE FOR BODY AND SLEEVES: Place the first 51-55-61-67-65-61 stitches on 1 thread for the sleeve (= between markers 4 and 1), cast on 7-7-7-7-15-23 stitches (= in side under sleeve), work the next 73-81-89-97-97-105 stitches in pattern as before (= front piece), place the next 51-55-61-67-65-61 stitches on 1 thread for the sleeve (= between markers 2 and 3), cast on 7-7-7-7-15-23 stitches (= in side under sleeve), work the last 73-81-89-97-97-105 stitches as before (= back piece). The body and sleeves are finished separately. The piece is now measured from here! BODY: = 160-176-192-208-224-256 stitches. Insert 1 marker in each side, in the middle stitch of the 7-7-7-7-15-23 cast-on under each sleeve. Allow the markers to follow your work onwards; they will mark the split in each side. Knit to the first marker. The round starts here. Continue A.2 in the round over all stitches – making sure to continue the pattern from the yoke. Work until the body measures 22-22-21-21-22-21 cm = 8¾"-8¾"-8¼"-8¼"-8¾"-8¼" from the division – adjusting so there are at least 5 knitted rounds after a row of holes. Now divide for the split in each side by each marker and finish the front and back pieces separately. FRONT PIECE: = 80-88-96-104-112-128 stitches, continued back and forth. On the first row (= right side), start working rib and increase 35-37-41-45-47-55 stitches evenly on the row as follows = 115-125-137-149-159-183 stitches: Change to circular needle size 3.5 MM = US 4, work 1 GARTER STITCH - read description above, rib (= knit 1, purl 1 – remember the increases), until there are 2 stitches left, knit 1 and 1 garter stitch. When the rib measures 8 cm = 3⅛", bind off with Italian bind-off or with rib. The sweater measures approx. 54-56-58-60-62-64 cm = 21¼"-22"-22¾"-23⅝"-24⅜"-25¼" from the shoulder. BACK PIECE: Work in the same way as the front piece. SLEEVES: Place the 51-55-61-67-65-61 stitches from the thread on the one side of the piece on short circular needle/double pointed needles size 5 MM = US 8 and knit up 1 stitch in each of the 7-7-7-7-15-23 stitches cast on under the sleeve = 58-62-68-74-80-84 stitches. Insert a marker in the middle of the 7-7-7-7-15-23 stitches under the sleeve. Start at the marker and continue A.1 in the round – making sure to continue the pattern from the yoke. Stitches which do not fit into the pattern under the sleeve are worked in stockinette stitch. . When the sleeve measures 2 cm = ¾" from the division, decrease 2 stitches under the sleeve – read DECREASE TIP. Decrease like this every 2nd round a total of 0-0-0-5-6-7 times, then every 2 cm = ¾" 4-5-8-5-6-6 times = 50-52-52-54-56-58 stitches. Continue working until the sleeve measures 39-38-36-36-35-32 cm = 15¼"-15"-14¼"-14¼"-13¾"-12½" from the division – adjusting so there are several knitted rounds after the last row of holes. There is approx. 6-6-6-7-7-7 cm = 2⅜"-2⅜"-2⅜"-2¾"-2¾"-2¾" left; try the sweater on and work to desired length before the rib. Change to double pointed needles size 3.5 MM = US 4 and start working rib (knit 1, purl 1), at the same time as increasing 8-8-10-10-10-10 stitches evenly on the first round = 58-60-62-64-66-68 stitches. When the rib measures 6-6-6-7-7-7 cm = 2⅜"-2⅜"-2⅜"-2¾"-2¾"-2¾", bind off with Italian bind-off or with rib. The sleeve measures approx. 45-44-42-43-42-39 cm = 17¾"-17¼"-16½"-17"-16½"-15¼". |
|||||||||||||
Diagram explanations |
|||||||||||||
|
|||||||||||||
 |
|||||||||||||
 |
|||||||||||||
 |
|||||||||||||
 |
|||||||||||||
Have you finished this pattern?Tag your pictures with #dropspattern #springsnowflakesweater or submit them to the #dropsfan gallery. Do you need help with this pattern?You'll find 33 tutorial videos, a Comments/Questions area and more by visiting the pattern on garnstudio.com. © 1982-2026 DROPS Design A/S. We reserve all rights. This document, including all its sub-sections, has copyrights. Read more about what you can do with our patterns at the bottom of each pattern on our site. |
|||||||||||||


With over 40 years in knitting and crochet design, DROPS Design offers one of the most extensive collections of free patterns on the internet - translated to 17 languages. As of today we count 324 catalogs and 12290 patterns - 12280 of which are translated into English (US/in).
We work hard to bring you the best knitting and crochet have to offer, inspiration and advice as well as great quality yarns at incredible prices! Would you like to use our patterns for other than personal use? You can read what you are allowed to do in the Copyright text at the bottom of all our patterns. Happy crafting!
Post a comment to pattern DROPS 249-4
We would love to hear what you have to say about this pattern!
If you want to leave a question, please make sure you select the correct category in the form below, to speed up the answering process. Required fields are marked *.