
Popular categories
Looking for a yarn?


Comments / Questions (89)
![]() Anna Maria wrote:
Anna Maria wrote:
Buongiorno, ho eseguito il collo che è venuto benissimo, ora non riesco a capire il diagramma. sto usando Drops Nepal lana e alpaca e vorrei fare la taglia m. Potete aiutarmi?
01.11.2024 - 10:51DROPS Design answered:
Buongiorno Anna Maria, che cosa non le è chiaro del diagramma? I diagrammi si leggono dal basso verso l'alto, da destra a sinistra lavorando in tondo. Buon lavoro!
02.11.2024 - 11:57
![]() Antonella wrote:
Antonella wrote:
Buonasera, nello sprone non sono indicati che tipo di aumenti bisogna fare. Grazie mille!! 😘
03.10.2024 - 21:29DROPS Design answered:
Buongiorno Antonella, per gli aumenti distribuiti uniformemente può utilizzare il metodo che preferisce, gli altri sono indicati nel diagramma. Buon lavoro!
04.10.2024 - 10:07
![]() Gayatri Narayan wrote:
Gayatri Narayan wrote:
Hi How do I know what the finished measurements for this pattern are, for me to decide on the size to knit? A previous drop pattern had finished measurements specified which helped me choose my size.
06.09.2024 - 22:15DROPS Design answered:
Dear Gayatri, you can find the measurements in cm in the size chart at the bottom of the pattern. You can see how to read this chart here: https://www.garnstudio.com/lesson.php?id=24&cid=19. You can also find the measurements in cm and inches in the US version of the pattern, here: https://www.garnstudio.com/pattern.php?id=10967&cid=17. Happy knitting!
08.09.2024 - 18:54
![]() Hanne Elena Rørbech wrote:
Hanne Elena Rørbech wrote:
Findes denne model til børn ? jeg har forsøgt mig at strikke den selv . hilsen Hanne Elena.
23.08.2024 - 08:57
![]() Ujwala wrote:
Ujwala wrote:
Sorry but could not understand your revert. What is blocking? Would appreciate if you could guide me in detail please
14.06.2024 - 17:46DROPS Design answered:
Dear Ujwala, you can see how to block in this video: https://www.garnstudio.com/video.php?id=516&lang=en. This technique allows us to better the shape the piece and stretch it correctly, before starting to use it. It also helps to even out irregular stitches, such as tighter/looser stitches. Happy knitting!
16.06.2024 - 17:59
![]() Ujwala wrote:
Ujwala wrote:
Further to my query wish to further state that the tightness is just under the arms. The black yarn behind the stitches picked up under the sleeve which is knitted in beige colour. Hope u have been able make my query understandable.
13.06.2024 - 18:09
![]() Ujwala wrote:
Ujwala wrote:
Hi I have almost completed this project. I used the fair isle method while switching colours. It feels slightly tight just under the chest. About two or three rows only. How do I rectify it now? Could you please help? Would appreciate a quick response.
13.06.2024 - 17:41DROPS Design answered:
Dear Ujwala, have you tried blocking the piece? Blocking can help even out the stitches, and ip you pull the piece to the necesarry measurements and pin, can also be helpful with the size to a small degree. Happy Crafting!
13.06.2024 - 22:55
![]() Marisa Fidalgo Benayas wrote:
Marisa Fidalgo Benayas wrote:
Hola me podría decir como conseguir este patrón en azul que también tiene dibujo abajo. QueenVictoriaa Inverted Peaks Sweater gracias
17.04.2024 - 19:13DROPS Design answered:
Hola Marisa, nosotros no hacemos patrones personalizados. Puedes modificar el dibujo a tu gusto y usar otros hilos para que el patrón quede en otros colores. Si te refieres a una foto de nuestra galería DROPS fan, puedes intentar ponerte en contacto con la diseñadora haciendo click en el proyecto concreto para consultar sus modificaciones.
21.04.2024 - 23:51
![]() Eugenia wrote:
Eugenia wrote:
Hola, quisiera saber cómo uno los 72 puntos al principio para tejer en redondo? Agrego uno más y los junto?? Gracias
27.03.2024 - 01:23DROPS Design answered:
Hola Eugenia, puedes ver el siguiente vídeo para entender cómo montar, unir y continuar trabajando en redondo: https://www.garnstudio.com/video.php?id=44&lang=es.
31.03.2024 - 23:18
![]() Myriem Leben wrote:
Myriem Leben wrote:
Bonjour Pour l empiècement de ce modèle taille L j'ai 90 mailles on dit de continuer avec le diagramme A1 en augmentant suivant le diagramme jusqu'à 26 cm le dernier tour d'augmentations tricoté on obtient 234 mailles. Combien de motif A1 on a sur tout l'empiècement
16.02.2024 - 22:52DROPS Design answered:
Bonjour Mme Leben, au tout début de A.1 on a 5 mailles, autrement dit, vous allez répéter 18 fois les 5 mailles de A.1 et augmenter comme indiqué dans le diagramme; vous aurez 13 mailles dans chaque A.1 quand les augmentations seront terminées, soit 18 x 13 = 234 mailles. Bon tricot!
19.02.2024 - 07:43
|
||||||||||
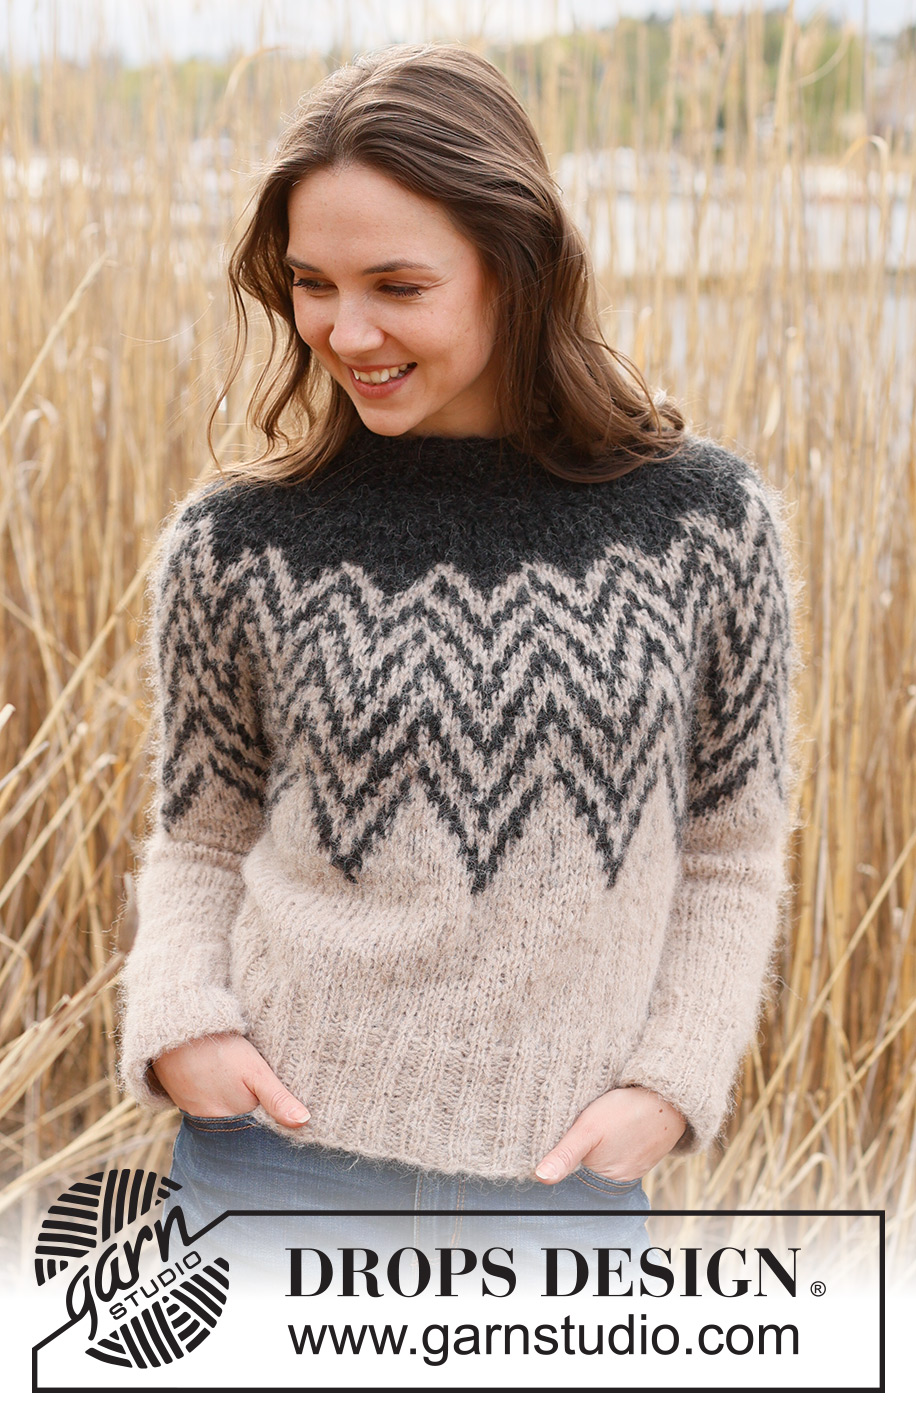
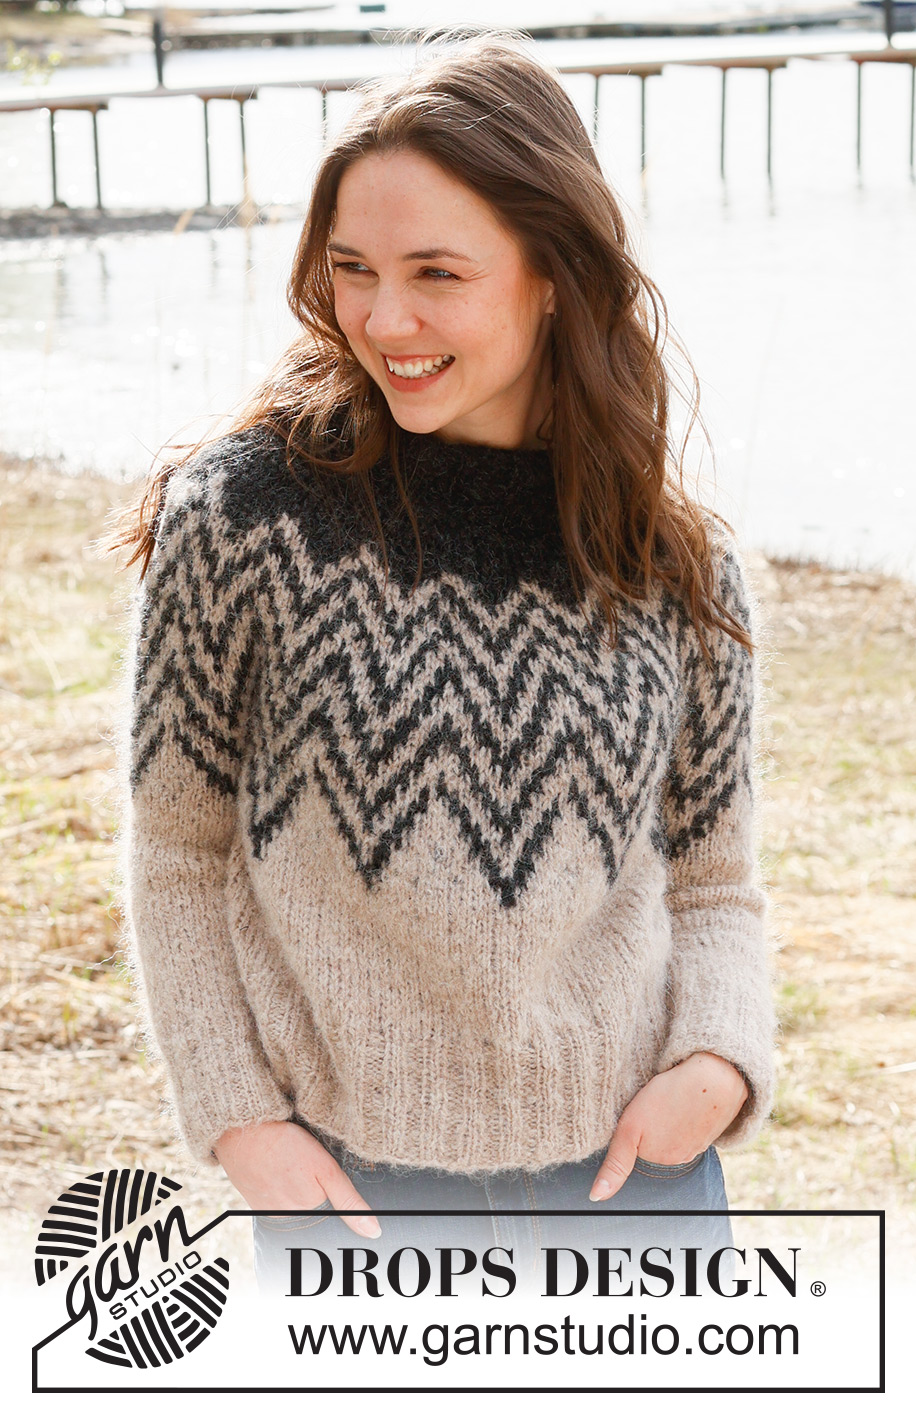
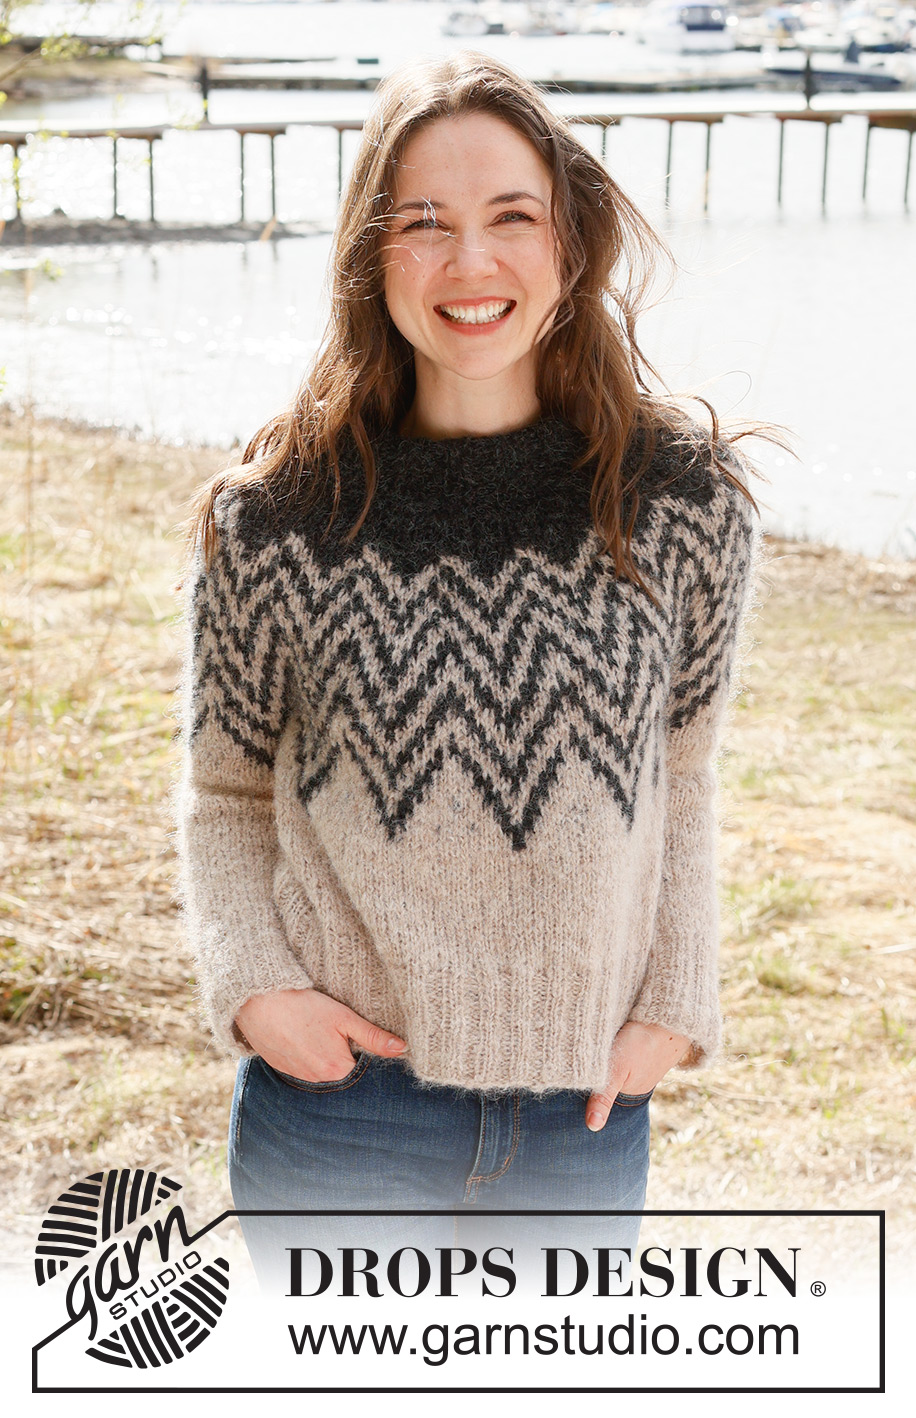
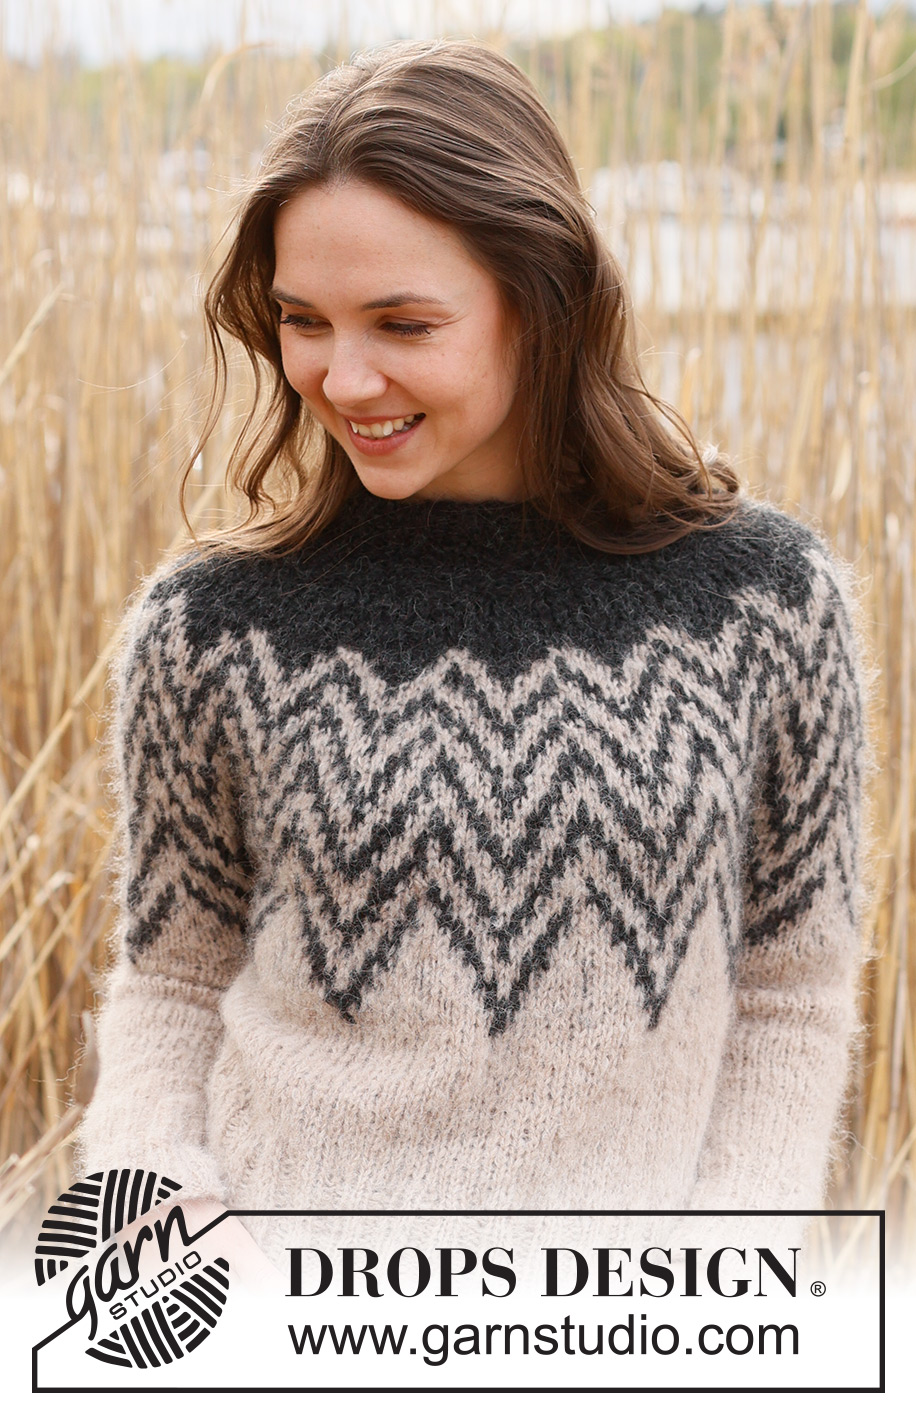
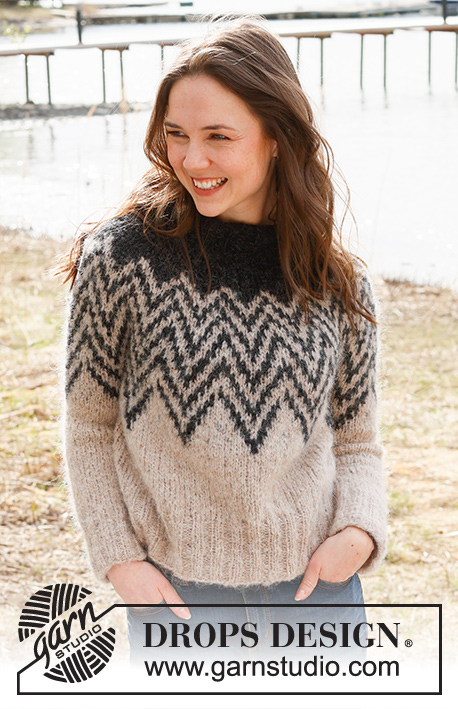
Inverted Peaks Sweater#invertedpeakssweater |
||||||||||
 |
 |
|||||||||
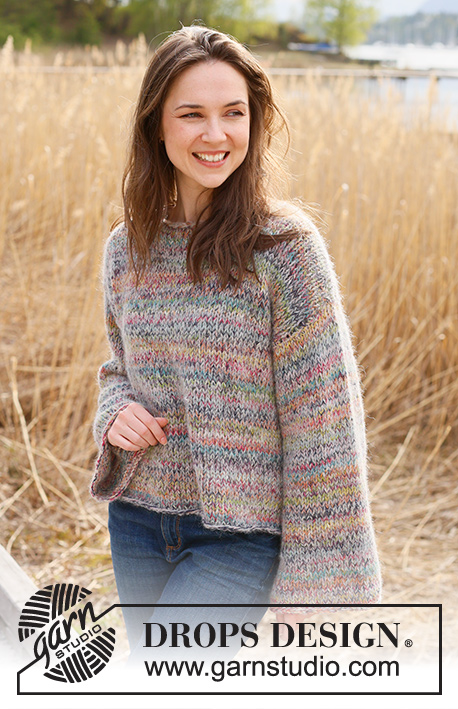
Knitted sweater in DROPS Melody. The piece is worked top down with double neck, round yoke and two-colored pattern. Sizes S - XXXL.
DROPS 235-4 |
||||||||||
|
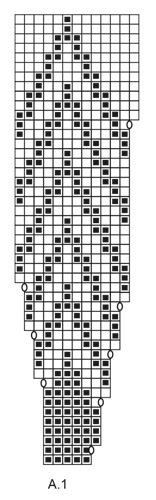
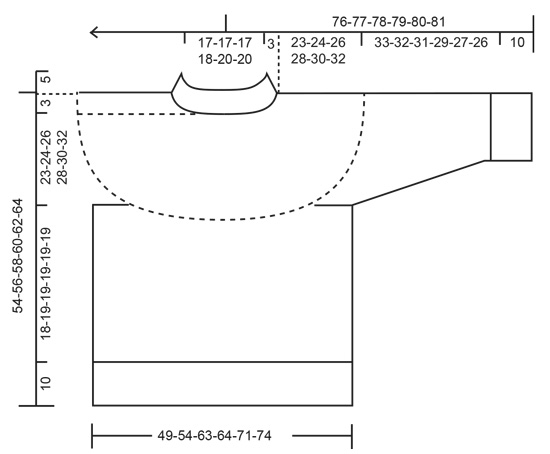
------------------------------------------------------- EXPLANATIONS FOR THE PATTERN: ------------------------------------------------------- PATTERN: See diagram A.1. The pattern is worked in stockinette stitch. KNITTING TIP: To avoid the knitting gauge losing its elasticity when working pattern it is important that the strands at the back are not tight. Use a size larger needle when working pattern if the piece becomes tight. DECREASE TIP (for sleeves): Work until there are 3 stitches left before the marker-thread, knit 2 together, knit 2 (marker-thread sits between these 2 stitches), slip 1 stitch as if to knit, knit 1 and pass the slipped stitch over the knitted stitch (2 stitches decreased). ------------------------------------------------------- START THE PIECE HERE: ------------------------------------------------------- SWEATER – SHORT OVERVIEW OF THE PIECE: The neck and yoke are worked in the round with circular needle, top down. The yoke is divided for body and sleeves and the body is continued in the round with circular needle, top down. The sleeves are worked with short circular needle/double pointed needles, top down. DOUBLE NECK: Cast on 72-72-72-76-84-84 stitches with color black DROPS Melody, using short circular needles size 5 MM = US 8 and 6 MM = US 10 held together (doing this gives you an elastic cast-on edge). Remove the needle size 6 mm = US 10 and work rib in the round (knit 2, purl 2) for 10 cm = 4". Fold the neck double to the inside and work another round of rib, at the same time as you work every 2nd stitch together with its corresponding stitch on the cast-on edge. You now have a double neck. Insert 1 marker mid-front – the yoke is measured from here. YOKE: Change to circular needle size 6 MM = US 10. Knit 1 round and increase 8-8-18-14-26-26 stitches evenly spaced = 80-80-90-90-110-110 stitches. Work 0-1-3-3-3-4 rounds of stockinette stitch with color black. Then work A.1 – read KNITTING TIP! Increase as shown in the diagram. REMEMBER THE KNITTING GAUGE! Continue A.1 until the yoke measures 23-24-26-28-30-32 cm = 9"-9½"-10¼"-11"-11¾"-12½" from the marker. The last increase has been worked and there are 208-208-234-234-286-286 stitches. Now divide for the body and sleeves as described below – NOTE: A.1 is not finished; it is continued on both the body and sleeves. Continue A.1 over the first 39-39-39-39-52-52 stitches (half back-piece), place the next 39-39-39-39-52-52 on 1 thread for the sleeve, cast on 4-10-10-12-8-12 stitches (in side under sleeve), continue A.1 over the next 65-65-78-78-91-91 stitches (front piece), place the next 39-39-39-39-52-52 stitches on 1 thread for the sleeve, cast on 4-10-10-12-8-12 stitches (in side under sleeve), continue A.1 over the remaining 26-26-39-39-39-39 stitches on the back piece. The body and sleeves are finished separately. BODY: = 138-150-176-178-198-206 stitches. Continue A.1 in the round; the new stitches under each sleeve are worked in color beige. When A.1 is finished, continue with stockinette stitch and color beige until the body measures 18-19-19-19-19-19 cm = 7"-7½"-7½"-7½"-7½"-7½" from the division. Knit 1 round and increase 6-6-12-12-14-14 stitches evenly spaced = 144-156-188-190-212-220 stitches. Change to circular needle size 5 MM = US 8 and work rib (knit 2, purl 2) for 10 cm = 4". Bind off with knit over knit and purl over purl. The sweater measures approx. 54-56-58-60-62-62 cm = 21¼"-22"-22¾"-23⅝"-24⅜"-24⅜" from the shoulder down. SLEEVES: Place the 39-39-39-39-52-52 stitches from the thread on the one side of the piece on short circular needle/double pointed needles size 6 MM = US 10 and knit up 1 stitch in each of the 4-10-10-12-8-12 stitches cast on under the sleeve = 43-49-49-51-60-64 stitches. Insert a marker-thread in the middle of the new stitches under the sleeve. Allow the thread to follow your work onwards; it will be used when decreasing under the sleeve. Start at the marker-thread and continue A.1 in the round ; the new stitches under the sleeve are worked in color beige. When A.1 is finished, continue with stockinette stitch and color beige over all stitches. AT THE SAME TIME when the sleeve measures 3-3-3-4-4-4 cm = 1⅛"-1⅛"-1⅛"-1½"-1½"-1½" from the division, decrease 2 stitches under the sleeve – read DECREASE TIP. Decrease like this every 12-6-6-7-4-3 cm = 4¾"-2⅜"-2⅜"-2¾"-1½"-1⅛" a total of 3-5-5-4-6-7 times = 37-39-39-43-48-50 stitches. Continue working until the sleeve measures 33-32-31-29-27-26 cm = 13"-12½"-12¼"-11⅜"-10⅝"-10¼" from the division. Knit 1 round and increase 7-5-9-9-8-10 stitches evenly spaced = 44-44-48-52-56-60 stitches Change to double pointed needles size 5 MM = US 8 and work rib (knit 2, purl 2) for 10 cm = 4". Bind off with knit over knit and purl over purl. The sleeve measures approx. 43-42-41-39-37-36 cm = 17"-16½"-16⅛"-15¼"-14½"-14¼" from the division. Work the other sleeve in the same way. |
||||||||||
Diagram explanations |
||||||||||
|
||||||||||
 |
||||||||||
 |
||||||||||
Have you finished this pattern?Tag your pictures with #dropspattern #invertedpeakssweater or submit them to the #dropsfan gallery. Do you need help with this pattern?You'll find 29 tutorial videos, a Comments/Questions area and more by visiting the pattern on garnstudio.com. © 1982-2026 DROPS Design A/S. We reserve all rights. This document, including all its sub-sections, has copyrights. Read more about what you can do with our patterns at the bottom of each pattern on our site. |
||||||||||


With over 40 years in knitting and crochet design, DROPS Design offers one of the most extensive collections of free patterns on the internet - translated to 17 languages. As of today we count 324 catalogs and 12290 patterns - 12280 of which are translated into English (US/in).
We work hard to bring you the best knitting and crochet have to offer, inspiration and advice as well as great quality yarns at incredible prices! Would you like to use our patterns for other than personal use? You can read what you are allowed to do in the Copyright text at the bottom of all our patterns. Happy crafting!
Post a comment to pattern DROPS 235-4
We would love to hear what you have to say about this pattern!
If you want to leave a question, please make sure you select the correct category in the form below, to speed up the answering process. Required fields are marked *.