Inverted Peaks Sweater by DROPS Design

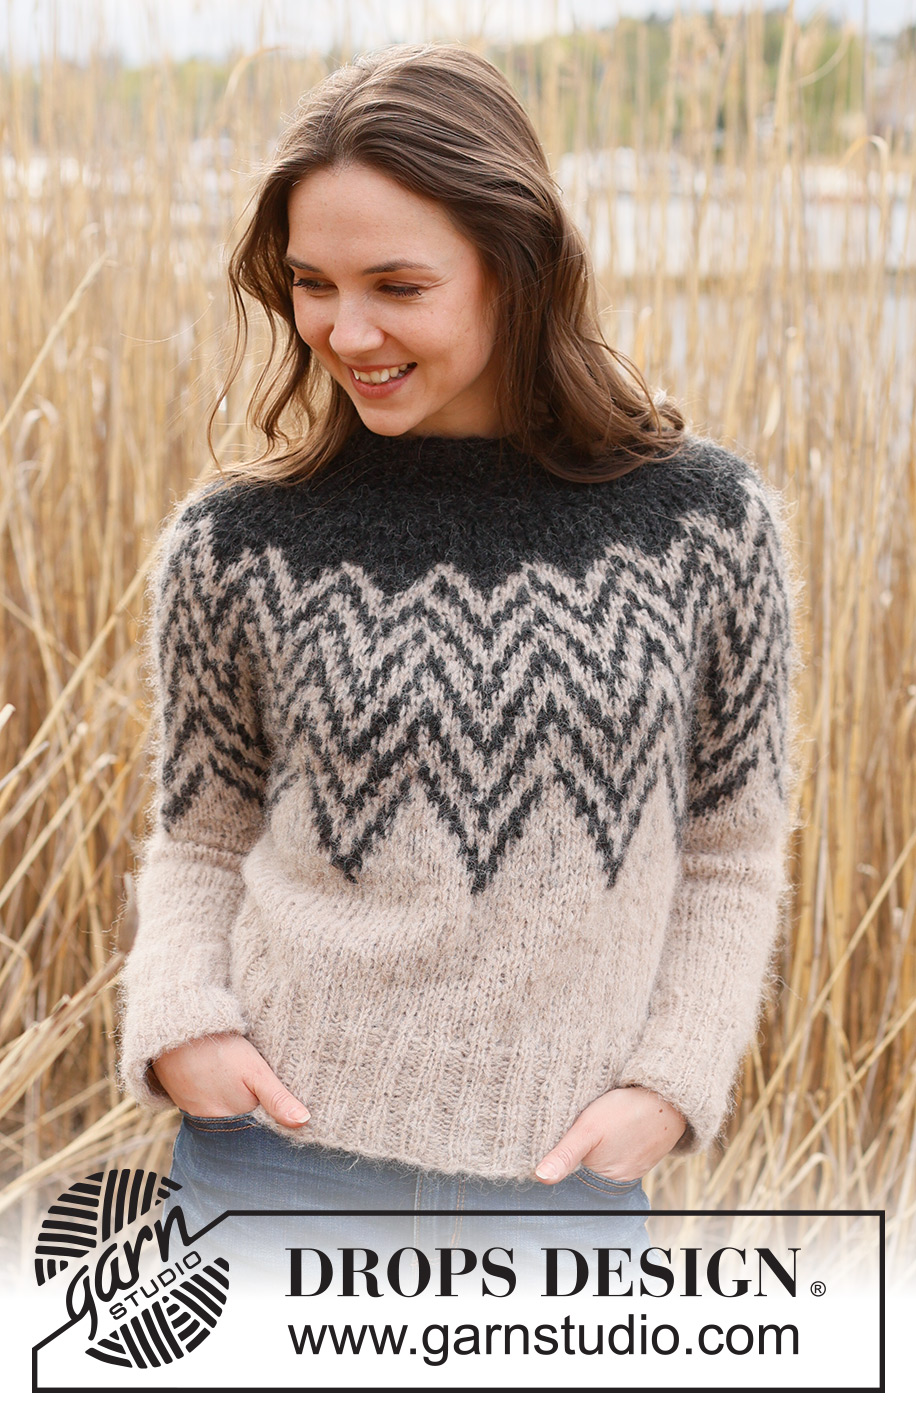
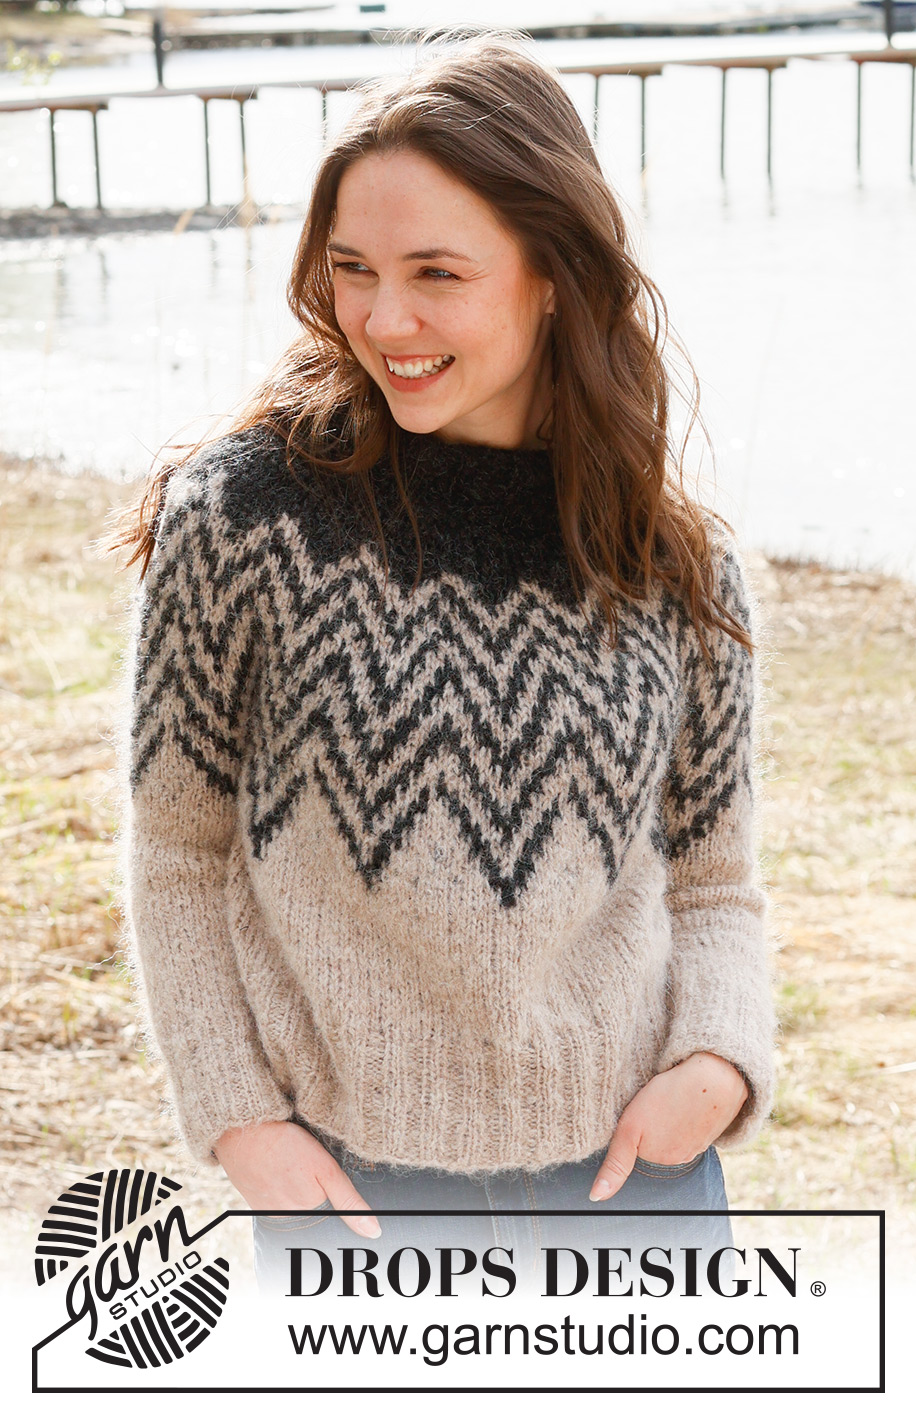
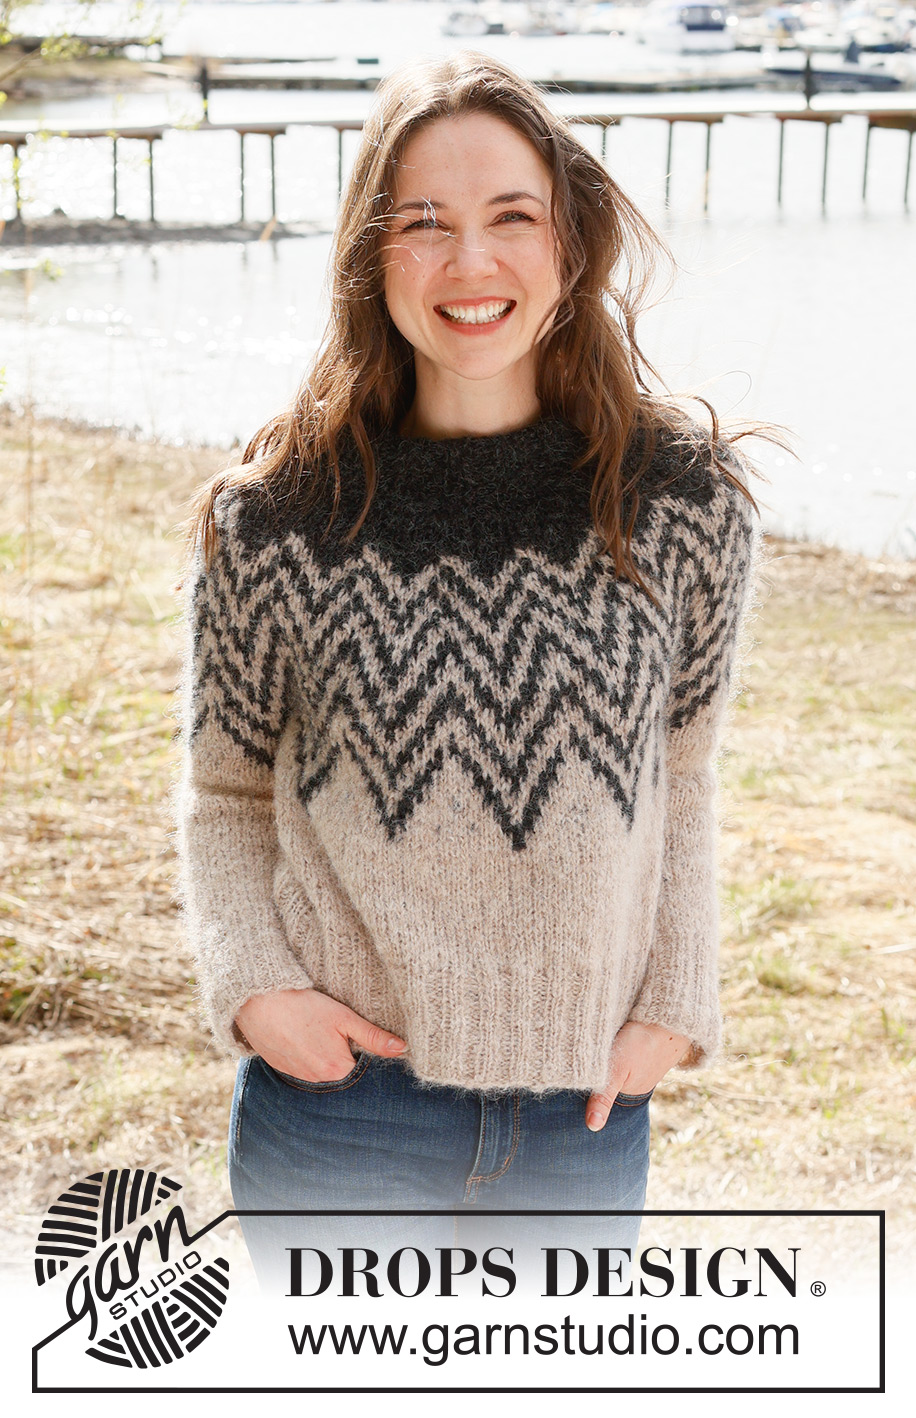
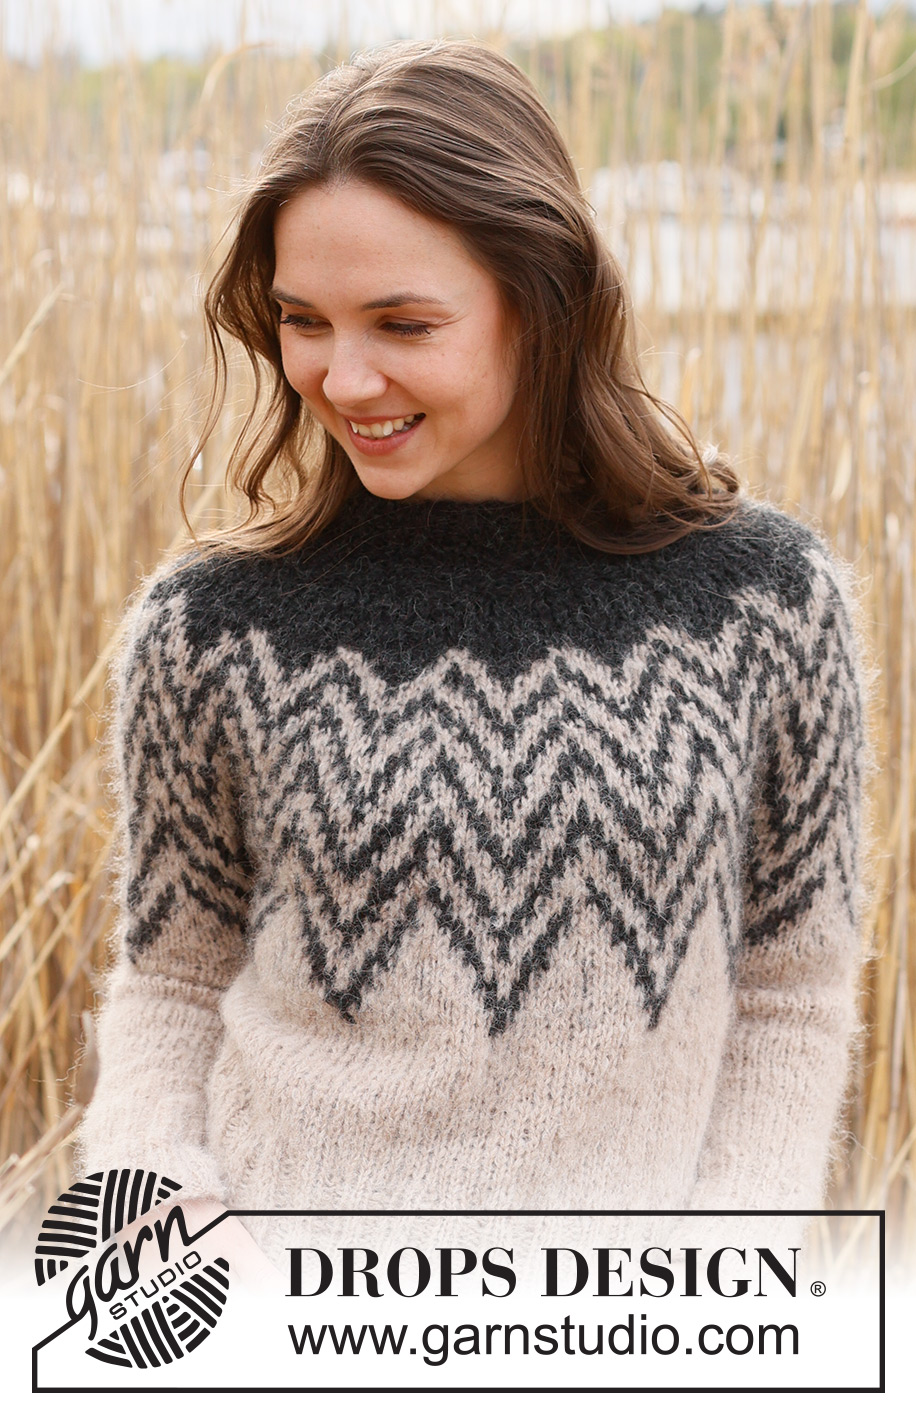
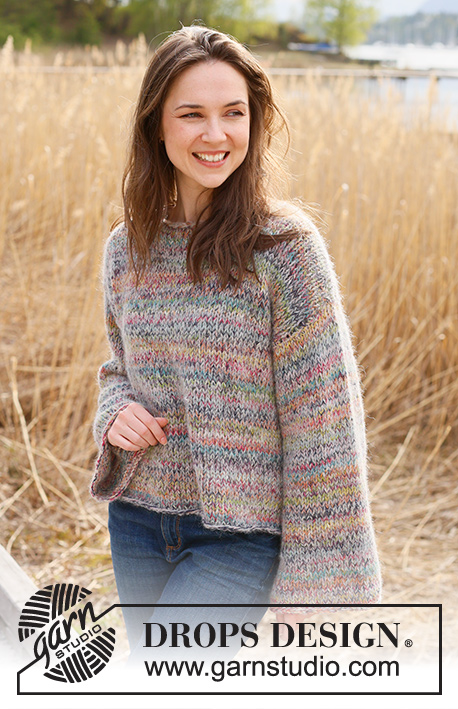
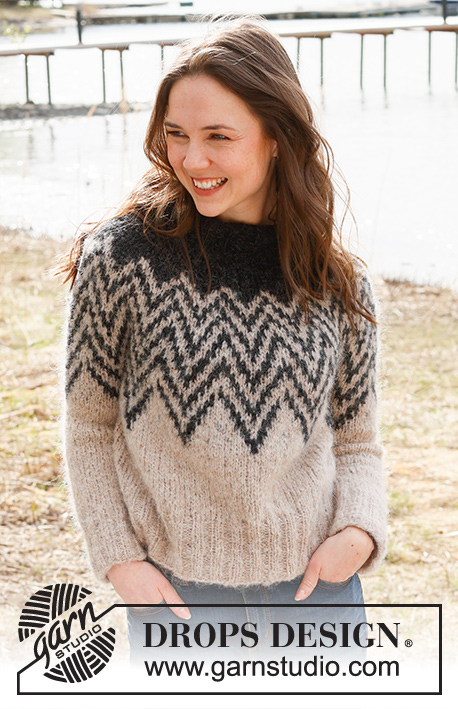
Knitted sweater in DROPS Melody. The piece is worked top down with double neck, round yoke and two-colored pattern. Sizes S - XXXL.

DROPS 235-4
DROPS Design: Pattern ml-090
Yarn group D
-------------------------------------------------------

SIZES:
S - M - L - XL - XXL – XXXL

Finished measurements:
Chest measurements: 98-108-136-138-142-148 cm = 38 1/2"-42 1/2"-53 1/2"-54 1/4"-55 3/4"-58 3/8"
Full length: 54-56-58-60-62-64 cm = 21 1/4"-22"-22 3/4"-23 5/8"-24 3/8"-25 1/4"
All measurements in charts are in cm.

MATERIALS:
DROPS MELODY from Garnstudio (belongs to yarn group D)
150-150-150-200-200-200 g color 15, beige
100-100-150-150-150-150 g color 05, black

NEEDLES:
DROPS CIRCULAR NEEDLE SIZE 6 MM = US 10: Length 40 cm = 16” and 80 cm = 32”.
DROPS CIRCULAR NEEDLE SIZE 5 MM = US 8: Length 40 cm = 16” and 80 cm = 32”.
DROPS DOUBLE POINTED NEEDLES SIZE 6 MM = US 10.
DROPS DOUBLE POINTED NEEDLES SIZE 5 MM = US 8.
The technique MAGIC LOOP can be used – you then only need circular needle of 80 cm = 32” in each size.

KNITTING GAUGE:
14 stitches in width and 16 rows in height with stockinette stitch = 10 x 10 cm = 4” x 4”.
NOTE: Needle size is only a guide. If you get too many stitches on 10 cm = 4”, change to a larger needle size. If you get too few stitches on 10 cm = 4”, change to a smaller needle size.

-------------------------------------------------------

Magic loop – See the technique here
Knitting tension – See how to measure it and why here
Alternative Yarn – See how to change yarns here
Yarn Groups A to F – Use the same pattern and change the yarn here
Yarn usage using an alternative yarn – Use our yarn converter here

-------------------------------------------------------


71% Alpaca, 25% Wool, 4% Polyamide
from 4.45 $ /50g
DROPS Melody uni colour DROPS Melody uni colour 4.45 $ /50g
Wool Warehouse Direct Ltd
Order
needles DROPS Needles & Hooks
You can get the yarn to make this pattern from 22.25$. Read more.

Pattern instructions

NOTE: This pattern is written in American English. All measurements in charts are in cm. For conversion from inches to cm - click here. There are different terms for crocheting in American and British English. If this pattern includes crochet, click for "crochet terms" here. For this pattern in British English, please click here.
-------------------------------------------------------

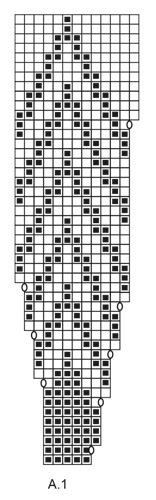
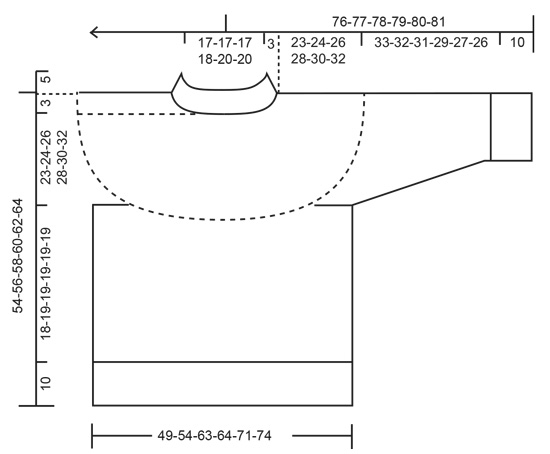
EXPLANATIONS FOR THE PATTERN:
-------------------------------------------------------

PATTERN:
See diagram A.1. The pattern is worked in stockinette stitch.

KNITTING TIP:
To avoid the knitting gauge losing its elasticity when working pattern it is important that the strands at the back are not tight. Use a size larger needle when working pattern if the piece becomes tight.

DECREASE TIP (for sleeves):
Work until there are 3 stitches left before the marker-thread, knit 2 together, knit 2 (marker-thread sits between these 2 stitches), slip 1 stitch as if to knit, knit 1 and pass the slipped stitch over the knitted stitch (2 stitches decreased).

-------------------------------------------------------

START THE PIECE HERE:

-------------------------------------------------------

SWEATER – SHORT OVERVIEW OF THE PIECE:
The neck and yoke are worked in the round with circular needle, top down. The yoke is divided for body and sleeves and the body is continued in the round with circular needle, top down. The sleeves are worked with short circular needle/double pointed needles, top down.

DOUBLE NECK:
Cast on 72-72-72-76-84-84 stitches with color black DROPS Melody, using short circular needles size 5 MM = US 8 and 6 MM = US 10 held together (doing this gives you an elastic cast-on edge).
Remove the needle size 6 mm = US 10 and work rib in the round (knit 2, purl 2) for 10 cm = 4”. Fold the neck double to the inside and work another round of rib, at the same time as you work every 2nd stitch together with its corresponding stitch on the cast-on edge. You now have a double neck. Insert 1 marker mid-front – the yoke is measured from here.

YOKE:
Change to circular needle size 6 MM = US 10.
Knit 1 round and increase 8-8-18-14-26-26 stitches evenly spaced = 80-80-90-90-110-110 stitches. Work 0-1-3-3-3-4 rounds of stockinette stitch with color black. Then work A.1 – read KNITTING TIP! Increase as shown in the diagram. REMEMBER THE KNITTING GAUGE! Continue A.1 until the yoke measures 23-24-26-28-30-32 cm = 9"-9 1/2"-10 1/4"-11"-11 3/4"-12 1/2" from the marker. The last increase has been worked and there are 208-208-234-234-286-286 stitches.
Now divide for the body and sleeves as described below – NOTE: A.1 is not finished; it is continued on both the body and sleeves. Continue A.1 over the first 39-39-39-39-52-52 stitches (half back-piece), place the next 39-39-39-39-52-52 on 1 thread for the sleeve, cast on 4-10-10-12-8-12 stitches (in side under sleeve), continue A.1 over the next 65-65-78-78-91-91 stitches (front piece), place the next 39-39-39-39-52-52 stitches on 1 thread for the sleeve, cast on 4-10-10-12-8-12 stitches (in side under sleeve), continue A.1 over the remaining 26-26-39-39-39-39 stitches on the back piece. The body and sleeves are finished separately.

BODY:
= 138-150-176-178-198-206 stitches. Continue A.1 in the round; the new stitches under each sleeve are worked in color beige. When A.1 is finished, continue with stockinette stitch and color beige until the body measures 18-19-19-19-19-19 cm = 7"-7 1/2"-7 1/2"-7 1/2"-7 1/2"-7 1/2" from the division. Knit 1 round and increase 6-6-12-12-14-14 stitches evenly spaced = 144-156-188-190-212-220 stitches. Change to circular needle size 5 MM = US 8 and work rib (knit 2, purl 2) for 10 cm = 4”. Bind off with knit over knit and purl over purl. The sweater measures approx. 54-56-58-60-62-62 cm = 21 1/4"-22"-22 3/4"-23 5/8"-24 3/8"-24 3/8" from the shoulder down.

SLEEVES:
Place the 39-39-39-39-52-52 stitches from the thread on the one side of the piece on short circular needle/double pointed needles size 6 MM = US 10 and knit up 1 stitch in each of the 4-10-10-12-8-12 stitches cast on under the sleeve = 43-49-49-51-60-64 stitches. Insert a marker-thread in the middle of the new stitches under the sleeve. Allow the thread to follow your work onwards; it will be used when decreasing under the sleeve.
Start at the marker-thread and continue A.1 in the round ; the new stitches under the sleeve are worked in color beige. When A.1 is finished, continue with stockinette stitch and color beige over all stitches. AT THE SAME TIME when the sleeve measures 3-3-3-4-4-4 cm = 1 1/8"-1 1/8"-1 1/8"-1 1/2"-1 1/2"-1 1/2" from the division, decrease 2 stitches under the sleeve – read DECREASE TIP. Decrease like this every 12-6-6-7-4-3 cm = 4 3/4"-2 3/8"-2 3/8"-2 3/4"-1 1/2"-1 1/8" a total of 3-5-5-4-6-7 times = 37-39-39-43-48-50 stitches. Continue working until the sleeve measures 33-32-31-29-27-26 cm = 13"-12 1/2"-12 1/4"-11 3/8"-10 5/8"-10 1/4" from the division. Knit 1 round and increase 7-5-9-9-8-10 stitches evenly spaced = 44-44-48-52-56-60 stitches Change to double pointed needles size 5 MM = US 8 and work rib (knit 2, purl 2) for 10 cm = 4”. Bind off with knit over knit and purl over purl. The sleeve measures approx. 43-42-41-39-37-36 cm = 17"-16 1/2"-16 1/8"-15 1/4"-14 1/2"-14 1/4" from the division.
Work the other sleeve in the same way.

Diagram

All measurements in charts are in cm.

symbols = black
symbols = beige
symbols = between 2 stitches make 1 yarn over; on the next round knit the yarn overs twisted (no holes)
diagram
diagram

Do you need help with this pattern?

Thank you for choosing a DROPS Design pattern. We take pride in providing patterns that are correct and easy to understand. All patterns are translated from Norwegian and you can always check the original pattern (DROPS 235-4) for measurements and calculations.

Are you having trouble following the pattern? See below for a list of resources to help you finish your project in no time - or why not, learn something new.

signature-image signature

Are you having trouble following the pattern? See below for a list of resources to help you finish your project in no time - or why not, learn something new.

Each of our patterns has specific tutorial videos to help you.

We have also step-by-step guides for different techniques which you'll find here.

1) Why is the knitting/crochet tension so important?

Knitting tension is what determines the final measurements of your work, and is usually measured per 10 x 10 cm. It is provided like so: number of stitches in width x number of rows in height - eg: 19 stitches x 26 rows = 10 x 10 cm.

The knitting tension is very individual; some people knit/crochet loosely while others work tightly. You adjust the knitting tension with the needle size, which is why the suggested needle size only serve as a guide! You need to adjust this (up or down) to ensure that YOUR knitting tension matches the knitting tension provided in the pattern. If you work with a different knitting tension than provided you will have a different yarn consumption, and your work will have different measurements than what the pattern suggests.

The knitting tension also determines which yarns can replace each other. As long as you achieve the same knitting tension you can replace one yarn with another.

See DROPS lesson: How to measure your tension/gauge

See DROPS video: How to make a gauge tension swatch

to top

2) What are the yarn groups?

All our yarns are categorised into yarn groups (from A to F) according to thickness and knitting tension – group A contains the thinnest yarns and group F the thickest. This makes it easier for you to find alternative yarns to our patterns, should you wish to switch yarn. All yarns within the same group have a similar knitting tension and can easily replace each other. However, different yarn qualities have different structures and properties which will give the finished work a unique look and feel.

Click here for an overview of the yarns in each yarn group

to top

3) Can I use a different yarn than what the pattern suggests?

The important thing when changing from one yarn to another is that the knitting/crochet tension remains the same. This is so that the measurements of the finished piece will be the same as on the sketch provided. It is easier to achieve the same knitting tension using yarns from the same yarn group. It is also possible to work with multiple strands of a thinner yarn to achieve the knitting tension of a thicker one. Please try our yarn converter. We recommend you to always work a test swatch.

Please NOTE: when changing yarn the garment might have a different look and feel to the garment in the photo, due to individual properties and qualities of each yarn.

See DROPS lesson: Can I use a different yarn than the one mentioned in the pattern?

to top

4) How do I use the yarn converter?

At the top of all our patterns you’ll find a link to our yarn converter, which is a helpful tool should you wish to use a different yarn than suggested. By filling in the yarn quality you wish to replace, the amount (in your size) and number of strands, the converter will present good alternative yarns with the same knitting tension. Additionally it will tell you how much you’ll require in the new qualities and whether you’ll need to work with multiple strands. Most skeins are 50g (some are 25g or 100g).

If the pattern is worked with multiple colours, every colour will have to be converted separately. Similarly, if the pattern is worked with several strands of different yarns (for example 1 strand Alpaca and 1 strand Kid-Silk) you will have to find alternatives for each, individually.

Click here to see our yarn converter

to top

5) Why do I get the wrong knitting tension with the suggested needle size?

The needle size provided in the pattern serves only as a guide, the important thing is to follow the knitting tension. And since knitting tension is very individual, you will have to adjust the needle size to ensure that YOUR tension is the same as in the pattern – maybe you’ll have to adjust 1, or even 2 needle sizes, up or down to achieve the correct tension. For this, we recommend that you work test swatches.

Should you work with a different knitting tension than the one provided, the measurements of the finished garment might deviate from the measurement sketch.

See DROPS lesson: How to measure your tension/gauge

See DROPS video: How to make a gauge tension swatch

to top

6) Why is the pattern worked top-down?

Working a garment top-down provides more flexibility and room for personal adjustment. For example it is easier to try the garment on while working, as well as making adjustments to length of yoke and shoulder caps.

The instructions are carefully explaining every step, in the correct order. Diagrams are adjusted to the knitting direction and are worked as usual.

to top

7) Why are the sleeves shorter in larger sizes?

The total width of the garment (from wrist-to-wrist) will be larger in the larger sizes, despite the actual sleeves being shorter. The larger sizes have longer sleeve caps and wider shoulders, so there will be a good fit in all sizes.

to top

8) What is a repeat?

Diagrams are often repeated on the round or in height. 1 repeat is the diagram the way it appears in the pattern. If it says to work 5 repeats of A.1 in the round, then you work A.1 a total of 5 times after/next to each other in the round. If it says to work 2 repeats of A.1 vertically/in height you work the entire diagram once, then begin again at the start and work the entire diagram one more time.

to top

9) How do I work according to a knitting diagram?

The diagram depicts all rows/rounds, and every stitch seen from the right side. It is read from bottom to top, from right to left. 1 square = 1 stitch.

When working back and forth, every other row is worked from the right side and every other row is worked from the wrong side. When working from the wrong side, the diagram will have to be worked reversed: from left to right, knit stitches are purled, purl stitches are knit etc.

When working in the round every round is worked from the right side and the diagram are worked from right to left on all rounds.

See DROPS lesson: How to read knitting diagrams

to top

10) How do I work according to a crochet diagram?

The diagram depicts all rows/rounds, and every stitch seen from the right side. It is worked from bottom to top, from right to left.

When working back and forth every other row is worked from the right side: from right to left and every other row is worked from the wrong side: from left to right.

When working in the round, every row in the diagram are worked from the right side, from right to left.

When working a circular diagram you start in the middle and work your way outwards, counter clockwise, row by row.

The rows usually start with a given number of chain stitches (equivalent to the height of the following stitch), this will either be depicted in the diagram or explained in the pattern.

See DROPS lesson: How to read crochet diagrams

to top

11) How do I work several diagrams simultaneously on the same row/round?

Instructions for working several diagrams after each other on the same row/round, will often be written like so: “work A.1, A.2, A.3 a total of 0-0-2-3-4 times". This means you work A.1 once, then A.2 is worked once, and A.3 is repeated (in width) the number of times provided for your size – in this case like so: S = 0 times, M = 0 times, L=2 times, XL= 3 times and XXL = 4 times.

The diagrams are worked as usual: begin with the first row in A.1, then work the first row in A.2 etc.

See DROPS lesson: How to read knitting diagrams

See DROPS lesson: How to read crochet diagrams

to top

12) Why does the piece start with more chain stitches than it’s worked with?

Chain stitches are slightly narrower than other stitches and to avoid working the cast-on edge too tight, we simply chain more stitches to begin with. The stitch count will be adjusted on the following row to fit the pattern and measurement sketch.

to top

13) Why increase before the rib edge when the piece is worked top-down?

The rib edge is more elastic and will contract slightly compared to, for example, stocking stitch. By increasing before the rib edge, you avoid a visible difference in width between the rib edge and the rest of the body.

to top

14) Why increase in the cast-off edge?

It’s very easy to cast off too tightly, and by making yarn overs while casting off (and simultaneously casting these off) you avoid a too tight cast off edge.

See DROPS video: How to bind off with yarn overs (yo)

to top

15) How do I increase/decrease on every 3rd and 4th row/round alternately?

To achieve an even increase (or decrease) you can increase on, for example: every 3rd and 4th row alternately, like so: work 2 rows and increase on the 3rd row, work 3 rows and increase on the 4th. Repeat this until the increase is complete.

See DROPS lesson: Increase or decrease 1 st on every 3rd and 4th row alternately

to top

16) Why is the pattern slightly different than what I see in the photo?

Pattern repeats can vary slightly in the different sizes, in order to get the correct proportions. If you’re not working the exact same size as the garment in the photo, yours might deviate slightly. This has been carefully developed and adjusted so that the complete impression of the garment is the same in all sizes.

Make sure to follow instructions and diagrams for your size!

to top

17) How can I work a jacket in the round instead of back and forth?

Should you prefer to work in the round instead of back and forth, you may of course adjust the pattern. You’ll need to add steeks mid-front (usually 5 stitches), and follow the instructions. When you would normally turn and work from the wrong side, simply work across the steek and continue in the round. At the end you’ll cut the piece open, pick up stitches to work bands, and cover the cut edges.

See DROPS video: How to knit steeks and cut open

to top

18) Can I work a jumper back and forth instead of in the round?

Should you prefer to work back and forth instead of in the round, you may of course adjust the pattern so you work the pieces separately and then assemble them at the end. Divide the stitches for the body in 2, add 1 edge stitch in each side (for sewing) and work the front and back pieces separately.

See DROPS lesson: Can I adapt a pattern for circular needles into straight needles?

to top

19) Why do you show discontinued yarns in the patterns?

Since different yarns have different qualities and textures we have chosen to keep the original yarn in our patterns. However, you can easily find options among our available qualities by using our yarn converter, or simply pick a yarn from the same yarn group.

It is possible that some retailers still have discontinued yarns in stock, or that someone has a few skeins at home that they would like to find patterns for.

The yarn converter will provide both alternative yarn as well as required amount in the new quality.

to top

20) How do I make a women’s size garment into a men’s size one?

If you have found a pattern you like which is available in women’s size it’s not very difficult to convert it to men’s size. The biggest difference will be the length of sleeves and body. Start working on the women size that you think would fit across the chest. The additional length will be worked right before you cast off for the armhole/sleeve cap. If the pattern is worked top-down you can add the length right after the armhole or before the first decrease on sleeve.

Regarding additional yarn amount, this will depend on how much length you add, but it is better with a skein too many than too few.

to top

21) How do I prevent a hairy garment from shedding?

All yarns will have excess fibres (from production) that might come off as lint or shedding. Brushed yarns (ie hairier yarns) have more of these loose, excess fibres, causing more shedding.

Shedding also depends on what is worn under or over the garment, and whether this pulls at the yarn fibres. It’s therefore not possible to guarantee that there will be no shedding

Below are some tips on how to get the best result when working with hairier yarns:

1. When the garment is finished (before you wash it) shake it vigorously so the looser hairs come off. NOTE: do NOT use a lint roller, brush or any method that pulls at the yarn.

2. Place the garment in a plastic bag and put it in your freezer - the temperature will cause the fibres to become less attached to each other, and excess fibres will come off easier.

3. Leave in the freezer for a few hours before taking it out and shaking it again.

4. Wash the garment according to the instructions on the yarn label.

to top

22) Where on the garment is the length measured?

The measurement sketch/schematic drawing provides information regarding the full length of the garment. If it’s a jumper or a jacket the length is measured from the highest point on the shoulder (usually closest to the neckline), and straight down to the bottom of the garment. It is NOT measured from the tip of shoulder. Similarly, the length of yoke is measured from the highest point on the shoulder and down to where yoke is split into body and sleeves.

See DROPS lesson: How to read a schematic drawing

to top

23) How do I know how many balls of yarn I need?

The required amount of yarn is provided in grams, eg: 450 g. To calculate how many balls you’ll need you first need to know how many grams are in 1 ball (25g, 50g or 100g). This information is available if you click on the individual yarn quality on our pages. Divide the amount required with the amount of each ball. For example, if each ball is 50g (the most common amount), the calculation will be as follows: 450 / 50 = 9 balls.

to top

Have you purchased DROPS yarn to make this pattern? Then you are entitled to receive help from the store where you bought the yarn. Find a list of DROPS stores here!
Still can't find the answer you need? Then scroll down and leave your question so one of our experts can try to help you. This will be done normally within 5 to 10 working days. In the meantime, you can read the questions and answers that others have left to this pattern or join the DROPS Workshop on Facebook to get help from fellow knitters/crocheters!

Comments / Questions (55)

country flag Angela wrote:

In welcher Farbe werden die Umschläge gearbeitet?

01.12.2023 - 21:19

country flag Jeanne wrote:

Ik heb deze trui gebreid van het garen melody. De trui ziet er heel mooi uit. Alleen is de boord aan de onderkant nogal slap en is niet flexibel. De mouwen heb ik afgekant op z'n Italiaans, maar de onderkant niet. Kan ik hier nog iets aan veranderen? Ik heb nog garen over. Alvast bedankt voor het antwoord.

28.11.2023 - 16:01

DROPS Design answered:

Dag Jeanne,

Ja, je zou de afkantrand van de boord op het lijf uit kunnen hallen opnieuw afkanten, maar dan in Italiaans afkanten. Als je de boord te wijd vindt, zou je ook de hele boord uit kunnen halen en steken minderen vlak voor de boord en/of de boord met een dunnere naald breien.

29.11.2023 - 19:24

country flag Anette wrote:

The round starts in the middle of the neck, but we have placed the marker in the middle of the front. So do I knit half a round (from neck to front) before starting diagram A1?

05.10.2023 - 13:32

DROPS Design answered:

Dear Anette, the rounds start on mid back but you measure the piece from marker placed on mid front. Happy knitting!

06.10.2023 - 08:47

country flag Samh wrote:

What color should the yarn loops be made with?

03.10.2023 - 12:26

DROPS Design answered:

Dear Same, make the yarn overs with the background color. Happy knitting!

04.10.2023 - 07:33

country flag Anette wrote:

Omgangen starter midtpå i nakken, men vi har placeret markøren midtpå foran. Strikker jeg så en halv omgang (fra nakke til front) inden jeg starter diagram A1?

01.10.2023 - 20:09

DROPS Design answered:

Hej Anette, markøren foran bruger du til at måle fra. Du starter mønsteret midt bagpå :)

11.10.2023 - 07:55

country flag Marianela Tapia wrote:

Hola Consulta, cuando hablas de aumentar 8 puntos (talla M) al inicio, luego tejer 3 dilas con el color 1 y luego comenzar el diagrama, pero en el diagrama el siguiente aumento esta en la fila 12, suman 15 filas sin aumentos? esta eso corecto? Gracias

29.05.2023 - 02:47

DROPS Design answered:

Hola Marianela, recuerda que el diagrama de punto se lee de abajo arriba (puedes ver más información en la siguiente lección:https://www.garnstudio.com/lesson.php?id=68&cid=23). El 1º aumento en el diagrama A.1 se encuentra en la 2ª fila. Por lo tanto, tendrás: la fila con aumentos, 3 filas con el color 1 y ahora empiezas A.1 y aumentas en la 2ª fila de A.1.

31.05.2023 - 20:52

country flag Ujwala wrote:

From which row of diagram A 1 should I begin while knitting the 39 stitches of sleeve

02.05.2023 - 12:28

DROPS Design answered:

Dear Ujwala, just continue with the same row you worked on body, ie just continue working diagram from yoke. Happy knitting!

02.05.2023 - 14:49

country flag Ujwala wrote:

While working sleeves the instruction states continue A 1 in the round . I am confused where to begin in reference to the diagram . Do I begin right from the bottom row with all 39 stitches in black and the 10 stitches under the sleeve in beige? And the follow the diagram upwards is it? I doubt if this will align with the existing pattern correctly . Shall appreciate and await a detailed clarification on this.

02.05.2023 - 08:15

DROPS Design answered:

Dear Ujwala, continue working the 39 sts as before and the new 10 its in beige (twist yarns every 3rd/5th sts to avoid long tails on WS); you can work as many stitches as possible in pattern so that there are fewer sts in beige mid under sleeve but note that pattern might not fit mid under sleeve. Happy knitting!

02.05.2023 - 10:01

country flag Eva Irene Hansen wrote:

Hei, til denne oppskriften er det beregnet for lite garn. Har strikket str. M i korrekt strikkefasthet, men får for lite lyst garn. Noen forslag til hva jeg kan gjøre for at det kan bli en fin genser?

28.03.2023 - 10:51

DROPS Design answered:

Hej Eva Irene, tak for information, vi skal se på garnforbruget at den lyse :)

12.04.2023 - 15:10

country flag Maria Rosaria Erriquez wrote:

Piegare il collo a metà verso l’interno e lavorare un altro giro a coste, allo stesso tempo lavorare ogni 2° maglia insieme alla corrispondente maglia sul bordo di avvio. Ora si avrà un collo doppio. Inserire 1 segnapunti al

18.02.2023 - 20:48

DROPS Design answered:

Buonasera Maria Rosaria, ci può spiegare meglio il suo problema? Buon lavoro!

20.02.2023 - 23:45

Post a comment to pattern DROPS 235-4

We would love to hear what you have to say about this pattern!

If you want to leave a question, please make sure you select the correct category in the form below, to speed up the answering process. Required fields are marked *.