
Popular categories
Looking for a yarn?


Comments / Questions (49)
![]() Apple wrote:
Apple wrote:
Hello! The instructions for the neck says that once you reach 7.5", you should turn your work so that the right side becomes the wrong side. Does this mean that at 7.5" I should swap and begin purling the twisted knit stitches, and using twisted knit on the purl stitches? Or is this referring to something else? Thank you for the help
03.09.2022 - 00:49DROPS Design answered:
Dear Apple, yes, you need to purl over the twisted knit stitches in the previous row and work twisted knit over the purl stitches. Happy knitting!
04.09.2022 - 22:48
![]() Jean wrote:
Jean wrote:
Hi, I am knitting the large size and on the yoke it says to increase 12 stitches to total 198 but 12 stitches on top of 180 would be 192. So, how many stitches should I increase at the end of the ribbed yoke please?
16.02.2022 - 13:17DROPS Design answered:
Dear Jean, size L is the 4th size in this pattern, this measn you cast on 124 sts, increase 31 sts = 155 sts, then increase again 31 sts = 186 sts and now increase 12 sts = 198 sts. Hope it can help. Happy knitting!
16.02.2022 - 13:48
![]() Ping Xu Misfeldt wrote:
Ping Xu Misfeldt wrote:
Kan det passe at halsdelen måles til 24cm lang. Er det ikke alt for lang? Den længste rullekrave jeg har måles kun 18cm.
09.02.2022 - 22:10DROPS Design answered:
Hej, Jo men det er de første 18 cm som bukkes ned :)
11.02.2022 - 07:57
![]() Isabella Ottaviani wrote:
Isabella Ottaviani wrote:
Buongiorno. Sono arrivata al punto in cui inizio lo sprone.C,è scritto di aumentare in modo uniforme ogni sezione con 1 maglia a rovescio a 2 maglie a rovescio. Taglia L percio avviate 124 maglie. Significa che ad ogni rovescio devo aumentare una maglia per arrivare a 2 maglie? perchè sono 62 maglie a rovescio e alla fine degli aumnti sarebbero piu di 155 maglie . Avete gia risposto ma anche la risposta non è chiara. grazie
12.01.2022 - 09:14DROPS Design answered:
Buonasera Isabella, deve aumentare a sezioni alterne (ogni seconda sezione a rovescio), non in tutte le sezioni a rovescio. Buon lavoro!
12.01.2022 - 22:47
![]() Conny Hansen wrote:
Conny Hansen wrote:
Hej igen Der er selvfølgelig ikke fejl i opskrift, har nu fundet den fejl jeg selv har lavet. Undskyld ulejligheden😊
07.01.2022 - 11:18
![]() Conny Hansen wrote:
Conny Hansen wrote:
Hej , jeg tror der er en fejl i opskriften. Har strikket bærestykke og skal slutte med 168 masker. Derefter tages 10 masker ud. Dette giver 178 masker, i opskrift står 190 masker. Ved ikke hvordan jeg skal komme videre når det ikke passer. Kan ikke gennemskue om det passer videre i opskriften.
06.01.2022 - 21:33
![]() Monica wrote:
Monica wrote:
Ho realizzato questo capo col filato da voi indicato, taglia M , e’ venuto molto bene pero’ una volta indossato lo sprone davanti si alza e forma un rigonfiamento alla base del collo. Cosa ho sbagliato? Grazie
04.01.2022 - 10:27DROPS Design answered:
Buonasera Monica, probabilmente ha mantenuto una lavorazione più morbida durante la lavorazione dello sprone. Buon lavoro!
04.01.2022 - 21:01
![]() Ilaria wrote:
Ilaria wrote:
Ciao so che avete già risposto a questa domanda ma io non riesco a capire come girare il lavoro dopo 18 cm dall'inizio del collo. Potete rispiegarlo in modo più dettagliato? Grazie
31.12.2021 - 13:40DROPS Design answered:
Buonasera Ilaria, deve semplicemente risvoltarlo, portando il rovescio del lavoro verso l'esterno e il diritto del lavoro all'interno. Buon lavoro!
31.12.2021 - 16:35
![]() Luisa wrote:
Luisa wrote:
Buongiorno, arrivati ai 18 cm bisogna girare il lavoro. Ma non é chiaro come. Altre due persone ve lo hanno chiesto e voi ripete basta girare il lavoro, ma come ? Se metto fuori il retro del lavoro la maglia mi rimane sopra i ferri. E se lo giro poi il lavoro mi va da sx verso dx. Scusate ma non è chiaro. Non c’è un video? Grazie
04.12.2021 - 01:07DROPS Design answered:
Buonasera Luisa, si, è corretto, deve risvoltare il lavoro, quindi il rovescio del lavoro passa all'esterno e poi prosegue il lavoro. Buon lavoro!
06.12.2021 - 20:21
![]() CLARISA RAVAZZANI wrote:
CLARISA RAVAZZANI wrote:
Desidererei chiedervi se sono disponibili le istruzioni per eseguire il modello senza ferri circolari. grazie.
03.12.2021 - 17:33DROPS Design answered:
Buongiorno Clarisa, questo modello è stato progetto per essere lavorato in tondo: se preferisce può lavorarlo in piano con l'aggiunta di una maglia di vivagno per ogni lato per la cucitura. Buon lavoro!
04.12.2021 - 11:08
|
|||||||
Silver Touch#silvertouchsweater |
|||||||
 |
 |
||||||
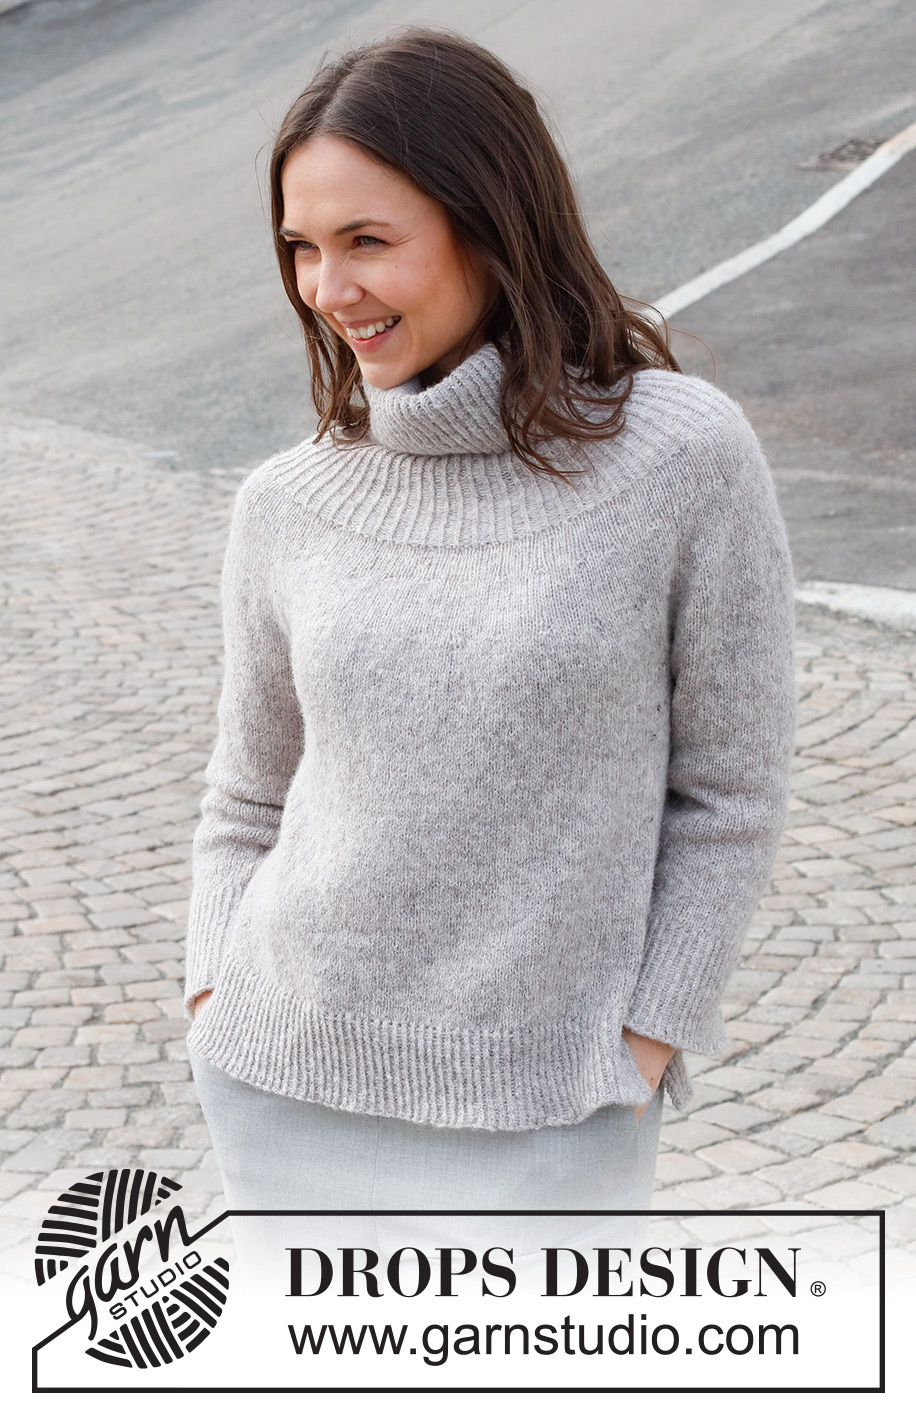
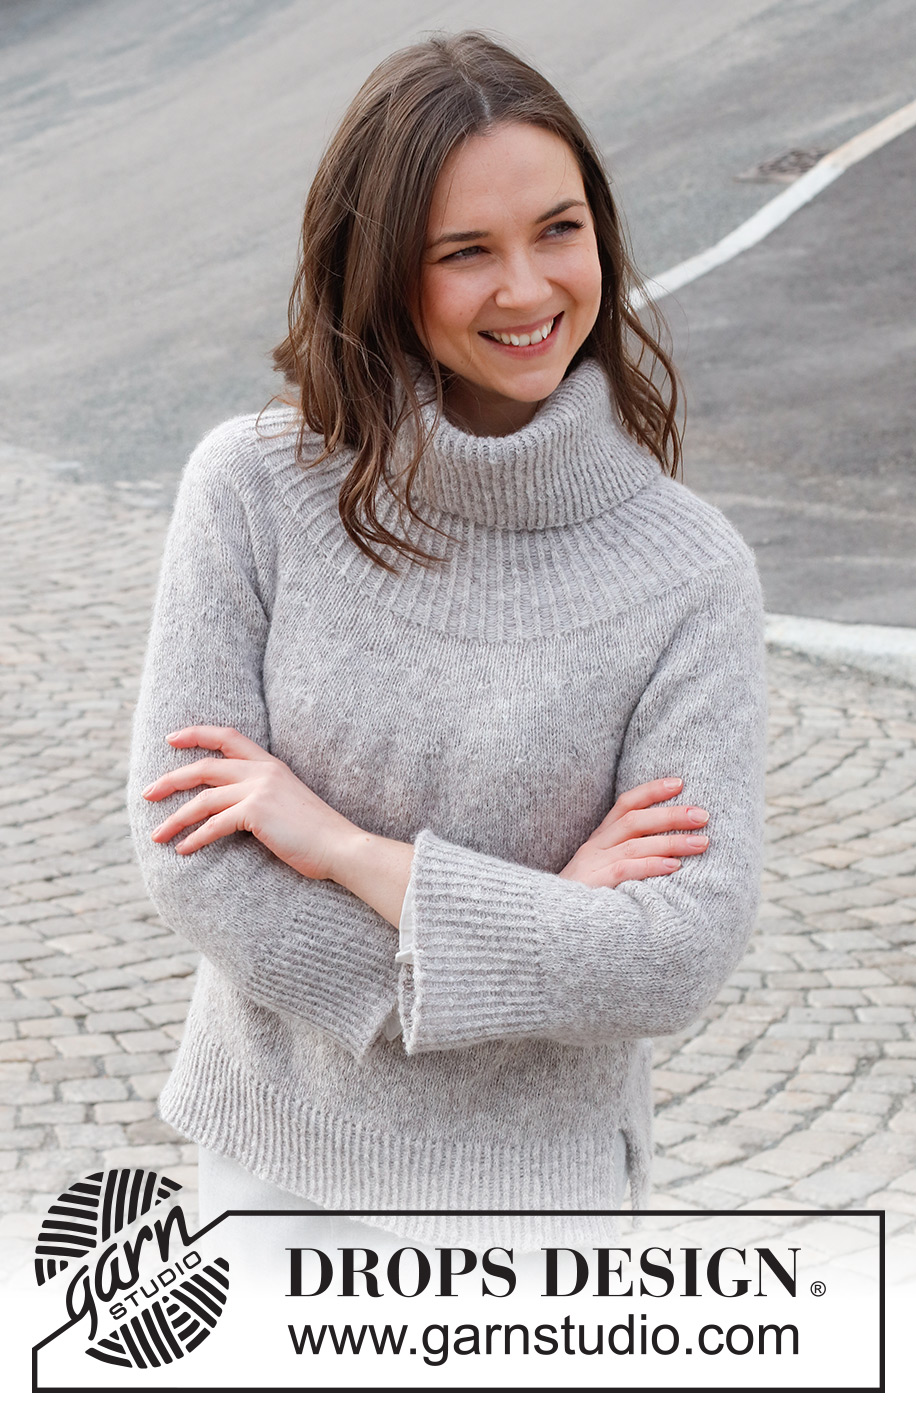
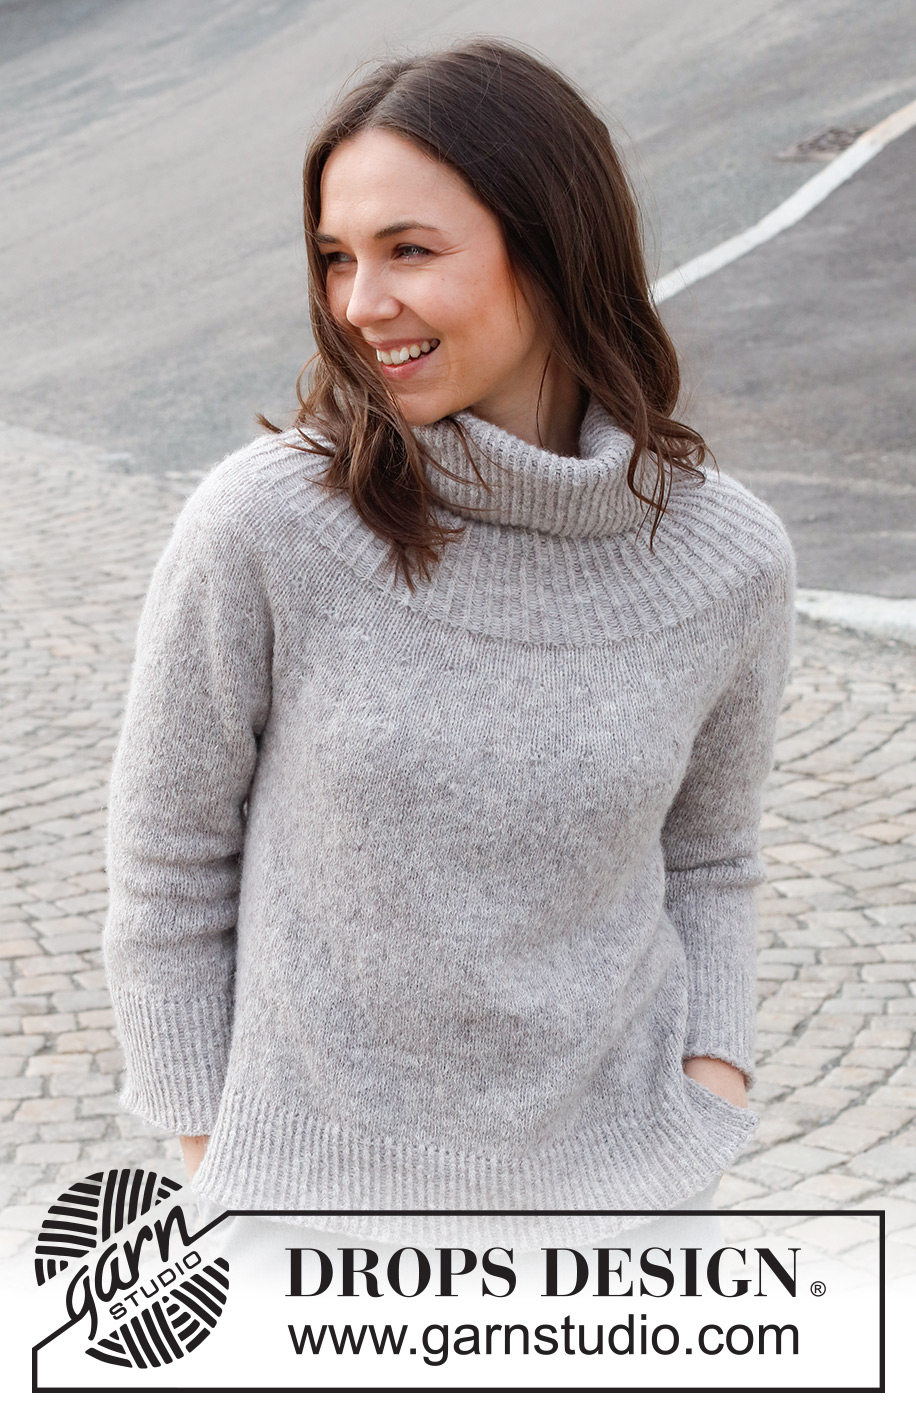
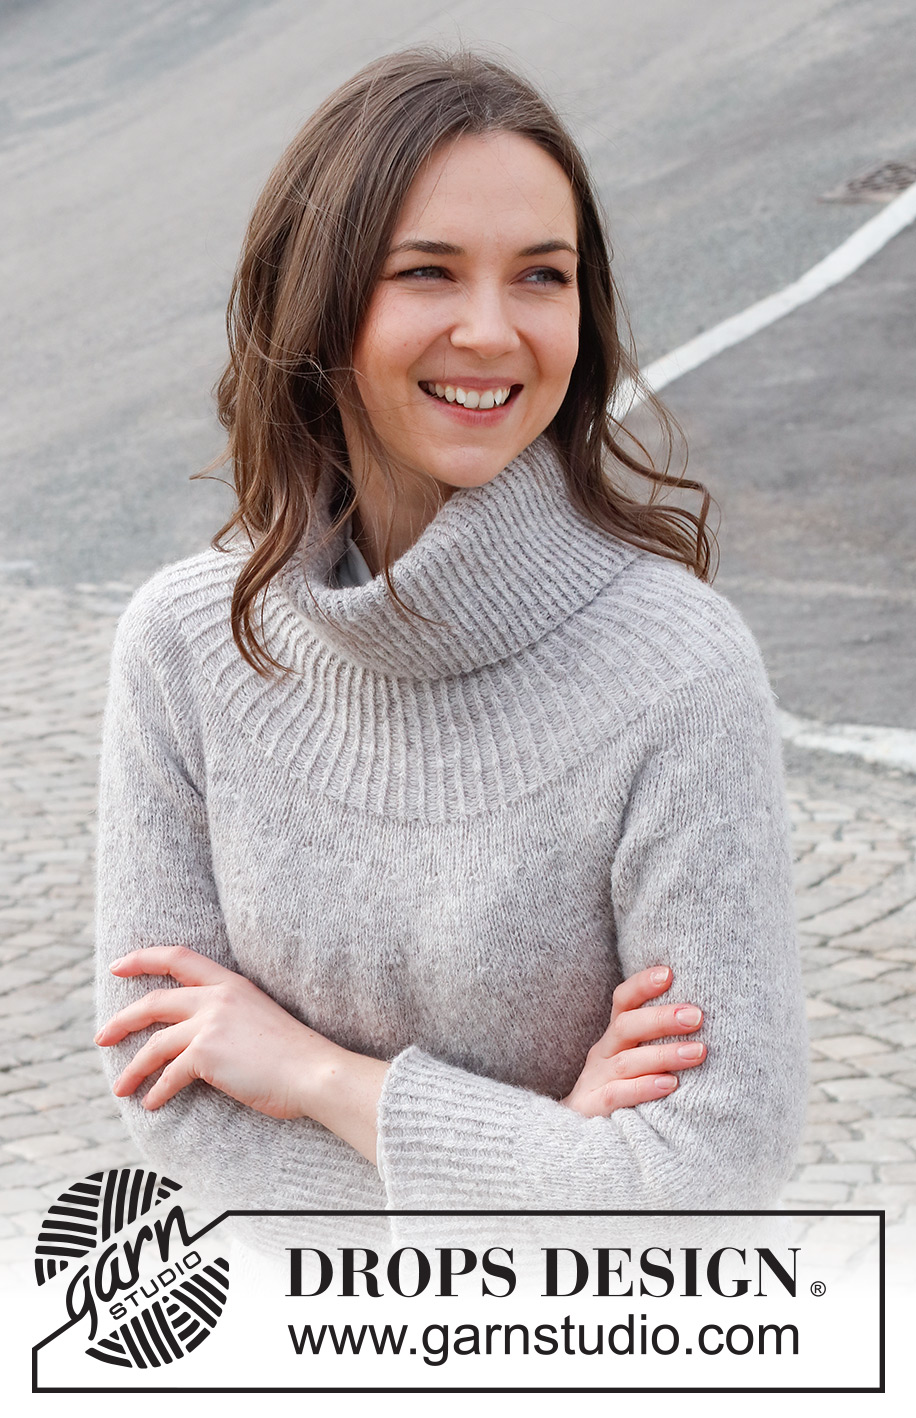
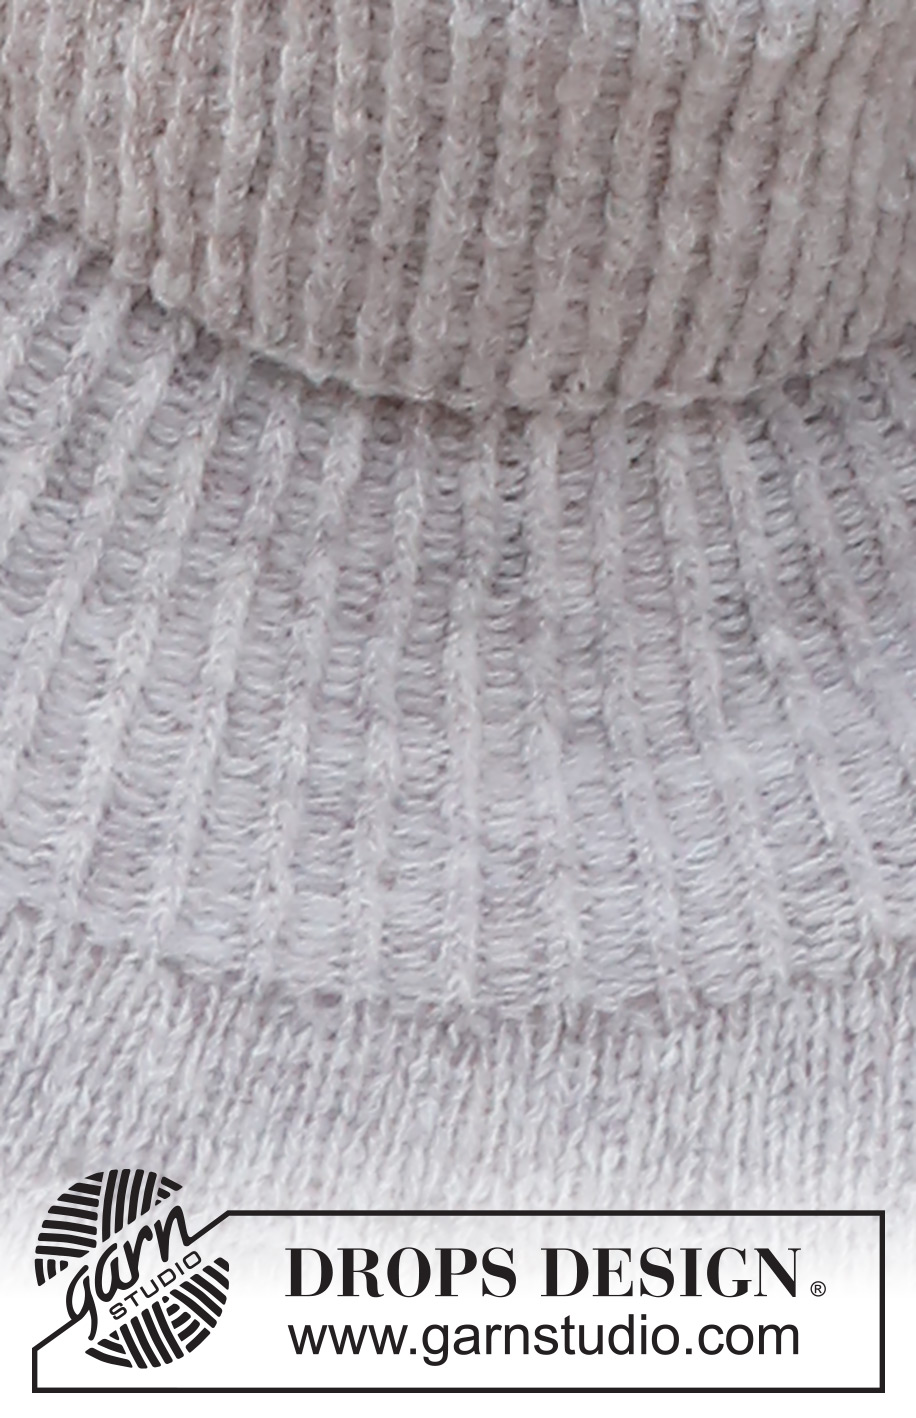
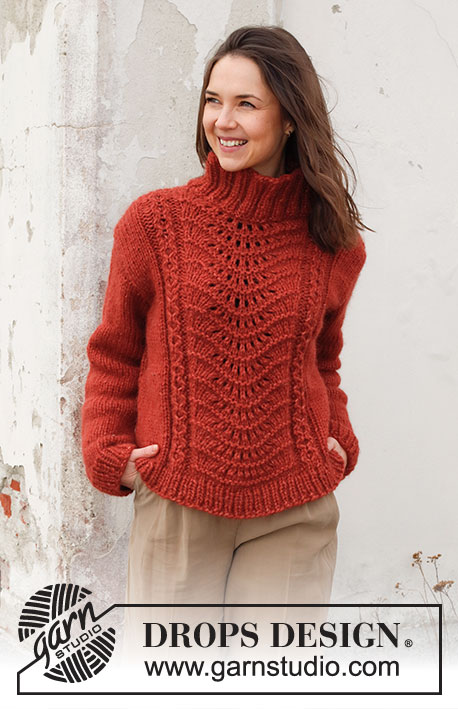
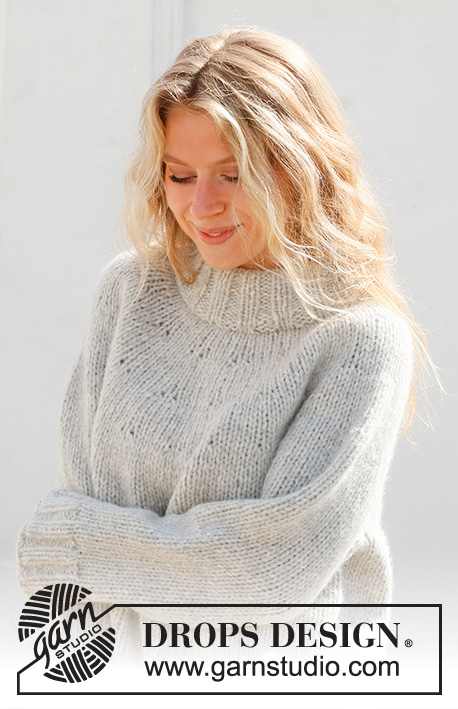
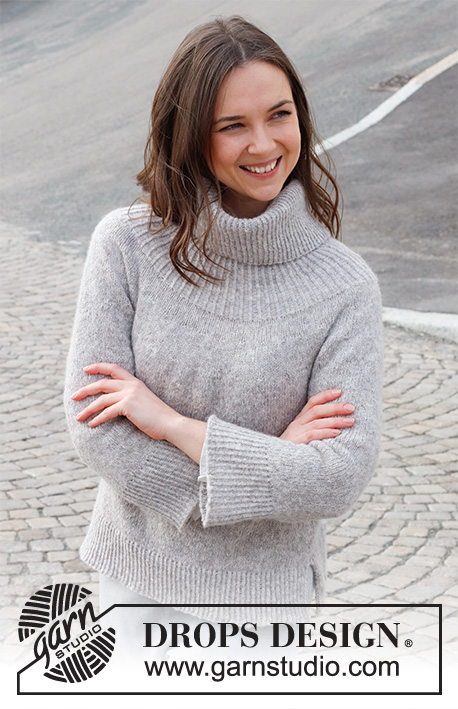
Knitted sweater in DROPS Sky. The piece is worked top down with round yoke, high neck, ribbed edges and split in the sides. Sizes XS - XXL.
DROPS 228-44 |
|||||||
|
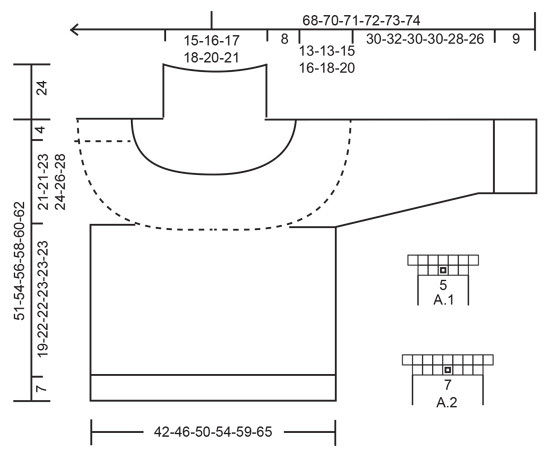
------------------------------------------------------- EXPLANATIONS FOR THE PATTERN: ------------------------------------------------------- RIDGE/GARTER STITCH (worked back and forth): Knit all rows. 1 ridge = knit 2 rows. PATTERN: See diagrams A 1 and A.2. INCREASE TIP: All increases are worked from the right side! Increase 1 stitch by making 1 yarn over after each purled section. On the next round purl the yarn overs twisted to avoid holes. INCREASE/DECREASE TIP (evenly spaced): To work out how to increase/decrease evenly, count the total number of stitches on needle (e.g. 168 stitches), and divide by the number of increases/decreases to be made (e.g. 2) = 84. In this example, increase by making 1 yarn over after each 84th stitch. On the next round work the yarn overs twisted to avoid holes. When decreasing, knit together each 83rd stitch and 84th stitch. DECREASE TIP (for sleeves): Decrease 1 stitch on either side of the marker thread as follows: Work until there are 3 stitches left before the marker thread, knit 2 together, knit 2 (marker thread sits between these 2 stitches), slip 1 stitch as if to knit, knit 1 and pass the slipped stitch over the knitted stitch (2 stitches decreased). BINDING-OFF TIP: To avoid the bind-off edge being tight you can bind off with a larger size needle. If the edge is still tight, make 1 yarn over after approx. each 6th stitch at the same time as binding off; the yarn overs are bind off as normal stitches. ------------------------------------------------------- START THE PIECE HERE: ------------------------------------------------------- SWEATER – SHORT OVERVIEW OF THE PIECE: The neck and yoke are worked in the round with circular needle, from mid back and top down. The yoke is divided for body and sleeves and the body is continued in the round with circular needle as far as the split, then finished each piece separately back and forth. The sleeves are worked in the round with double pointed needles/short circular needle, top down. HIGH NECK: Cast on 108-112-120-124-132-136 stitches with circular needle size 4 MM = US 6 and DROPS Sky Purl 1 round. Change to circular needle size 3 MM = US 2.5. Work rib in the round (knit 1 twisted, purl 1) for 18 cm = 7". Turn the piece so the right side is now the wrong side. This is so the neck will be right side out when folded down later. Continue rib in the round (knit 1 twisted, purl 1) until the neck measures 24 cm = 9½". YOKE: Insert a marker. THE PIECE IS MEASURED FROM HERE. Now increase every second purl-1 to purl-2 – read INCREASE TIP = 135-140-150-155-165-170 stitches. When the piece measures 4 cm = 1½" from the marker, increase the remaining purl-1 sections to purl-2 = 162-168-180-186-198-204 stitches. When the rib measures 8 cm = 3⅛" from the marker, work the different sizes as follows: SIZE XS: Knit 1 round where you decrease 4 stitches evenly spaced – read INCREASE/DECREASE TIP = 158 stitches. SIZES S, M, L, XL AND XXL: Knit 1 round where you increase 2-10-12-18-30 stitches evenly spaced – read INCREASE/DECREASE TIP = 170-190-198-216-234 stitches. ALL SIZES: Move the marker here. THE PIECE IS MEASURED FROM HERE. Change to circular needle size 4 MM = US 6. Work stockinette stitch for 4 cm = 1½", then work pattern as follows: Knit 2-0-3-2-3-2, work A.1 until there are 1-0-2-1-3-2 stitches left (= 31-34-37-39-42-46 repeats of 5 stitches), knit 1-0-2-1-3-2. When A.1 has been completed in height there are 220-238-264-276-300-326 stitches on the round. Continue with stockinette stitch. When the piece measures 9-9-10-11-12-13 cm = 3½"-3½"-4"-4⅜"-4¾"-5⅛", work pattern as follows: Knit 2-0-3-2-3-2, work A.2 until there are 1-0-2-1-3-2 stitches left (= 31-34-37-39-42-46 repeats of 7 stitches), knit 1-0-2-1-3-2. When A.2 has been completed in height there are 282-306-338-354-384-418 stitches. Continue with stockinette stitch until the piece measures 13-13-15-16-18-20 cm = 5⅛"-5⅛"-6"-6¼"-7"-8". Now divide for the body and sleeves as follows: Work the first 40-43-47-50-56-62 stitches (= half back piece), place the next 60-66-74-76-80-84 stitches on a thread for the sleeve, cast on 8-10-10-12-12-12 stitches (= in side under sleeve), work the next 81-87-95-101-112-125 stitches (= front piece), place the next 60-66-74-76-80-84 stitches on a thread for the sleeve, cast on 8-10-10-12-12-12 stitches (= in side under sleeve), work the last 41-44-48-51-56-63 stitches (= half back piece). The body and sleeves are finished separately. THE PIECE IS NOW MEASURED FROM HERE! BODY: = 178-194-210-226-248-274 stitches. Continue with stockinette stitch in the round until the piece measures 19-22-22-23-23-23 cm = 7½"-8¾"-8¾"-9"-9"-9" from the division. Try the sweater on and work to desired length; there is approx. 7 cm = 2¾" left to finished length. Now divide the piece, with 89-97-105-113-124-137 stitches on the front and back pieces. Finish each piece separately, back and forth. BACK PIECE: Knit 1 row from the right side where you increase 12-14-16-16-17-20 stitches evenly spaced (do not increase over 2 edge stitches on each side) = 101-111-121-129-141-157 stitches. Change to circular needle size 3 MM = US 2.5 and work rib as follows: ROW 1 (= wrong side): 2 edge stitches in garter stitch, * purl 1 twisted, knit 1 *, work from *-* until there are 3 stitches left, purl 1 twisted, 2 edge stitches in garter stitch. ROW 2 (right side): 2 edge stitches in garter stitch, * knit 1 twisted, purl 1 *, work from *-* until there are 3 stitches left, knit 1 twisted, 2 edge stitches in garter stitch. Repeat these 2 rows for 7 cm = 2¾". Bind off with knit over knit and purl over purl – read BINDING-OFF TIP. The sweater measures approx. 51-54-56-58-60-62 cm = 20"-21¼"-22"-22¾"-23⅝"-24⅜" from the shoulder down. FRONT PIECE: Work in the same way as the back piece. SLEEVES: Place the 60-66-74-76-80-84 stitches from the thread on the one side of the piece on short circular needle/double pointed needles size 4 MM = US 6 and knit up 1 stitch in each of the 8-10-10-12-12-12 new stitches under the sleeve = 68-76-84-88-92-96 stitches. Insert a marker thread in the middle of the new stitches (= 4-5-5-6-6-6 stitches on each side of the thread). Allow the thread to follow your work onwards; it is used when decreasing later. Work stockinette stitch in the round for 4 cm = 1½". Now decrease 2 stitches under the sleeve – read DECREASE TIP. Decrease like this every 3½-2½-1½-1½-1½-1 cm = 1¼"-1"-½"-½"-½"-⅜" a total of 7-10-13-14-15-16 times = 54-56-58-60-62-64 stitches. Continue working until the sleeve measures 30-32-30-30-28-26 cm = 11¾"-12½"-11¾"-11¾"-11"-10¼" (shorter measurements in larger sizes due to wider neck and longer yoke). Try the sweater on and work to desired length; there is approx. 9 cm = 3½" left to finished length. Knit 1 round where you increase 8-8-10-10-10-10 stitches evenly spaced = 62-64-68-70-72-74 stitches. Change to double pointed needles size 3 MM = US 2.5 and work rib (knit 1 twisted, purl 1) for 9 cm = 3½". Bind off with knit over knit and purl over purl – remember BINDING-OFF TIP. The sleeve measures 39-41-39-39-37-35 cm = 15¼"-16⅛"-15¼"-15¼"-14½"-13¾". Work the other sleeve in the same way. |
|||||||
Diagram explanations |
|||||||
|
|||||||
 |
|||||||
Have you finished this pattern?Tag your pictures with #dropspattern #silvertouchsweater or submit them to the #dropsfan gallery. Do you need help with this pattern?You'll find 32 tutorial videos, a Comments/Questions area and more by visiting the pattern on garnstudio.com. © 1982-2026 DROPS Design A/S. We reserve all rights. This document, including all its sub-sections, has copyrights. Read more about what you can do with our patterns at the bottom of each pattern on our site. |
|||||||


With over 40 years in knitting and crochet design, DROPS Design offers one of the most extensive collections of free patterns on the internet - translated to 17 languages. As of today we count 324 catalogs and 12290 patterns - 12280 of which are translated into English (US/in).
We work hard to bring you the best knitting and crochet have to offer, inspiration and advice as well as great quality yarns at incredible prices! Would you like to use our patterns for other than personal use? You can read what you are allowed to do in the Copyright text at the bottom of all our patterns. Happy crafting!
Post a comment to pattern DROPS 228-44
We would love to hear what you have to say about this pattern!
If you want to leave a question, please make sure you select the correct category in the form below, to speed up the answering process. Required fields are marked *.