
Popular categories
Looking for a yarn?


Comments / Questions (10)
![]() Doortje wrote:
Doortje wrote:
Knitted this one and was happy with the pattern. No mistakes i.m.o. Adjusted the length and with by comparing the measurements to a well fitting cardigan. Omitted the increases before the ribbing, seemed odd, otherwise happy with both the pattern and the end results!
29.10.2025 - 21:21
![]() Vivien Ohnemus wrote:
Vivien Ohnemus wrote:
A lovely pattern but full of mistakes! Can’t rely on the measurements (e.g length of sleeves) or number of stitches (e.g for shoulder piece) !! Dreadful! I‘m managing somehow. But it’s very annoying when knitting patterns aren’t correct! And why on earth would you increase stitches for the ribbing and make it baggy? Ribbed cuffs and hems should fit snugly not stick out! Not the standard I‘m used to from DROPS Design.
06.09.2025 - 21:49
![]() Corthay wrote:
Corthay wrote:
Bonjour, Les corrections apportées à ce modèle ne sont pas très explicites... Après les augmentations de l'empiècement, j'arrive bien à 186 mailles pour la 1ère taille, mais le nombre de mailles dans la répartition ne correspond pas. J'ai 26 /46/42/46/26. Ca joue avec ces chiffres? Merci pour votre réponse et bonnes salutations. Claire Corthay
27.03.2024 - 14:50DROPS Design answered:
Bonjour Mme Corthay, dans la 1ère taille, vous devez avoir 27 mailles pour chaque devant (= 17 m + 10 augm pour les manches marteau + 4 augm pour le raglan); 36 mailles pour chaque manche (=12 m + 2 x 8 augm pour les manches + 2 x 4augm pour le raglan) et pour le dos vous devez avoir 52 mailles (24 + 2 x 10 pour les manches marteau + 2 x 4 pour le raglan). En espérant que cela pourra vous aider. Bon tricot!
02.04.2024 - 12:38
![]() Eveline wrote:
Eveline wrote:
Per favore c'è una fotografia del retro per capire se ho fatto bene le spalle? Grazie mille
24.12.2023 - 19:44DROPS Design answered:
Buonasera Eveline, non abbiamo ulteriori fotografie di questo modello. Buon lavoro!
26.12.2023 - 16:47
![]() Ann-Christin Olsfelt Johansson wrote:
Ann-Christin Olsfelt Johansson wrote:
Hej! I den svenska beskrivningen - där det beskrivs hur man placerar ut markörerna för sadelaxlarnas ökningar - står att man ska börja mitt bak. Rev mitt huvud över detta och tittade sedan på den norska beskrivningen - där står det "foran", alltså mitt FRAM. Då förstod jag hur det hängde ihop. Ändring av detta vore bra!
16.11.2022 - 09:29DROPS Design answered:
Hej! Tack för info, detta är nu rättat! Mvh DROPS Design
16.11.2022 - 14:03
![]() Frederike wrote:
Frederike wrote:
Wat betreft de vraag over de markeerdraden, ik heb het inmiddels door. Het is ook zo logisch, maargoed het duurde even voordat ik het zag..
11.09.2022 - 14:50
![]() Frederike wrote:
Frederike wrote:
Ik vroeg me af; de markeerdraden zijn genummerd van 1-4 is dit hoe je ze tegenkomt in de naald, voor of achterkant, of is het aan de goede kant draad 1-4 en aan de andere kant 4-1? Als ik naar het filmpje kijk over zadelschouders lijkt het dat je elke keer vanaf 1 telt, maar ik twijfel. Heb dit nog niet eerder zo gebreid. Alvast bedankt! Mvg frederike
10.09.2022 - 16:56DROPS Design answered:
Dag Frederike,
Je voegt de markeerdraden in aan de goede kant, dus aan de goede kant tel je van 1 tot 4 en aan de verkeerde kant inderdaad andersom; van 4 naar 1.
14.09.2022 - 12:08
![]() Marjorie wrote:
Marjorie wrote:
Bonjour, Pour avoir déjà tricoté cette laine, il me semble qu'elle est poilue et laisse des peluches un peu partout difficile à enlever (faute du polyamine ?). Je voudrais donc réaliser ce modèle avec une autre laine équivalente non-poilue, laine chaude (laine, alpaga... Ou autre), quelle laine me conseillère à-coups et combien de pelote pour un pull en 5-6ans? Merci de votre retour. Marjorie
08.01.2022 - 15:29DROPS Design answered:
Bonjour Marjorie, utilisez notre convertisseur pour découvrir toutes les possibilités pour remplacer DROPS Air (1 autre fil du groupe C ou bien 2 fils du groupe A) et la quantité correspondante. Votre magasin saura vous conseiller si besoin, même par mail ou téléphone. Bon tricot!
10.01.2022 - 07:53
![]() Jan wrote:
Jan wrote:
Hello, I have found an error in the pattern for YOKE INCREASES, after "divide the yoke for the body and sleeves": The second set of cast on should be: "cast on 6-6-6-8-8-8 new stitches (= in side under sleeve)". Kind regards, Jan
29.12.2021 - 21:41DROPS Design answered:
Hi Jan, thank you for pointing this out. You are right. We will correct it. Happy knitting!
30.12.2021 - 09:33
![]() Cathy Shannahan wrote:
Cathy Shannahan wrote:
I love this. I will be making multiples
17.08.2021 - 16:56
|
|||||||||||||
Outdoor Adventure Jacket#outdooradventurejacket |
|||||||||||||
 |
 |
||||||||||||
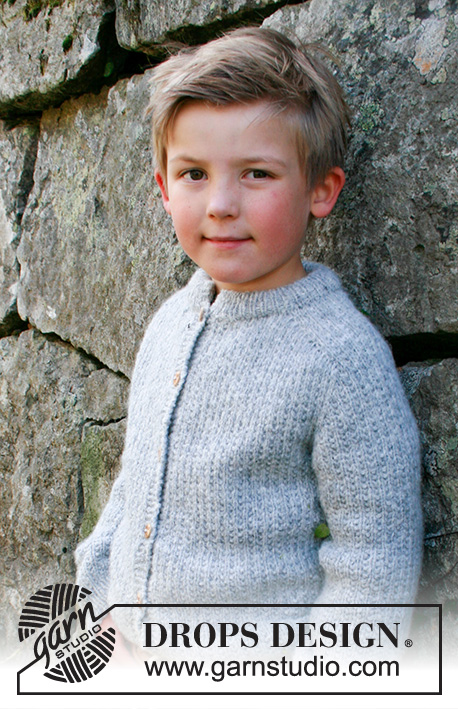
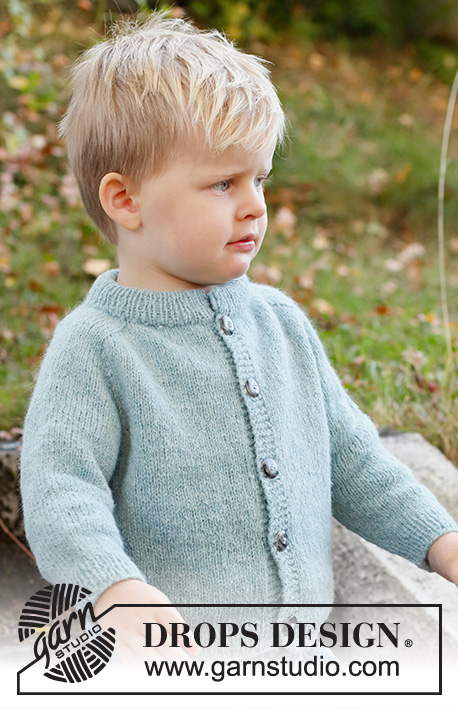
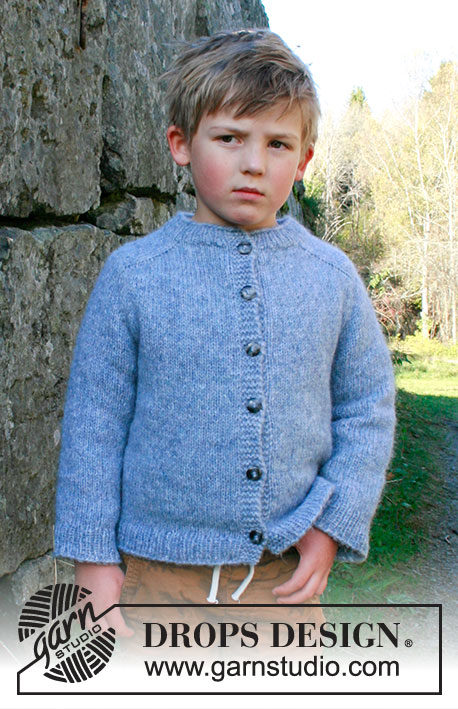
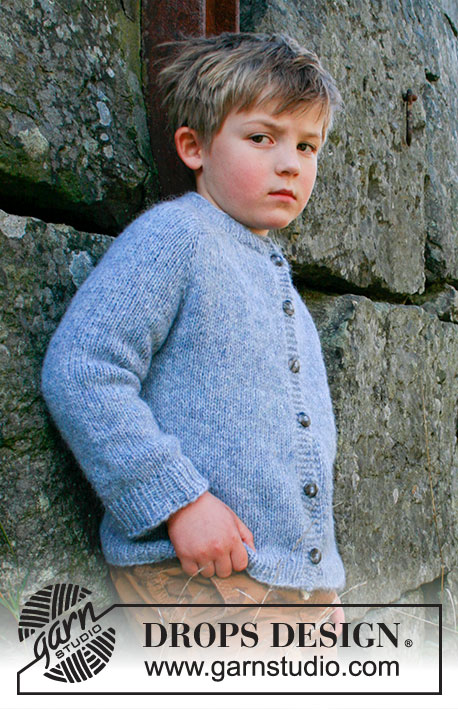
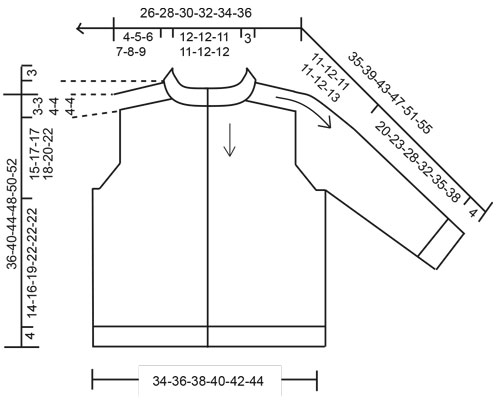
Knitted jacket for children in DROPS Air. The piece is worked top down, with saddle shoulders. Sizes 3 – 14 years.
DROPS Children 40-17 |
|||||||||||||
|
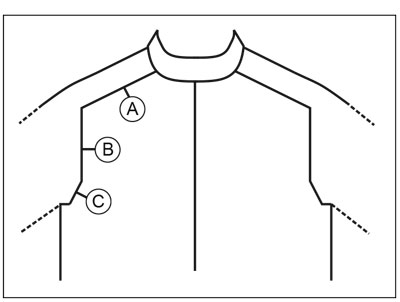
------------------------------------------------------- EXPLANATIONS FOR THE PATTERN: ------------------------------------------------------- RIDGE/GARTER STITCH (worked back and forth): Knit all rows. 1 ridge in height = Knit 2 rows. INCREASE TIP-1 (evenly spaced): To work out how to increase evenly, count the total number of stitches on the needle (e.g. 73 stitches) minus bands (e.g. 10 stitches) and divide the remaining stitches by the number of increases to be made (e.g. 9) = 7. In this example, increase by making 1 yarn over after alternately each 7th stitch. Do not increase on bands. On the next row work the yarn overs twisted to avoid holes. INCREASE TIP-2 (for saddle shoulders, sleeves and yoke from the RIGHT SIDE): BEFORE MARKER: The new stitch twists to the right. Use the left needle to pick up the strand between 2 stitches from the previous row, pick up the back strand and knit in the front loop. AFTER MARKER: The new stitch twists to the left. Use the left needle to pick up the strand between 2 stitches from the previous row, pick up the front strand and knit in the back loop. INCREASE TIP-3 (for saddle shoulders from the WRONG SIDE): BEFORE MARKER: The new stitch twists to the right. Use the left needle to pick up the strand between 2 stitches from the previous row, pick up the front strand and purl in the back loop. AFTER MARKER: The new stitch twists to the left. Use the left needle to pick up the strand between 2 stitches from the previous row, pick up the back strand and purl in the front loop. DECREASE TIP (for sleeves): Start 3 stitches before the marker thread, knit 2 together, knit 2 (the marker thread sits in the middle of these 2 stitches), slip 1 stitch as if to knit, knit 1 and pass the slipped stitch over (2 stitches decreased). BUTTONHOLES: Work buttonholes on the right band (when the garment is worn). Work from the right side when there are 3 stitches left on the row as follows: Make 1 yarn over, knit 2 together and knit 1. On the next row (wrong side), knit the yarn over to leave a hole. The first buttonhole is worked when the neck is finished (in the transition between neck and yoke). The other 5-5-5-6-6-6 buttonholes are worked with approx. 6-7-7½-7-7-7½ cm = 2⅜"-2¾"-2⅞"-2¾"-2¾"-2⅞" between each one. BINDING-OFF TIP: To avoid the bind-off edge being tight you can bind off with a larger size needle. If the edge is still tight, make 1 yarn over after approx. each 6th stitch at the same time as binding off; the yarn overs are bind off as normal stitches. ------------------------------------------------------- START THE PIECE HERE: ------------------------------------------------------- JACKET – SHORT OVERVIEW OF THE PIECE: The neck and yoke are worked back and forth with circular needle, from mid-front and top down. Stitches are increased for the saddle shoulders, then for the sleeves and finally for the yoke. The yoke is divided for the body and sleeves and the body continued back and forth. The sleeves are worked in the round with double pointed needles/short circular needle, top down. NECK: Cast on 73-73-77-77-81-81 stitches (including 5 band stitches on each side) with circular needle size 4 MM = US 6 and Air. Purl 1 row (= wrong side). The next row is worked as follows from the right side: 5 band stitches in GARTER STITCH – read description above, * knit 1, purl 1 *, work from *-* until there are 6 stitches left on the row, knit 1 and finish with 5 band stitches in garter stitch. Continue this rib for 3 cm = 1⅛". When the rib is finished, work 1 row from the right side where you increase 9 stitches evenly spaced – read INCREASE TIP-1 = 82-82-86-86-90-90 stitches. Remember the BUTTONHOLE – read description above. Purl 1 row from the wrong side (yarn overs purled twisted and the 5 outermost stitches on each side are knitted = bands). Change to circular needle size 5 MM = US 8 and work the yoke as described below. YOKE: Insert a marker after the band at the beginning of the row (= mid-front) – THE YOKE IS MEASURED FROM HERE! In addition insert 4 other markers, without working the stitches, as follows – each marker is inserted between 2 stitches, is used when increasing for the saddle shoulders and should have a different color to the marker on the neck. Marker 1: Start mid-back, count 17-17-16-16-17-17 stitches (= front piece), insert marker before the next stitch. Marker 2: Count 12-12-16-16-16-16 stitches from marker 1 (= shoulder), insert marker before the next stitch. Marker 3: Count 24-24-22-22-24-24 stitches from marker 2 (= back piece), insert marker before the next stitch. Marker4: Count 12-12-16-16-16-16 stitches from marker 3 (= shoulder), insert marker before the next stitch. There are 17-17-16-16-17-17 stitches left on the front piece after marker 4. Allow the 4 markers to follow your work onwards. SADDLE-SHOULDER INCREASES: Read the whole section before continuing! Continue with stockinette stitch and 5 band stitches in garter stitch on each side. AT THE SAME TIME, on the first row from the right side increase 4 stitches for the shoulders as follows: Increase BEFORE markers 1 and 3 and AFTER markers 2 and 4 – read INCREASE TIP-2. You are only increasing on the front and back pieces, the number of shoulder stitches remains the same. On the next row from the wrong side increase for the shoulders as follows – read INCREASE TIP-3: Increase BEFORE markers 4 and 2 and AFTER markers 3 and 1. The increases are therefore worked differently from the right and wrong sides, so the stitches lie neatly. Increase like this every row (both from the right and wrong side) a total of 10-12-14-16-18-20 times = 122-130-142-150-162-170 stitches. REMEMBER THE KNITTING GAUGE! After the last increase the piece measures approx. 4-5-6-7-8-9 cm = 1½"-2"-2⅜"-2¾"-3⅛"-3½" from the marker on the neck. Now increase for the sleeves as follows. SLEEVE INCREASES: Continue with stockinette stitch and 5 band stitches in garter stitch on each side. AT THE SAME TIME on the next row from the right side increase 4 stitches for the sleeves as follows: Increase AFTER markers 1 and 3 and BEFORE markers 2 and 4. You increase only on the sleeves and the number of stitches on the front and back pieces remains the same. The new stitches are worked in stockinette stitch. Increase like this every 2nd row (each row from the right side) a total of 8-9-8-9-11-13 times = 154-166-174-186-206-222 stitches. The piece measures approx. 11-12-13-15-18-21 cm = 4⅜"-4¾"-5⅛"-6"-7"-8¼" from the marker on the neck. YOKE INCREASES: Now increase on each side of all 4 markers as follows: Work until there is 1 stitch left before markers 1 and 3, increase 1 stitch, work 1 stitch, move the marker to the right needle and increase 1 stitch after the marker. Work to markers 2 and 4, increase 1 stitch before the marker, move the marker to the right needle, work 1 stitch and increase 1 stitch after the marker (= a total of 8 stitches increased on the row). You are now increasing on the front/back pieces and on the sleeves. Increase like this every 2nd row (each row from the right side) a total of 4-4-4-3-2-1 times = 186-198-206-210-222-230 stitches. When all the increases are finished, the piece measures approx. 15-17-17-18-20-22 cm = 6"-6¾"-6¾"-7"-8"-8¾" from the neck. If the piece is shorter than this continue working, without further increases, to the correct measurement. Now divide the yoke for the body and sleeves as follows: Work the first 31-33-34-35-37-38 stitches (= front piece), place the next 36-38-40-40-42-44 stitches on 1 thread for the sleeve, cast on 6-6-6-8-8-8 new stitches (= in side under sleeve), work the next 52-56-58-60-64-66 stitches (= back piece), place the next 36-38-40-40-42-44 stitches on 1 thread for the sleeve, cast on 6-6-6-8-8-8 new stitches (= in side under sleeve), work the last 31-33-34-35-37-38 stitches (= front piece). The body and sleeves are finished separately. THE PIECE IS NOW MEASURED FROM HERE. BODY: = 126-134-138-146-154-158 stitches. Continue back and forth with stockinette stitch and 5 band stitches on each side until the piece measures 14-16-19-22-22-22 cm = 5½"-6¼"-7½"-8¾"-8¾"-8¾" from the division. There is approx. 4 cm = 1½" left to finished length; try the jacket on and work to desired length. Work 1 row from the right side where you increase 25-27-27-29-31-31 stitches evenly spaced – remember INCREASE TIP-1 = 151-161-165-175-185-189 stitches. NOTE: This is done to avoid the rib being tight. Change to circular needle size 4 MM = US 6. The next row is worked as follows from the right side: 5 band stitches in garter stitch, *purl 1, knit 1*, work from *-* until there are 6 stitches left on the row, purl 1 and 5 band stitches in garter stitch. Work this rib for 4 cm = 1½". Bind off with garter stitch over garter stitch, knit over knit and purl over purl – read BINDING-OFF TIP! The jacket measures approx. 36-40-44-48-50-52 cm = 14¼"-15¾"-17¼"-19"-19¾"-20½" from the shoulder down. SLEEVES: Place the 36-38-40-40-42-44 stitches from the thread on the one side of the piece on double pointed needles/short circular needle size 5 MM = US 8 and knit up 1 stitch in each of the 6-6-6-8-8-8 stitches cast on under the sleeve = 42-44-46-48-50-52 stitches. Insert a marker thread in the middle of the 6-6-6-8-8-8 new stitches under the sleeve. Start at the marker thread and work stockinette stitch in the round. When the sleeve measures 3 cm = 1⅛" from the division, decrease 2 stitches mid-under the sleeve – read DECREASE TIP. Decrease like this every 5-6-7-8-9-11 cm = 2"-2⅜"-2¾"-3⅛"-3½"-4⅜" a total of 4 times in all sizes = 34-36-38-40-42-44 stitches. Continue working without further decreases until the sleeve measures 20-23-28-32-35-38 cm = 8"-9"-11"-12½"-13¾"-15" from the division. There is approx. 4 cm = 1½" left to finished length; try the jacket on and work to desired length. Knit 1 round where you increase 6 stitches evenly spaced = 40-42-44-46-48-50 stitches. Change to double pointed needles size 4 MM = US 6 and work rib (knit 1, purl 1) for 4 cm = 1½". Bind off with knit over knit and purl over purl – remember BINDING-OFF TIP! The sleeve measures approx. 24-27-32-36-39-42 cm = 9½"-10⅝"-12½"-14¼"-15¼"-16½" from the division. Work the other sleeve in the same way. ASSEMBLY: Sew the buttons onto the left band. |
|||||||||||||
Diagram explanations |
|||||||||||||
|
|||||||||||||
 |
|||||||||||||
 |
|||||||||||||
Have you finished this pattern?Tag your pictures with #dropspattern #outdooradventurejacket or submit them to the #dropsfan gallery. Do you need help with this pattern?You'll find 34 tutorial videos, a Comments/Questions area and more by visiting the pattern on garnstudio.com. © 1982-2026 DROPS Design A/S. We reserve all rights. This document, including all its sub-sections, has copyrights. Read more about what you can do with our patterns at the bottom of each pattern on our site. |
|||||||||||||


With over 40 years in knitting and crochet design, DROPS Design offers one of the most extensive collections of free patterns on the internet - translated to 17 languages. As of today we count 324 catalogs and 12290 patterns - 12280 of which are translated into English (US/in).
We work hard to bring you the best knitting and crochet have to offer, inspiration and advice as well as great quality yarns at incredible prices! Would you like to use our patterns for other than personal use? You can read what you are allowed to do in the Copyright text at the bottom of all our patterns. Happy crafting!
Post a comment to pattern DROPS Children 40-17
We would love to hear what you have to say about this pattern!
If you want to leave a question, please make sure you select the correct category in the form below, to speed up the answering process. Required fields are marked *.