
Popular categories
Looking for a yarn?


































Comments / Questions (138)
 Jan wrote:
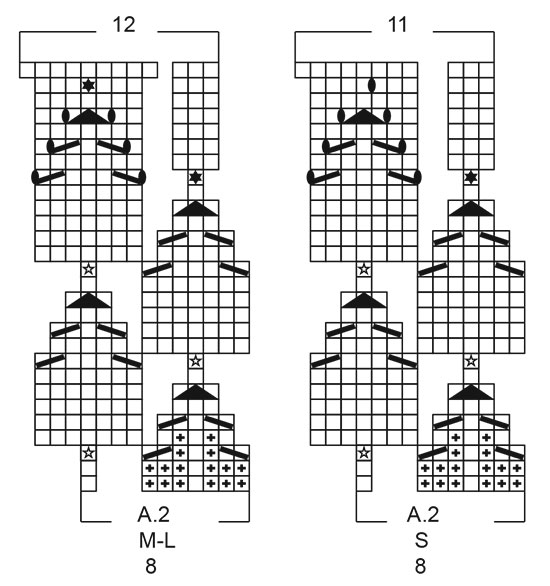
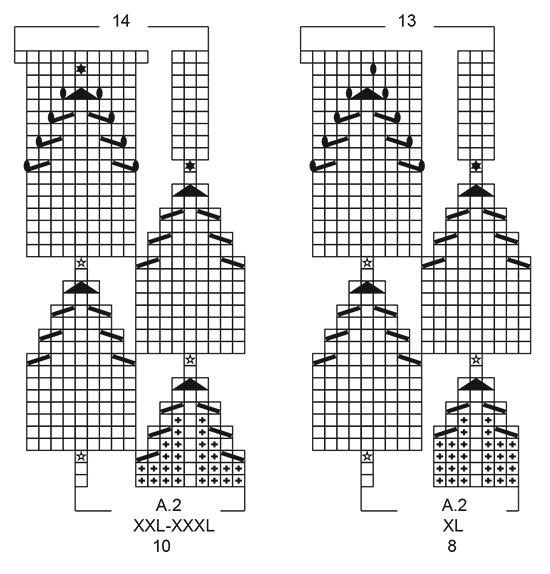
Do you knit the charts from right to left or left to right and do you start at the bottom of the chart or at the top? Also Chart 2 is very confusing, what do you do with all the blank spaces between the rows? e.g. knit 8 stitches then there is a blank space then knit 3 more stitches. Do you have the charts written out?
06.09.2026 - 19:02DROPS Design answered:
Dear Jan, here is a lesson on how to read our charts. This top is worked in the round, which means that all rows are worked from the right side. So you read the chart from right to left and from the bottom up. Sometimes the chart has some white spaces. This is because we are trying to make a 3D representation of the chart on paper. So those white spaces in the chart account for the space occupied by the increases later on. Otherwise, the stitches would overlap each other in the chart and their position may seem more confusing. So you simply ignore the white spaces and simply knit each square with their corresponding symbol. In your example, you would simply knit 11 stitches. Happy knitting!
06.09.2026 - 19:34
 Pamela wrote:
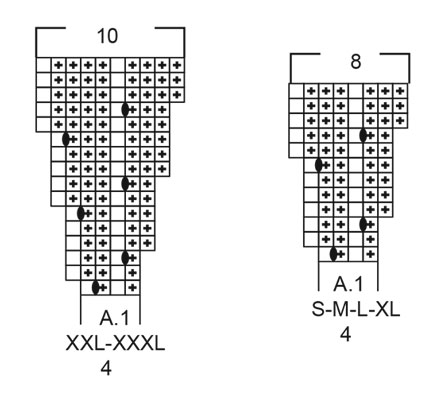
Looking at chart A1 for the yoke, it seems to be primarily purl stitches, but looking at the photos of the finished top, the only purl stitches are in the neck rib. Am I misunderstanding the chart? The same applies to the first 6 rows of chart A2.
20.08.2026 - 16:13DROPS Design answered:
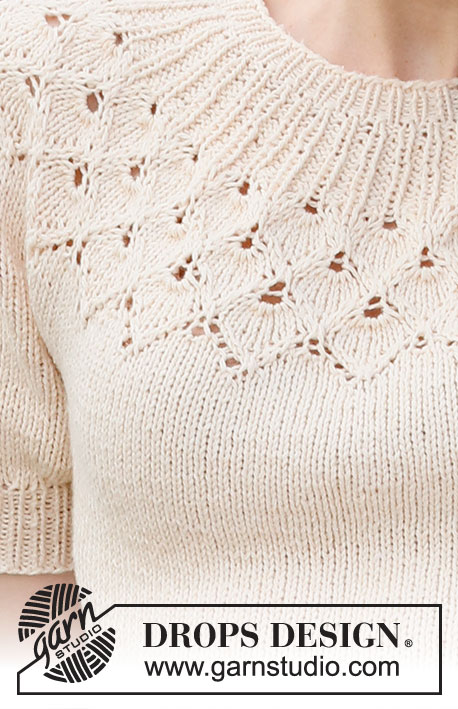
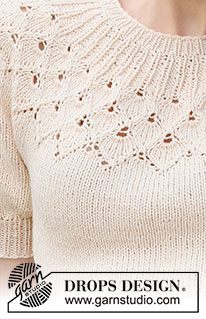
Dear Pamela, A.1 is worked just after neck edge - see last picture; the number of purl stitches will increase by and by to prepare A.2. Happy knitting!
21.08.2026 - 06:52
 Andra wrote:
Should A2 be worked several times and not just 1?Mine look that the design shows only once, but in your pics seemed to be 3 times
14.08.2026 - 09:53
 Sally wrote:
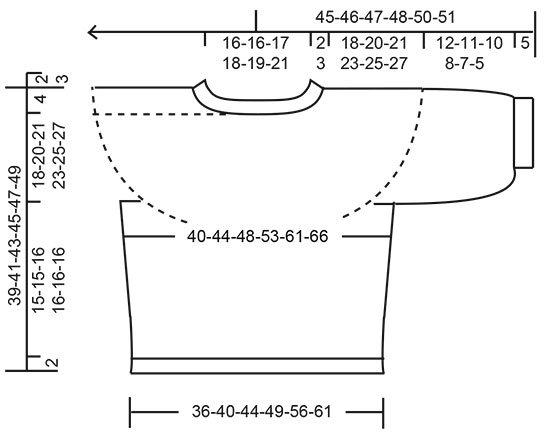
Why are the sleeves shorter on the larger sizes than they are on the smaller sizes?
13.08.2026 - 21:08DROPS Design answered:
Hi Sally, There are shorter sleeves on the larger sizes due to wider shoulders and a broader yoke. You can of course adjust the length of the sleeves if you wish. Regards, Drops team.
14.08.2026 - 06:09
 Willy Post wrote:
Hoe kan ik het uitprinten? Vroeger stond er zo’n printer teken bij. Groetjes
29.07.2026 - 13:32DROPS Design answered:
Dag Willy,
Helemaal bovenaan rechts van de de titel van het patroon staat het afdruk pictogram.
29.07.2026 - 20:42
 Patricia wrote:
Pour A2 taille XXL il est précisé dans la légende de tricoter 9 fois la même maille et de le faire 4 fois au total j'ai visionné la vidéo , cela se fait tout le tour et non 4 fois. Par contre S'il s'agit du nombre de fois où il faut réaliser ce petit carré comportant une étoile vierge dans le diagramme , dans A 2 il n'y en a que 3 merci pour vos explications
21.07.2026 - 14:06DROPS Design answered:
Bonjour Patricia, pour tricoter 9 fois la même maille, vous allez tricoter 4 fois la partie entre les *, autrement dit, vous tricotez 1 m end (= 1 m), puis *1 jeté, 1 m end dans la même maille (= 2 m)* x 4 = 8 m + la 1ère m tricotée = 9 mailles. Dans la vidéo, on tricote 7 fois la même mailles comme dans les 3 premières mailles, raison pour laquelle on ne tricote que 3 fois de *à*. Bon tricot!
04.08.2026 - 12:56
Susan wrote:
I'm trying to find the measurements that relate to the sizes S M L etc? Can anyone help where I can see them please?
20.07.2026 - 16:36DROPS Design answered:
Hu Susan, please see the lesson Drops HERE. Happy knitting!
20.07.2026 - 21:48
 Pia wrote:
Onko tarkoitus että joustimen jälkeen alkavat lisäykset tulee niin että oikeat silmukat jatkuu samalla linjalla vai eri? Molempia kun näkee eri neulojien versioissa? Mielestäni ohjeen mukaan ne jatkuisi samalla linjalla mutta suurimmalla osalla neulojista ne ei jatku suoraan.
14.07.2026 - 07:37DROPS Design answered:
Hei, piirroksen A.1 lisäykset tehdään aina nurjan silmukan jälkeen ja seuraavalla kerroksella lisätty silmukka neulotaan nurin piirroksen mukaan. Oikeat silmukat eivät kuitenkaan jatku samalla linjalla (katso kuva).
14.07.2026 - 18:21
 Maria Rita wrote:
Vorrei farlo più lungo Devo ugualmente fare gli aumenti prima dei ferri a coste finali ?
22.06.2026 - 22:20DROPS Design answered:
Buonasera Maria Rita, può fare gli aumenti prima del bordo a coste. Buon lavoro!
01.07.2026 - 23:51
 Berglind wrote:
Hvernig geri ég * táknið* Ég skil það alls ekki...það er í swing uppskriftinni. Bæði fyllt stjarna og tóm. Svar óskast sem fyrst.
18.06.2026 - 13:16DROPS Design answered:
Blessuð Berglind. Þú prjónar 1 lykkju slétt en bíður með að sleppa lykkjunni af vinstri prjóni (= 1 lykkja komin á hægri prjón), slærð 1 sinni uppá hægri prjón og prjónar 1 lykkju slétt í sömu lykkjuna (= 3 lykkjur komnar á hægri prjón), slærð 1 sinni uppá hægri prjón og prjónar 1 lykkju slétt í sömu lykkjuna (= 5 lykkjur komnar á hægri prjón), slærð 1 sinni uppá hægri prjón og prjónar 1 lykkju slétt í sömu lykkjuna og lætur lykkjuna falla af vinstri prjóni sem prjónað hefur verið í 3 sinnum í stærð S = 7 lykkjur á hægri prjóni. Gangi þér vel.
22.06.2026 - 09:59
|
|||||||||||||||||||||||||
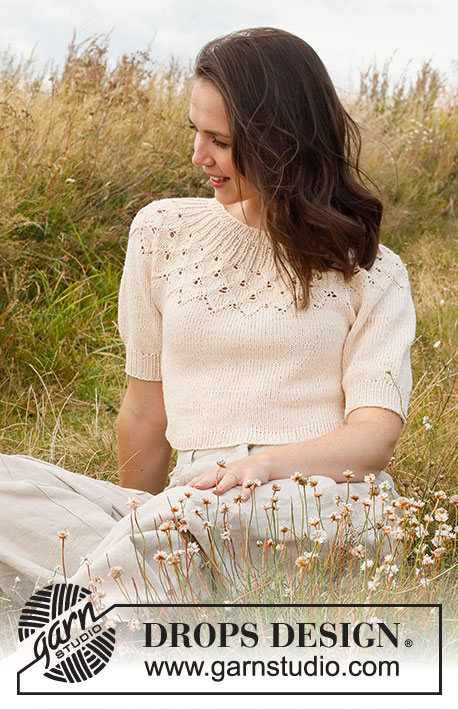
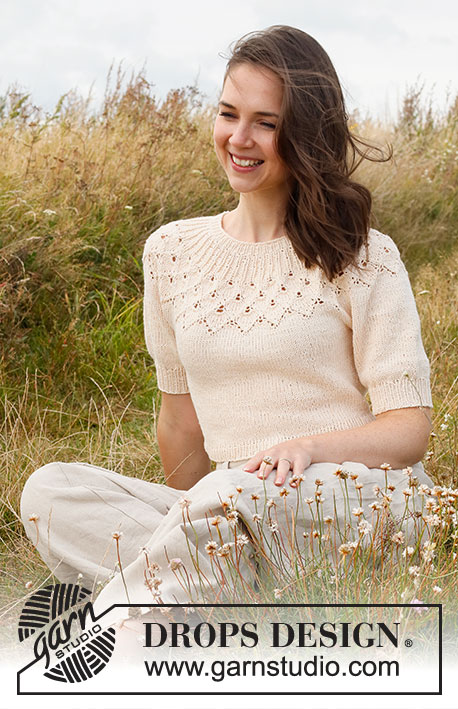
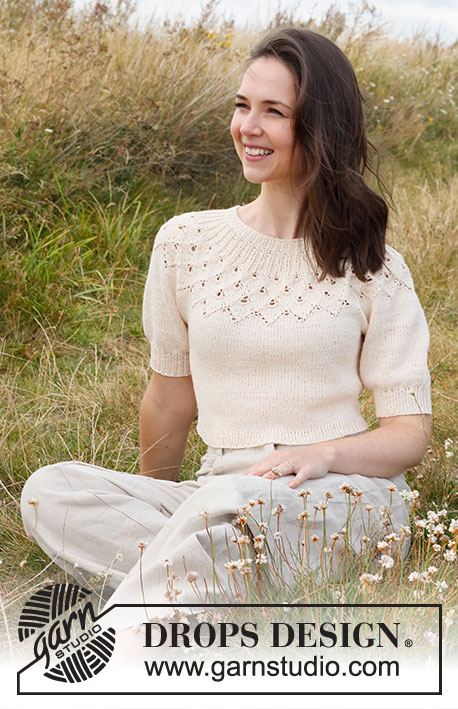
Swing by Spring Top#swingbyspringtop |
|||||||||||||||||||||||||
 |
 |
||||||||||||||||||||||||
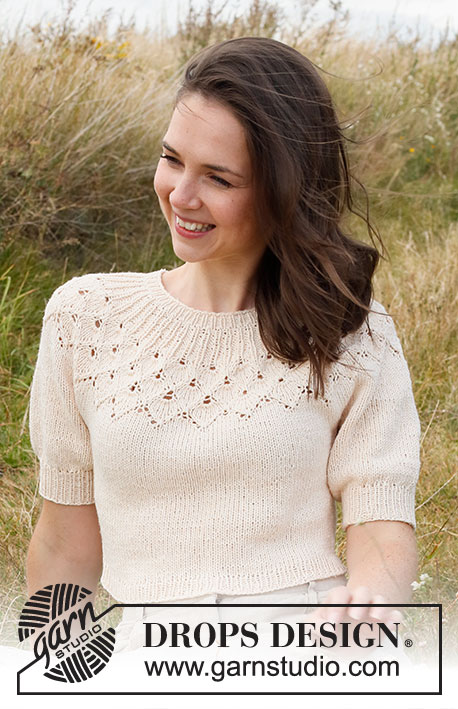
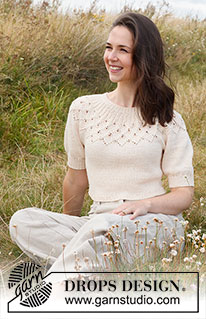
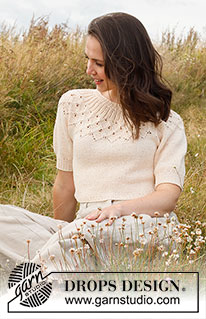
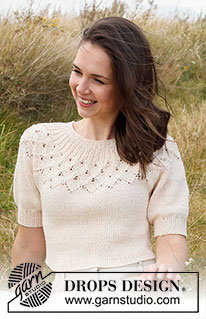
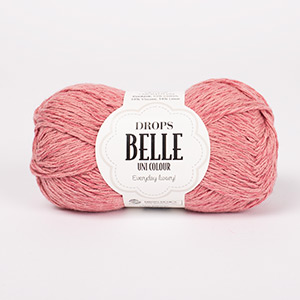
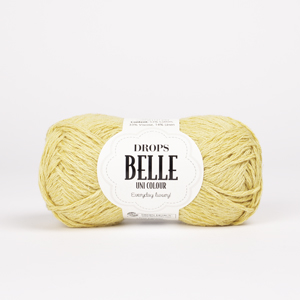
Knitted sweater in DROPS Belle. Piece is knitted top down with round yoke, lace pattern, leaf pattern and short balloon sleeves. Size: S - XXXL
DROPS 222-32 |
|||||||||||||||||||||||||
|
------------------------------------------------------- EXPLANATION FOR THE PATTERN: ------------------------------------------------------- PATTERN: See diagrams A.1 and A.2. Choose diagram for your size. DECREASE TIP (applies to side of body): Decrease 1 stitch on each side of marker thread as follows: Work until 3 stitches remain before marker thread and knit 2 together, knit 2 (marker thread is between these 2 stitches), slip 1 stitch knitwise, knit 1, pass slipped stitch over stitch worked. BIND-OFF TIP: To avoid a tight bind-off edge you may use a larger needle size. If this also is too tight, work a 1 yarn over after approx. every 4th stitch while binding off (bind off yarn overs as regular stitches). ------------------------------------------------------- START THE PIECE HERE: ------------------------------------------------------- SWEATER - SHORT OVERVIEW OF THE PIECE: Work neck edge and yoke in the round from mid back, top down. Now divide yoke for body and sleeves. Body is worked in the round on circular needle, top down. Work sleeves in the round on double pointed needles/short circular needle, top down. NECK EDGE: Cast on 100-100-104-108-112-120 stitches on circular needle size 3 mm = US 2,5 with Belle. Knit 1 round. Then work rib = knit 1/purl 1. When rib measures 2-2-3-3-3-3 cm = ¾"-¾"-1⅛"-1⅛"-1⅛"-1⅛", switch to circular needle size 4 mm = US 6. Insert 1 marker at the beginning of round mid back, measure yoke from this marker! YOKE: Work A.1 in the round (= 25-25-26-27-28-30 repetitions of 4 stitches). When A.1 has been worked, there are 200-200-208-216-280-300 stitches on needle. Piece now measures 4-4-4-4-6-6 cm = 1½"-1½"-1½"-1½"-2⅜"-2⅜" from marker. Then work A.2 in the round (= 25-25-26-27-28-30 repetitions of 8-8-8-8-10-10 stitches). REMEMBER THE KNITTING GAUGE! When A.2 has been worked, there are 275-300-312-351-392-420 stitches on needle. Piece measures approx. 14-14-14-17-19-19 cm = 5½"-5½"-5½"-6¾"-7½"-7½" from marker (i.e. 16-16-17-20-22-22 cm = 6¼"-6¼"-6¾"-8"-8¾"-8¾" from cast-on edge). Work in stockinette stitch until piece measures 18-20-21-23-25-27 cm = 7"-8"-8¼"-9"-9¾"-10⅝" from marker. Now divide piece for body and sleeves. Work next round as follows: Knit 38-42-44-50-58-63 (= ½ back piece), slip the next 62-66-68-76-80-84 stitches on a stitch holder for sleeve, cast on 8-8-12-12-12-12 new stitches on needle (= in the side under sleeve), knit 75-84-88-99-116-126 (= front piece), slip the next 62-66-68-76-80-84 stitches on a stitch holder for sleeve, cast on 8-8-12-12-12-12 new stitches on needle (= in the side under sleeve), knit the last 38-42-44-50-58-63 stitches (= ½ back piece). Finish body and sleeves separately. NOW MEASURE PIECE FROM HERE! BODY: = 167-184-200-223-256-276 stitches. Insert 1 marker thread in the middle of the 8-8-12-12-12-12 new stitches under each sleeve (= in the side of body). There are now 83-92-100-111-128-138 stitches on front piece and 84-92-100-112-128-138 stitches on back piece. Move the marker threads upwards when working; they are used when decreasing in the sides later. Work in stockinette stitch in the round. When piece measures 3 cm = 1⅛" from division, decrease 1 stitch on each side of every marker thread - read DECREASE TIP (= 4 stitches decreased). Decrease like this every 2 cm = ¾" 4-4-4-4-5-5 times in total = 151-168-184-207-236-256 stitches. Work in stockinette stitch in the round until piece measures 15-15-16-16-16-16 cm = 6"-6"-6¼"-6¼"-6¼"-6¼" from division – or desired length (approx. 2 cm = ¾" remain until finished measurements). Knit 1 round while increasing 23-26-28-31-36-38 stitches evenly = 174-194-212-238-272-294 stitches. Switch to circular needle size 3 mm = US 2,5. Work rib (knit 1/purl 1) in the round for 2 cm = ¾". Bind off with knit over knit and purl over purl - read BIND-OFF TIP. Sweater measures approx. 39-41-43-45-47-49 cm = 15¼"-16⅛"-17"-17¾"-18½"-19¼" from shoulder and down. SLEEVES: Slip the 62-66-68-76-80-84 stitches from stitch holder in one side of piece on double pointed needles/a short circular needle size 4 mm = US 6, and pick up 1 stitch in each of the 8-8-12-12-12-12 new stitches cast on in the side under sleeve = 70-74-80-88-92-96 stitches. Work in stockinette stitch in the round until sleeve measures 12-11-10-8-7-5 cm = 4¾"-4⅜"-4"-3⅛"-2¾"-2" from division (approx. 5 cm = 2" remain until finished measurements, try the sweater on and work to desired length. Knit 1 round while decreasing 16-16-14-14-14-14 stitches evenly = 54-58-66-74-78-82 stitches. Switch to double pointed needles size 3 mm = US 2,5. Work rib in the round = knit 1/purl 1 for 5 cm = 2". Bind off with knit over knit and purl over purl - remember BIND-OFF TIP! Sleeve measures approx. 17-16-15-13-12-10 cm = 6¾"-6¼"-6"-5⅛"-4¾"-4" from division. Work the other sleeve the same way. |
|||||||||||||||||||||||||
Diagram explanations |
|||||||||||||||||||||||||
|
|||||||||||||||||||||||||
 |
|||||||||||||||||||||||||
 |
|||||||||||||||||||||||||
 |
|||||||||||||||||||||||||
 |
|||||||||||||||||||||||||
Have you finished this pattern?Tag your pictures with #dropspattern #swingbyspringtop or submit them to the #dropsfan gallery. Do you need help with this pattern?You'll find 23 tutorial videos, a Comments/Questions area and more by visiting the pattern on garnstudio.com. © 1982-2026 DROPS Design A/S. We reserve all rights. This document, including all its sub-sections, has copyrights. Read more about what you can do with our patterns at the bottom of each pattern on our site. |
|||||||||||||||||||||||||






With over 40 years in knitting and crochet design, DROPS Design offers one of the most extensive collections of free patterns on the internet - translated to 17 languages. As of today we count 333 catalogs and 12532 patterns - 12522 of which are translated into English (US/in).
We work hard to bring you the best knitting and crochet have to offer, inspiration and advice as well as great quality yarns at incredible prices! Would you like to use our patterns for other than personal use? You can read what you are allowed to do in the Copyright text at the bottom of all our patterns. Happy crafting!
Post a comment to pattern DROPS 222-32
We would love to hear what you have to say about this pattern!
If you want to leave a question, please make sure you select the correct category in the form below, to speed up the answering process. Required fields are marked *.