
Popular categories
Looking for a yarn?


Comments / Questions (21)
![]() Joy Kot wrote:
Joy Kot wrote:
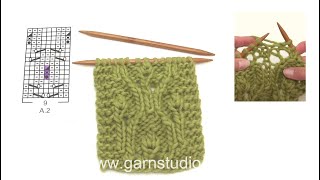
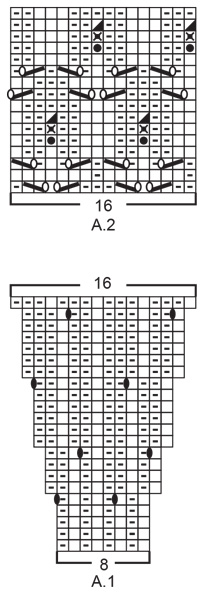
Hi In the pattern A2 and A3 does the x symbol mean K3 together
22.11.2025 - 06:17DROPS Design answered:
Hi Joy, Yes, x = K3 together. Regards, Drops Team.
24.11.2025 - 07:38
![]() Linda wrote:
Linda wrote:
Er staat een fout in het telpatroon. Bij uitleg van een meerdering van een steek (dicht rondje)moet tussenhaakjes staan, dat er GEEN gaatje ontstaat .
17.10.2025 - 22:06
![]() Luisa wrote:
Luisa wrote:
Nel diagramma A2 alla riga n°5 il simbolo ● nella maglia sotto la maglia successiva purtroppo non ho capito quale maglia prendere forse devo andare sotto la maglia che ho sul ferro poi la maglia sul ferro deve cadere.....aiuto purtroppo mi sono boccata Grazie mille se mi aiutate
26.08.2025 - 15:05DROPS Design answered:
Buonasera Luisa, provi a vedere se questo video può esserle di aiuto. Buon lavoro!
30.08.2025 - 20:11
![]() Kerstin Milferstädt-Conrad wrote:
Kerstin Milferstädt-Conrad wrote:
Ich möchte diesen Pullover mit beifad3n und Drops Nord mit Nadeln Nr 5 in Größe M stricken. Reicht dazu als Anleitung Größe S, um die stärkeren Nadeln auszugleichen?
06.07.2025 - 12:21DROPS Design answered:
Liebe Frau Milferstädt-Conrad, dieses Modell wird mit einem Garn der Garngruppe B gestrickt, die Maschenprobe bekommen Sie mit Nord vielleicht nicht, so müssen Sie dann die ganze Anleitung je nach Ihrer eigenen Maschenprobe neu umrechnen. Viel Spaß beim Stricken!
23.07.2025 - 12:13
![]() Luhaib Alsammarraie wrote:
Luhaib Alsammarraie wrote:
Hi. Can you explain what is (in stitch below next stitch knit 1, 1 yarn over, knit 1) I didn’t fully understand how this stitch is knitted. Any video tutorial for this specific stitch please?
18.04.2025 - 21:12DROPS Design answered:
Dear Luhaib, you can see how this stitch is worked in this video. It's the 1st icon in the video. Happy knitting!
20.04.2025 - 23:38
![]() Marianne Bang wrote:
Marianne Bang wrote:
Tegnet hvor der er en streg efterfulgt af en lille cirkel er ikke vist er cirklen ikke bare at slå om
24.08.2024 - 09:51DROPS Design answered:
Hej Marianne, jo stregen betyder 2 ret sammen og cirklen betyder slå om :)
28.08.2024 - 08:03
![]() Magdalena wrote:
Magdalena wrote:
Hello Drops team, My question is : I have knitted lots of sweaters based on your patterns as I do absolutely love them. I would like to try and sell them just to make little money for myself ( so I can afford more yarn). Some of those sweaters are modified by me ( ribbed next instead rolled one, long sleeve instead short, etc) Is it still ok for me to sell modified versions of those sweaters ? Thank you for your help Kind regards Magdalena
08.02.2024 - 12:26DROPS Design answered:
Dear Magdalena, please find all informations required under the copyright at the bottom of each pattern page. Happy knitting!
08.02.2024 - 15:51
![]() Ida wrote:
Ida wrote:
Hej igen! Tittade på Daisy Lane mönstret ni rekommenderade istället, har funderat på den. Jag tyckte denna var så fin med rullkanten, jag antar att det blir konstigt i mönstret om jag försöker sticka en rullkant i halsringningen på det mönstret? Eller går det? Stickar jag bara slätstickning då och isåfall hur många varv dvs när ska jag ” hoppa in i mönstret” igen? Annars får jag väl testa med denna det kanske märks ganska snabbt om det funkar eller inte./ Hälsn. Ida
31.05.2023 - 09:57DROPS Design answered:
Hej Ida, det er kun de første 8 omgange glatstrik som før rullkanten, ja og da du strikker oppefra og ned, så er det bare at sætte maskerne på et par ekstra pinde, så du kan prøve selve pasformen undervejs :)
01.06.2023 - 14:27
![]() Ida wrote:
Ida wrote:
Hej! Jag har aldrig stickat en tröja förut men funderar på att prova. Kan jag sticka denna utan mönster dvs hoppa över diagraminstruktionerna och bara sticka slätstickning där istället? Finns det någon film som visar hur man stickar omslag vridet räta? / Tack på förhand!
30.05.2023 - 13:16DROPS Design answered:
Hei Ida. Kan ikke gi noen 100% riktig svar, da vi ikke har strikket denne toppen i glattstrikk og vet resultatet. Mener det skal gå greit, så lenge strikkefastheten overholdes. Men ta en titt på Daisy Lane i DROPS 231-53, det er en topp i glattstrikk og selv om den har splitt nederst kan man jo heller lage kanten som du ser i 222-34. Ta en titt på videoen "Omslag", selv om den viser hvordan man strikker et omslag fra vrangen er prinsippet det samme når det strikkes fra rettsiden - strikk i bakre maskebue . mvh DROPS Design
30.05.2023 - 14:08
![]() Agnieszka wrote:
Agnieszka wrote:
Proszę mi powiedzieć czy schemat pokazuje wyłącznie prawą stronę robótki czy prawą i lewą?
05.05.2023 - 15:54DROPS Design answered:
Witaj Agnieszko, schemat pokazuje prawą stronę robótki, wszystkie rzędy. W tym przypadku sweterek jest przerabiany na okrągło, to oznacza, że wszystkie okrążenia będą wykonywane wyłącznie na prawej stronie robótki. Zachęcam do zapoznania się z kursem DROPS Jak odczytywać schematy w robótce na drutach, część dotyczącą przerabiania 'na okrągło'. W razie dodatkowych pytań służę pomocą. Pozdrawiam!
05.05.2023 - 16:08
|
||||||||||||||||||||||||||||||||||
Now and Forever#nowandforeversweater |
||||||||||||||||||||||||||||||||||
 |
 |
|||||||||||||||||||||||||||||||||
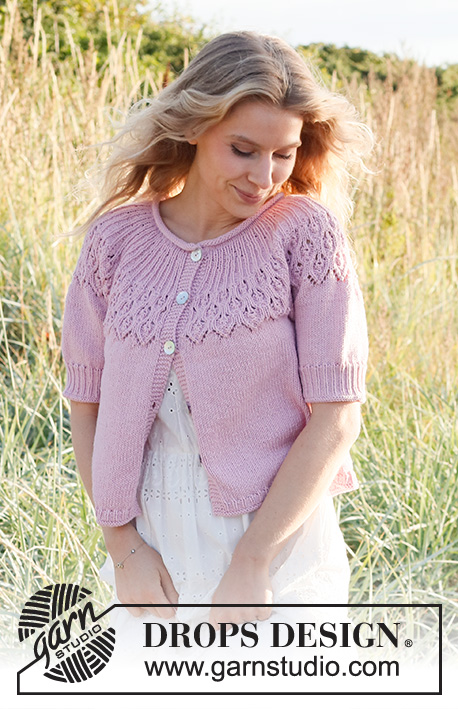
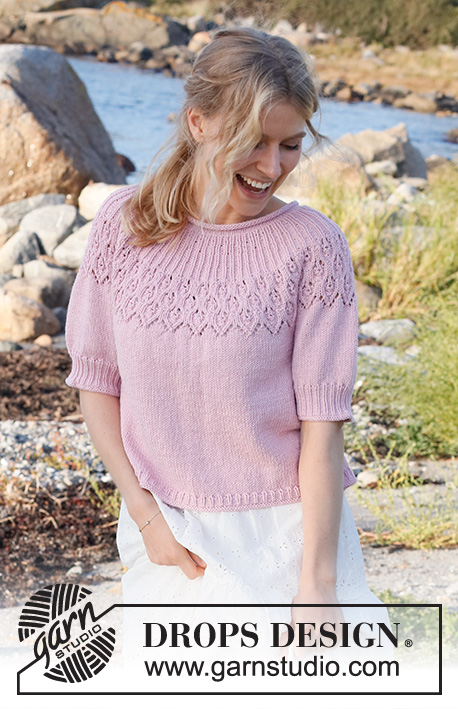
Knitted sweater in DROPS Merino Extra Fine. Piece is knitted top down with rolling edge in the neck, round yoke, lace pattern on yoke and short sleeves. Size: S - XXXL
DROPS 222-34 |
||||||||||||||||||||||||||||||||||
|
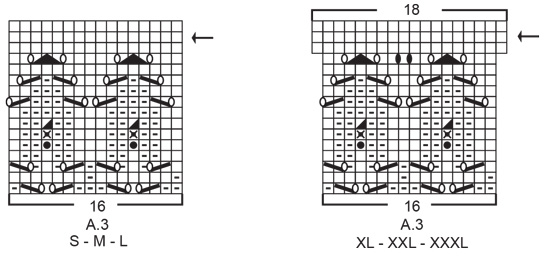
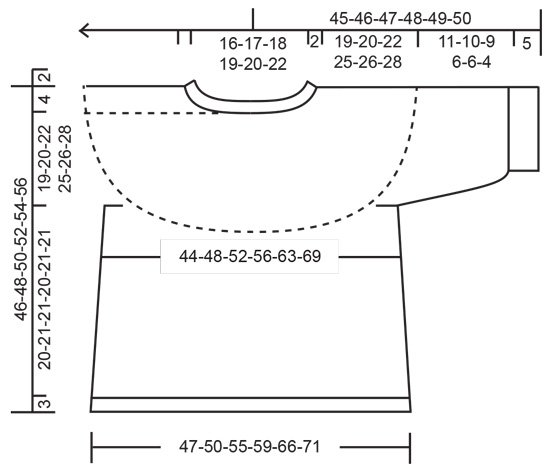
------------------------------------------------------- EXPLANATION FOR THE PATTERN: ------------------------------------------------------- PATTERN: See diagrams A.1 to A.3. Choose diagram for your size (applies to A.3). INCREASE/DECREASE TIP (evenly spaced): To calculate how to increase/decrease evenly, use the total number of stitches on row (e.g. 100 stitches) and divide stitches by number of increases/decreases to be done (e.g. 44) = 2.3. In this example increase by making 1 yarn over after approx. every other stitch. On next round knit yarns over twisted to avoid holes. To decrease knit approx. every 1st and 2nd stitch together. INCREASE TIP (applies to sides of body): Work until 4 stitches remain before marker thread, make 1 yarn over, work 8 stitches in stockinette stitch (marker thread is in the middle of these 8 stitches), make 1 yarn over (= 2 stitches increased at the marker thread, and 4 stitches increased in total on round). On next round knit yarns over twisted to avoid holes. Then work the new stitches in stockinette stitch. BIND-OFF TIP: To avoid a tight bind-off edge you may use a larger needle size. If this also is too tight, work a 1 yarn over after approx. every 6th stitch while binding off (bind off yarn overs as regular stitches). ------------------------------------------------------- START THE PIECE HERE: ------------------------------------------------------- SWEATER - SHORT OVERVIEW OF THE PIECE: Work neck edge and yoke in the round on circular needle from mid back, top down. Now divide yoke for body and sleeves. Body is worked in the round on circular needle, top down. Work sleeves in the round on double pointed needles/short circular needle, top down. NECK EDGE: Cast on 100-104-110-114-118-124 stitches on a short circular needle size 3 MM = US 2.5 with Merino Extra Fine. Work 8 rounds in stockinette stitch (rolling edge). Then work 2 rounds in stockinette stitch and increase at the same time 44-48-50-54-58-60 stitches evenly on first round - read INCREASE/DECREASE TIP = 144-152-160-168-176-184 stitches (knit yarn overs twisted on last round). Insert 1 marker in the middle of round (= mid front). Then work yoke as explained below. Measure yoke from this marker! YOKE: Switch to circular needle size 4 MM = US 6 and work A.1 in the round (= 18-19-20-21-22-23 repetitions of 8 stitches). Continue pattern like this, and increase as shown in diagram. REMEMBER THE KNITTING GAUGE! When A.1 has been worked vertically, there are 288-304-320-336-352-368 stitches on needle. Then work A.2 in the round (= 18-19-20-21-22-23 repetitions of 16 stitches). When A.2 has been worked 1-1-1-2-2-2 times vertically, work A.3 in the round (= 18-19-20-21-22-23 repetitions of 16 stitches). On round marked with arrow in A.3 increase 8-16-28-2-12-26 stitches evenly (there are 288-304-320-378-396-414 stitches on needle before increase begins) - remember INCREASE/DECREASE TIP = 296-320-348-380-408-440. When entire A.3 has been worked vertically, work in stockinette stitch until piece measures 19-20-22-25-26-28 cm = 7½"-8"-8¾"-9¾"-10¼"-11" from marker by the neck. Now divide yoke for body and sleeves, i.e. work last round as follows: Work 43-47-51-55-61-67 stitches in stockinette stitch (= ½ back piece), slip the next 62-66-72-80-82-86 stitches on 1 stitch holder for sleeve, cast on 6-6-8-8-10-10 new stitches on needle (= in the side under sleeve), work 86-94-102-110-122-134 stitches in stockinette stitch (= front piece), slip the next 62-66-72-80-82-86 stitches on 1 stitch holder for sleeve, cast on 6-6-8-8-10-10 new stitches on needle (= in the side under sleeve) , and work the remaining 43-47-51-55-61-67 stitches in stockinette stitch as before (= ½ back piece). Finish body and sleeves separately. NOW MEASURE PIECE FROM HERE! BODY: = 184-200-220-236-264-288 stitches. Insert 1 marker thread in each side on body– in the middle of the 6-6-8-8-10-10 stitches cast on under each sleeve = 92-100-110-118-132-144 stitches between every marker thread. Move the marker threads upwards when working; they should be used for increase later in the sides on body. Work in stockinette stitch in the round. When piece measures 6 cm = 2⅜" from division, increase 1 stitch on each side of both marker threads - read INCREASE TIP( = 4 stitches increased). Increase like this every 6 cm = 2⅜" 3 times in total in each side = 196-212-232-248-276-300 stitches. Work until piece measures 20-21-21-20-21-21 cm = 8"-8¼"-8¼"-8"-8¼"-8¼" from division. Approx. 3 cm = 1⅛" remain until finished measurements, try the sweater on and work until desired length. Now increase stitches as explained below - this is done to avoid the rib from contracting the piece together. Knit 1 round while increasing 29-31-35-37-39-45 stitches evenly = 225-243-267-285-315-345 stitches. Switch to circular needle size 3 MM = US 2.5. Work 5 rounds rib (= knit 1/purl 2). Then knit 1 round and purl round. Bind off by knitting– read BIND-OFF TIP. Sweater measures approx. 46-48-50-52-54-56 cm = 18"-19"-19¾"-20½"-21¼"-22" from shoulder and down. SLEEVES: Slip the 62-66-72-80-82-86 stitches from stitch holder in one side of piece on double pointed needles or a short circular needle size 4 MM = US 6 and pick in addition up 1 stitch in each of the 6-6-8-8-10-10 new stitches cast on under sleeve = 68-72-80-88-92-96 stitches. Work in stockinette stitch in the round until piece measures 11-10-9-6-6-4 cm = 4⅜"-4"-3½"-2⅜"-2⅜"-1½" from division. Approx. 5 cm = 2" remain until finished measurements, try the sweater on and work until desired length. Knit 1 round while decreasing 8-6-8-10-8-6 stitches evenly - read INCREASE/DECREASE TIP = 60-66-72-78-84-90 stitches. Switch to double pointed needles size 3 MM = US 2.5. Work rib in the round = knit 1/purl 2 for 5 cm = 2". Then knit 1 round and purl 1 round. Bind off by knitting– read BIND-OFF TIP. Sleeve measures approx. 16-15-14-11-11-9 cm = 6¼"-6"-5½"-4⅜"-4⅜"-3½" from division. Work the other sleeve the same way. |
||||||||||||||||||||||||||||||||||
Diagram explanations |
||||||||||||||||||||||||||||||||||
|
||||||||||||||||||||||||||||||||||
 |
||||||||||||||||||||||||||||||||||
 |
||||||||||||||||||||||||||||||||||
 |
||||||||||||||||||||||||||||||||||
Have you finished this pattern?Tag your pictures with #dropspattern #nowandforeversweater or submit them to the #dropsfan gallery. Do you need help with this pattern?You'll find 28 tutorial videos, a Comments/Questions area and more by visiting the pattern on garnstudio.com. © 1982-2026 DROPS Design A/S. We reserve all rights. This document, including all its sub-sections, has copyrights. Read more about what you can do with our patterns at the bottom of each pattern on our site. |
||||||||||||||||||||||||||||||||||


With over 40 years in knitting and crochet design, DROPS Design offers one of the most extensive collections of free patterns on the internet - translated to 17 languages. As of today we count 324 catalogs and 12290 patterns - 12280 of which are translated into English (US/in).
We work hard to bring you the best knitting and crochet have to offer, inspiration and advice as well as great quality yarns at incredible prices! Would you like to use our patterns for other than personal use? You can read what you are allowed to do in the Copyright text at the bottom of all our patterns. Happy crafting!
Post a comment to pattern DROPS 222-34
We would love to hear what you have to say about this pattern!
If you want to leave a question, please make sure you select the correct category in the form below, to speed up the answering process. Required fields are marked *.