
Popular categories
Looking for a yarn?


Comments / Questions (18)
![]() Ellen wrote:
Ellen wrote:
Jeg er usikker på hva dere mener med størrelsene når det står: STØRRELSE: 2 - 3/5 - 6/9 - 10/12 år Betyr det størrelse 2-3 år, 5-6 år, 9-10 år og 12 år. Eller betyr det 2 år, 3/5 år, 6/9 år og 10/12 år. Jeg oppfattet det første, så jeg tenker å strikke 5-6 år. Blir det riktig?
16.03.2026 - 15:23DROPS Design answered:
Hei Ellen, Minste størrelse er til 2 år, neste størrelse 3-5 år, så 6-9 år og største størrelse 10-12 år. Vennlig hilsen, Drops Team.
17.03.2026 - 06:40
![]() Birgit wrote:
Birgit wrote:
Udtagning, er det 7 masker på hver side af midten
18.10.2025 - 10:11DROPS Design answered:
Hei Birgit. Det økes på innsiden av de ytterste 7 maskene mot midt foran. Når arbeidet måler 8-8-9-9 cm fra der merketråden ble satt, økes det 1 maske i hver side mot midt foran – les ØKETIPS (= 2 masker økt). Øk slik på hver 4.pinne (dvs på annenhver pinne fra retten) totalt 8 ganger i hver side = 8 masker i hver side = 16 økte masker. mvh DROPS Design
20.10.2025 - 14:34
![]() Alicia wrote:
Alicia wrote:
Fabulous pattern but I am struggling with the increases. My first yo is between p stitches - p, yo, p On the next knit row how do I manage these? I’ve read the comments and I’m still not getting it. At some point there has to be 3 p and 3 k stitches to maintain the pattern. Is that right? Or is the whole pattern moved over by 1 stitch ? thanks for your help.
01.08.2025 - 01:35DROPS Design answered:
Dear Alicia, you are working the pattern with 1 edge stitch on each side, so that increasing inside 7 sts will be between the 3rd and 4th stitch in A.1; the new stitches will be worked as en extension of the pattern to the right at the beg of the row and to the left at the end of the row, so that the first 2 sts increased will be worked as 2nd then 1st stitch at the beg of row / 1st and 2nd stitch at the end of the row, and the 6 sts in pattern after/before the edge stitch continue as before. Happy knitting!
01.08.2025 - 08:18
![]() Deni wrote:
Deni wrote:
Hi,In regards to increasing,is it done right after the first(garter)stitch at the beginning of the row and right before the garter stitch at the end of the row? Thank you.
23.05.2025 - 07:45DROPS Design answered:
Dear Deni, the increases are worked inside the first and last 7 sts - see INCREASE TIP. So work the first 7 sts as before, increase 1 stitch, work remaining sts as before until 7 sts remain, increase 1 stitch, work the last 7 sts as before. Happy knitting!
23.05.2025 - 09:12
![]() K And K wrote:
K And K wrote:
Hi. Thanks for answering. I noticed that I had wrong cast on. I'm trying again. Another question. At INCREASES ON EACH SIDE TOWARDS MID FRONT, should I yarn over at the very first stitch? I'm making size-4 so I have 88 stitches(29 at right side, 30 at mid, 29 at left side) now. Do I have to yarn over at the stitch 1, or stitch 30(first stitch of MID-SECTION)? And, if I yarn over 1st stitch, do I have to yarn over the same stitch? Or at 3rd stitch(knit the 1st and new stitch).
07.02.2025 - 05:33DROPS Design answered:
Dear K and K, increase as explained under INCREASE TIP (for sides of face-opening): at the beg of the pattern, this means increase from RS after the first 7 sts and before the last 7 sts and incorporate the new stitches in pattern as explained. Happy knitting!
07.02.2025 - 15:48
![]() K And K wrote:
K And K wrote:
Hi again. If the first row(the purl row) is not included in pattern, should I skip the first row when I knit up the stitches? And I knitted over 40 rows, 9cm. But if I have to knit up the stitches only 25, should I skip some rows?
23.01.2025 - 12:21DROPS Design answered:
Dear K and K, we don't pick up stitches in every row, since the opening will be too tight then. If you have 40 rows in 9 cm you are working very tight (since the gauge is 30 rows = 10cm) so you will need to adjust the number of stitches to knit up accordingly. So pick up in approx. 3 of every 4 rows or something similar, so that the number of stitches is correct for working A.1 later on. You don't need to skip the first row. Happy knitting!
25.01.2025 - 20:20
![]() Peppi wrote:
Peppi wrote:
En ymmärrä, miten lisäykset neulotaan mukaan kuvioon?
22.01.2025 - 20:47DROPS Design answered:
Hei, lisätyillä silmukoilla neulotaan piirroksen A.1 mallineuletta seuraavasti: Neulo 2 ensimmäisellä lisätyllä silmukalla sileää neuletta, neulo seuraavilla 2 lisätyllä silmukalla ainaoikeaa, neulo seuraavilla 2 lisätyllä silmukalla sileää neuletta jne.
24.01.2025 - 18:33
![]() K And K wrote:
K And K wrote:
Hi. Thanks for the nice pattern. I have a few questions. 1. At the beginning, is the very first row not included in pattern? Should I purl all stitches including the edge? 2. For the 1 edge stitch in GARTER STITCH - do I have to knit all the edge stitches? 3. When I knit the edges, knit rows have holes but purl rows don\'t. Should I knit up stitches only odd rows(except the first purl row)? 4. When should I knit up stitches? At the right side, or the wrong side?
21.01.2025 - 07:48DROPS Design answered:
Dear K And K, the very first row purled from WS is worked before starting pattern ie not included in diagram and worked extra. When working 1 edge stitch in garter stitch, knit this stitch from both right and wrong side. Pattern A.1 is like broken rib, ie, seen from RS, 2 sts in stocking stitch (first 2 sts A.1), 2 sts in garter stitch (last 2 sts A.1). Happy knitting!
21.01.2025 - 16:21
![]() Ouahida wrote:
Ouahida wrote:
Hi please I don’t understand how to do the increases 😴
28.12.2024 - 10:23DROPS Design answered:
Dear Ouahida, as you work back and forth, you should see the edges that form the opening of the balaclava. The stitches closest to this face opening (or mid-front) would be the outermost stitches (from the mid back of the piece). So before /after the last and first 7 stitches in the row, you will increase 1 stitch (= 2 in total in the row). This increase is worked 8 times in total on alternate right side rows (you never increase on the wrong side and only increase in one of every two right side rows). The yarn overs are worked twisted and then worked in the pattern: alternating between stocking stitch or garter stitch depending on the stitches before/after them. Happy knitting!
30.12.2024 - 01:29
![]() Argene Revelant wrote:
Argene Revelant wrote:
Bonjour, j'aime beaucoup vos modèles, mais, pour celui-ci, je ne vois pas le diagramme. Merci
28.01.2024 - 15:32DROPS Design answered:
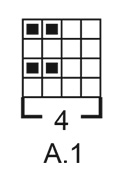
Bonjour Mme Revelant et merci. Le diagramme A.1 se trouve tout à la fin des explications, il se tricote sur 4 mailes et 4 rangs. Bon tricot!
29.01.2024 - 12:14
|
|||||||
Northern Spirit Kids#northernspiritbalaclava |
|||||||
 |
 |
||||||
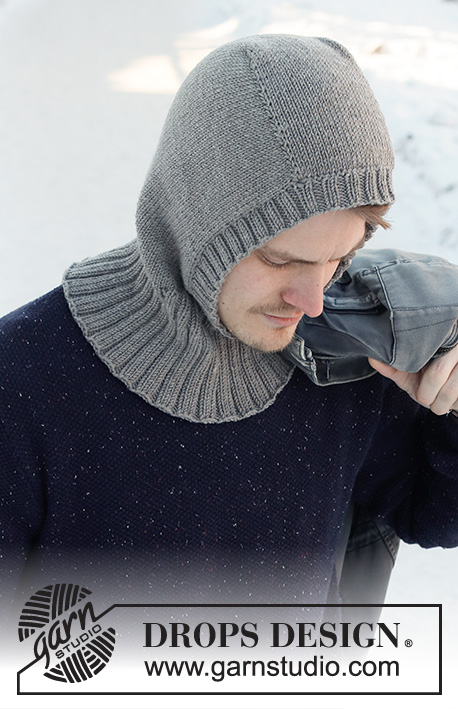
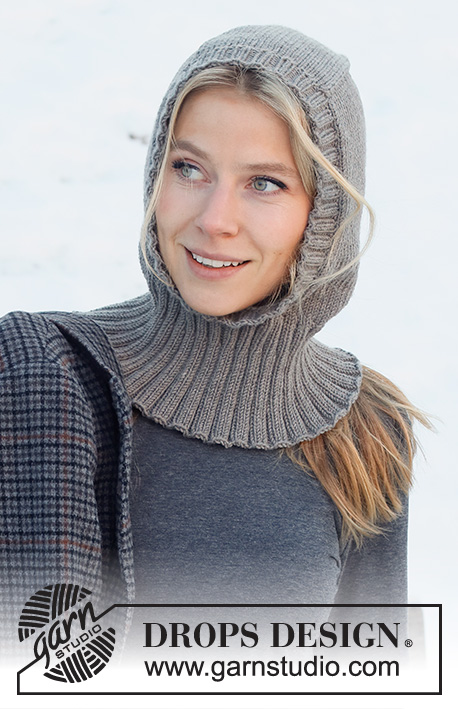
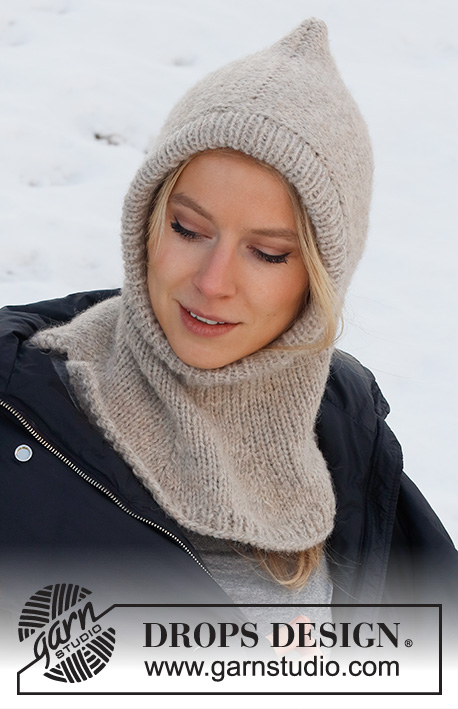
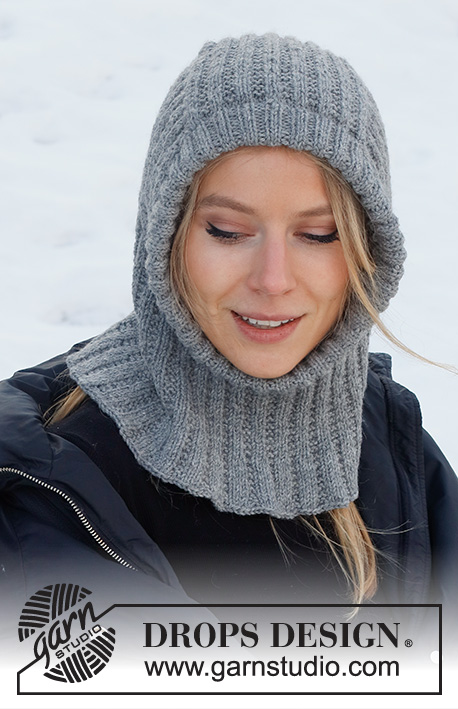
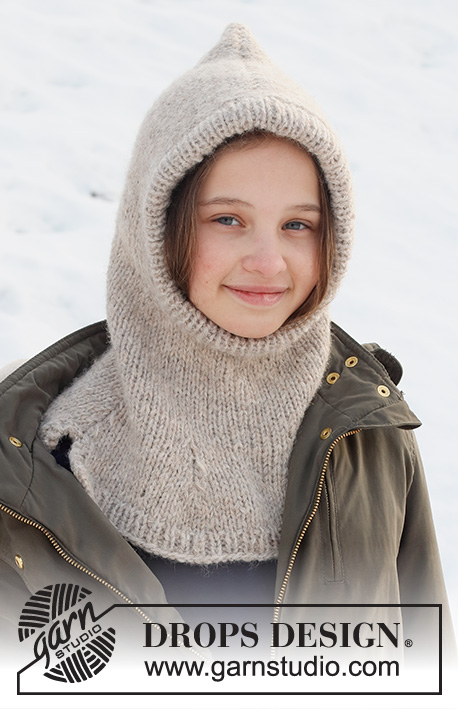
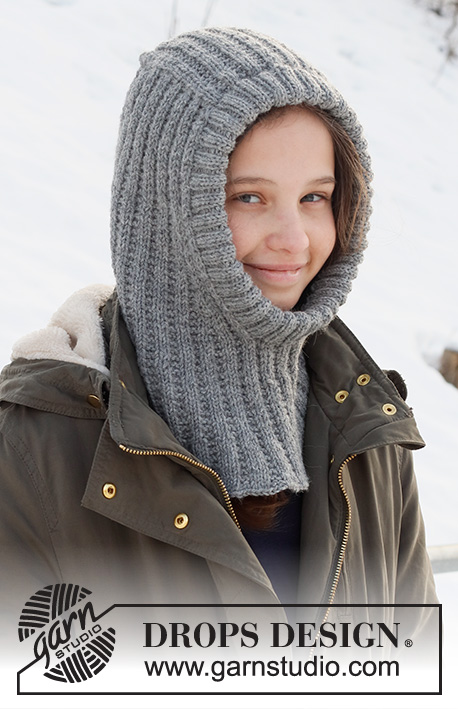
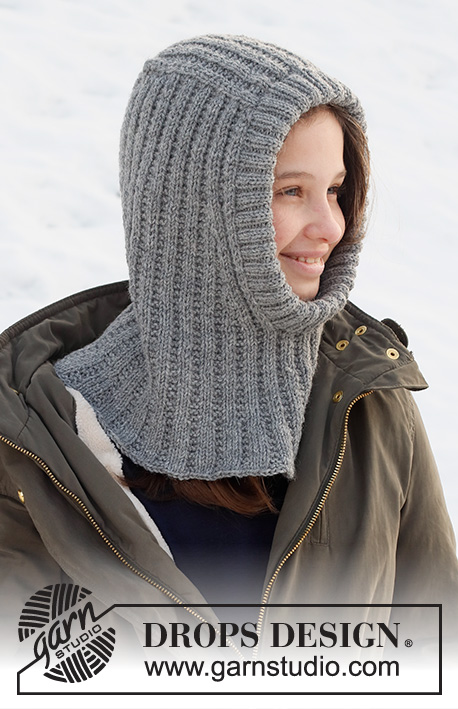
Knitted hat / balaclava for children in DROPS Lima. The piece is worked with textured pattern and ribbed edging. Sizes 2 to 12 years.
DROPS Children 37-28 |
|||||||
|
------------------------------------------------------- EXPLANATIONS FOR THE PATTERN: ------------------------------------------------------- RIDGE/GARTER STITCH (worked back and forth): Knit all rows. 1 ridge in height = Knit 2 rows. PATTERN: See diagram A.1. The diagram shows all rows in the pattern from the right side. INCREASE TIP (for sides of face-opening): Increase on the inside of the outermost 7 stitches on each side. All increases are worked from the right side! Increase 1 stitch by making 1 yarn over. On the next row (wrong side) work the yarn overs twisted to avoid holes. The increased stitches are worked into A.1, i.e. the first 2 stitches are worked in stockinette stitch, the next 2 in garter stitch, the next 2 in stockinette stitch, etc.. DECREASE TIP (mid-back): All decreases are worked from the right side! Start 4 stitches before the marker thread mid-back, knit 2 together, knit 4 (marker thread sits between these 4 stitches), slip 1 stitch as if to knit, knit 1 and pass the slipped stitch over the knitted stitch (= 2 stitches decreased). BINDING-OFF TIP: To avoid the bind-off edge being tight you can bind off with a larger size needle. If the edge is still tight, make 1 yarn over after approx. each 8th stitch at the same time as binding off; the yarn overs are bind off as normal stitches. ------------------------------------------------------- START THE PIECE HERE: ------------------------------------------------------- BALACLAVA – SHORT OVERVIEW OF THE PIECE: The middle section is worked back and forth with circular needle, from mid front and backwards. Stitches are knitted up on each side of this section. The piece is continued back and forth before stitches are cast on for the neck mid-front. The rest of the balaclava is finished in the round with circular needle. A ribbed edge is worked around the face-opening to finish. MID-SECTION: Cast on 24-28-32-32 stitches (including 1 edge stitch on each side) with circular needle size 3.5 MM = US 4 and Lima. Purl 1 row from the wrong side. The next row is worked as follows from the right side: 1 edge stitch in GARTER STITCH – read description above, work A.1 until there are 3 stitches left, work the first 2 stitches in A.1 (so the pattern begins and finishes in the same way) and finish with 1 edge stitch in garter stitch. Continue this pattern. REMEMBER THE KNITTING GAUGE! When the piece measures 9-11-11-13 cm = 3½"-4⅜"-4⅜"-5⅛", bind off the 1 edge stitch on each side = 22-26-30-30 stitches. Cut the strand. Then work the hood as described below. HOOD: Now knit up stitches on each side of the middle section on the next row from the right side as follows: Knit up 21-25-25-29 along the side of the mid-section inside the 1 edge stitch, continue A.1 as before over the 22-26-30-30 stitches on the needle and knit up 21-25-25-29 stitches along the other side of the mid-section inside the 1 edge stitch = 64-76-80-88 stitches. Insert 1 marker thread in the middle of the row (= mid-back). Allow the thread to follow your work onwards; it is used later when decreasing mid-back. THE PIECE IS NOW MEASURED FROM WHERE THE MARKER THREAD WAS INSERTED! Continue A.1 back and forth with 1 edge stitch in garter stitch on each side towards mid-front – the pattern should match the pattern on the middle section. Then increase on each side towards mid front and decrease mid-back as described below – read the sections on increasing and decreasing before continuing! INCREASES ON EACH SIDE TOWARDS MID FRONT: When the piece measures 8-8-9-9 cm = 3⅛"-3⅛"-3½"-3½" from where the marker thread was first inserted, increase 1 stitch on each side towards mid front – read INCREASE TIP (= 2 stitches increased). Increase like this every 4th row (i.e. every 2nd row from the right side) a total of 8 times on each side. DECREASING MID-BACK: AT THE SAME TIME when you are about to increase for the 5th time, decrease 2 stitches mid-back – read DECREASE TIP. Decrease like this every 4th row a total of 4 times (the increases and decreases finish at the same time). After all the increases and decreases there are 72-84-88-96 stitches. When the piece measures 18-18-19-19 cm = 7"-7"-7½"-7½" from where the marker thread was first inserted, cast on stitches mid-front for the neck; you can try the balaclava on and work to the desired length. Cast on 12-12-16-16 stitches at the end of the next row from the right side = 84-96-104-112 stitches. Remove the marker thread and insert 1 marker on the row. THE PIECE IS NOW MEASURED FROM THIS MARKER. Work the neck as described below. NECK: Continue working in the round with A.1 over all stitches – make sure the pattern matches the whole way round. When the piece measures 5-6-7-8 cm = 2"-2⅜"-2¾"-3⅛" from the marker on the neck, increase all knit 2 sections to knit 3 by making 1 yarn over after each knit 2 (the yarn overs are knitted twisted on the next round) = 105-120-130-140 stitches. Continue working until the piece measures 8-9-10-11 cm = 3⅛"-3½"-4"-4⅜" from the marker. Now increase all 2 garter stitches to 3 garter stitches by making 1 yarn over after all 2 garter stitches = 126-144-156-168 stitches. Work 1 round with knit 3, 3 garter stitches (the yarn overs are worked twisted to avoid holes). Purl 1 round, then bind off loosely with knit – read BINDING-OFF TIP. The piece measures approx. 32-34-36-38 cm = 12½"-13⅜"-14¼"-15" from the middle of the mid-section and down. EDGE AROUND FACE-OPENING: Start from the right side at the bottom, where stitches were cast on for the neck, and knit up 136-140-148-152 stitches around the opening, inside the 1 edge stitch using short circular needle size 3 MM = US 2.5 and Lima. The number of stitches should be divisible by 4. Work rib in the round (knit 2, purl 2) for 5-6-6-6 cm = 2"-2⅜"-2⅜"-2⅜" – make sure the rib matches the stitches on the mid-section and on the cast-on stitches on the neck. Loosely bind off with knit over knit and purl over purl – read BINDING-OFF TIP. Fold the rib double to the inside and sew down. To avoid the edge being tight and rolling outwards, it is important the seam is elastic. |
|||||||
Diagram explanations |
|||||||
|
|||||||
 |
|||||||
Have you finished this pattern?Tag your pictures with #dropspattern #northernspiritbalaclava or submit them to the #dropsfan gallery. Do you need help with this pattern?You'll find 24 tutorial videos, a Comments/Questions area and more by visiting the pattern on garnstudio.com. © 1982-2026 DROPS Design A/S. We reserve all rights. This document, including all its sub-sections, has copyrights. Read more about what you can do with our patterns at the bottom of each pattern on our site. |
|||||||


With over 40 years in knitting and crochet design, DROPS Design offers one of the most extensive collections of free patterns on the internet - translated to 17 languages. As of today we count 324 catalogs and 12290 patterns - 12280 of which are translated into English (US/in).
We work hard to bring you the best knitting and crochet have to offer, inspiration and advice as well as great quality yarns at incredible prices! Would you like to use our patterns for other than personal use? You can read what you are allowed to do in the Copyright text at the bottom of all our patterns. Happy crafting!
Post a comment to pattern DROPS Children 37-28
We would love to hear what you have to say about this pattern!
If you want to leave a question, please make sure you select the correct category in the form below, to speed up the answering process. Required fields are marked *.