
Popular categories
Looking for a yarn?


Comments / Questions (57)
![]() Annette Kristensen wrote:
Annette Kristensen wrote:
Under afsnittet bærestykke står der, citat : "4.mærke: spring over de næste 9 masker, sæt 4.mærke i næste maske. Der er nu 11-13-13-15-15-15 masker tilbage på omgangen." Skal man flytte maskerne over på pinden og så strikke de sidste masker efter 4. mærke er sat med helpatent 2. omgang? Og herefter starte ny omgang med 3. omgang samtidig med at udtagningen til RAGLAN starter?
20.09.2022 - 08:53DROPS Design answered:
Hei Annette. Når du var ferdig med halskanten ble det satt 1 merke (= starten/slutten på omgangen og det er herfra det skal måles ifra). Så skal det settes 4 nye masker (uten å strikke), disse merkene skal vise overgangen mellom erme og for-bakstykke, og hvor det skal økes til raglan. Du har nå 5 merker i arbeidet. Når raglan starter/3. omg strikkes det slik i str. XS: Start midt bak, strikk 12 m, øk 4 m i neste m (1. merke), strikk 9 m, øk 4 m i neste m (2. merke). Strikk 23 m, øk 4 m i neste maske (3. merke), strikk 9 m, øk 4 m i neste maske (4. merke). Strikk 11 m = midt bak. mvh DROPS Design
26.09.2022 - 09:12
![]() Emmanuelle wrote:
Emmanuelle wrote:
Bonjour, je n'arrive pas à comprendre quelles mailles doivent être tricotées à l'endroit près les augmentations du diagramme ("Tricoter ensuite les nouvelles mailles en côtes anglaises, mais après au premier tour après cette augmentation, les mailles envers des augmentations se tricotent à l'endroit sans jetés, car les jetés n'ont pas été faits. " Merci beaucoup pour votre réponse et pour votre travail!
28.03.2022 - 11:12DROPS Design answered:
Bonjour Emmanuelle, lorsque vous augmentez, vous avez tricoté 3 fois la même maille, au tour suivant, tricotez les nouvelles mailles en côtes anglaises comme les autres, mais au lieu de tricoter ensemble à l'envers la maille glissée et son jeté, vous tricoterez 1 maille envers seule (car son jeté n'a pas encore été fait). Cette vidéo peut vous aider à comprendre comment tricoter les augmentations. Bon tricot!
28.03.2022 - 15:55
![]() Anita wrote:
Anita wrote:
Ich habs jetzt begriffen. Durch die Rundungen, muß ja die hintere Reihe noch gestricht werden und so stimmt auch das Diagramm. Vielen Dank für Eure Hilfe. Liebe Grüße Anita
08.02.2022 - 17:49
![]() Anita wrote:
Anita wrote:
Vielen Dank! Es wird aber eben von 1. Reihe und 2. Reihe gesprochen und das wäre doch dann nicht in Rundungen. Dann stimmt doch das Diagramm auch nicht oder, wenn alles in Rundungen gestrickt wird. Habe gerade einen Knopf in der Leitung. :-) Lg Anita
08.02.2022 - 16:27DROPS Design answered:
Liebe Anita, schauen Sie mal das Video, man wiederholt nur Runde 2 + 3 (die 1. Runde wird nur am Anfang gestrickt) - (das Video beginnt mit 1 Maschen links zusammen mit Umschlag/ A.1 mit 1 Masche rechts zusammen mit dem Umschlag), dann wiederholen Sie immer 2. und 3. Runde, also 1 Masche veschoben wie im Video gezeigt wird. Am besten stricken Sie eine kleine Maschenprobe mit einem Garnrest (und vielleicht Magic loop) so können Sie am besten das Muster versuchen. Viel Spaß beim stricken!
08.02.2022 - 17:21
![]() Anita wrote:
Anita wrote:
Liebes Drops Team, Ich habe die Erklärungen gelesen und beim Vollpatent strickt man ja die Maschen mit dem Umschlag immer rechts also vorne und hinten und beim Halbpatent strickt man die Maschen hinten links. Nun habe ich gesehen, dass in der Beschreibung steht im Vollpatent aber die Beschreibung vom Vollpatent ist mit hinten links, was ja dann wieder das Halbpatent wäre. Habe ich da etwas falsch verstanden? Besten Dank für Eure Hilfe und liebe Grüsse Anita
08.02.2022 - 12:52DROPS Design answered:
Liebe Anita, also ja, wenn man Vollpatent in Reihen strickt, dann strickt man die Maschen mit dem Umschlag immer rechts zusammen (siehe Video), aber hier strickt man Vollpatent in Runden, und die Maschen mit Umschläge werden entweder rechts oder links gestrickt - siehe Video. Viel Spaß beim stricken!
08.02.2022 - 15:22
![]() Heidi Karlsbakk wrote:
Heidi Karlsbakk wrote:
Hei. Finner ikke overvidden på hver str? M og L
04.02.2022 - 14:12DROPS Design answered:
Hej Heidi, M = 2 x 55 = 110 cm i omkreds og L= 2 x 60 = 120 cm i omkreds :)
04.02.2022 - 14:25
![]() Céline wrote:
Céline wrote:
Bonjour, Je me lance dans le modèle 223-15. Pour avoir un échantillon10×10 cm en 12 mailles et 34 rangs j'utilise des aiguilles n°8 pour les côtes anglaises. Je me demande si du coup je dois utiliser des aiguilles n°4 ou n°6 pour faire le col en côte. Merci pour votre aide. Céline
16.12.2021 - 19:08DROPS Design answered:
Bonjour Céline, les aiguilles 4 dans ce modèle avec une laine comme Air doivent vous donner un échantillon de 19 mailles pour 10 cm, cela vous permettra de trouver la taille des aiguilles qu'il vous faut pour les côtes. Bon tricot!
17.12.2021 - 08:09
![]() Catherine Streit wrote:
Catherine Streit wrote:
Laine merveilleuse, mais grosse surprise dans votre modèle : Echantillon 12 mailles sur 33 rangs =10x10cm. Pour moi, cela fait 10x15 cm. Modèle 215-30, c'est 12 m sur 22 rangs (10x10 cm)... avec la même laine. Sur la pelote, c'est 17 mailles sur 22 rangs Êtes vous certain du 34 rangs? Avec les aiguilles 6, je suis juste avec 12 mailles, mais tellement faux pour les rangs...(22 rangs au lieu de 34). Merci de m'aider.
30.10.2021 - 19:24DROPS Design answered:
Bonjour Mme Schreit, pour ce modèle, vous devez avoir 12 mailles et 34 rangs en côtes anglaises = 10 x 10 cm, avec des aiguilles 6 (ou la taille adéquate); pour le gilet 215-3, l'échantillon est de 16 m x 20 rangs en jersey avec des aiguilles 5,5 tout simplement car il faut moins de mailles en côtes anglaises qu'en jersey pour la même largeur et également pour la texture requise pour ce modèle. N'oubliez pas d'adapter vos aiguilles si besoin. Bon tricot!
03.11.2021 - 07:08
![]() Anna Sarjanen wrote:
Anna Sarjanen wrote:
Hej Ökningen till raglan blir mycket snyggare om man gör en ökning på varje sida om markeringen vart fjärde varv istället. Plockar upp en maska i den som ska stickas rät, stickar den räta, plockar upp en maska ur bågen på den som ska stickas avig, gör omslag och lyfter. Andra ökningen får man då på en maska som ska stickas avig. Plocka en maska ur bågen, sticka nästa rät (fast den egentligen skulle vara avig), plocka upp en ur bågen på nästa, sticka den rät.
24.09.2021 - 12:59
![]() Brigitte Grov wrote:
Brigitte Grov wrote:
Hei igjen. Det har ikke blitt så pent så langt ettersom kastet da automatisk strekker seg over to masker. Kanskje jeg gjør det feil?
07.06.2021 - 13:30DROPS Design answered:
Hei Birgitte. Du avslutter 2. omgang med "lag 1 kast om pinnen, ta 1 maske løs av pinnen som om den skulle strikkes vrang" og starter 3 omg med "lag 1 kast om pinnen, ta 1 maske løs av pinnen som om den skulle strikkes vrang". Selv om du føler at kastet strekker seg over 2 masker har du 1 maske mellom disse to kastene. Vi skal prøve å lage en video der vi viser overgangen bedre. mvh DROPS design
07.06.2021 - 15:31
|
|||||||||||||||||||
Full Moon Festival#fullmoonfestivalsweater |
|||||||||||||||||||
 |
 |
||||||||||||||||||
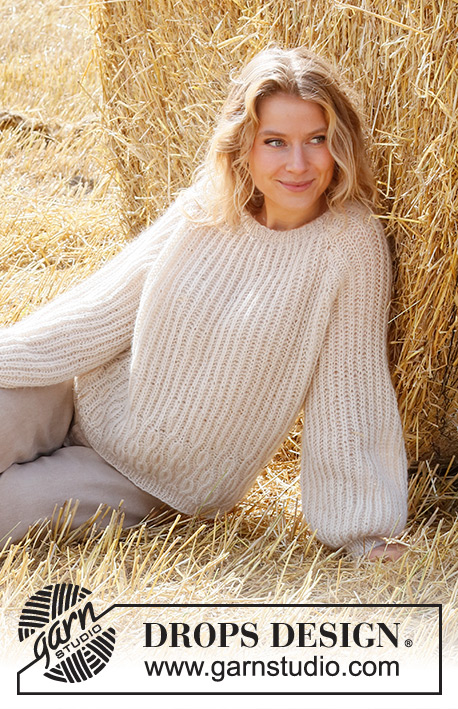
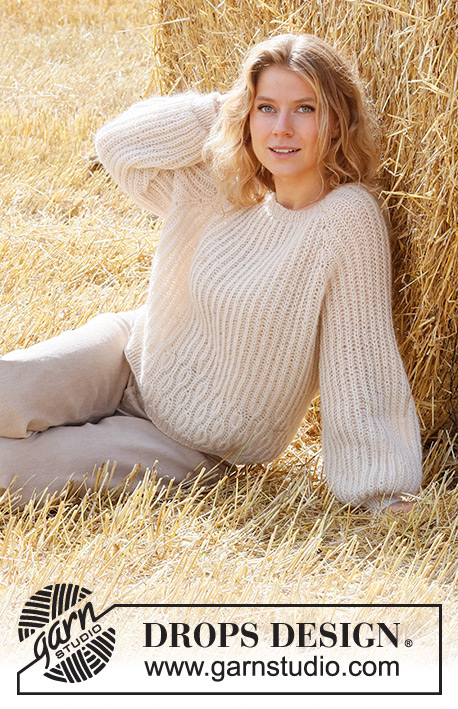
Knitted sweater in DROPS Air. The piece is worked top down, with raglan and English rib. Sizes XS - XXL.
DROPS 223-15 |
|||||||||||||||||||
|
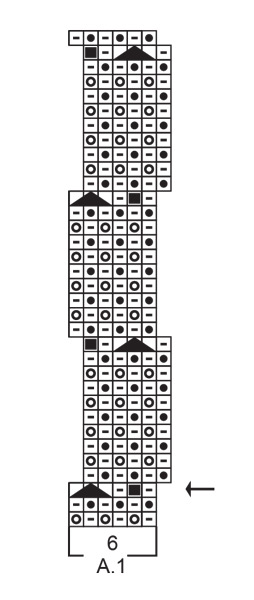
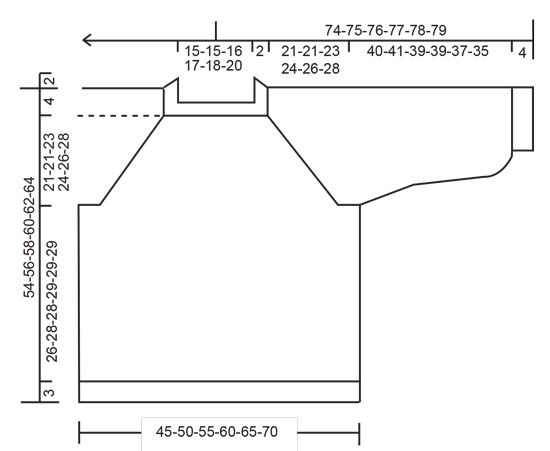
------------------------------------------------------- EXPLANATIONS FOR THE PATTERN: ------------------------------------------------------- PATTERN: See diagram A.1. INCREASE/DECREASE TIP (evenly spaced): To work out how to increase/decrease evenly, count the number of stitches to be increased/decreased over (e.g. 13 stitches), and divide by the number of increases/decreases to be made (e.g. 2) = 6.5. In this example, increase by making 1 yarn over after alternately each 6th and 7th stitch. On the next round work the yarn overs twisted to avoid holes. When decreasing, knit together alternately each 5th and 6th and each 6th and 7th stitch. ENGLISH RIB: ROUND 1: * Make 1 yarn over, slip 1 stitch as if to purl, knit 1 *, repeat from *-* to end of round. ROUND 2: * Purl together the yarn over and slipped stitch, make 1 yarn over, slip 1 stitch as if to purl *, repeat from *-* to end of round. ROUND 3: * Make 1 yarn over, slip 1 stitch as if to purl, knit together the yarn over and slipped stitch *, repeat from *-* to end of round. Repeat rounds 2 and 3 onwards. ENGLISH RIB STITCH: When counting the stitches the yarn overs are not included. RAGLAN: Increase 4 stitches in each marker-stitch (= 16 stitches increased on the round). All increases are worked on a round where the yarn overs and knitted stitches are knitted together (i.e. round 3 in the English rib). Increase as follows in the knitted stitch: Knit together the yarn over and knitted stitch, but do not slip the stitch from the left needle, make 1 yarn over the right needle, knit the yarn over and knitted stitch together again, move the marker to this stitch (= mid-stitch), make 1 yarn over the right needle, knit the yarn over and knitted stitch together again (= 3 stitches and 2 yarn overs), slip the stitch and yarn over off the left needle. On the next round work the new stitches in English rib, but note that on this first round after the increases, the purled stitches in the increases are purled without yarn overs because the yarn overs have not been made. The marker sits in the middle of the increased stitches (a knitted stitch). DECREASE TIP (for sleeves): Decrease 2 stitches on round 3 in the English rib as follows: Work until there are 2 stitches left before the marker-stitch (yarn overs not counted), slip the next stitch + yarn over as if to knit together, knit the next 2 stitches + yarn over together and pass the slipped stitch + yarn-over over these knitted together stitches (= 2 stitches decreased), move the marker to the next knitted stitch. BINDING-OFF TIP: To avoid the bind-off edge being tight you can bind off with a larger size needle. If the edge is still tight, make 1 yarn over after approx. each 4th stitch at the same time as binding off; the yarn overs are bind off as normal stitches. ------------------------------------------------------- START THE PIECE HERE: ------------------------------------------------------- SWEATER – SHORT OVERVIEW OF THE PIECE: The neck and yoke are worked in the round with circular needle, top down from mid back. The yoke is divided for body and sleeves and the body continued in the round with circular needle. The sleeves are worked in the round with short circular needle/double pointed needles, top down. NECK: Cast on 76-76-80-84-88-92 stitches with short circular needle size 4 MM = US 6 and Air. Knit 1 round. Then work rib (purl 1, knit 1) in the round for 2 cm = ¾". The next round is worked as follows: Work rib as before over the first 12-14-14-16-16-16 stitches, knit 13-11-11-11-13-13 and decrease 4-2-2-2-4-4 stitches evenly over these stitches – read DECREASE TIP, work rib as before over the next 25-27-29-31-31-33 stitches, knit 13-11-11-11-13-13 and decrease 4-2-2-2-4-4 stitches evenly over these stitches – read DECREASE TIP, work rib as before over the last 13-13-15-15-15-17 stitches = 68-72-76-80-80-84 stitches. Change to circular needle size 6 MM = US 10. Insert 1 marker at the beginning of the round; the yoke is measured from this marker! YOKE: Now work ENGLISH RIB – read description above, the whole round. When round 3 has been completed, insert 1 marker in an ENGLISH RIB STITCH – read description above, in each transition between body and sleeves (= 4 markers) as follows: Marker 1: Skip 11-13-13-15-15-15 stitches, insert marker in the next stitch (= half back piece). Marker 2: Skip the next 9 stitches, insert marker in the next stitch (= sleeve). Marker 3: Skip the next 23-25-27-29-29-31 stitches, insert marker in the next stitch (= front piece). Marker 4: Skip the next 9 stitches, insert marker in the next stitch. There are 12-12-14-14-14-16 stitches left on the round. Continue in the round with English rib. AT THE SAME TIME, the next time you work round 3, begin to increase for RAGLAN – read description above. Increase like this every 8th round a total of 6-7-8-9-10-11 times = 164-184-204-224-240-260 stitches. REMEMBER THE KNITTING GAUGE! Continue with English rib until the piece measures 21-21-23-24-26-28 cm = 8¼"-8¼"-9"-9½"-10¼"-11" from the marker on the neck – adjust so the next round is round 2 in the English rib. Now divide the piece for the body and sleeves on the next round as follows: Work the first 24-28-30-34-36-38 stitches (= ½ back piece), place the next 33-37-41-45-49-53 stitches on a thread for the sleeve, cast on 5-5-5-5-7-7 new stitches (= in side under sleeve), work the next 49-55-61-67-71-77 stitches (= front piece), place the next 33-37-41-45-49-53 stitches on a thread for the sleeve, cast on 5-5-5-5-7-7 new stitches (= in side under sleeve), work the last 25-27-31-33-35-39 stitches. Body and sleeves are finished separately. THE PIECE IS NOW MEASURED FROM HERE! BODY: = 108-120-132-144-156-168 stitches. Continue in the round with English rib as before. When the piece measures 17-19-19-20-20-20 cm = 6¾"-7½"-7½"-8"-8"-8" from the division – adjust so the next round is round 3 in the English rib; there is 12 cm = 4¾" to finished length, try the sweater on and work to desired length. Work A.1 on the whole round. When there is 1 round left in the diagram, the piece measures approx. 26-28-28-29-29-29 cm = 10¼"-11"-11"-11⅜"-11⅜"-11⅜" from the division. On the next round (the last round in the diagram = round 2 in the English rib) increase stitches in the sides and insert 4 markers (which will be used when working rib) as follows: Half back piece: * Purl together the yarn over and slipped stitch, knit 1 *, work from *-* over the next 14-14-18-18-20-22 stitches. Insert a marker here. Side of body: * Purl the yarn over twisted (= 1 stitch increased), purl 1, knit 1 *, work from *-* over the next 26-28-30-34-36-40 stitches (= 13-14-15-17-18-20 stitches increased), insert a marker here. Front piece: * Purl together the yarn over and slipped stitch, knit 1 *, work from *-* over the next 28-32-36-38-42-44 stitches. Insert a marker here. Side of body: * Purl the yarn over twisted (= 1 stitch increased), purl 1, knit 1 *, work from *-* over the next 26-28-30-34-36-40 stitches (= 13-14-15-17-18-20 stitches increased), insert a marker here. Half back piece: * Purl together the yarn over and slipped stitch, knit 1 *, work from *-* over the next 14-18-18-20-22-22 stitches. There are 134-148-162-178-192-208 stitches on the needle. Change to circular needle size 4 MM = US 6 and work rib as follows: (purl 1, knit 1) as far as the first marker, (purl 2, knit 1) as far as the next marker, (purl 1, knit 1) as far as the next marker, (purl 2, knit 1) as far as the next marker, (purl 1, knit 1) to end of round. Continue this rib for 3 cm = 1⅛". Bind off with knit over knit and purl over purl – read BINDING-OFF TIP. The sweater measures approx. 54-56-58-60-62-64 cm = 21¼"-22"-22¾"-23⅝"-24⅜"-25¼" from the shoulder down. SLEEVES: Place the 33-37-41-45-49-53 stitches from the thread on the one side of the piece on short circular needle/double pointed needles size 6 MM = US 10 and cast on 5-5-5-5-7-7 new stitches on the needle (= mid under sleeve) = 38-42-46-50-56-60 stitches. Continue in the round with the English rib as before – make sure you begin on the correct round in the pattern, round now starts with the 1st of the 5-5-5-5-7-7 new stitches that were cast on mid under sleeve. Sizes XS, S, M and L: go to ALL SIZES below. Sizes XL and XXL work as follows: Insert a marker in the middle stitch under the sleeve (= 1 knitted stitch in the English rib). Allow the marker to follow your work onwards; it is used when decreasing under the sleeve. When the sleeve measures 4 cm = 1½" from the division – adjust so the next round is round 3 in the English rib, decrease under the sleeve – read DECREASE TIP (= 2 stitches decreased). Decrease like this every 8th round a total of 2-2 times = 52-56 stitches. ALL SIZES: Continue working until the sleeve measures 40-41-39-39-37-35 cm = 15¾"-16⅛"-15¼"-15¼"-14½"-13¾" from the division (shorter measurements in larger sizes due to longer yoke). There is 4 cm = 1½" to finished length, try the sweater on and work to desired length. The next round is worked as follows: * Knit together the yarn over and slipped stitch, purl 1 *, work from *-* to the end of the round. Change to double pointed needles size 4 MM = US 6 and knit 1 round where you decrease 0-2-4-8-8-10 stitches evenly spaced = 38-40-42-42-44-46 stitches. Work rib (knit 1, purl 1) for 4 cm = 1½". Bind off with knit over knit and purl over purl – remember BINDING-OFF TIP. The sleeve measures approx. 44-45-43-43-41-39 cm = 17¼"-17¾"-17"-17"-16⅛"-15¼" from the division. Work the other sleeve in the same way. ASSEMBLY: Sew the openings under the sleeves. |
|||||||||||||||||||
Diagram explanations |
|||||||||||||||||||
|
|||||||||||||||||||
 |
|||||||||||||||||||
 |
|||||||||||||||||||
Have you finished this pattern?Tag your pictures with #dropspattern #fullmoonfestivalsweater or submit them to the #dropsfan gallery. Do you need help with this pattern?You'll find 24 tutorial videos, a Comments/Questions area and more by visiting the pattern on garnstudio.com. © 1982-2026 DROPS Design A/S. We reserve all rights. This document, including all its sub-sections, has copyrights. Read more about what you can do with our patterns at the bottom of each pattern on our site. |
|||||||||||||||||||


With over 40 years in knitting and crochet design, DROPS Design offers one of the most extensive collections of free patterns on the internet - translated to 17 languages. As of today we count 324 catalogs and 12290 patterns - 12280 of which are translated into English (US/in).
We work hard to bring you the best knitting and crochet have to offer, inspiration and advice as well as great quality yarns at incredible prices! Would you like to use our patterns for other than personal use? You can read what you are allowed to do in the Copyright text at the bottom of all our patterns. Happy crafting!
Post a comment to pattern DROPS 223-15
We would love to hear what you have to say about this pattern!
If you want to leave a question, please make sure you select the correct category in the form below, to speed up the answering process. Required fields are marked *.