
Looking for a yarn?


Comments / Questions (17)
![]() Josi wrote:
Josi wrote:
Bjr est-il possible de faire ce modèle en xl ,parce que là je vois les explications uniquement en s/m et m/l
24.11.2024 - 16:36DROPS Design answered:
Bonjour Josi, ce modèle n'est malheureusement disponible que jusqu'au L - vous pouvez adapter les explications à la taille souhaitée en vous inspirant d'un modèle de tension similaire dans la taille requise ou bien retrouvez tous nos pulls avec jacquard nordique, en XL, ici, n'hésitez pas à ajouter des filtres supplémentaires si besoin. Bon tricot!
25.11.2024 - 09:24
![]() Giulia wrote:
Giulia wrote:
È possibile eseguire modello del maglione e gonna con ferri diritti ?
23.11.2024 - 22:34DROPS Design answered:
Buonasera Giulia, per la lavorazione totalmente in piano deve riadattare le spiegazioni. Buon lavoro!
27.11.2024 - 00:08
![]() Carol Wallace wrote:
Carol Wallace wrote:
Thank you for helping me with the garter stitch and decreasing. However, I am still having problems with the decreases. I read decrease every other row 31 times. I have been decreasing every other row, or every second row on each end. It seems like when I get to 31 rows, its too short to decrease the neck. Am I reading this wrong?
02.10.2024 - 05:15DROPS Design answered:
Dear Mrs Wallace, you will decrease for the raglan 1 stitch at the beginning of the row (after the edge stitch) + 1 stitch at the end of the row (before the edge stitch), so that you will decrease 2 sts on every other row = on every row from the right side a total of 31 times (you will have worked 62 rows and have decreased 62 sts). Happy knitting!
02.10.2024 - 08:53
![]() Annette wrote:
Annette wrote:
Liebes Dropsteam, bei der Anleitung für den Rock steht etwa in der Hälfte der Anleitung, dass man 17x 1 M. abketten soll. Dabei ist bei der Angabe bei wieviel cm Länge man die tun soll leider die Zahl vergessen worden. Könnt ihr mir bitte weiterhelfen? Ganz lieben Dank und viele Grüße, Annette
01.10.2024 - 12:08DROPS Design answered:
Liebe Annette, diese Abnahmen entstehen alle 1 cm (deshalb sind es keine Nummer als in alle cm ist). Viel Spaß beim Stricken!
01.10.2024 - 16:21
![]() Carol Wallace wrote:
Carol Wallace wrote:
I am up to the armhole decrease. I'm mid way through the Llama at 11.75". Is the garter stitch around the yoke of the sweater? It says 'Dec 1 st for armhole inside 1 edge st (knit in garter st thoughout) every other row 25-31. when 1-2 decs remain, ????? not sure I understand.
29.09.2024 - 19:03DROPS Design answered:
Dear Carol, the edge stitch in garter stitch are the stitches at each end of the rows of the back/front piece. Work as follows: Knit 1 edge stitch in garter stitch (the edge stitch is always worked in garter stitch), decrease the next stitch), work the rest of the back piece and decrease right before the edge stitch at the end of the row. You will repeat this decrease in alternate rows/every other row until you have decreased 25-31 times in total. Then decrease every 4th row, in the same way as before 3-0 times. However, when you have 1-2 decreases left (so when you have decreased on 27 rows for size S/M or 29 times for size M/L) decrease for the neck as stated. Happy knitting!
29.09.2024 - 23:40
![]() Annette wrote:
Annette wrote:
Liebes Dropsteam, beim Rock in Karisma ist angegeben, dass man zum Stricken eine Rundstricknadel Nr.4 benötigt. Allerdings soll man lt. Anleitung den Maschenanschlag und den weiteren Rock mit Nadel Nr. 4,5 stricken. Was ist richtig? Liebe Grüße Annette
19.09.2024 - 20:28DROPS Design answered:
Liebe Annette, Rock wird mit der Rundnadel Nr 4 gestrickt, eine Korrektur erfolgt, danke für den Hinweis. Viel Spaß beim Stricken!
20.09.2024 - 08:37
![]() Sunniva wrote:
Sunniva wrote:
Vil gjerne felle ragland og ikke sy den, har dere fremgangsmåte for det?
04.03.2024 - 19:53DROPS Design answered:
Hej Sunniva, ja vi har mange opskrifter med raglan som strikkes rundt, nedefra og op, du kan følge en af disse: genser, raglan, 20masker :)
07.03.2024 - 15:30
![]() Annedore Döring wrote:
Annedore Döring wrote:
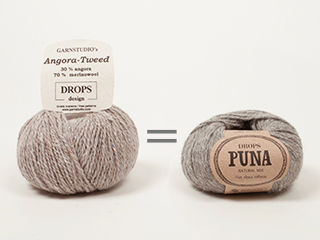
Danke für Ihre Antwort, aber Ihre Angaben beziehen sich auf die Farbe Anthrazit. Im Musterstreifen gibt es aber einen anderen Grauton, Pfefferkorn oder auch Koksgrau. Hierfür machen Sie keine Angaben für den Rock. Die Wolle für den Musterstreifen ist Auch nicht Karisma, sondern Angora Tweed oder Soft Tweed. Wieviel brauche ich für den Rock in Größe M/L in der Farbe Koksgrau oder Pfefferkorn?
13.02.2023 - 09:07DROPS Design answered:
Liebe Frau Döring, benutzen Sie unseren Garnumrechner für die ältere Garne - Angora Tweed war etwas Länger für 50 g als Karisma ist, So brauchen Sie 50 g in die 2 Farben Nr 10 und Nr 11 - dh je 2 Knäuel Karisma in diese beide Farben + 400 g Farbe Nr 53 (= 8 Knäuel) - oder von den gewünschten Farben Viel Spaß beim stricken!
13.02.2023 - 11:31
![]() Annedore Döring wrote:
Annedore Döring wrote:
Guten Tag, wieviel Wolle braucht man in der Farbe Koksgrau für den Rock in Größe M//L?
10.02.2023 - 16:51DROPS Design answered:
Liebe Frau Döring, Material sowie Nadel und Maschenprobe finden Sie etwas unten auf der Seite, nach den Erklärlungen des Pullovers, dh 350-400 g (siehe Grösse) DROPS Karisma. Viel Spaß beim stricken!
13.02.2023 - 08:45
![]() Solveig Marie Holt wrote:
Solveig Marie Holt wrote:
Solveig marie holt nedre ringgata 78b 1723 sarpsborg norge kan du sende oppskriften hjem privat til meg i posten Dashing Through the Snow by DROPS Design
27.12.2022 - 00:54DROPS Design answered:
Hei Solveig. Det kan vi dessverre ikke gjøre, men du kan selv laste ned oppskriften (gratis) og skrive ut oppskriften du trenger. Har du ikke en printer, kan du oppsøke et bibliotekt og be de hjelpe deg. mvh DROPS Design
02.01.2023 - 13:23
|
|||||||||||||
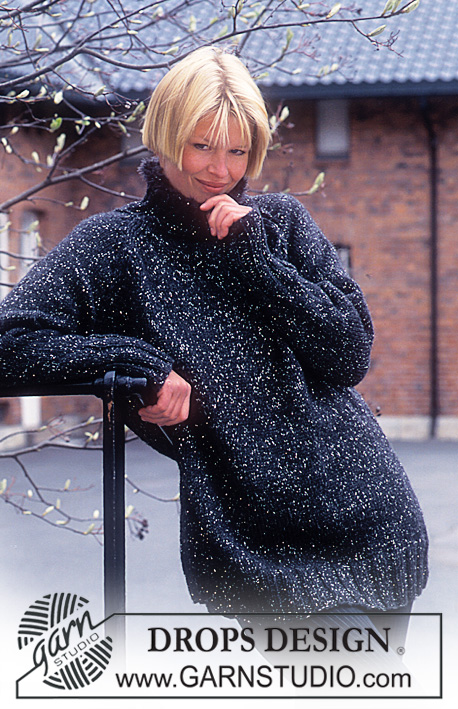
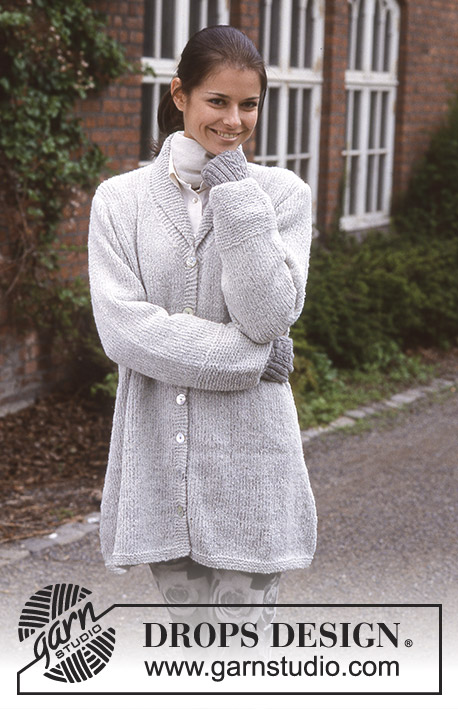
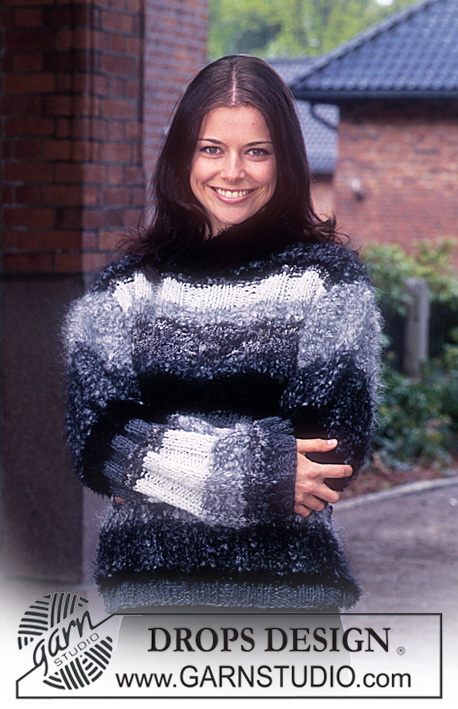
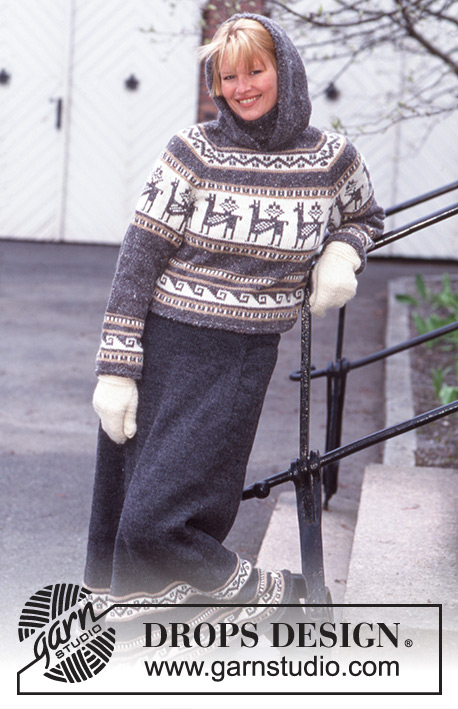
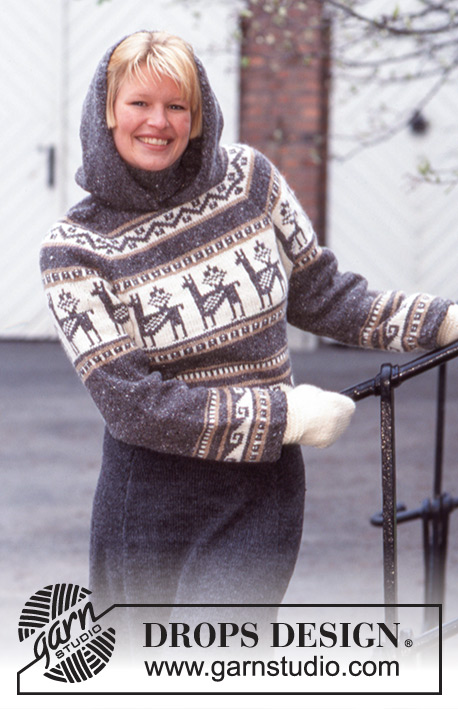
Dashing Through the Snow |
|||||||||||||
 |
 |
||||||||||||
DROPS Sweater with hood in Angora Tweed. Skirt in Karisma Superwash and Gloves in Alaska.
DROPS 63-16 |
|||||||||||||
|
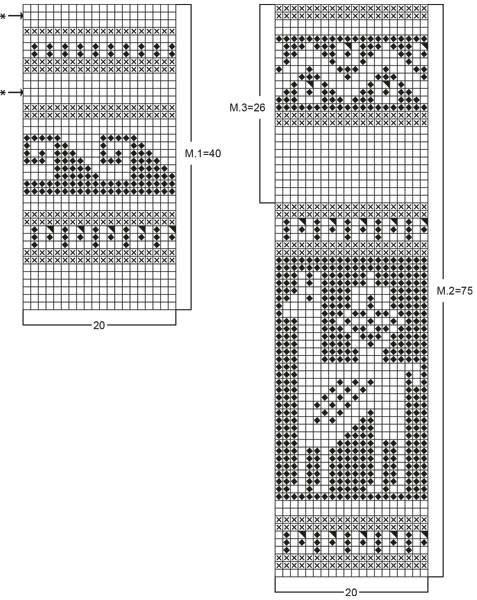
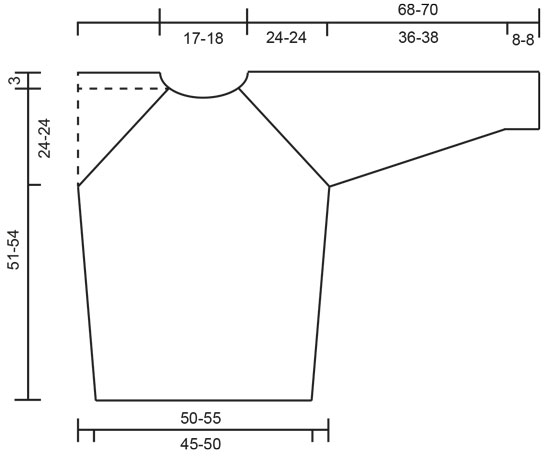
SWEATER: Gauge: 20 sts x 26 rows on larger needles in stockinette st = 10 x 10 cm [4" x 4"] Garter Stitch, when knitting flat: Knit all sts, all rows. Garter Stitch, when knitting in the round: *Rnd 1, knit. Rnd 2, purl *. Repeat from * - *. Rib: * K 2, P 2 *. Repeat from * - *. Pattern: See charts (1 chart = 1 repeat). The pattern is seen from the right side. Body: Cast on 180-200 sts on smaller circular needles with coal gray; join and place a marker at the join. Knit 4 rows garter st. Change to larger circular needles and knit Pattern 1. On the 2 rows marked with * on the chart, inc 10 sts evenly distributed = 200-220 sts. When the work measures 18-19 cm [7" - 7.5"] knit Pattern 2 - center a llama at the center front. When the work measures 27-30 cm [10-⅝" - 11.75"], knit the next row as follows: bind off 3 sts for armhole, 94-104 sts for the front, bind off 6 sts for armhole, 94-104 sts for the back, bind off 3 sts for armhole. Knit the rest of the front and back separately. Back: = 94-104 sts. Dec 1 st for armhole inside 1 edge st (knit in garter st throughout) every other row 25-31 times, then every 4th row 3-0 times. At the same time, when 1-2 decs remain, bind off the center 30-32 sts for the neck, then bind off 2 sts at each neck edge on the next row. After Pattern 2 knit 9-14 rows with coal gray. The work measures approx. 51-54 cm [20" - 21.25"], bind off. Front: Bind off for armholes and knit pattern as for the back, but when 2-4 decs remain bind off the center 26-28 sts for the neck, then bind off 2 sts at each neck edge every other row 2 times. After the last armhole dec the work measures approx. 51-54 cm [20" - 21.25"]. Bind off. Sleeve: Cast on 50-50 sts on smaller double pointed needles with coal gray; join and place a marker at the join. Knit 4 rows garter st, change to larger needles and knit Pattern 1. When the work measures 8 cm [3-⅛"], inc 1 st each side of marker 23-23 times: Size S/M: Alternately every 3rd and 4th row Size M/L: Every 4th row = 96-96 sts. When the work measures 35 cm [13.75"] knit Pattern 2 - center a llama on the sleeve. When the work measures 44-46 cm [17.25" - 18-⅛"] bind off 3 sts each side of marker (be sure this is the same pattern row of Pattern 2 as on the body) and knit the rest of the work back and forth on the needles. Dec at each side inside 1 edge st (knit in garter st throughout) every other row: 2 sts 7-7 times, 1 st 24-24 times = 14-14 sts. After Pattern 2 knit the rest with coal gray until the work measures 68-70 cm [26.75" - 27-⅝"]. Bind off. Assembly: Sew raglan seams - 1 edge st for seam has been calculated in on all parts; match up borders evenly. Neck: Pick up approx. 76 sts around the neck on smaller circular needles; join and knit rib for 12 cm [4.75"]. Bind off loosely in rib. Hood with tassel: Pick up and knit hood in the same row as the neck was picked up. Pick up 94-94 sts on smaller double pointed needles with coal gray. Knit back and forth from the center front as follows: 1 cm [3/8"] rib keeping 2 sts garter st at each side edge. Change to larger needles, increasing 12-12 sts evenly distributed on the 1st row = 106-106 sts. Then knit stockinette st keeping 2 edge sts in garter st at each side edge. When the hood measures 36-37 cm [14-⅛" - 14.5"] put sts on st holder, fold the hood double, weave together at the top. Make a tassel as follows: cut 50 strands (approx. 20 cm [7-⅞"] in length) in coal gray, knot around the center of the tassel, fold it double (= tassel becomes 10 cm [4"] long), wind a strand 4-5 times around the tassel approx. 3 cm [1.25"] below the fold. Attach the tassel to the back of the hood. Crochet border: Work 1 row of single crochet (sc) around the bottom edges of the body and sleeves and around the hood with double yarn from the right side with coal gray. Then work 1 row of sc in the opposite direction, from left to right without turning the work (reverse crochet). SKIRT IN KARISMA SUPERWASH: Sizes: Small/Medium - Medium/Large Finished measurements: hip: 80 - 85.7 cm [31.5" - 33.75"] measured approx. 18 cm [7"] below waist length: 96-100 cm [37.75" - 39-⅜"] Materials: Garnstudio KARISMA SUPERWASH from Garnstudio 100% superwash wool, 50 g./110 m./120 yards 350-400 g color no. 53, coal gray and use: Garnstudio ANGORA-TWEED 30% angora, 70% lambswool, 50 g./145 m./158 yards 50- 50 g color no. 10, off white 50- 50 g color no. 11, beige Alternate yarns (to either Karisma Superwash or Karisma Angora-Tweed): * Garnstudio MUSKAT, 100% mercerized Egyptian cotton, 50 g./100 m./109 yds * Garnstudio BOMULL-LIN, 53% Egyptian cotton, 47% linen, 50 g/85 m./93 yds DROPS 4 mm [US 6] circular needles, or size needed to obtain correct gauge. DROPS 4 mm [US F] crochet hook, or size needed to obtain correct gauge. Gauge: 21 sts x 28 rows in stockinette st = 10 x 10 cm [4" x 4"] Garter Stitch, when knitting flat: Knit all sts, all rows. Garter Stitch, when knitting in the round: *Rnd 1, knit. Rnd 2, purl *. Repeat from * - *. Skirt: Cast on 330-390 sts on circular needles with Karisma Superwash; join and place a marker at the join. Knit 4 rows garter st. Knit Pattern 1, then Pattern 3. Continue with Karisma Superwash in stockinette st. When the work measures 24-23 cm [9.5" - 9"], place 3 markers in the work with 110-130 sts between them. Dec 1 st at each side of the markers (6 decs per row) as follows: K 2 tog before the marker, after the marker slip 1, K 1, pass the slipped stitch over (psso). Dec 10-18 times every 5-3 cm [2" - 1.25"]. Then dec 1 st at each side of the markers 17-17 times every cm [3/8"] = 168-180 sts. When the work measures 93-97 cm [36-⅝" - 38-⅛"] dec 22-20 sts evenly distributed on the row = 146-160 sts. Knit 3 cm [1.25"] stockinette st, purl 1 row (for the folding edge), 3 cm [1.25"] stockinette st, bind off and fold the edge over double against the wrong side and sew. Pull elastic through the waistband. Work 1 row of single crochet (sc) around the bottom edge of the skirt with double strands of coal gray from the right side. Then work 1 row of sc in the opposite direction, from left to right without turning the work (reverse crochet). MITTENS IN ALASKA: Sizes: Women’s (Men’s) Garnstudio ALASKA from Garnstudio 100% pure new wool, 50 g/75 m./82 yards 100 (100) g color no. 02, natural DROPS 4 mm [US 6] double pointed needles, or size needed to obtain correct gauge. Gauge: 19 sts x 25 rows = 10 x 10 cm [4" x 4"] in stockinette st. Garter Stitch, when knitting flat: Knit all sts, all rows. Garter Stitch, when knitting in the round: *Rnd 1, knit. Rnd 2, purl *. Repeat from * - *. Pattern 4: * 2 rows stockinette st, purl 1 row * (seen from the right side). Mittens: The numbers in ( ) = Men’s sizes. Cast on 42 (48) sts; join and knit garter st for 3 cm [1.25"]. On the next row dec 4 sts evenly distributed = 38 (44) sts. Knit Pattern 4 for 5 cm [2"]. After Pattern 4 attach 3 markers as follows: 1 marker, 1 thumb-st (stockinette st), 1 marker (= at the side), 22 (25) sts on top of the hand, 1 marker (= at the side), 15 (18) sts on the hand. Continue in stockinette st - measure the work from here. When the work measures 1 cm [3/8"] inc 1 st on each side of the thumb-st every other row 5 times = 48 (54) sts. When the work measures 6.5 (7) cm [2.5" (2.75")] put the center 11 (11) sts for the thumb on a stitch holder. On the next row cast on 1 new st inside the sts on the st holder = 38 (44) sts. When the work measures 15 (16) cm [5-⅞" (6.25")] move the markers 2 sts up on the hand (1 marker on each side of the mitten). Then dec 1 st on each side of the markers as follows: Before the marker: slip 1, K 1, psso. After the marker: K 1, K 2 tog Dec 1 st each side of markers 2 (3) times every other row and then every row until 6 (4) sts remain on the needles. Pull a double strand through the last sts and tie off the strand. The entire mitten measures approx. 27 (29) cm [10-⅝" (11-⅜")]. Thumb: Pick up a total of 15 (18) sts around the thumb and knit stockinette st. When the thumb measures 6.5 (7) cm [2.5" (2.75")] K 2 tog across the next row and pull a doubled strand through the remaining sts. Knit another mitten, reversing all shaping. |
|||||||||||||
Diagram explanations |
|||||||||||||
|
|||||||||||||
|
|||||||||||||
|
|||||||||||||
Have you finished this pattern?Tag your pictures with #dropspattern or submit them to the #dropsfan gallery. Do you need help with this pattern?You'll find 35 tutorial videos, a Comments/Questions area and more by visiting the pattern on garnstudio.com. © 1982-2025 DROPS Design A/S. We reserve all rights. This document, including all its sub-sections, has copyrights. Read more about what you can do with our patterns at the bottom of each pattern on our site. |
|||||||||||||


With over 40 years in knitting and crochet design, DROPS Design offers one of the most extensive collections of free patterns on the internet - translated to 17 languages. As of today we count 314 catalogs and 11822 patterns - 11812 of which are translated into English (US/in).
We work hard to bring you the best knitting and crochet have to offer, inspiration and advice as well as great quality yarns at incredible prices! Would you like to use our patterns for other than personal use? You can read what you are allowed to do in the Copyright text at the bottom of all our patterns. Happy crafting!
Post a comment to pattern DROPS 63-16
We would love to hear what you have to say about this pattern!
If you want to leave a question, please make sure you select the correct category in the form below, to speed up the answering process. Required fields are marked *.