
Looking for a yarn?


Comments / Questions (28)
![]() Mona wrote:
Mona wrote:
Ich habe das Netz gerade fertiggestellt. Sieht wirklich toll aus und werde noch mehrere zum Verschenken häkeln. Habe dafür Makrameegarn 1,5 mm Garnstärke benutzt und mit Häkelnadel 5 gehäkelt. Nur für die Hänkelinnenseite habe ich Nadelstärke 4 gewählt. Nach Maschenprobe habe ich mich komplett an die Anleitung gehalten und bin gut zurecht gekommen. Herzlichen Dank dafür.
25.07.2024 - 12:54
![]() Joanna Grygier wrote:
Joanna Grygier wrote:
It is nice but not for heavy thinhs.
20.05.2024 - 16:15
![]() Carolina wrote:
Carolina wrote:
Buenos días no estoy pidiendo un patrón personalizado solo unas explicaciones que no sabéis darme. La verdad es que no entiendo sino ponéis unos patrones claros para que los ponéis si no los vamos a entender. Porque son totalmente inservibles. Ya que haces el esquema al no completo y no lo dejes a medias, pues eso es un mal trabajo.
01.04.2024 - 10:56
![]() Carolina wrote:
Carolina wrote:
A ver, estoy haciendo el bolso, mi problema es que no entiendo porque no está claro, como hacer el borde, cómo va enganchado a la red que he hecho. no está nada claro, y no entiendo el patrón. yo tengo ya el cuadrado y tengo que hacer el borde y las asas y no sé como se tejen No se si me explico bien, por eso pedia el patrón del enlace entre el cuadrado y el borde. Muchas gracias por vuestra atencion
25.03.2024 - 14:59DROPS Design answered:
Hola Carolina, no tenemos esquemas aparte de los disponibles en el patrón publicado y no hacemos patrones personalizados. Si puedes indicar qué parte del borde te causa dificultades podemos tratar de explicarlo. En la primera fila del borde comenzarás en uno de los grupos de 4 puntos altos antes de un arco de la esquina. Trabajarás directamente sobre los puntos de la última vuelta del cuadrado. Vas trabajando como se indica, formando el borde. En la vuelta 4, trabajarás unas cadenetas largas en posiciones concretas del bolso; estos formarán las asas y se reforzarán trabajando puntos bajos sobre las asas al final.
31.03.2024 - 23:34
![]() Carolina wrote:
Carolina wrote:
Necesito esquema del borde y asas, no se entiende bien la descripcion Lo tengo a medias y no puedo terminarlo. Gracias
22.03.2024 - 22:31DROPS Design answered:
Hola Carolina, no hacemos patrones personalizados. ¿ Puedes indicar qué parte de la sección BORDE Y ASAS te da problemas? E intentaremos aclarar tus dudas.
24.03.2024 - 23:48
![]() Marie wrote:
Marie wrote:
Hier bitte minimum ein Knäuel mehr bestellen. Ich häkle diese Tasche mit einer 3,0mm Nadel und es reicht die angegebene Menge nicht aus. Ein Knäuel nachbestellt, nun hoffe ich dass das wenigstens reicht...
21.08.2023 - 15:44DROPS Design answered:
Liebe Marie, häkeln Sie mit DROPS Cotton Light? Stimmt Ihre Maschenprobe? Sie sollen 18 Stäbchen x 9 Reihen = 1 0 x 10 cm haben, wenn diese Maschenprobe nicht stimmt, dann kann die Garnmenge unterschiedlich sein. Viel Spaß beim häkeln!
22.08.2023 - 09:43
![]() Doris wrote:
Doris wrote:
Ich möchte den Rand und die Henkel in einer anderen Farbe häkeln, wieviel Garn brauche ich dafür? Gesamt sind 250g angegeben. Reichen 200g für den Granny Square und 50g für Rand und Henkel?
18.09.2022 - 16:34DROPS Design answered:
Liebe Doris, da wir die Tasche einfarbig gehäkelt haben, haben wir leider nur die Garnmenge für eine Farbe, gerne kann Ihnen aber Ihr DROPS Händler damit helfen, auch per Telefon oder per E-Mail. Viel Spaß beim häkeln!
19.09.2022 - 10:15
![]() Elke wrote:
Elke wrote:
Ich habe dieses Einkaufsnetz bestimmt schon 30x gehäkelt und verschenkt. Kam immer gut an und ist sehr beliebt. Ich mache die Träger aber deutlich länger mit 90 Maschen, um es Bequem über der Schulter zu tragen.
24.04.2022 - 14:37
![]() Ingrid wrote:
Ingrid wrote:
Danke für die gute Beschreibung, geholfen haben mir auch die Videos. Das Netz war schnell gemacht und ich werde sicherlich noch mehrere häkeln!
13.07.2021 - 22:00
![]() Claudette Paquet wrote:
Claudette Paquet wrote:
Est ce possible d'avoir cette information en français
18.03.2021 - 21:11DROPS Design answered:
Bonjour Mme Paquet, tous nos modèles sont disponibles en français, cliquez sur le menu déroulant sous la photo pour changer la langue. Bon crochet!
19.03.2021 - 07:45
|
||||||||||||||||||||||||||||
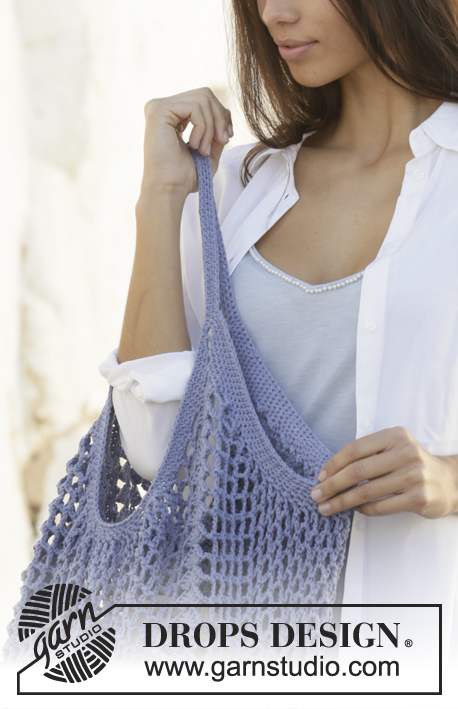
Pacific Blues#pacificbluesbag |
||||||||||||||||||||||||||||
 |
 |
|||||||||||||||||||||||||||
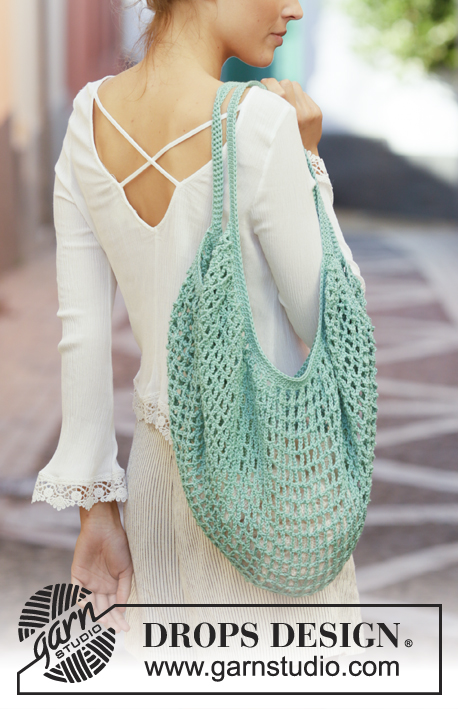
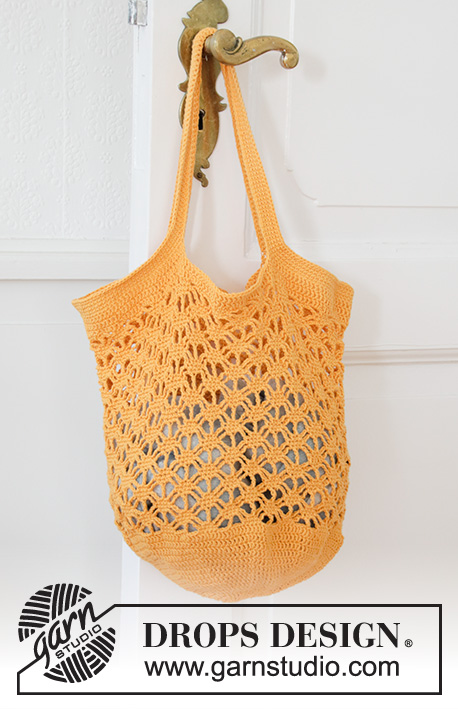
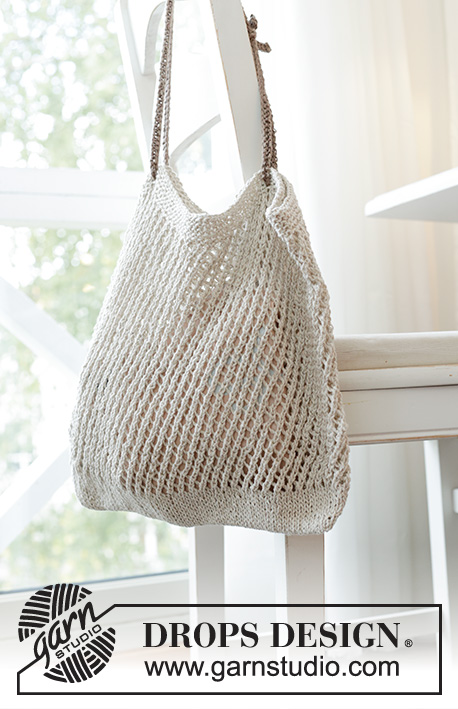
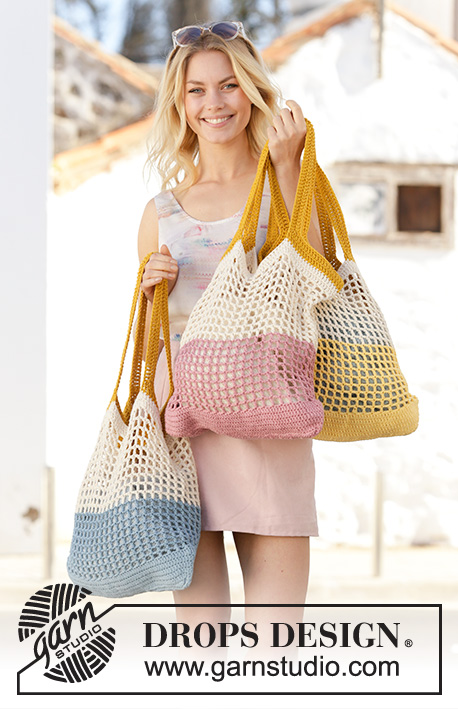
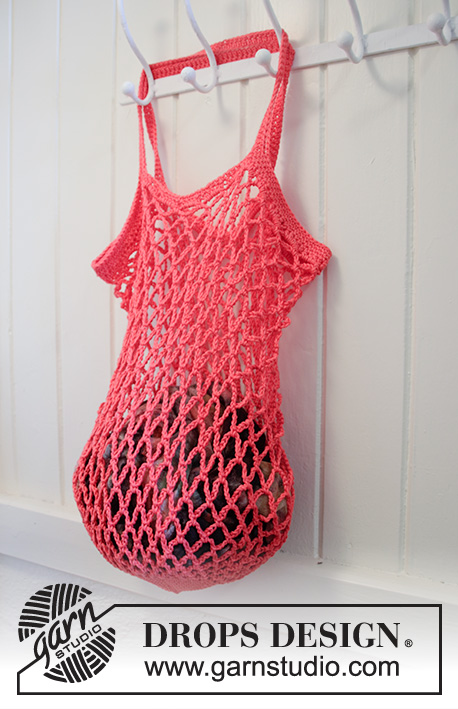
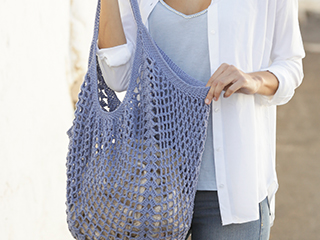
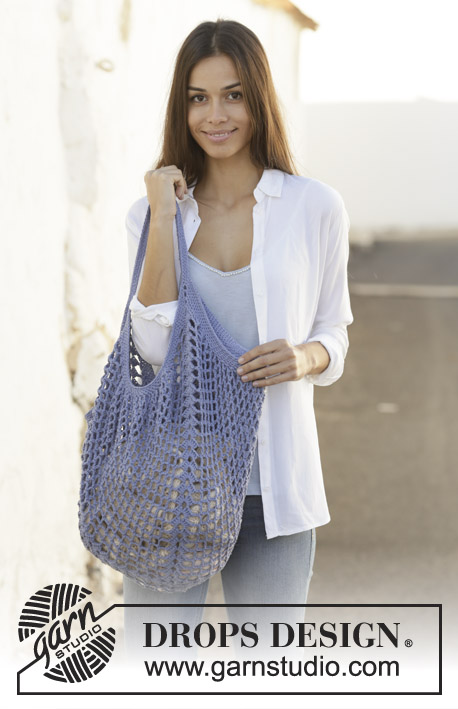
Crocheted bag in DROPS Cotton Light. The piece is worked in the round with chain-spaces and double crochet groups.
DROPS 199-15 |
||||||||||||||||||||||||||||
|
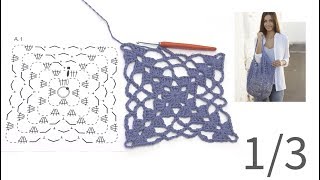
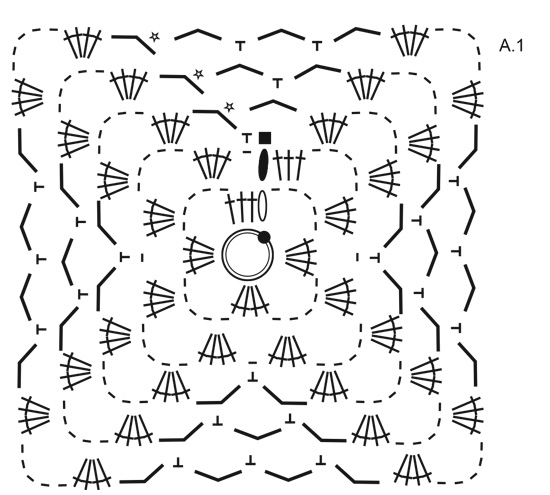
EXPLANATIONS FOR THE PATTERN: ------------------------------------------------------- PATTERN: See diagram A.1. CROCHET INFORMATION: At the beginning of each round of single crochets, start with 1 chain stitch; this chain stitch does not replace the first single crochet. The round finishes with 1 slip stitch in the first single crochet on the round. ------------------------------------------------------- START THE PIECE HERE: ------------------------------------------------------- BAG - SHORT OVERVIEW OF THE PIECE: The piece is worked in the round from the bottom of the bag and outwards in a square. Then the edge and straps are worked in the round. SQUARE: Work 4 chain stitches with hook size 4 mm = US 6 and Cotton Light and form them into a ring with 1 slip stitch in the first chain stitch. Continue in the round according to diagram A.1. When A.1 has been worked in height continue in the round as shown, working the last 2 rounds in the diagram; i.e. there will be 1 more chain-space on each side of the square every time you work a round. REMEMBER THE CROCHET GAUGE! When you have worked 28 rounds from the chain-stitch ring and outwards there are 27 chain-spaces along each side + chain-space in each corner. Finish the 28th round with 1 single crochet (white star) as shown in A.1, then work 6 chain stitches and 1 slip stitch in the first of the 4 double crochets before the next corner. The piece measures approx. 74 x 74 cm = 29⅛" x 29⅛". EDGE AND STRAPS: Now work edge and straps as follows: ROUND 1: * Work 1 single crochet in each of the first 4 double crochets – read CROCHET INFORMATION, work 2 single crochets around the chain-space in corner, 5 chain stitches, 2 single crochets around the same chain-space in corner, 1 single crochet in each of the next 4 double crochets, 3 single crochets around each of the next 3 chain-spaces, 1 single crochet around each of the next 21 chain-spaces, 3 single crochets around each of the next 3 chain-spaces *, work from *-* a total of 4 times on the round (= 51 single crochets on each side). ROUND 2: * Work 1 single crochet in each of the first 6 stitches, 2 single crochets around the chain-space in corner, 5 chain stitches, 2 single crochets around the same chain-space in corner, 1 single crochet in each of the next 6 stitches, 1 single crochet in each of the next 39 single crochets *, work from *-* a total of 4 times on the round (= 55 single crochets on each side). ROUND 3: * Work 1 single crochet in each of the first 8 stitches, 2 single crochets around the chain-space in corner, 5 chain stitches, 2 single crochets around the same chain-space in corner, 1 single crochet in each of the next 8 stitches, 1 single crochet in each of the next 39 single crochets *, work from *-* a total of 4 times on the round (= 59 single crochets on each side). Now work straps as follows: ROUND 4: Work 1 single crochet in each of the first 10 stitches, * 3 single crochets around the chain-space in corner, work 60 loose chain stitches for the strap, skip the next side of the square and continue working around the chain-space in the next corner (make sure the row of chain stitches has not twisted) work 3 single crochets around the chain-space in corner, 1 single crochet in each single crochet as far as the next corner *, work from *-* 1 more time but finish with 1 slip stitch in the first chain stitch at the beginning of the round. ROUND 5: Work 1 single crochet in each stitch. ROUND 6: Work 1 single crochet in each stitch. Cut and fasten strand. Now work a round of single crochets on the opposite side of the strap; i.e. in the chain-stitch row which was worked for the strap: Fasten the strand with 1 single crochet in the first chain stitch worked after the corner, work 1 single crochet in each of the 60 chain stitches on the strap, 3 single crochets around the chain stitch in corner, continue with 1 single crochet in each stitch as far as the next corner, work 3 single crochets around the chain stitch in corner, finish with 1 slip stitch in the first single crochet on the round. Cut and fasten strand well. Repeat around the other strap. |
||||||||||||||||||||||||||||
Diagram explanations |
||||||||||||||||||||||||||||
|
||||||||||||||||||||||||||||
|
||||||||||||||||||||||||||||
Have you finished this pattern?Tag your pictures with #dropspattern #pacificbluesbag or submit them to the #dropsfan gallery. Do you need help with this pattern?You'll find 12 tutorial videos, a Comments/Questions area and more by visiting the pattern on garnstudio.com. © 1982-2025 DROPS Design A/S. We reserve all rights. This document, including all its sub-sections, has copyrights. Read more about what you can do with our patterns at the bottom of each pattern on our site. |
||||||||||||||||||||||||||||


With over 40 years in knitting and crochet design, DROPS Design offers one of the most extensive collections of free patterns on the internet - translated to 17 languages. As of today we count 314 catalogs and 11822 patterns - 11812 of which are translated into English (US/in).
We work hard to bring you the best knitting and crochet have to offer, inspiration and advice as well as great quality yarns at incredible prices! Would you like to use our patterns for other than personal use? You can read what you are allowed to do in the Copyright text at the bottom of all our patterns. Happy crafting!
Post a comment to pattern DROPS 199-15
We would love to hear what you have to say about this pattern!
If you want to leave a question, please make sure you select the correct category in the form below, to speed up the answering process. Required fields are marked *.