
Looking for a yarn?


Comments / Questions (83)
![]() Patricia wrote:
Patricia wrote:
Pour apporter une précision à ma question ci dessous quand je commence le motif A1 je commence par 2 mailles grises la logique voudrait que je termine mon tour par 2 mailles grises sauf que là je termine par de mailles de couleur naturel. Voilà pour l'explication supplémentaire si ça peut aider à résoudre mon problème
29.03.2025 - 16:10DROPS Design answered:
Bonjour Patricia, pensez à mettre un marqueur entre chaque A.1, cela vous permettra de mieux visualiser chaque motif et son nombre de mailles et d'ainsi mieux repérer à quel niveau vous avez eu ce décalage. Bon tricot!
31.03.2025 - 08:31
![]() Patricia wrote:
Patricia wrote:
Bonjour je suis bien ennuyée. J'ai mes 300 mailles totales requises (taille M) avec les manches de montées . J'ai bien repris au milieu dos à (89 mailles) soit 44 mailles d'un côté du fil marqueur et 45 de l'autre donc en nombre impair sauf que GROS PROBLEME le motif A1 lui est en nombre de mailles paires , mon motif en fin de rang est donc totalement décalé. Merci pour votre aide je suis perdue je ne sais comment faire
29.03.2025 - 12:08DROPS Design answered:
Bonjour Patricia, A.1 se tricote effectivement sur 10 mailles, donc 30 fois sur les 300 mailles, après A.1, vous tricoterez A.2 en diminuant comme indiqué dans le diagramme. Le décalage d'une maille dont vous parlez ne sera pas visible du tout lorsque l'empiècement sera terminé. Bon tricot!
31.03.2025 - 08:28
![]() Patricia wrote:
Patricia wrote:
Bonjour, Pour le corps le fil marqueur est placé sous les manches ce qui fait que le départ d'un tour complet s'effectue sur le côté du pull. Pour l'empiècement en astuce tricot il est mentionné de commencer au milieu du dos là où le dos et le devant se sont terminés , j'ai du mal à comprendre. Dois je reprendre mes tours au milieu dos où il n'y a que 89 mailles à diviser par deux c'est ça ? Merci
24.03.2025 - 14:53DROPS Design answered:
Bonjour Patricia, tout à fait, on commence l'empiècement au milieu dos, divisez votre nombre de mailles du dos et glissez la moitié sur l'aiguille droite sans les tricoter, et reprenez à partir de la maille suivante du dos pour commencer l'empiècement. Comme votre nombre de mailles est impair, vous pouvez commencer soit par la maille centrale, soit par la maille suivante. Bon tricot!
25.03.2025 - 08:44
![]() Lis Nielsen wrote:
Lis Nielsen wrote:
I skriver både på ryg/forstykke og ærmer, at man i ribben skal gentage 1. og 2. omgang i 3 cm, er det ikke kun 2. omgang der skal gentages
18.03.2025 - 17:33DROPS Design answered:
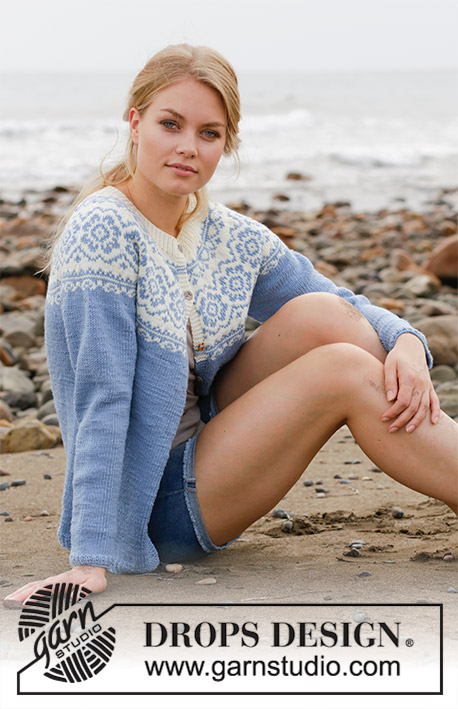
Hei Lis. Nei, vrangborden strikkes slik det er forklart (gjenta 1. og 2. omgang = en perlerib). Vi har dessverre ikke bilde av vrangborden, men om du ser på jakken som er lik genseren, og på bildet der modellen sitter med ryggen til, kan se litt av vrangborden. (Vrangborden i hals/erme er ikke lik den nederste vrangborden). mvh DROPS Design
24.03.2025 - 10:37
![]() Patricia wrote:
Patricia wrote:
Bonjour Le schéma (patron) indique 58 cm de mesure entre la base du pull et le début de l'emmanchure alors que dans les explications il est précisé que le pull doit mesurer 36 cm avant de commencer le marquage des emmanchures il y a une erreur ou c'est moi qui n'est rien compris ? merci.
28.02.2025 - 17:02DROPS Design answered:
Bonjour Patricia, les 58 cm en taille S correspondent à la hauteur totale du pull posé à plat, du haut de l'épaule jusqu'en bas. Ainsi, avant les emmanchures, vous aurez 36 cm pour le bas, avant les emmanchures + 19 cm d'empiècement + 3 cm d'épaules = 58 cm de hauteur totale. Bon tricot!
28.02.2025 - 17:23
![]() Gina Van Der Meer wrote:
Gina Van Der Meer wrote:
Is er een reden dat de halsboord anders gebreid wordt dan de boord voor het pand en de mouwen? Zou het wel gelijk kunnen, dus de oneven naalden recht en de even naalden averecht?
25.02.2025 - 17:58DROPS Design answered:
Dag Gina,
Alle boorden worden gebreid in boordsteek: 1 recht, 1 averecht steeds herhalen. Ook de hals boord.
26.02.2025 - 20:54
![]() Bjørg Njøten wrote:
Bjørg Njøten wrote:
Hei.Skal jeg starte midt bak med mønsteret.?
02.02.2025 - 10:53DROPS Design answered:
Hei Bjørg, Ja, omgangen og mønsteret begynner midt bak. God fornøyelse!
03.02.2025 - 07:01
![]() Merçe Campillo Alonso wrote:
Merçe Campillo Alonso wrote:
Me guntan las lanas de drops y me gustan mucho sus patrones
05.01.2025 - 10:37
![]() Asia wrote:
Asia wrote:
Dzień dobry. Ja dopiero zaczynam robótkę. Zrobiłam 8 cm i zaczynam po bokach zamykać oczka. Mam jeszcze zrobić tak 4 razy co 8 cm. Później mam przerabiać przez 36 cm , czyli to mi da 76 cm samego koloru niebieskiego swetra. Później jeszcze troszkę niebieski i mam robić białym wzór. Mi wychodzi z obliczeń że sweterek będzie prawie na 100 cm długi. Myślę że gdzieś robię błąd, ale nie umiem tego wyłapać. Jaka długość powinna być tego swetra?
08.12.2024 - 21:31DROPS Design answered:
Witaj Asiu, po zamknięciu oczek na bokach swetra jego długość powinna wynosić ok. 32 cm. Dalej przerabiasz kolorem niebieskim przez jeszcze 4 cm - teraz całkowita długość swetra wynosi 36 cm. We wzorze w tym momencie dochodzisz już do podkroju pachy. Uwaga - jeśli chcesz aby sweter był dłuższy to jest właściwy moment na przerobienie kilku dodatkowych centymetrów. Pozdrawiamy!
09.12.2024 - 13:48
![]() Kirsten Nielsen wrote:
Kirsten Nielsen wrote:
Hej jeg strikker str xl og der står at jeg skal slå om og strikke to masker og slå om igen på ærmet og så vil mærke tråden sidde midt mellem de to masker altså udtagningstips det kan jeg ikke få til at passe vil i gerne forklare mig det på forhånd tak
16.11.2024 - 18:07DROPS Design answered:
Hej Kirsten, du skal lave et omslag på hver side af de 2 midterste masker. Vi skal få opdateret Udtagningstipset :)
22.11.2024 - 14:06
|
|||||||||||||
Periwinkle#periwinklesweater |
|||||||||||||
 |
 |
||||||||||||
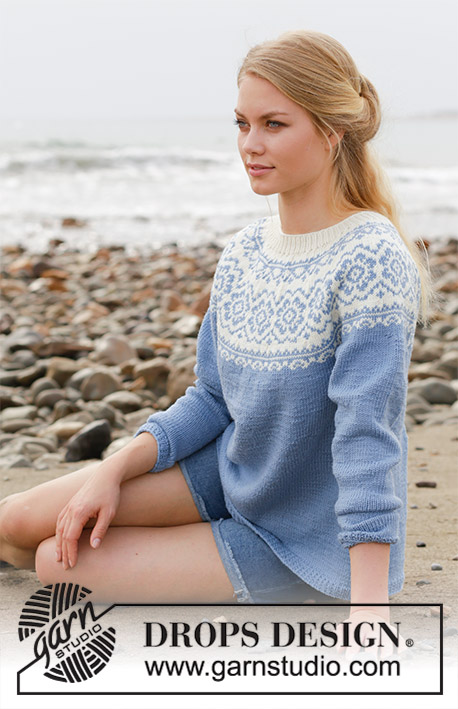
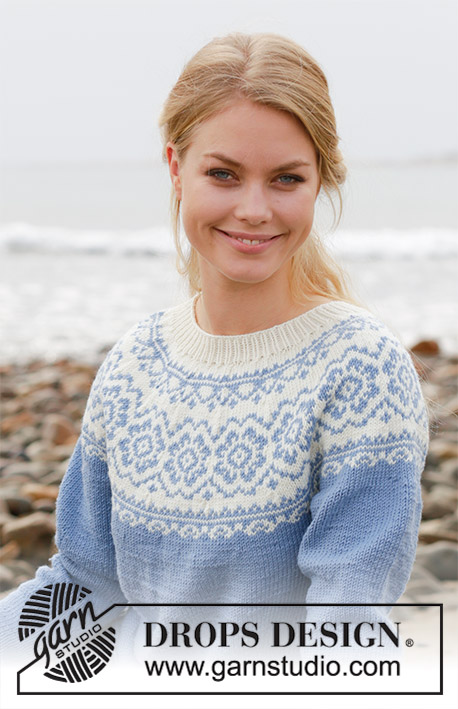
Knitted sweater with round yoke, multi-colored Nordic pattern and A-shape. Size: S - XXXL Piece is knitted in DROPS Merino Extra Fine.
DROPS 191-1 |
|||||||||||||
|
INFORMATION FOR PATTERN: PATTERN: See diagrams A.1 and A.2. Choose diagram for your size. DECREASE TIP-1 (evenly): To calculate how to decrease evenly, use the total number of stitches on round (e.g. 200 stitches) and divide stitches by number of decreases to be done (e.g. 10) = 20. In this example decrease by knitting approx. every 19th and 20th stitch together. DECREASE TIP-2 (applies to sides of body): Begin 5 stitches before marker thread in the side, knit 2 together, knit 6 (marker thread is in the middle of these 6 stitches), slip 1 stitch knitwise, knit 1, pass slipped stitch over stitch worked (= 2 stitches decreased). INCREASE TIP (applies to mid under sleeve): Begin 1 stitches before marker thread, make 1 yarn over, knit 2 (marker thread is in the middle of these 2 stitches), make 1 yarn over (= 2 stitches increased). On next round knit yarn overs twisted to avoid holes. KNITTING TIP: To avoid the knitting gauge to tighten when working pattern, it is important not to tighten the strands on back side of piece. Use a larger needle size when working pattern if needed. ---------------------------------------------------------- SWEATER: Body is worked in the round on circular needle, bottom up. Sleeves are worked in the round on double pointed needles/a short circular needle, bottom up. Then slip body and sleeves together and finish yoke in the round on circular needle. An elevation in the back of neck can be worked to get a better fit so that yoke is somewhat higher in the neck. This elevation can be skipped, to make the neck the same at the front and back - see explanation on elevation in pattern. BODY: Cast on 200-220-238-258-284-312 stitches on circular needle size 3 mm / US 2.5 with light gray blue. Work rib as follows: ROUND 1: Knit all stitches. ROUND 2: * Knit 1, purl 1 *, repeat from *-* the entire round. Repeat 1st and 2nd round until rib measures 3 cm / 1". Switch to circular needle size 4 mm / US 6. Knit 1 round while decreasing 10-10-12-12-14-14 stitches evenly - read DECREASE TIP-1 = 190-210-226-246-270-298 stitches. Insert 1 marker thread at beginning of round and 1 marker thread after 95-105-113-123-135-149 stitches (= in the sides), move the marker thread when working. Work in stockinette stitch in the round. REMEMBER THE GAUGE! When piece measures 8 cm / 3⅛", decrease 1 stitch on each side of both marker threads - read DECREASE TIP-2 (= 4 stitches decreased). Decrease like this every 8 cm / 3⅛" 4 times in total in each side = 174-194-210-230-254-282 stitches. Work until piece measures approx. 36 cm / 14¼" in all sizes. Work next round as follows: Bind off 4-4- 5-5- 6-7 stitches for armhole, knit 79-89-95-105-115-127 stitches (back piece), bind off 8-8-10-10-12-14 stitches for armhole, knit 79-89-95-105- 115-127stitches (front side), and bind off the remaining 4-4-5-5-6-7 stitches for armhole. Put piece aside and work the sleeves. SLEEVE: Cast on 44-46-48-52-52-54 stitches on double pointed needles size 3 mm / US 2.5 with light gray blue. Work rib as follows: ROUND 1: Knit all stitches. ROUND 2: * Knit 1, purl 1 *, repeat from *-* the entire round. Repeat 1st and 2nd round until rib measures 3 cm / 1". Switch to double pointed needles size 4 mm / US 6. Insert 1 marker thread at beginning of round (= mid under sleeve) and move the marker thread upwards. Work in stockinette stitch in the round. When piece measures 9-7-9-7-9-7 cm / 3½"-2¾"-3½"-2¾"-3½"-2¾", increase 2 stitches mid under sleeve - read INCREASE TIP. Increase like this every 3½-3-2-2-1½-1½ cm / 1¼"-1⅛"-¾"-¾"-½"-½" 11-13-16-17-19-20 times in total = 66-72-80-86-90-94 stitches (switch to a short circular needle when there are enough stitches). Continue until sleeve measures 46-45-43-41-40-38 cm / 18"-17¾"-17"-16"-15¾"-15" (shorter measurements in the larger sizes because of wider neck and longer yoke). Work next round as follows: bind off 4-4-5-5-6-7 stitches, knit 58-64-70-76-78-80 stitches and bind off the remaining 4-4-5-5-6-7 stitches. Put piece aside and make another sleeve the same way. YOKE: Slip sleeves on to same circular needle as body where armholes were bound off = 274-306-330-362-386-414 stitches. NOW MEASURE THE PIECE FROM HERE! Read KNITTING TIP! Begin round mid back where body is finished. Continue with light gray blue. Knit 1 round while decreasing 4-6-0-2-6-4 stitches evenly = 270-300-330-360-380-410 stitches - remember DECREASE TIP-1. Work stockinette stitch in the round. When piece measures 1-2-3-3-4-6 cm / ⅜"-¾"-1"-1"-1½"-2 ½" from where body and sleeves were put together, work A.1 in the round (= 27-30-33-36-38-41 repetitions of 10 stitches). Continue pattern like this. AT THE SAME TIME on row marked with arrow in A.1 decrease 10-0-10-20-20-30 stitches evenly = 260-300-320-340-360-380 stitches. NOTE! In size S and L decrease in the off white sections. Now work A.2 in the round (= 13-15-16-17-18-19 repetitions of 20 stitches). Continue pattern like this and decrease as shown in A.2. When A.2 has been worked, there are 130-150-160-170-180-190 stitches on needle. Now work elevation in the back of neck or start to work the neck edge if you do not want an elevation. ELEVATION IN BACK OF NECK: Skip this paragraph if you do not want an elevation. Insert 1 marker at beginning of round = mid back. Begin from right side with off white and knit 15-16-17-18-19-20 stitches past stitch with marker, turn, tighten yarn and purl 30-32-34-36-38-40. Turn, tighten yarn and knit 45-48-51-54-57-60, turn, tighten yarn and purl 60-64-68-72-76-80. Turn, tighten yarn and knit 75-80-85-90-95-100, turn, tighten yarn and purl 90-96-102-108-114-120, turn, tighten yarn and knit until mid back. NECK EDGE: Knit 1 round with off white while decreasing 24-40-44-48-54-58 stitches evenly = 106-110-116-122-126-132 stitches. Switch to a short circular needle size 3 mm / US 2.5. Work rib as follows: * Knit 1, purl 1 *, repeat from *-* the entire round. Continue rib like this for 3 cm / 1". Bind off stitches with knit over knit and purl over purl. Sweater measures approx. 58-60-62-64-66-68 cm / 22¾"-23⅝"-24⅜"-25¼"-26"-26¾" from shoulder and down. ASSEMBLY: Sew the openings under the sleeves. |
|||||||||||||
Diagram explanations |
|||||||||||||
|
|||||||||||||

|
|||||||||||||

|
|||||||||||||

|
|||||||||||||

|
|||||||||||||
Have you finished this pattern?Tag your pictures with #dropspattern #periwinklesweater or submit them to the #dropsfan gallery. Do you need help with this pattern?You'll find 31 tutorial videos, a Comments/Questions area and more by visiting the pattern on garnstudio.com. © 1982-2025 DROPS Design A/S. We reserve all rights. This document, including all its sub-sections, has copyrights. Read more about what you can do with our patterns at the bottom of each pattern on our site. |
|||||||||||||


With over 40 years in knitting and crochet design, DROPS Design offers one of the most extensive collections of free patterns on the internet - translated to 17 languages. As of today we count 314 catalogs and 11821 patterns - 11811 of which are translated into English (US/in).
We work hard to bring you the best knitting and crochet have to offer, inspiration and advice as well as great quality yarns at incredible prices! Would you like to use our patterns for other than personal use? You can read what you are allowed to do in the Copyright text at the bottom of all our patterns. Happy crafting!
Post a comment to pattern DROPS 191-1
We would love to hear what you have to say about this pattern!
If you want to leave a question, please make sure you select the correct category in the form below, to speed up the answering process. Required fields are marked *.