DROPS Merino Extra Fine
100% Wool
from 4.55 $ /50g
Get the yarn to make this pattern from 54.60$.

The yarn cost is calculated from the pattern’s smallest size and the yarn’s cheapest product type. Looking for an even better price? You might find it on the DROPS Deals!

DROPS SS24

Periwinkle

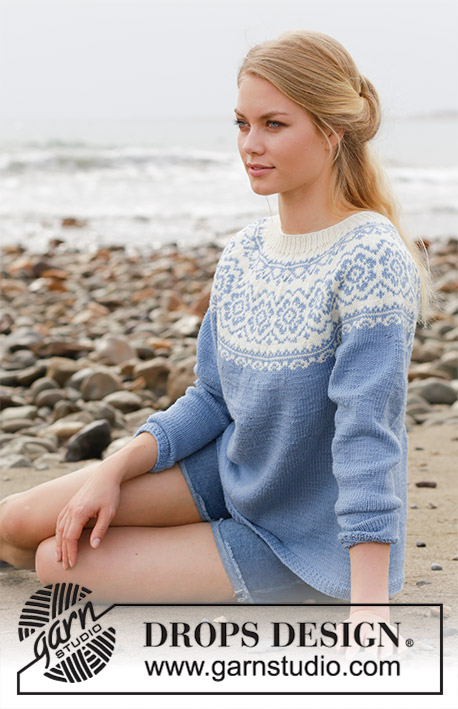
Knitted sweater with round yoke, multi-colored Nordic pattern and A-shape. Size: S - XXXL Piece is knitted in DROPS Merino Extra Fine.

DROPS 191-1
DROPS design: Pattern me-135
Yarn group B
----------------------------------------------------------
Size: S - M - L - XL - XXL - XXXL
Materials:
DROPS MERINO EXTRA FINE from Garnstudio (belongs to yarn group B)
500-550-600-650-700-800 g color 19, light gray blue
100-150-150-150-150-150 g color 01, off white

Piece can also be knitted with yarn from:
"Alternative yarn (yarn group B)" - see link below.


DROPS DOUBLE POINTED NEEDLES AND CIRCULAR NEEDLE (40 + 60 or 80 cm / 16" + 24" or 32") SIZE 4 mm/US 6 – or size needed to get 21 stitches and 28 rows in stockinette stitch = width 10 cm / 4" and 10 cm / 4" vertically.

DROPS DOUBLE POINTED NEEDLES AND CIRCULAR NEEDLE (40 + 60 or 80 cm / 16" + 24" or 32") SIZE 3 mm/US 2.5 for rib – or size needed to get 23 stitches and 32 rows in stockinette stitch = width 10 cm / 4" and 10 cm / 4" vertically.

-------------------------------------------------------
Color combinations shown are:
A) DROPS Merino Extra Fine 30, 01.
B) DROPS Merino Extra Fine 01, 15.
-------------------------------------------------------

-------------------------------------------------------

Alternative Yarn – See how to change yarns here
Yarn Groups A to F – Use the same pattern and change the yarn here
Yarn usage using an alternative yarn – Use our yarn converter here

-------------------------------------------------------

DROPS Merino Extra Fine
100% Wool
from 4.55 $ /50g
Get the yarn to make this pattern from 54.60$.

The yarn cost is calculated from the pattern’s smallest size and the yarn’s cheapest product type. Looking for an even better price? You might find it on the DROPS Deals!

Pattern instructions

NOTE: This pattern is written in American English. All measurements in charts are in cm. For conversion from inches to cm - click here. There are different terms for crocheting in American and British English. If this pattern includes crochet, click for "crochet terms" here. For this pattern in British English, please click here.
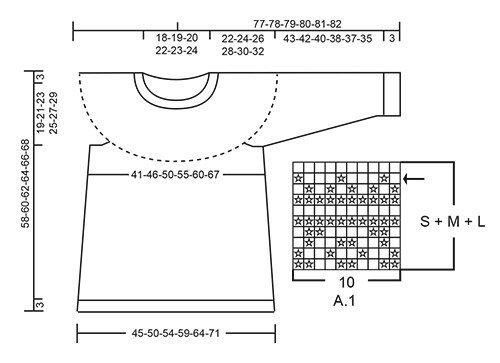
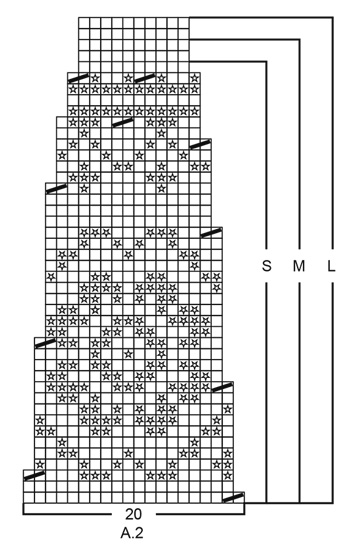
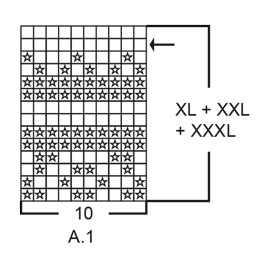
INFORMATION FOR PATTERN:

PATTERN:
See diagrams A.1 and A.2. Choose diagram for your size.

DECREASE TIP-1 (evenly):
To calculate how to decrease evenly, use the total number of stitches on round (e.g. 200 stitches) and divide stitches by number of decreases to be done (e.g. 10) = 20.
In this example decrease by knitting approx. every 19th and 20th stitch together.

DECREASE TIP-2 (applies to sides of body):
Begin 5 stitches before marker thread in the side, knit 2 together, knit 6 (marker thread is in the middle of these 6 stitches), slip 1 stitch knitwise, knit 1, pass slipped stitch over stitch worked (= 2 stitches decreased).

INCREASE TIP (applies to mid under sleeve):
Begin 2 stitches before marker thread, make 1 yarn over, knit 2 (marker thread is in the middle of these 2 stitches), make 1 yarn over (= 2 stitches increased). On next round knit yarn overs twisted to avoid holes.

KNITTING TIP:
To avoid the knitting gauge to tighten when working pattern, it is important not to tighten the strands on back side of piece. Use a larger needle size when working pattern if needed.
----------------------------------------------------------

SWEATER:
Body is worked in the round on circular needle, bottom up. Sleeves are worked in the round on double pointed needles/a short circular needle, bottom up. Then slip body and sleeves together and finish yoke in the round on circular needle.
An elevation in the back of neck can be worked to get a better fit so that yoke is somewhat higher in the neck. This elevation can be skipped, to make the neck the same at the front and back - see explanation on elevation in pattern.

BODY:
Cast on 200-220-238-258-284-312 stitches on circular needle size 3 mm / US 2.5 with light gray blue. Work rib as follows:
ROUND 1: Knit all stitches.
ROUND 2: * Knit 1, purl 1 *, repeat from *-* the entire round. Repeat 1st and 2nd round until rib measures 3 cm / 1". Switch to circular needle size 4 mm / US 6. Knit 1 round while decreasing 10-10-12-12-14-14 stitches evenly - read DECREASE TIP-1 = 190-210-226-246-270-298 stitches. Insert 1 marker thread at beginning of round and 1 marker thread after 95-105-113-123-135-149 stitches (= in the sides), move the marker thread when working.
Work in stockinette stitch in the round. REMEMBER THE GAUGE!
When piece measures 8 cm / 3⅛", decrease 1 stitch on each side of both marker threads - read DECREASE TIP-2 (= 4 stitches decreased). Decrease like this every 8 cm / 3⅛" 4 times in total in each side = 174-194-210-230-254-282 stitches.
Work until piece measures approx. 36 cm / 14¼" in all sizes. Work next round as follows: Bind off 4-4- 5-5- 6-7 stitches for armhole, knit 79-89-95-105-115-127
stitches (back piece), bind off 8-8-10-10-12-14 stitches for armhole, knit 79-89-95-105- 115-127stitches (front side), and bind off the remaining 4-4-5-5-6-7
stitches for armhole. Put piece aside and work the sleeves.

SLEEVE:
Cast on 44-46-48-52-52-54 stitches on double pointed needles size 3 mm / US 2.5 with light gray blue. Work rib as follows:
ROUND 1: Knit all stitches.
ROUND 2: * Knit 1, purl 1 *, repeat from *-* the entire round.
Repeat 1st and 2nd round until rib measures 3 cm / 1". Switch to double pointed needles size 4 mm / US 6. Insert 1 marker thread at beginning of round (= mid under sleeve) and move the marker thread upwards. Work in stockinette stitch in the round. When piece measures 9-7-9-7-9-7 cm / 3½"-2¾"-3½"-2¾"-3½"-2¾", increase 2 stitches mid under sleeve - read INCREASE TIP. Increase like this every 3½-3-2-2-1½-1½ cm / 1¼"-1⅛"-¾"-¾"-½"-½" 11-13-16-17-19-20 times in total = 66-72-80-86-90-94 stitches (switch to a short circular needle when there are enough stitches). Continue until sleeve measures 46-45-43-41-40-38 cm / 18"-17¾"-17"-16"-15¾"-15" (shorter measurements in the larger sizes because of wider neck and longer yoke).
Work next round as follows: bind off 4-4-5-5-6-7 stitches, knit 58-64-70-76-78-80 stitches and bind off the remaining 4-4-5-5-6-7 stitches. Put piece aside and make another sleeve the same way.

YOKE:
Slip sleeves on to same circular needle as body where armholes were bound off = 274-306-330-362-386-414 stitches. NOW MEASURE THE PIECE FROM HERE!
Read KNITTING TIP! Begin round mid back where body is finished. Continue with light gray blue. Knit 1 round while decreasing 4-6-0-2-6-4 stitches evenly = 270-300-330-360-380-410 stitches - remember DECREASE TIP-1. Work stockinette stitch in the round. When piece measures 1-2-3-3-4-6 cm / ⅜"-¾"-1"-1"-1½"-2 ½" from where body and sleeves were put together, work A.1 in the round (= 27-30-33-36-38-41 repetitions of 10 stitches). Continue pattern like this. AT THE SAME TIME on row marked with arrow in A.1 decrease 10-0-10-20-20-30 stitches evenly = 260-300-320-340-360-380 stitches. NOTE! In size S and L decrease in the off white sections.
Now work A.2 in the round (= 13-15-16-17-18-19 repetitions of 20 stitches). Continue pattern like this and decrease as shown in A.2. When A.2 has been worked, there are 130-150-160-170-180-190 stitches on needle.
Now work elevation in the back of neck or start to work the neck edge if you do not want an elevation.

ELEVATION IN BACK OF NECK:
Skip this paragraph if you do not want an elevation.
Insert 1 marker at beginning of round = mid back. Begin from right side with off white and knit 15-16-17-18-19-20 stitches past stitch with marker, turn, tighten yarn and purl 30-32-34-36-38-40. Turn, tighten yarn and knit 45-48-51-54-57-60, turn, tighten yarn and purl 60-64-68-72-76-80. Turn, tighten yarn and knit 75-80-85-90-95-100, turn, tighten yarn and purl 90-96-102-108-114-120, turn, tighten yarn and knit until mid back.

NECK EDGE:
Knit 1 round with off white while decreasing 24-40-44-48-54-58 stitches evenly = 106-110-116-122-126-132 stitches. Switch to a short circular needle size 3 mm / US 2.5. Work rib as follows: * Knit 1, purl 1 *, repeat from *-* the entire round. Continue rib like this for 3 cm / 1". Bind off stitches with knit over knit and purl over purl. Sweater measures approx. 58-60-62-64-66-68 cm / 22¾"-23⅝"-24⅜"-25¼"-26"-26¾" from shoulder and down.

ASSEMBLY:
Sew the openings under the sleeves.

This pattern has been corrected.

Updated online: 26.02.2018
The diagram symbols for off white and light greyblue have been corrected.
Updated online: 09.04.2018
Correction in diagram A.2A.
Updated online: 02.05.2018
The section regarding bind off for armholes has been corrected

Diagram

All measurements in charts are in cm.

symbols = off white
symbols = light grey blue
symbols = knit 2 together
symbols = decrease round
diagram
diagram
diagram
diagram

Each of our patterns has specific tutorial videos to help you.

Do you have a question? See a list of frequently asked questions (FAQ)

Knitting tension is what determines the final measurements of your work, and is usually measured per 10 x 10 cm. It is provided like so: number of stitches in width x number of rows in height - eg: 19 stitches x 26 rows = 10 x 10 cm.

The knitting tension is very individual; some people knit/crochet loosely while others work tightly. You adjust the knitting tension with the needle size, which is why the suggested needle size only serve as a guide! You need to adjust this (up or down) to ensure that YOUR knitting tension matches the knitting tension provided in the pattern. If you work with a different knitting tension than provided you will have a different yarn consumption, and your work will have different measurements than what the pattern suggests.

The knitting tension also determines which yarns can replace each other. As long as you achieve the same knitting tension you can replace one yarn with another.

See DROPS lesson: How to measure your tension/gauge

See DROPS video: How to make a gauge tension swatch

The required amount of yarn is provided in grams, eg: 450 g. To calculate how many balls you’ll need you first need to know how many grams are in 1 ball (25g, 50g or 100g). This information is available if you click on the individual yarn quality on our pages. Divide the amount required with the amount of each ball. For example, if each ball is 50g (the most common amount), the calculation will be as follows: 450 / 50 = 9 balls.

The important thing when changing from one yarn to another is that the knitting/crochet tension remains the same. This is so that the measurements of the finished piece will be the same as on the sketch provided. It is easier to achieve the same knitting tension using yarns from the same yarn group. It is also possible to work with multiple strands of a thinner yarn to achieve the knitting tension of a thicker one. Please try our yarn converter. We recommend you to always work a test swatch.

Please NOTE: when changing yarn the garment might have a different look and feel to the garment in the photo, due to individual properties and qualities of each yarn.

See DROPS lesson: Can I use a different yarn than the one mentioned in the pattern?

All our yarns are categorised into yarn groups (from A to F) according to thickness and knitting tension – group A contains the thinnest yarns and group F the thickest. This makes it easier for you to find alternative yarns to our patterns, should you wish to switch yarn. All yarns within the same group have a similar knitting tension and can easily replace each other. However, different yarn qualities have different structures and properties which will give the finished work a unique look and feel.

Click here for an overview of the yarns in each yarn group

At the top of all our patterns you’ll find a link to our yarn converter, which is a helpful tool should you wish to use a different yarn than suggested. By filling in the yarn quality you wish to replace, the amount (in your size) and number of strands, the converter will present good alternative yarns with the same knitting tension. Additionally it will tell you how much you’ll require in the new qualities and whether you’ll need to work with multiple strands. Most skeins are 50g (some are 25g or 100g).

If the pattern is worked with multiple colours, every colour will have to be converted separately. Similarly, if the pattern is worked with several strands of different yarns (for example 1 strand Alpaca and 1 strand Kid-Silk) you will have to find alternatives for each, individually.

Click here to see our yarn converter

Since different yarns have different qualities and textures we have chosen to keep the original yarn in our patterns. However, you can easily find options among our available qualities by using our yarn converter, or simply pick a yarn from the same yarn group.

It is possible that some retailers still have discontinued yarns in stock, or that someone has a few skeins at home that they would like to find patterns for.

The yarn converter will provide both alternative yarn as well as required amount in the new quality.

If you think it's hard to decide what size to make, it can be a good idea to measure a garment you own already and like the size of. Then you can pick the size by comparing those measures with the ones available in the pattern's size chart.

You'll find the size chart at the bottom of the pattern.

See DROPS lesson: How to read size chart

The needle size provided in the pattern serves only as a guide, the important thing is to follow the knitting tension. And since knitting tension is very individual, you will have to adjust the needle size to ensure that YOUR tension is the same as in the pattern – maybe you’ll have to adjust 1, or even 2 needle sizes, up or down to achieve the correct tension. For this, we recommend that you work test swatches.

Should you work with a different knitting tension than the one provided, the measurements of the finished garment might deviate from the measurement sketch.

See DROPS lesson: How to measure your tension/gauge

See DROPS video: How to make a gauge tension swatch

Working a garment top-down provides more flexibility and room for personal adjustment. For example it is easier to try the garment on while working, as well as making adjustments to length of yoke and shoulder caps.

The instructions are carefully explaining every step, in the correct order. Diagrams are adjusted to the knitting direction and are worked as usual.

The diagram depicts all rows/rounds, and every stitch seen from the right side. It is read from bottom to top, from right to left. 1 square = 1 stitch.

When working back and forth, every other row is worked from the right side and every other row is worked from the wrong side. When working from the wrong side, the diagram will have to be worked reversed: from left to right, knit stitches are purled, purl stitches are knit etc.

When working in the round every round is worked from the right side and the diagram are worked from right to left on all rounds.

See DROPS lesson: How to read knitting diagrams

The diagram depicts all rows/rounds, and every stitch seen from the right side. It is worked from bottom to top, from right to left.

When working back and forth every other row is worked from the right side: from right to left and every other row is worked from the wrong side: from left to right.

When working in the round, every row in the diagram are worked from the right side, from right to left.

When working a circular diagram you start in the middle and work your way outwards, counter clockwise, row by row.

The rows usually start with a given number of chain stitches (equivalent to the height of the following stitch), this will either be depicted in the diagram or explained in the pattern.

See DROPS lesson: How to read crochet diagrams

Instructions for working several diagrams after each other on the same row/round, will often be written like so: “work A.1, A.2, A.3 a total of 0-0-2-3-4 times". This means you work A.1 once, then A.2 is worked once, and A.3 is repeated (in width) the number of times provided for your size – in this case like so: S = 0 times, M = 0 times, L=2 times, XL= 3 times and XXL = 4 times.

The diagrams are worked as usual: begin with the first row in A.1, then work the first row in A.2 etc.

See DROPS lesson: How to read knitting diagrams

See DROPS lesson: How to read crochet diagrams

The total width of the garment (from wrist-to-wrist) will be larger in the larger sizes, despite the actual sleeves being shorter. The larger sizes have longer sleeve caps and wider shoulders, so there will be a good fit in all sizes.

The measurement sketch/schematic drawing provides information regarding the full length of the garment. If it’s a jumper or a jacket the length is measured from the highest point on the shoulder (usually closest to the neckline), and straight down to the bottom of the garment. It is NOT measured from the tip of shoulder. Similarly, the length of yoke is measured from the highest point on the shoulder and down to where yoke is split into body and sleeves.

See DROPS lesson: How to read a schematic drawing

Diagrams are often repeated on the round or in height. 1 repeat is the diagram the way it appears in the pattern. If it says to work 5 repeats of A.1 in the round, then you work A.1 a total of 5 times after/next to each other in the round. If it says to work 2 repeats of A.1 vertically/in height you work the entire diagram once, then begin again at the start and work the entire diagram one more time.

Chain stitches are slightly narrower than other stitches and to avoid working the cast-on edge too tight, we simply chain more stitches to begin with. The stitch count will be adjusted on the following row to fit the pattern and measurement sketch.

The rib edge is more elastic and will contract slightly compared to, for example, stocking stitch. By increasing before the rib edge, you avoid a visible difference in width between the rib edge and the rest of the body.

It’s very easy to cast off too tightly, and by making yarn overs while casting off (and simultaneously casting these off) you avoid a too tight cast off edge.

See DROPS video: How to bind off with yarn overs (yo)

To achieve an even increase (or decrease) you can increase on, for example: every 3rd and 4th row alternately, like so: work 2 rows and increase on the 3rd row, work 3 rows and increase on the 4th. Repeat this until the increase is complete.

See DROPS lesson: Increase or decrease 1 st on every 3rd and 4th row alternately

Should you prefer to work in the round instead of back and forth, you may of course adjust the pattern. You’ll need to add steeks mid-front (usually 5 stitches), and follow the instructions. When you would normally turn and work from the wrong side, simply work across the steek and continue in the round. At the end you’ll cut the piece open, pick up stitches to work bands, and cover the cut edges.

See DROPS video: How to knit steeks and cut open

Should you prefer to work back and forth instead of in the round, you may of course adjust the pattern so you work the pieces separately and then assemble them at the end. Divide the stitches for the body in 2, add 1 edge stitch in each side (for sewing) and work the front and back pieces separately.

See DROPS lesson: Can I adapt a pattern for circular needles into straight needles?

Pattern repeats can vary slightly in the different sizes, in order to get the correct proportions. If you’re not working the exact same size as the garment in the photo, yours might deviate slightly. This has been carefully developed and adjusted so that the complete impression of the garment is the same in all sizes.

Make sure to follow instructions and diagrams for your size!

If you have found a pattern you like which is available in women’s size it’s not very difficult to convert it to men’s size. The biggest difference will be the length of sleeves and body. Start working on the women size that you think would fit across the chest. The additional length will be worked right before you cast off for the armhole/sleeve cap. If the pattern is worked top-down you can add the length right after the armhole or before the first decrease on sleeve.

Regarding additional yarn amount, this will depend on how much length you add, but it is better with a skein too many than too few.

All yarns will have excess fibres (from production) that might come off as lint or shedding. Brushed yarns (ie hairier yarns) have more of these loose, excess fibres, causing more shedding.

Shedding also depends on what is worn under or over the garment, and whether this pulls at the yarn fibres. It’s therefore not possible to guarantee that there will be no shedding

Below are some tips on how to get the best result when working with hairier yarns:

1. When the garment is finished (before you wash it) shake it vigorously so the looser hairs come off. NOTE: do NOT use a lint roller, brush or any method that pulls at the yarn.

2. Place the garment in a plastic bag and put it in your freezer - the temperature will cause the fibres to become less attached to each other, and excess fibres will come off easier.

3. Leave in the freezer for a few hours before taking it out and shaking it again.

4. Wash the garment according to the instructions on the yarn label.

Pilling is a natural process that happens to even the most exclusive of fibers. It's a natural sign of wear and tear that is hard to avoid, and that is most visible in high friction areas of your garment like a sweater's arms and cuffs.

You can make your garment look as new by removing the pilling, using a fabric comb or a pill/lint remover.

Still can't find the answer you need? Then scroll down and leave your question so one of our experts can try to help you. This will be done normally within 5 to 10 working days.
In the meantime, you can read the questions and answers that others have left to this pattern or join the DROPS Workshop on Facebook to get help from fellow knitters/crocheters!

You might also like...

Periwinkle

Magda, Italy

Periwinkle

Stirlingknitter, United Kingdom

Periwinkle

Mari, New Zealand

Min sin

Hilde, Norway

191-1 Periwinkle

Rita, Belgium

Post a comment to pattern DROPS 191-1

We would love to hear what you have to say about this pattern!

If you want to leave a question, please make sure you select the correct category in the form below, to speed up the answering process. Required fields are marked *.

Comments / Questions (66)

country flag Elina Kerälä wrote:

Haluaisin tietää koot esim rinnanympäryssentteinä, jotta voin valita oikean koon. Puikot jo tanassa kutomista varten😊

01.05.2021 - 09:41

country flag June Elise Laugsand wrote:

Hvorfor får jeg ikke lastet ned rettelsen?

01.05.2021 - 09:06

DROPS Design answered:

Hei June. Om du klikker på den røde linken, kommer det opp beskrivelse på hva som er blitt rettet og når. Disse rettelsene står allerede i selve oppskriften eller diagrammet. Så om du skal skrive ut oppskriften er oppskriften korrekt. mvh DROPS design

03.05.2021 - 13:51

country flag Outi wrote:

Kun aletaan tekemään kaarroketta, ohjeessa on että kerroksen vaihtumiskohta on takana, kohdassa jossa etu ja takakappale loppui. Eikö se kerroksen vaihtumiskohta ole ollut sivulla??

04.04.2021 - 10:50

DROPS Design answered:

Kerroksen vaihtumiskohta oli aiemmin sivussa, mutta kaarrokkeessa vaihtumiskohta on keskellä takana.

06.04.2021 - 17:08

country flag Dina wrote:

Hei! No har eg nettopp satt ermene på pinnene til bolen, og eg vart usikker på korleis eg veit kor omgangsstart er når eg skal felle masker før eg byrjer på A1, når maskeantalet på for/bakstykke er eit oddetal? Eg strikker i str M, og då har eg 89 masker mellom kvart erme. Kva er midten av dei og kor er då omgangsstart?

24.02.2021 - 14:05

DROPS Design answered:

Hei Dina. Omgangen starter midt bak (etter at ermene er satt på samme pinne). På bakstykket er det 89 masker, start da midt bak, pass på når det da skal felles at det felles jevnt fordelt, slik at midt masken fremdeles blir midt . Så om du strikker 25 masker (fra midt bak), *strikk 2 masker sammen, strikk 49 masker*, gjenta *-* 4 ganger til, strikk 2 masker sammen og så strikk de 24 siste maskene. Da har du felt 6 masker og omgangen starter/slutter er midt bak. mvh DROPS design

10.03.2021 - 09:27

country flag Maria Elena Mauro wrote:

Ho eseguito questo splendido modello in beige/bianco, il risultato è ottimo. Segnalo un errore nel "suggerimento per gli aumenti (applicato al centro sotto la manica) : iniziare 1 maglia (non 2 maglie) prima del segnapunti"

14.02.2021 - 11:37

DROPS Design answered:

Buonasera Maria Elena, abbiamo inoltrato la sua segnalazione al settore design: se necessario il modello verrà aggiornato direttamente online. Buon lavoro!

14.02.2021 - 19:53

country flag Bertin Christelle wrote:

Bonjour sur ce modèle vous nous dites de placer un 2ème fil marqueur à15 mailles du premiier mais le premier c’est pour moi le milieu dos et on doit faire les diminutions des côtes autour de ces 2 marqueur escusez moi mais je suis perdu merci beaucoup

12.02.2021 - 10:10

DROPS Design answered:

Bonjour Mme Bertin, êtes-vous au tout début du pull ou à la fin de l'empiècement? Je ne suis pas bien sûre... Pouvez-vous nous indiquer où vous êtes exactement et la taille que vous tricotez? Merci!

12.02.2021 - 11:44

country flag Raija wrote:

Neuloin paidan ohjeen mukaan . Värit kirsikka ja luonnonvalkoinen. Kaunis malli ja työ onnistui hyvin. Kiitos.

17.01.2021 - 13:50

country flag Reidun Olsen wrote:

Har tenkt å strikke denne i rett fasong, altså ikke i A-fasong. Vil det gå bra? Tenkt å strikke den i Wollevo soft merino. Pinne str 2,5 og 3,5. Vil str M være en normal damestr? Tenkte å legge opp 210m til vrangbord, og strikke opp uten økning, sette på ermer og ellers følge diagram .

18.11.2020 - 22:15

DROPS Design answered:

Hei Reidun, Det er viktig å strikke en prøvelapp før du begynner, slik at du får riktig antall masker og rad på 10 x 10 cm. Juster pinne størrelse etter det. Når du har fått riktig strikkefasthet, kan du følge oppskriften (minus A-fasongen). God fornøyelse!

19.11.2020 - 10:29

country flag Kayley wrote:

Hello, would it be possible to make this a turtle neck. Would I skip the neck elevation and continue with the rib? Thank you for the lovely pattern!

21.05.2020 - 13:49

DROPS Design answered:

Hi Kayley, Yes. if you skip the elevation, the neck will be the same front and back. Happy knitting!

22.05.2020 - 07:55

country flag Renate wrote:

Har Karimagarn och vill sticka denna tröja. Jag brukar sticka med sticka 3,5 på Karisma. Kan jag ändå följa mönstret som vanligt. Jag håller alltid masktäthet när jag stickar//Tack för svar

10.05.2020 - 21:08

DROPS Design answered:

Hej Ja du kan använda DROPS Karisma till detta mönster. Se bara till att du får den stickfasthet som uppges i mönstret. Mvh DROPS Design

11.05.2020 - 08:29