
Popular categories
Looking for a yarn?


Comments / Questions (67)
![]() Pia Knudsen wrote:
Pia Knudsen wrote:
Strikker trøjen i prematur og skal dele til ærmer, ryg og forstykker jeg har 158 masker. der deles således: 5 m ( forkant), 25 m (forstykke), 34 m (ærme) 40 m (ryg) 34 m (ærme) 25 m (forstykke) 5 m (forkant) = 168 m hvor skal jeg finde de 10 ekstra masker??
21.04.2023 - 20:58DROPS Design answered:
Hej Pia, 5m rille 20m (= forstykke), 34 erme, strikk 40m (= bakstykke), 34m erme, 20 m (= forstykke) 5m rille = 158m.
25.04.2023 - 13:37
![]() Karin Jessen wrote:
Karin Jessen wrote:
Jeg er nået til udtagning efter mønster. Kan det passe, at der skal tages færre masker i str 12-18 mdr. end str 6-9 md
18.03.2023 - 10:01
![]() Micocoule wrote:
Micocoule wrote:
Bonjour dans l'explication des manches, à propos du fil marqueur, ne faudrait - il pas lire "faire suivre le fil marqueur" plutôt que "faire le fil" ? Joli modèle je me suis bien régalée avec le point fantaisie.
18.02.2023 - 11:43DROPS Design answered:
Bonjour Micocoule et merci, c'est ajouté :) Bonne continuation!
20.02.2023 - 09:23
![]() Hege Flusund Beddari wrote:
Hege Flusund Beddari wrote:
Hva har jeg misforstått her... Hos meg har jakken blitt mye større foran enn bak... Strikker 1/3 mnd, og det står at bakstykke skal ha 52 masker, mens framstykkene er 31m + 31 m + knappestolpe. Jeg har ett kjempeoverlapp! Bruker baby merino.
04.01.2023 - 21:36DROPS Design answered:
Hei Hege, Forstykkene skal ha 31 masker hver (med stolpene inkludert i masketallet), 42 masker på hvert erme og 52 masker på bakstykket. Med 5 masker på hver stolpe har du 26 masker på begge forstykkene og stolpene som overlapper. Håper dette hjelper og god fornøyelse!
05.01.2023 - 07:58
![]() María Teresa Ureta wrote:
María Teresa Ureta wrote:
PATRÓN: Ver diagrama A.1. Los diagramas muestran todas las hileras del patrón vistas por el lado derecho. Hay un error en alemán está bien explicado
15.12.2022 - 22:46
![]() Jaana T wrote:
Jaana T wrote:
Kuvio ei ole ainoastaan kaunis vaan erittäin mukava neuloa niin oikealta kuin nurjalta puolelta. Kiitos myös keskoskoon mahdollisuudesta!
18.10.2022 - 09:32
![]() Claire Desjardins wrote:
Claire Desjardins wrote:
Je viens de trouver le patron du bonnet. Il faut cliquer sur chaque photo pour voir les détails. Merci pour ce joli modèle.
16.06.2022 - 01:55
![]() Claire wrote:
Claire wrote:
Bonjour. J'aimerais aussi faire le bonnet mais il n'est pas indiqué. Pouvez-vous m'indiquer comment le faire? Merci.
15.06.2022 - 21:15DROPS Design answered:
Bonjour Claire, les explications pour le bonnet se trouvent dans le modele baby 33-25. Bon tricot!
16.06.2022 - 09:08
![]() Berardocco BERARDOCCO wrote:
Berardocco BERARDOCCO wrote:
Toujours aussi beaux vos petits modeles merci
11.03.2022 - 07:26
![]() Sabine Motti wrote:
Sabine Motti wrote:
Liebes Drops-Team! "Das erste Knopfloch in der ersten Hin-Reihe nach der Halsblende einarbeiten. Dann die nächsten 4 Knopflöcher im Abstand von ca. 5 cm dazwischen einarbeiten." Das kann kaum für alle Größen gelten aufgrund der unterschiedlichen Längen der Jacken. Habe ich etwas missverstanden? Dank vorab!
26.11.2021 - 18:48DROPS Design answered:
Liebe Frau Motti, es wird für jede Große gleich aber dann wird der niedrige Knopfloch wird bei ber 1. Größe niedriger als in die letzte Größe sein. Viel Spaß beim stricken!
29.11.2021 - 07:26
|
||||||||||||||||
Stroll in the Park#strollintheparkset |
||||||||||||||||
 |
 |
|||||||||||||||
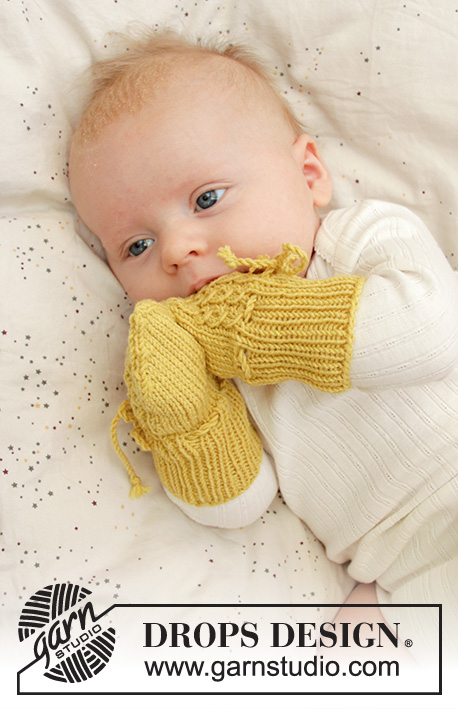
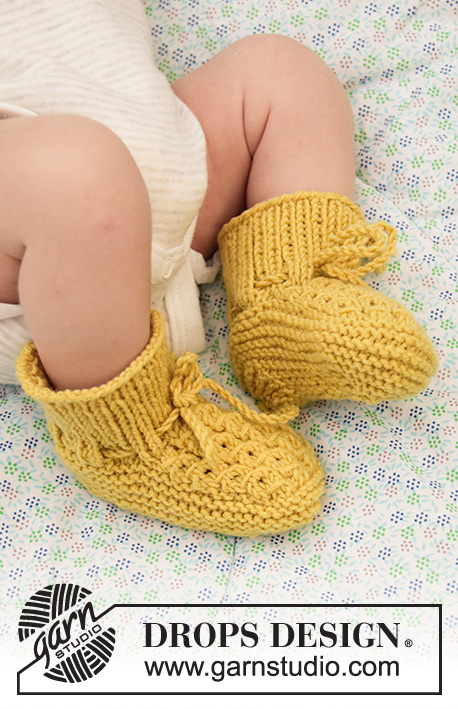
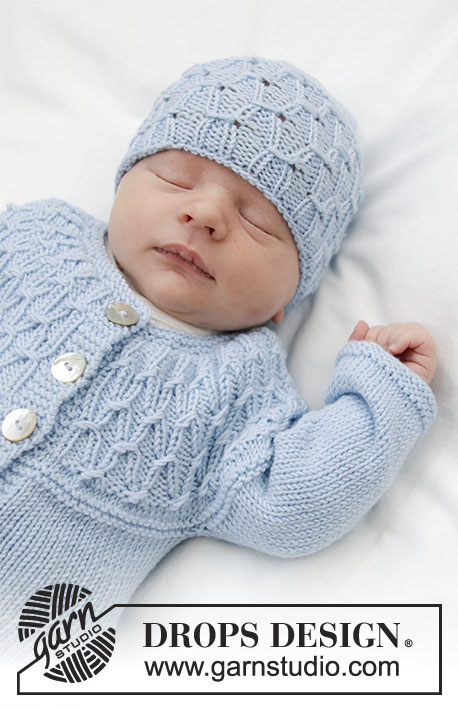
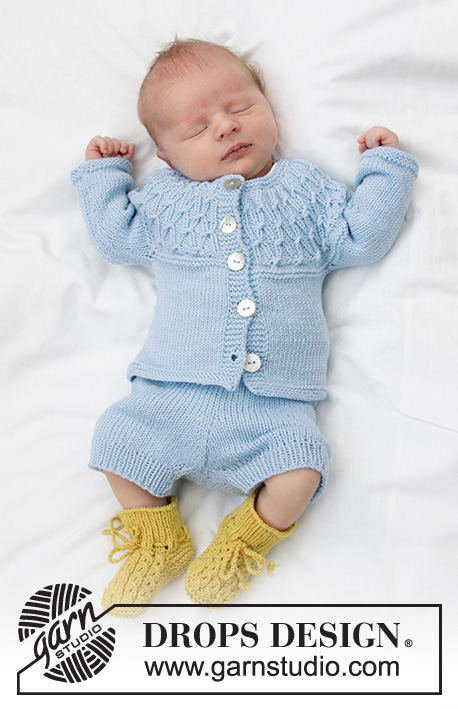
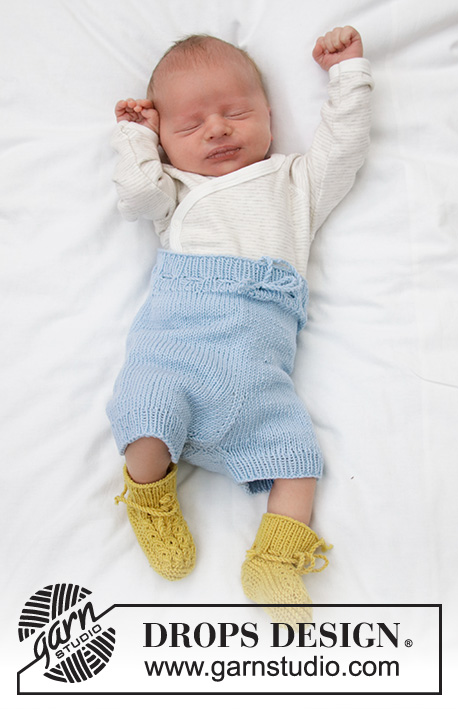
Jacket for baby with round yoke and textured pattern, knitted top down. Shorts for baby with ties and rib. Piece is knitted in DROPS BabyMerino or DROPS Alpaca. Size: Premature to 2 years
DROPS Baby 33-26 |
||||||||||||||||
|
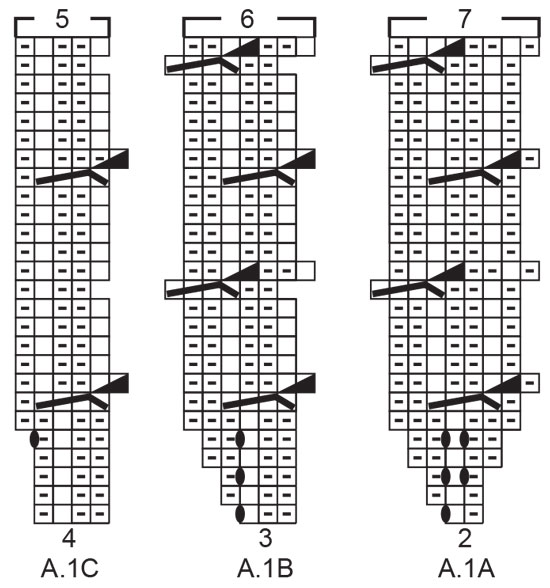
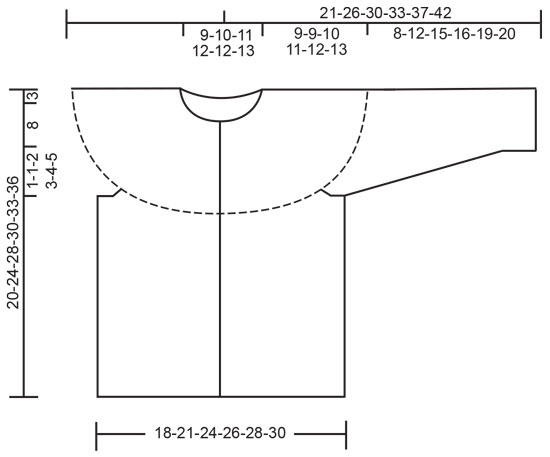
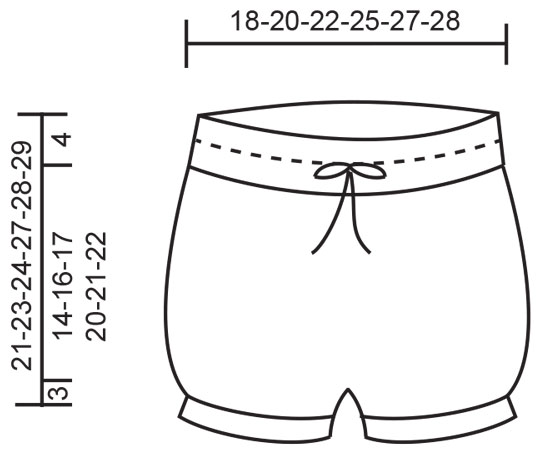
---------------------------------------------------------- EXPLANATION FOR THE PATTERN: ---------------------------------------------------------- INFORMATION FOR PATTERN: GARTER STITCH (back and forth): 1 ridge = knit 2 rows. RIDGE/GARTER STITCH (worked in the round): 1 ridge = 2 rounds. Knit 1 round and purl 1 round. PATTERN: See diagram A.1. Diagrams show all rows in pattern seen from the right side. INCREASE TIP (evenly on jacket): To calculate how to increase evenly, use the total number of stitches on row (e.g. 68 stitches), minus bands (e.g. 10 stitches) and divide the remaining stitches by number of increases to be done (e.g. 11) = 5.2. In this example increase after alternately approx. every 5th stitch by making 1 yarn over. On next row work yarn overs twisted to avoid holes Do not increase over bands. RAGLAN (applies to size 12/18 months - 2 years): Increase for raglan on each side of the 4 marker threads in every transition between body and sleeves (= 8 stitches increased on every increase row). All increases are done from the right side! Work until 1 stitch remains before marker thread, make 1 yarn over, knit 2 (marker thread is in the middle of these 2 stitches), make 1 yarn over (= 2 stitches increased). On next row (wrong side) purl yarn overs twisted to avoid holes. DECREASE TIP (applies to mid under sleeve on jacket and on inside of legs on shorts): Begin 3 stitches before marker and knit 2 together, knit 2 (marker is between these 2 stitches), slip 1 stitch knitwise, knit 1, pass slipped stitch over stitch worked (= 2 stitches decreased). BUTTONHOLES: Decrease for buttonholes on right band (when garment is worn). 1 buttonhole = work from right side until 3 stitches remain on needle, make 1 yarn over, knit 2 together and finish by knitting 1. On next row (wrong side) knit the yarn over to make a hole. Decrease for first buttonhole on first row from right side after neck edge. Then decrease the next 4 buttonholes approx. 5 cm apart. INCREASE TIP (applies mid front and mid back on shorts): Work until 1 stitch remains before marker thread, make 1 yarn over, knit 2 (marker thread is in the middle of these 2 stitches), make 1 yarn over (= 2 stitches increased). On next round knit yarn overs twisted to avoid holes. ---------------------------------------------------------- BEGIN PIECE FOR JACKET HERE: ---------------------------------------------------------- JACKET - SHORT OVERVIEW OF THE PIECE: Work yoke and body back and forth on circular needle from mid front, work top down. Work sleeves in the round on double pointed needles, top down. NECK EDGE: Cast on (68) 72-78-82-84 (86) stitches (including 5 band stitches in each side towards mid front) on circular needle size 2.5 mm with Baby Merino or Alpaca. Work 2 ridges in GARTER STITCH - see explanation above. Knit 1 row from right side while increasing (11) 16-16-18-19 (20) stitches evenly - read INCREASE TIP and decrease for BUTTONHOLES on right band - see explanation above = (79) 88-94-100-103 (106) stitches. Purl 1 row from wrong side (knit bands). Switch to circular needle size 3 mm and work yoke as explained below. YOKE: Work first row as follows from right side: 5 band stitches in garter stitch, A.1A (= 2 stitches), work A.1B until 9 stitches remain on row (= (21) 24-26-28-29 (30) repetitions of 3 stitches), work A.1C (= 4 stitch) and finish with 5 band stitches in garter stitch. Continue pattern like this and increase as shown in diagrams. REMEMBER THE KNITTING TENSION! When A.1 has been worked vertically, there are (148) 166-178-190-196 (202) stitches on row and piece measures approx. 7 cm from cast-on edge. Work 2 rows in stocking stitch with 5 band stitches in garter stitch in each side and increase AT THE SAME TIME (10) 16-20-24-14 (12) stitches evenly on first row = (158) 182-198-214-210 (214 stitches. Work 2 ridges in GARTER STITCH - see explanation above. Then work as explained in the different sizes. PREMATURE, 0/1 MONTHS, 1/3 MONTHS + 6/9 MONTHS: Continue with stocking stitch and 5 band stitches in garter stitch in each side towards mid front until piece measures (9) 9-10-11 cm from cast-on edge mid front. Work next row as follows in stocking stitch with 5 band stitches in garter stitch in each side: Work(25) 28-31-33 stitches (= front piece), slip the next (34) 40-42-46 stitches on 1 stitch holder for sleeve, cast on (4) 4-6-6 new stitches on row (= in the side under sleeve), work (40) 46-52-56 stitches as before (= back piece), slip the next (34) 40-42-46 stitches on 1 stitch holder for sleeve, cast on (4) 4-6-6 new stitches on row (= in the side under sleeve) and work the (25) 28-31-33 stitches (= front piece). Then work body as explained below. NOW MEASURE THE PIECE FROM HERE! 12/18 MONTHS, 2 YEARS: Insert 4 marker threads in piece (without working stitches) as follows: Insert first marker thread after the first 33 (34) stitches (= front piece), insert 2nd marker thread after the next 44 (44) stitches (= sleeve), insert 3rd marker thread after the next 56 (58) stitches (= back piece), and insert 4th marker thread after the next 44-44 stitches (= sleeve). 33 (34) stitches remain on row after last marker thread (= front piece). Continue in stocking stitch back and forth with 5 band stitches in garter stitch in each side towards mid front. When 2 rows have been worked, increase for RAGLAN on next row from right side - see explanation above. Increase like this every 4th row (i.e. every other row from right side) 2 (3) times in total. After last increase for raglan there are 226 (238) stitches on needle. Work until piece measures 12 (13) cm from cast-on edge. Work next row as follows in stocking stitch with 5 band stitches in garter stitch in each side: Work 35 (37) stitches (= front piece), slip the next 48 (50) stitches on 1 stitch holder for sleeve, cast on 8 (8) new stitches on row (= in the side under sleeve), work 60 (64) stitches as before (= back piece), slip the next 48 (50) stitches on 1 stitch holder for sleeve, cast on 8 (8) new stitches on row (= in the side under sleeve) and work the remaining 35 (37) stitches (= front piece). Then work body as explained below. NOW MEASURE THE PIECE FROM HERE! BODY: = (98) 110-126-134-146 (154) stitches. Continue back and forth in stocking stitch with 5 band stitches in garter stitch in each side towards mid front. When piece measures (7) 11-14-15-17 (19) cm from division switch to circular needle size 2.5 mm. Work 3 ridges back and forth over all stitches. Switch back to circular needle size 3 mm. Loosely cast off by knitting from right side. Jacket measures approx. (20) 24-28-30-33 (36) cm from shoulder and down. SLEEVE: Slip the (34) 40-42-46-48 (50) stitches from stitch holder in one side of piece on double pointed needles size 3 mm and pick in addition up 1 stitch in each of the (4) 4-6-6-8 (8) new stitches cast on under sleeve = (38) 44-48-52-56 (58) stitches. Insert 1 marker thread in the middle of the (4) 4-6-6-8 (8) stitches under sleeve and move the marker thread upwards when working. Work in stocking stitch in the round. When piece measures 2 cm from division, decrease 2 stitches mid under sleeve - read DECREASE TIP. Decrease like this every (3) 2-2-1½-1½ (1½) cm (2) 4-6-7-9 (9) times in total = (34) 36-36-38-38 (40) stitches. Work until piece measures (7) 11-14-15-18 (19) cm from division. Switch to double pointed needles size 2.5 mm. Work 3 ridges in GARTER STITCH in the round - see explanation above. Switch back to double pointed needles size 3 mm and loosely cast off by knitting. Sleeve measures approx. (8) 12-15-16-19 (20) cm from division. Work the other sleeve the same way. ASSEMBLY: Sew the buttons on to the left band. ---------------------------------------------------------- BEGIN PIECE FOR SHORTS HERE: ---------------------------------------------------------- SHORTS - SHORT OVERVIEW OF THE PIECE: Worked in the round on circular needles/double pointed needles, top down. Cast on (96) 106-116-132-144 (152) stitches on circular needle size 2.5 mm with Baby Merino or Alpaca. Knit 1 round. Then work rib in the round = knit 1/ purl 1. When rib measures 2½ cm, work a round with eyelet holes for tie as follows: * Knit 1, purl 1, make 1 yarn over, purl 2 together *, work from *-* the entire round (= (24) 26-29-33-36 (38) holes on round). Then continue rib = knit 1/purl 1 until piece measures 4 cm from cast-on edge. Switch to circular needle size 3 mm, knit 1 round while decreasing (10) 10-10-12-14 (18) stitches evenly - read DECREASE TIP-1 = (86) 96-106-120-130 (134) stitches. Now work an elevation at the back of shorts as explained below. ELEVATION AT THE BACK: To get a better fit work the shorts higher at the back than at the front. This is done by working short rows back and forth as follows: Insert 1 marker at beginning of round = mid back. Work from right side and knit 8 past marker, turn, tighten yarn and purl 16 stitches back. Turn, tighten yarn and knit 24, turn, tighten yarn and purl 32. Turn, tighten yarn and knit 40, turn, tighten yarn and purl 48. Turn piece, tighten yarn and knit until mid back. SHORTS: Continue in the round in stocking stitch over all stitches. REMEMBER THE KNITTING TENSION! When shorts measures (14) 16-17-20-21 (22) cm from cast-on edge, insert 1 marker thread mid front and 1 marker thread mid back. On next round increase 1 stitch on each side of both marker threads – read INCREASE TIP (= 4 stitches increased). Increase like this every other round 6 times in total = (110) 120-130-144-154 (158) stitches. Now divide for legs at both marker threads. Slip half the stitches on a stitch holder or extra needle and work leg over the remaining stitches as explained below. The piece measures (18) 20-21-24-25 (26) cm from cast-on edge mid front. NOW MEASURE THE PIECE FROM HERE! LEG: = (55) 60-65-72-77 (79) stitches. Distribute the stitches on double pointed needles size 3 mm and work in stocking stitch in the round. AT THE SAME TIME after 1 round, decrease 2 stitches on inside of leg - read DECREASE TIP. Decrease like this every other round (2) 2-2-2-3 (3) times in total = (51) 56-61-68-71 (73) stitches. Switch to double pointed needles size 2.5 mm. Knit 1 round while increasing (5) 6-7-8-9 (9) stitches evenly = (56) 62-68-76-80 (82) stitches. Work rib in the round = knit 1/purl 1 for 2 cm. Loosely cast off stitches with knit over knit and purl over purl. Work the other leg the same way. TWINED STRING FOR TIE: Cut 2 lengths of 3 metres each. Twine the strands tog until they resist, fold the string double so that it twines again. Make a knot at each end. Thread tie up and down in row with eyelet holes on shorts, make a bow mid front. |
||||||||||||||||
Diagram explanations |
||||||||||||||||
|
||||||||||||||||
 |
||||||||||||||||
 |
||||||||||||||||
 |
||||||||||||||||
Have you finished this pattern?Tag your pictures with #dropspattern #strollintheparkset or submit them to the #dropsfan gallery. Do you need help with this pattern?You'll find 34 tutorial videos, a Comments/Questions area and more by visiting the pattern on garnstudio.com. © 1982-2026 DROPS Design A/S. We reserve all rights. This document, including all its sub-sections, has copyrights. Read more about what you can do with our patterns at the bottom of each pattern on our site. |
||||||||||||||||


With over 40 years in knitting and crochet design, DROPS Design offers one of the most extensive collections of free patterns on the internet - translated to 17 languages. As of today we count 324 catalogues and 12245 patterns translated into English (UK/cm). 12245
We work hard to bring you the best knitting and crochet have to offer, inspiration and advice as well as great quality yarns at incredible prices! Would you like to use our patterns for other than personal use? You can read what you are allowed to do in the Copyright text at the bottom of all our patterns. Happy crafting!
Post a comment to pattern DROPS Baby 33-26
We would love to hear what you have to say about this pattern!
If you want to leave a question, please make sure you select the correct category in the form below, to speed up the answering process. Required fields are marked *.