
Popular categories
Looking for a yarn?


Comments / Questions (83)
![]() Brigitte Beier wrote:
Brigitte Beier wrote:
Wie gross ist dann der Halsausschnitt, wenn das Bündchen angestrickt ist ? Ihre Antwort war nicht zielführend.
21.11.2024 - 09:38DROPS Design answered:
Liebe Frau Beier, Halsausschnitt is ca 4 cm - am Ende sollen der Pullunder wie beim Foto aussehen - mit der richtigen Maschenprobe. Viel Spaß beim Stricken!
21.11.2024 - 15:34
![]() Brigitte Beier wrote:
Brigitte Beier wrote:
Es ist auf dem Foto nicht zu erkennen, ob der Halsausschnitt mit dem Maß von 17 - 19 cm incl. Bündchen ist. Auf der Zeichgnung kann man nicht erkennen, ob das Bündchen re. oder links der bezeichneten Linie liegt. Wenn das incl. Bündchen ist, bliebe nicht mehr viel für den Halsausschnitt. dann blieben nur noch 11 - 13 cm für den Ausschnitt ?
19.11.2024 - 14:03DROPS Design answered:
Liebe Frau Beier, die Breite für den Halsausschnitt ist hier passend zu den abgekettenen Maschen für den Halsausschnitt am Rückenteil. Viel Spaß beim Stricken!
19.11.2024 - 16:20
![]() Lynley wrote:
Lynley wrote:
Hi Can you tell me how many balls of the recommended yarn for size M will I need? Thanks Lynley
29.07.2024 - 12:32DROPS Design answered:
Hi Lynley, you will need 6 balls of DROPS Soft Tweed. Happy knitting!
29.07.2024 - 13:44
![]() Eyssartier Marie-noelle wrote:
Eyssartier Marie-noelle wrote:
Bonjour A quel moment du tricot se font les diagrammes A1 A2 A3 A4 et dans quel ordre pour la taille L S'il vous plaît merci
14.05.2024 - 16:36DROPS Design answered:
Bonjour Mme Eyssartier, les diagrammes A.1 à A.4 s'appliquent lors des diminutions des emmanchures et de l'encolure mais ils ne sont pas tous tricotés dans toutes les tailles; pour le dos et et les 2 devants, vous diminuez pour les emmanchures 10 fois de chaque côté comme dans A.3/A.4 en taille L, pour le devant droit, vous diminuez pour l'encolure en suivant 4 x A.2 puis 9 x A.3, et pour l'encolure du devant gauche, 4 x A.2 et 9 x A.4. Bon tricot!
15.05.2024 - 07:26
![]() Eyssartier Marie-noelle wrote:
Eyssartier Marie-noelle wrote:
Bonjour Que veut dire ce qui suit Pour les diminutions-2 diminuer 0-0-0-2-4-7 fois au total 2 comme indiqué dans A.3/A.4 tous les 4 rangs 8-10-10.-9-8-6 fois (on diminue 8-10-10-13-16-20 mailles de chaque côté) sachant que je fais une taille L S'il vous plaît merci
17.04.2024 - 16:55DROPS Design answered:
Bonjour Mme Eyssartier, les indications sont données dans l'ordre des tailles, autrement dit la taille L est la 3ème taille et vous allez donc diminuer 10 fois tous les 4 rangs comme indiqué dans A.3 / A.4 (lorsqu'il y a un 0, la taille n'est pas concernée, donc on ne diminue ici pas tous les 2 rangs mais directement tous les 4 rangs). Vous diminuez donc 10 fois de chaque côté = vous diminuez 20 mailles, il y a avait 113 mailles - 7 mailles rabattues de chaque côté - 10 mailles diminuées = 113-14-20= il reste 79 mailles. Bon tricot!
18.04.2024 - 07:57
![]() Eyssartier Marie-noelle wrote:
Eyssartier Marie-noelle wrote:
Bonjour Je fait se pull en taille L J'ai un problème pour les diminutions emmanchures et encolure Je ne comprends pas par rapport au diagramme Pourriez-vous m'expliquer s'il vous plaît merci
15.04.2024 - 16:09DROPS Design answered:
Bonjour Mme Eyssartier, les diminutions se font comme indiqué sous DIMINUTIONS-2, autrement dit, comme dans les diagrammes A.2 (on diminue 2 mailles) ou A.3/A.4 (on diminue 2 mailles sur l'endroit et on fait 1 jeté au rang suivant sur l'envers, ainsi on ne diminue qu'une seule maille). Bon tricot!
16.04.2024 - 07:54
![]() CR wrote:
CR wrote:
Hi I'm working the back panel for a Large and I have a question about Decrease tip 2- Is my understanding correct that I should only be working the decrease 1 stitch according to A.3/A.4 and not the decrease 2 stitches, because my size isn't included in the instructions for that decrease
04.04.2024 - 23:28DROPS Design answered:
Dear CR, yes, when the pattern says "so something 0 times", you should go directly to the next instruction (so no decrease as in A.2, just the other patterns in this case). Happy Knitting!
05.04.2024 - 02:00
![]() Ghita Gustafsson wrote:
Ghita Gustafsson wrote:
Jag stickar med angivna stickor och har 20 m/10 cm och mitt arbete mäter totalt 52 cm inte 48 som det står. Vad gör jag?
22.03.2024 - 18:03DROPS Design answered:
Hej igen, har du taget ind til 97 masker. Hvis du har 20 masker på 10 cm så får du 97m/20m=48 cm - prøv med ½ nummer mindre :)
03.04.2024 - 14:08
![]() Ghita Gustafsson wrote:
Ghita Gustafsson wrote:
Hej undrar på diagram a3 och a4 ska de användas på vä resp hö sida? Och börjar diagrammen ner till höger . Är det bara räta varv angivna i mönstret.
22.03.2024 - 15:21DROPS Design answered:
Hej Ghita, ja når du strikker fra retsiden, starter diagrammet i nederste højre hjørne. Næste pind strikkes fra vrangen også ifølge diagrammet og starter i venstre side af diagrammet :)
03.04.2024 - 14:04
![]() Marie-noelle Eyssartier wrote:
Marie-noelle Eyssartier wrote:
Bonjour le modèle me plait beaucoup quel est le fil alternatif qui passe dans la machine à laver s'il vous plait merci dans l'attente je vous remercie de votre compréhension Mme EYSSARTIER
12.03.2024 - 07:46DROPS Design answered:
Bonjour Mme Eyssartier, vous pouvez utiliser n'importe quelle autre laine du groupe de fils B, traitée "Superwash" ou bien un coton, découvrez-les ici . Bon tricot!
12.03.2024 - 08:08
|
||||||||||||||||||||||
May Flowers Vest#mayflowersvest |
||||||||||||||||||||||
 |
 |
|||||||||||||||||||||
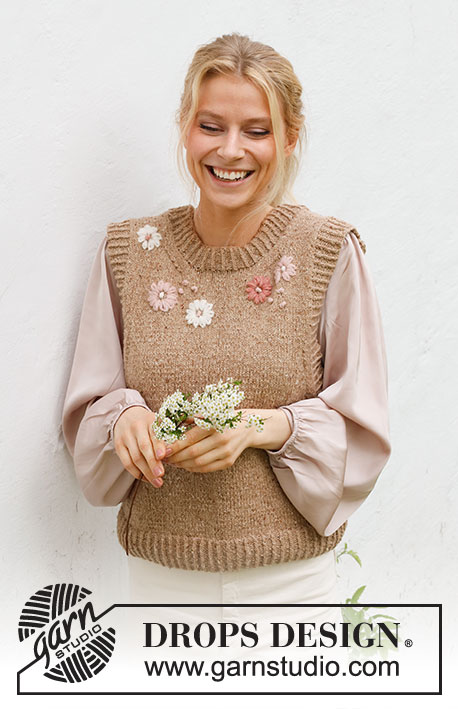
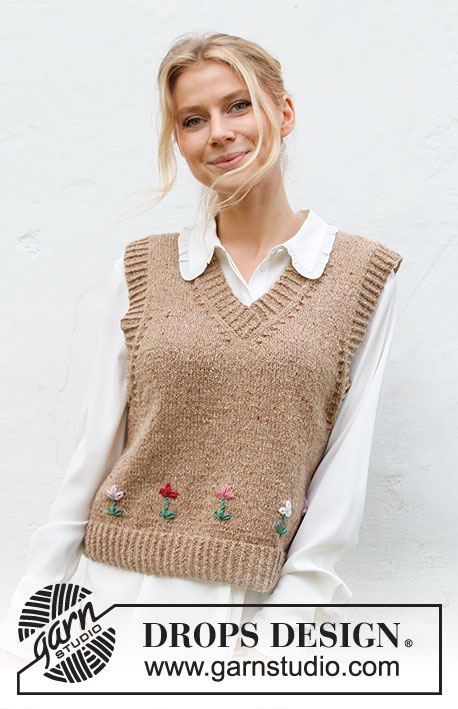
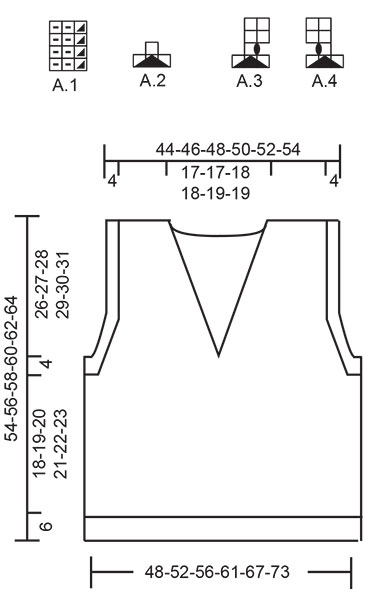
Knitted vest / slipover in DROPS Soft Tweed. The piece is worked with V-neck, ribbed edges and embroidered flowers. Sizes S - XXXL. Theme: Embroidery.
DROPS 222-42 |
||||||||||||||||||||||
|
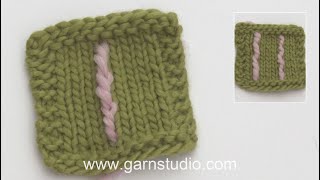
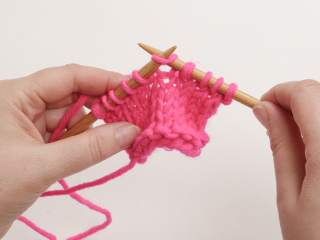
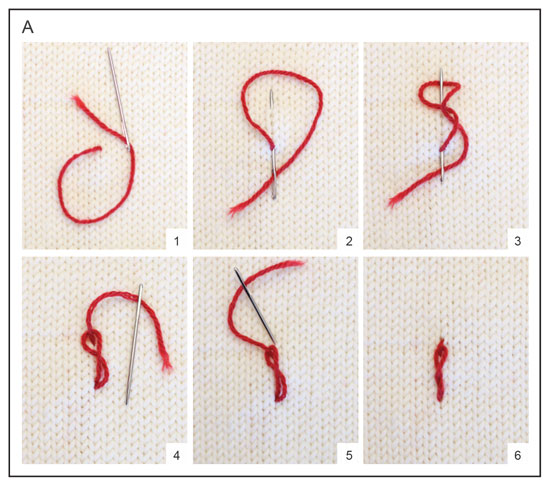
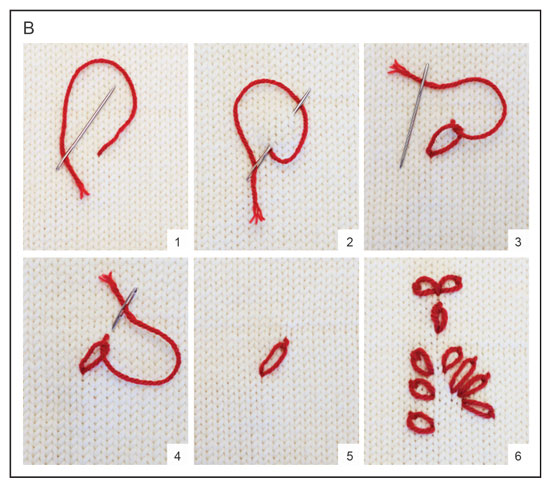
------------------------------------------------------- EXPLANATIONS FOR THE PATTERN ------------------------------------------------------- RIDGE/GARTER STITCH (worked back and forth): Knit all rows. 1 ridge = knit 2 rows. PATTERN: See diagrams A.1 to A.4. The diagrams show all rows in the pattern from the right side. DECREASE TIP-1 (evenly spaced): To work out how to decrease evenly, count the total number of stitches on needle (e.g. 111 stitches) minus the edge stitches (e.g. 2 stitches) and divide the remaining stitches by the number of decreases to be made (e.g. 14) = 7.7. In this example decrease by knitting together alternately each 6th and 7th stitch and each 7th and 8th stitch (approx.). DECREASE TIP-2 (for armholes and V-neck): All decreases are worked from the right side! Decrease 2 stitches at the beginning of the row as follows: Work 1 edge stitch in garter stitch, 2 stitches in stocking stitch, A.2 over the next 3 stitches (= 2 stitches decreased). Decrease 2 stitches at the end of the row as follows: Work until there are 6 stitches left, work A.2 over the next 3 stitches (= 2 stitches decreased), 2 stitches in stocking stitch, 1 edge stitch in garter stitch Decrease 1 stitch at the beginning of the row as follows: Work 1 edge stitch in garter stitch, 2 stitches in stocking stitch, A.3 over the next 3 stitches (2 stitches decreased on the first row and 1 stitch increased on the second row in A.3 = 1 stitch decreased). Decrease 1 stitch at the end of the row as follows: Work until there are 6 stitches left, A.4 over the next 3 stitches (2 stitches decreased on the first row and 1 stitch increased on the second row in A.4 = 1 stitch decreased), 2 stitches in stocking stitch, 1 edge stitch in garter stitch. ------------------------------------------------------- START THE PIECE HERE: ------------------------------------------------------- VEST – SHORT OVERVIEW OF THE PIECE: The front and back pieces are worked back and forth on circular needles. The pieces is then sewn together. Edges are worked in the round on circular needles around the armholes, and the neck edge is worked back and forth on circular needle. When the whole vest is finished flowers are embroidered on the front piece. BACK PIECE: Cast on 111-120-129-141-153-168 stitches with circular needle size 3.5 mm and DROPS Soft Tweed. Work rib back and forth as follows: 1 edge stitch in GARTER STITCH – read description above, A.1 until there are 2 stitches left, work the first stitch in A.1 and 1 edge stitch in garter stitch. Continue this rib for 6 cm. Knit 1 row from the right side where you decrease 14-15-16-18-18-21 stitches evenly spaced – read DECREASE TIP-1 = 97-105-113-123-135-147 stitches. Change to circular needle size 4.5 mm. Purl 1 row from the wrong side (edge stitches are knitted). Continue with stocking stitch back and forth with 1 edge stitch in garter stitch on each side until the piece measures 24-25-26-27-28-29 cm. REMEMBER THE KNITTING TENSION! At the beginning of the next 2 rows cast off 5-5-7-7-8-8 stitches for the armholes. Then decrease on each side as follows – read DECREASE TIP-2. Decrease 2 stitches as shown in A.2 every 4th row a total of 0-0-0-2-4-7 times, then decrease 1 stitch as shown in A.3/A.4 every 4th row 8-10-10-9-8-6 times (= 8-10-10-13-16-20 stitches decreased on each side) = 71-75-79-83-87-91 stitches. Continue with stocking stitch and 1 edge stitch in garter stitch on each side. When the piece measures 52-54-56-58-60-62 cm, cast off the middle 31-31-33-33-35-35 stitches for the neck and each shoulder is finished separately. On the next row from the neck cast off 1 stitch = 19-21-22-24-25-27 stitches on the shoulder. Continue with stocking stitch and 1 edge stitch in garter stitch on each side until the piece measures 30-31-32-33-34-35 cm from the bottom of the armhole. Cast off with knit (make sure the cast-off edge is not tight). The piece measures 54-56-58-60-62-64 cm from the shoulder down. Work the other shoulder in the same way. FRONT PIECE: Cast on 111-120-129-141-153-168 stitches with circular needle size 3.5 mm and DROPS Soft Tweed. Work rib back and forth as follows: 1 edge stitch in garter stitch, A.1 until there are 2 stitches left, work the first stitch in A.1, 1 edge stitch in garter stitch. Continue this rib for 6 cm. Knit 1 row from the right side where you decrease 14-15-16-18-18-21 stitches evenly spaced – read DECREASE TIP-1 = 97-105-113-123-135-147 stitches. Change to circular needle size 4.5 mm. Purl 1 row from the wrong side (edge stitches are knitted). Continue with stocking stitch back and forth with 1 edge stitch in garter stitch on each side until the piece measures 24-25-26-27-28-29 cm. OVERVIEW OF THE NEXT SECTION: You now decrease for the armholes and V-neck at the same time – read the next section before continuing. ARMHOLES: At the beginning of the next 2 rows cast off 5-5-7-7-8-8 stitches for the armholes. Then decrease stitches on each side as follows – remember DECREASE TIP-2. Decrease 2 stitches as shown in A.2 every 4th row 0-0-0-2-4-7 times, then decrease 1 stitch as shown in A.3/A.4 every 4th row 8-10-10-9-8-6 times = 8-10-10-13-16-20 stitches decreased on each side. V-NECK: When the piece measures 31-32-33-34-35-36 cm, cast off the middle stitch on the row and each shoulder is finished separately. Right shoulder: Continue back and forth and decrease for the neck at the beginning of each row from the right side (from the neck) – remember DECREASE TIP-2. Decrease 2 stitches as shown in A.2 every 4th row 4-4-4-4-4-4 times, then decrease 1 stitch as shown in A.3 every 4th row 8-8-9-9-10-10 times = 16-16-17-17-18-18 stitches decreased for the neck. When all the decreases for the neck and armhole are finished there are 19-21-22-24-25-27 stitches on the shoulder. Continue with stocking stitch and 1 edge stitch in garter stitch on each side until the piece measures 30-31-32-33-34-35 cm from the bottom of the armhole. Cast off with knit (make sure the cast-off edge is not tight). The piece measures 54-56-58-60-62-64 cm from the shoulder down. Left shoulder: Continue back and forth and decrease for the neck at the end of each row from the right side (towards the neck) – remember DECREASE TIP-2. Decrease 2 stitches as shown in A.2 every 4th row 4-4-4-4-4-4 times, then decrease 1 stitch as shown in A.4 every 4th row 8-8-9-9-10-10 times = 16-16-17-17-18-18 stitches decreased for the neck. When all the decreases for the neck and armhole are finished there are 19-21-22-24-25-27 stitches on the shoulder. Continue with stocking stitch and 1 edge stitch in garter stitch on each side until the piece measures 30-31-32-33-34-35 cm from the bottom of the armhole. Cast off with knit (make sure the cast-off edge is not tight). The piece measures 54-56-58-60-62-64 cm from the shoulder down. ASSEMBLY: Sew the shoulder seams with grafting stitches. Sew the side seams from the armholes down, inside the 1 edge stitch. NECK: Start from the bottom of the V-neck, use circular needle size 3.5 mm and DROPS Soft Tweed. Knit up from the right side 159 to 192 stitches inside the 1 edge stitch around the neck. The number of stitches should be divisible by 3. Work pattern A.1 back and forth with 1 edge stitch in garter stitch on each side – make sure the pattern starts and finishes with the first stitch in A.1 inside the edge stitches, so the pattern is symmetrical on both sides. Continue back and forth like this for 4 cm. Cast off with knit over knit and purl over purl. Lay the right side of the neck on top of the left side mid-front. Sew the edge stitch neatly to the neck line. Repeat on the inside so the left side is sewn to the right side. SLEEVE EDGES: Start at the side seam under the sleeve with circular needle size 3.5 mm and DROPS Soft Tweed. Knit up from the right side 144 to 168 stitches inside the 1 edge stitch around the armhole. The number of stitches should be divisible by 3. Work A.1 in the round for 3½ to 4 cm. Work 1 more round but in the first 5-5-6-6-7-7 repetitions and the last 6-6-7-7-8-8 repetitions of A.1 under the sleeve, decrease all purl-2 to purl-1 by purling the 2 stitches together. This gives a neater finish to the bottom of the sleeve edge. Cast off with knit over knit and purl over purl. Work the other sleeve edge in the same way. EMBROIDERING: Flowers are embroidered at the bottom of the front piece. Place the flowers in a row approx. 2 cm above the rib and 8.5 – 9 cm between each one. FLOWER – SHORT OVERVIEW OF THE PIECE: The flower measures approx. 4,5 – 5 cm in height and approx. 2,5 cm in width. The flower consists of 2 leaves at the bottom, 1 stem and 1 flower. First embroider the leaves, then make the stem and finish with the flower itself. The hole flower is worked with twisted chain stitches and chain stitches. LEAVES: The leaves are embroidered with 1 strand colour forest green and consist of 2 chain stitches starting from the same hole at the bottom of the flower. Start as follows: STITCH 1: Work 1 chain stitch of approx. 2 cm in length, slightly diagonally up and to the right – see diagram B and diagram explanation. STITCH 2: Work the second chain stitch from the same hole, slightly diagonally up and to the left. The leaves are finished. STEM: The stem is embroidered with 1 strand of colour forest green and consists of 2 twisted chain stitches in height. Start from the same hole as the leaves started from and work 1 twisted chain stitch of approx. 1.5 cm straight up between the 2 leaves - see diagram A and the diagram explanation. Work 1 more stitch in height. The stem is finished. Cut and fasten the strand. FLOWER: Each flower is worked with 2 strands and chain stitch, each with a different colour: powder pink, dark rose, rose, off white and light pink. They consist of 3 chain stitches, all starting from the same hole where the stem finished. Start as follows: STITCH 1: Work a chain stitch of approx. 1.5 cm, slightly diagonally up to the right – see diagram B and diagram explanation. STITCH 2: Work the second chain stitch from the same hole, slightly diagonally up to the left. STITCH 3: Work the third chain stitch from the same hole but straight up between the other 2 stitches. The flower is finished. Cut and fasten the strand. Work as many flowers as you wish, placing them as you feel is best. |
||||||||||||||||||||||
Diagram explanations |
||||||||||||||||||||||
|
||||||||||||||||||||||
 |
||||||||||||||||||||||
 |
||||||||||||||||||||||
 |
||||||||||||||||||||||
Have you finished this pattern?Tag your pictures with #dropspattern #mayflowersvest or submit them to the #dropsfan gallery. Do you need help with this pattern?You'll find 32 tutorial videos, a Comments/Questions area and more by visiting the pattern on garnstudio.com. © 1982-2026 DROPS Design A/S. We reserve all rights. This document, including all its sub-sections, has copyrights. Read more about what you can do with our patterns at the bottom of each pattern on our site. |
||||||||||||||||||||||


With over 40 years in knitting and crochet design, DROPS Design offers one of the most extensive collections of free patterns on the internet - translated to 17 languages. As of today we count 324 catalogues and 12290 patterns translated into English (UK/cm). 12290
We work hard to bring you the best knitting and crochet have to offer, inspiration and advice as well as great quality yarns at incredible prices! Would you like to use our patterns for other than personal use? You can read what you are allowed to do in the Copyright text at the bottom of all our patterns. Happy crafting!
Post a comment to pattern DROPS 222-42
We would love to hear what you have to say about this pattern!
If you want to leave a question, please make sure you select the correct category in the form below, to speed up the answering process. Required fields are marked *.