
Popular categories
Looking for a yarn?


Comments / Questions (69)
![]() Gunhild Andersen wrote:
Gunhild Andersen wrote:
Skal man strikke ret og vrang, som maskerne viser på vrangsiden i mønster 1. Jeg læser opskriften sådan, at det kun er retsiden, der er vist i mønsteret og dermed ingen forklaring til vrang pinden. Ligeledes den opslåede maske, mellem to masker - skal den strikkes drejet r på vrangsiden. Tak for hjælpen.
28.10.2024 - 08:12DROPS Design answered:
Hej Gunhild, du starter nederst i diagrammet, strikker først pind fra retsiden, næste pind i diagrammet fra vrangen osv. Øverst i opskriften kan du klikke på Videoer, her finder du en video til denne opskrift, som viser nøjagtig hvordan du gør :)
29.10.2024 - 09:58
![]() Mary wrote:
Mary wrote:
Thank you. That worked.
21.10.2024 - 00:55
![]() Mary wrote:
Mary wrote:
In the part of diagrams where needle is inserted between 4th and 5th stitch on left needle and yarn pulled through. Should I knit this new loop?
20.10.2024 - 13:08DROPS Design answered:
Dear Mary, this stitch isn't worked; you simply pull the yarn through and then, in the next row, you purl this stitch and the next one together. You can see in the following video how to knit these charts: https://www.garnstudio.com/video.php?id=1472&lang=en. Happy knitting!
20.10.2024 - 20:25
![]() Caroline Ulff Hjorth wrote:
Caroline Ulff Hjorth wrote:
Jag undrar hur jag ska förstå beskrivningen av oket när jag inte vill sticka mönstret. Har stickat halskanten för strl 1-3 mån. Hur och när ska jag lägga ut maskor på varven därefter?
29.08.2024 - 22:10DROPS Design answered:
Hei Caroline. I denne oppskriften er det tatt høyde for økninger tilpasset mønstret. Om det strikkes uten mønster er resultatet usikker da mønstret trekker bærestykket noe sammen. Om du fremdeles ønsker å strikke uten mønster må du gjøre økninger der diagramikonet som går over 4 masker vises (men som skrevet over, usikker på hvordan det vil bli). Design avd har ingen mulighet til å tilpasse oppskriften. mvh DROPS Design
02.09.2024 - 09:33
![]() Jacques wrote:
Jacques wrote:
Bonjour, Je tricote le short en 1-3 mois. Dans l'explication il est mentionné "Quand le pantalon mesure 17cm depuis le rang de montage" doit on prendre la mesure au niveau du milieu devant ou du milieu dos qui comprend la réhausse ? Merci pour votre aide
15.08.2024 - 14:07DROPS Design answered:
Bonjour mme Jacques, mesurez au milieu devant, autrement dit, sans les rangs raccourcis du dos. Bon tricot!
16.08.2024 - 07:44
![]() Linn wrote:
Linn wrote:
Jag får inte maskantalet att stämma från halskant till ok. Jag stickar utifrån strl. 48/52 och fattar inte om de 10 kantmaskorna ska inkluderas i antalet som står på varje storlek eller inte. Hur jag än räknar så stämmer det inte. Det blir inte 24 rapporter á 3 maskor, utan 26-27 om jag inkluderar kanterna och mycket mindre om jag inte inkluderar dem. Hoppas ni förstår min förvirrande fråga. Tack!
03.06.2024 - 21:22DROPS Design answered:
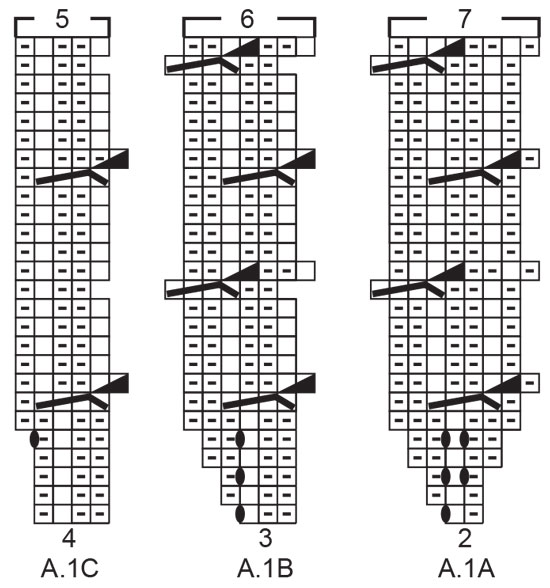
Hej Linn. Du stickar såhär vid oket i storlek 48/52: 5 framkantsmaskor i rätstickning, A.1A (= 2 maskor), A.1B x 24 (= 72 m), A.1C (= 4 maskor) och avsluta med 5 framkantsmaskor i rätstickning. Dvs: 5+2+72+4+5= 88 m. Mvh DROPS Design
04.06.2024 - 07:17
![]() Linn Thörnvall wrote:
Linn Thörnvall wrote:
Jag får inte maskantalet att stämma från halskant till ok. Jag stickar utifrån strl. 48/52 och fattar inte om de 10 kantmaskorna ska inkluderas i antalet som står på varje storlek eller inte. Hur jag än räknar så stämmer det inte. Det blir inte 24 rapporter á 3 maskor, utan 26-27 om jag inkluderar kanterna och mycket mindre om jag inte inkluderar dem. Hoppas ni förstår min förvirrande fråga. Tack!
03.06.2024 - 21:16
![]() Ulrika wrote:
Ulrika wrote:
Hej, Finns det något liknande mönster i större storlekar? Eller går det att justera mönstret?
29.02.2024 - 20:40DROPS Design answered:
Hei Ulrika. For voksne kan du ta en titt på DROPS 179-2. For større barn, nei, men du kan fint justere oppskriften til større barn (design avd. har dessverre ikke mulighet til å regne det ut). mvh DROPS Design
04.03.2024 - 13:37
![]() Valérie Questroy wrote:
Valérie Questroy wrote:
Re, Oui c'est bien au niveau du diagramme Au rang 15 il faut faire la nouvelle m et la suivante à l'envers, ce qui veut dire qu'au rg 16, j'ai 5 endroit. Mais au rg 17, il faut faire 2 envers, 1 endroit ... Donc ma question est est ce qu'au rg 16, je dois faire l'inverse du 15 donc 5 endroit ou préparer le rg 17 en faisant 2 endroit, 1 envers, 2 endroit Merci
20.02.2024 - 16:16DROPS Design answered:
Bonjour Mme Questroy, autant 15, vus tricotez simplement les mailles comme elles se présentent, soit sur l'envers: A.1C - 1 m end, 1 m env, 2 m end, 1 m env, A.1B: 2 m env, 1 m end, 2 m env, 1 m end et A.11: 2 m end, 2 m env, 2 m end, 1 m env, 1 m end. Bon tricot!
21.02.2024 - 08:12
![]() Valérie Questroy wrote:
Valérie Questroy wrote:
Bonjour, Je suis bloqué au rang 16 et ou 17. Au rang 15, Il est dit qu'il faut tricoter ensemble, à l'envers la nouvelle maille et la maille suivante, ce qui veut dire qu'au rang 16, il faut faire 5 points endroit. Ma question est donc; est-ce qu'il faut suivre le rang 15 avec 5 mailles endroit ou suivre le rang 17 et faire 2 point endroits , 1 point envers, 2 points endroit, ...... Merci beaucoup
20.02.2024 - 15:45DROPS Design answered:
Bonjour Mme Questroy, je ne suis pas bien sûre de votre question, le rang 15 se tricote en côtes, mais dans cette vidéo, nous montrons comment tricoter les rangs 7 et 8 + les rangs 13 et 14, peut-être que cela pourra vous aider? C'est probablement la partie du diagramme qui vous pose problème si j'ai bien compris. Sinon n'hésitez pas à revenir, merci pour votre compréhension. Bon tricot!
20.02.2024 - 15:56
|
||||||||||||||||
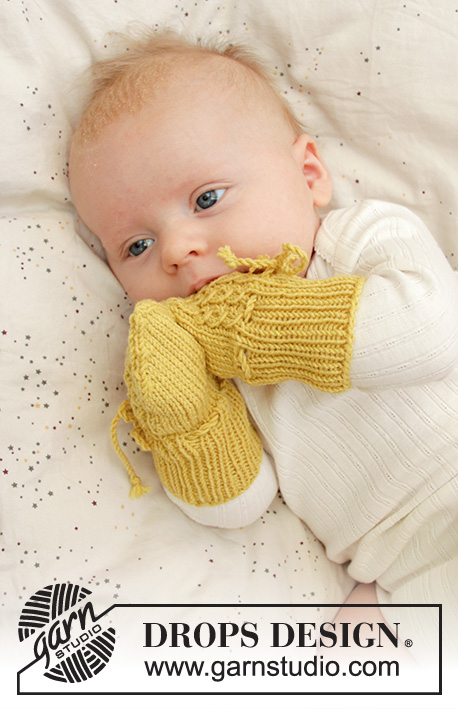
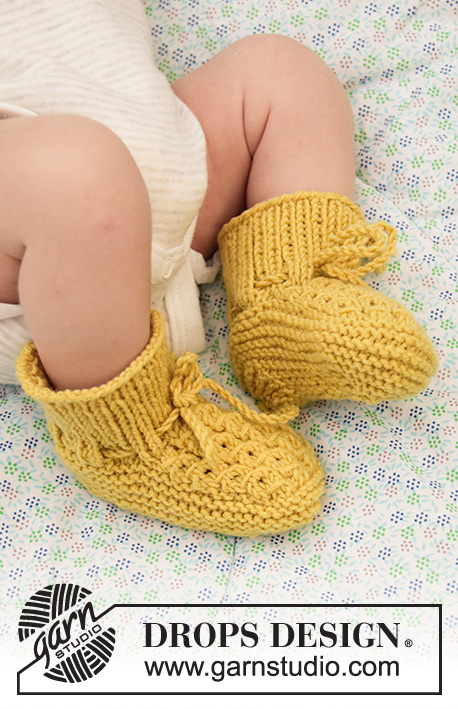
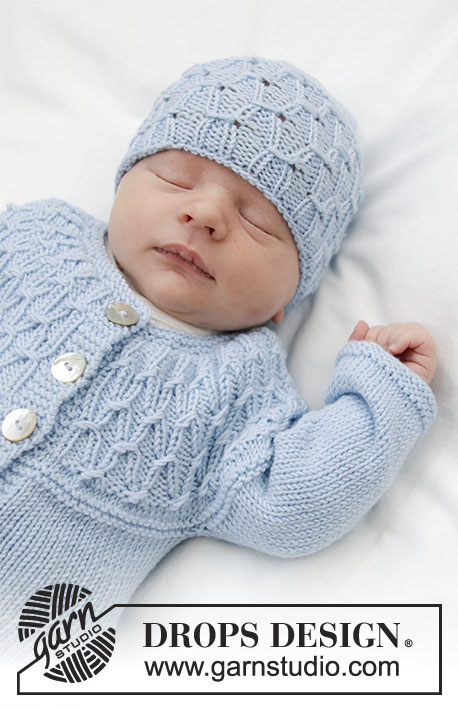
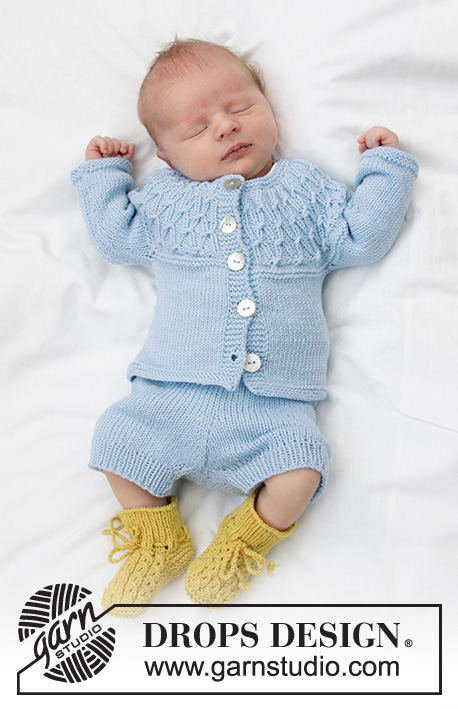
Stroll in the Park#strollintheparkset |
||||||||||||||||
 |
 |
|||||||||||||||
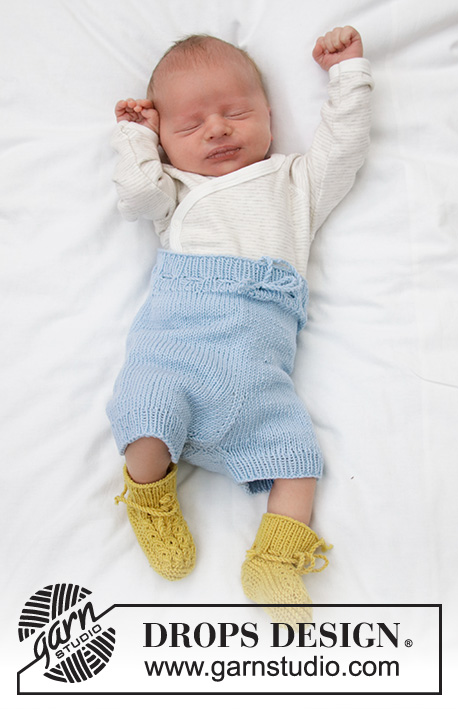
Jacket for baby with round yoke and textured pattern, knitted top down. Shorts for baby with ties and rib. Piece is knitted in DROPS BabyMerino or DROPS Alpaca. Size: Premature to 2 years
DROPS Baby 33-26 |
||||||||||||||||
|
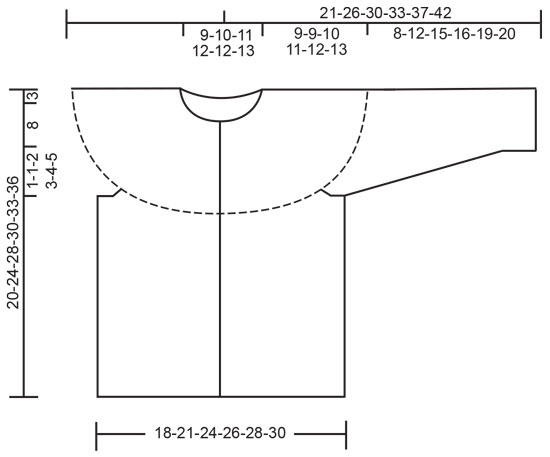
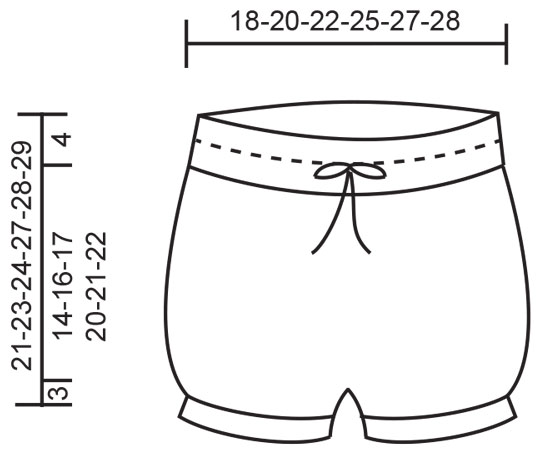
---------------------------------------------------------- EXPLANATION FOR THE PATTERN: ---------------------------------------------------------- INFORMATION FOR PATTERN: GARTER STITCH (back and forth): 1 ridge = knit 2 rows. RIDGE/GARTER STITCH (worked in the round): 1 ridge = 2 rounds. Knit 1 round and purl 1 round. PATTERN: See diagram A.1. Diagrams show all rows in pattern seen from the right side. INCREASE TIP (evenly on jacket): To calculate how to increase evenly, use the total number of stitches on row (e.g. 68 stitches), minus bands (e.g. 10 stitches) and divide the remaining stitches by number of increases to be done (e.g. 11) = 5.2. In this example increase after alternately approx. every 5th stitch by making 1 yarn over. On next row work yarn overs twisted to avoid holes Do not increase over bands. RAGLAN (applies to size 12/18 months - 2 years): Increase for raglan on each side of the 4 marker threads in every transition between body and sleeves (= 8 stitches increased on every increase row). All increases are done from the right side! Work until 1 stitch remains before marker thread, make 1 yarn over, knit 2 (marker thread is in the middle of these 2 stitches), make 1 yarn over (= 2 stitches increased). On next row (wrong side) purl yarn overs twisted to avoid holes. DECREASE TIP (applies to mid under sleeve on jacket and on inside of legs on shorts): Begin 3 stitches before marker and knit 2 together, knit 2 (marker is between these 2 stitches), slip 1 stitch knitwise, knit 1, pass slipped stitch over stitch worked (= 2 stitches decreased). BUTTONHOLES: Decrease for buttonholes on right band (when garment is worn). 1 buttonhole = work from right side until 3 stitches remain on needle, make 1 yarn over, knit 2 together and finish by knitting 1. On next row (wrong side) knit the yarn over to make a hole. Decrease for first buttonhole on first row from right side after neck edge. Then decrease the next 4 buttonholes approx. 5 cm apart. INCREASE TIP (applies mid front and mid back on shorts): Work until 1 stitch remains before marker thread, make 1 yarn over, knit 2 (marker thread is in the middle of these 2 stitches), make 1 yarn over (= 2 stitches increased). On next round knit yarn overs twisted to avoid holes. ---------------------------------------------------------- BEGIN PIECE FOR JACKET HERE: ---------------------------------------------------------- JACKET - SHORT OVERVIEW OF THE PIECE: Work yoke and body back and forth on circular needle from mid front, work top down. Work sleeves in the round on double pointed needles, top down. NECK EDGE: Cast on (68) 72-78-82-84 (86) stitches (including 5 band stitches in each side towards mid front) on circular needle size 2.5 mm with Baby Merino or Alpaca. Work 2 ridges in GARTER STITCH - see explanation above. Knit 1 row from right side while increasing (11) 16-16-18-19 (20) stitches evenly - read INCREASE TIP and decrease for BUTTONHOLES on right band - see explanation above = (79) 88-94-100-103 (106) stitches. Purl 1 row from wrong side (knit bands). Switch to circular needle size 3 mm and work yoke as explained below. YOKE: Work first row as follows from right side: 5 band stitches in garter stitch, A.1A (= 2 stitches), work A.1B until 9 stitches remain on row (= (21) 24-26-28-29 (30) repetitions of 3 stitches), work A.1C (= 4 stitch) and finish with 5 band stitches in garter stitch. Continue pattern like this and increase as shown in diagrams. REMEMBER THE KNITTING TENSION! When A.1 has been worked vertically, there are (148) 166-178-190-196 (202) stitches on row and piece measures approx. 7 cm from cast-on edge. Work 2 rows in stocking stitch with 5 band stitches in garter stitch in each side and increase AT THE SAME TIME (10) 16-20-24-14 (12) stitches evenly on first row = (158) 182-198-214-210 (214 stitches. Work 2 ridges in GARTER STITCH - see explanation above. Then work as explained in the different sizes. PREMATURE, 0/1 MONTHS, 1/3 MONTHS + 6/9 MONTHS: Continue with stocking stitch and 5 band stitches in garter stitch in each side towards mid front until piece measures (9) 9-10-11 cm from cast-on edge mid front. Work next row as follows in stocking stitch with 5 band stitches in garter stitch in each side: Work(25) 28-31-33 stitches (= front piece), slip the next (34) 40-42-46 stitches on 1 stitch holder for sleeve, cast on (4) 4-6-6 new stitches on row (= in the side under sleeve), work (40) 46-52-56 stitches as before (= back piece), slip the next (34) 40-42-46 stitches on 1 stitch holder for sleeve, cast on (4) 4-6-6 new stitches on row (= in the side under sleeve) and work the (25) 28-31-33 stitches (= front piece). Then work body as explained below. NOW MEASURE THE PIECE FROM HERE! 12/18 MONTHS, 2 YEARS: Insert 4 marker threads in piece (without working stitches) as follows: Insert first marker thread after the first 33 (34) stitches (= front piece), insert 2nd marker thread after the next 44 (44) stitches (= sleeve), insert 3rd marker thread after the next 56 (58) stitches (= back piece), and insert 4th marker thread after the next 44-44 stitches (= sleeve). 33 (34) stitches remain on row after last marker thread (= front piece). Continue in stocking stitch back and forth with 5 band stitches in garter stitch in each side towards mid front. When 2 rows have been worked, increase for RAGLAN on next row from right side - see explanation above. Increase like this every 4th row (i.e. every other row from right side) 2 (3) times in total. After last increase for raglan there are 226 (238) stitches on needle. Work until piece measures 12 (13) cm from cast-on edge. Work next row as follows in stocking stitch with 5 band stitches in garter stitch in each side: Work 35 (37) stitches (= front piece), slip the next 48 (50) stitches on 1 stitch holder for sleeve, cast on 8 (8) new stitches on row (= in the side under sleeve), work 60 (64) stitches as before (= back piece), slip the next 48 (50) stitches on 1 stitch holder for sleeve, cast on 8 (8) new stitches on row (= in the side under sleeve) and work the remaining 35 (37) stitches (= front piece). Then work body as explained below. NOW MEASURE THE PIECE FROM HERE! BODY: = (98) 110-126-134-146 (154) stitches. Continue back and forth in stocking stitch with 5 band stitches in garter stitch in each side towards mid front. When piece measures (7) 11-14-15-17 (19) cm from division switch to circular needle size 2.5 mm. Work 3 ridges back and forth over all stitches. Switch back to circular needle size 3 mm. Loosely cast off by knitting from right side. Jacket measures approx. (20) 24-28-30-33 (36) cm from shoulder and down. SLEEVE: Slip the (34) 40-42-46-48 (50) stitches from stitch holder in one side of piece on double pointed needles size 3 mm and pick in addition up 1 stitch in each of the (4) 4-6-6-8 (8) new stitches cast on under sleeve = (38) 44-48-52-56 (58) stitches. Insert 1 marker thread in the middle of the (4) 4-6-6-8 (8) stitches under sleeve and move the marker thread upwards when working. Work in stocking stitch in the round. When piece measures 2 cm from division, decrease 2 stitches mid under sleeve - read DECREASE TIP. Decrease like this every (3) 2-2-1½-1½ (1½) cm (2) 4-6-7-9 (9) times in total = (34) 36-36-38-38 (40) stitches. Work until piece measures (7) 11-14-15-18 (19) cm from division. Switch to double pointed needles size 2.5 mm. Work 3 ridges in GARTER STITCH in the round - see explanation above. Switch back to double pointed needles size 3 mm and loosely cast off by knitting. Sleeve measures approx. (8) 12-15-16-19 (20) cm from division. Work the other sleeve the same way. ASSEMBLY: Sew the buttons on to the left band. ---------------------------------------------------------- BEGIN PIECE FOR SHORTS HERE: ---------------------------------------------------------- SHORTS - SHORT OVERVIEW OF THE PIECE: Worked in the round on circular needles/double pointed needles, top down. Cast on (96) 106-116-132-144 (152) stitches on circular needle size 2.5 mm with Baby Merino or Alpaca. Knit 1 round. Then work rib in the round = knit 1/ purl 1. When rib measures 2½ cm, work a round with eyelet holes for tie as follows: * Knit 1, purl 1, make 1 yarn over, purl 2 together *, work from *-* the entire round (= (24) 26-29-33-36 (38) holes on round). Then continue rib = knit 1/purl 1 until piece measures 4 cm from cast-on edge. Switch to circular needle size 3 mm, knit 1 round while decreasing (10) 10-10-12-14 (18) stitches evenly - read DECREASE TIP-1 = (86) 96-106-120-130 (134) stitches. Now work an elevation at the back of shorts as explained below. ELEVATION AT THE BACK: To get a better fit work the shorts higher at the back than at the front. This is done by working short rows back and forth as follows: Insert 1 marker at beginning of round = mid back. Work from right side and knit 8 past marker, turn, tighten yarn and purl 16 stitches back. Turn, tighten yarn and knit 24, turn, tighten yarn and purl 32. Turn, tighten yarn and knit 40, turn, tighten yarn and purl 48. Turn piece, tighten yarn and knit until mid back. SHORTS: Continue in the round in stocking stitch over all stitches. REMEMBER THE KNITTING TENSION! When shorts measures (14) 16-17-20-21 (22) cm from cast-on edge, insert 1 marker thread mid front and 1 marker thread mid back. On next round increase 1 stitch on each side of both marker threads – read INCREASE TIP (= 4 stitches increased). Increase like this every other round 6 times in total = (110) 120-130-144-154 (158) stitches. Now divide for legs at both marker threads. Slip half the stitches on a stitch holder or extra needle and work leg over the remaining stitches as explained below. The piece measures (18) 20-21-24-25 (26) cm from cast-on edge mid front. NOW MEASURE THE PIECE FROM HERE! LEG: = (55) 60-65-72-77 (79) stitches. Distribute the stitches on double pointed needles size 3 mm and work in stocking stitch in the round. AT THE SAME TIME after 1 round, decrease 2 stitches on inside of leg - read DECREASE TIP. Decrease like this every other round (2) 2-2-2-3 (3) times in total = (51) 56-61-68-71 (73) stitches. Switch to double pointed needles size 2.5 mm. Knit 1 round while increasing (5) 6-7-8-9 (9) stitches evenly = (56) 62-68-76-80 (82) stitches. Work rib in the round = knit 1/purl 1 for 2 cm. Loosely cast off stitches with knit over knit and purl over purl. Work the other leg the same way. TWINED STRING FOR TIE: Cut 2 lengths of 3 metres each. Twine the strands tog until they resist, fold the string double so that it twines again. Make a knot at each end. Thread tie up and down in row with eyelet holes on shorts, make a bow mid front. |
||||||||||||||||
Diagram explanations |
||||||||||||||||
|
||||||||||||||||
 |
||||||||||||||||
 |
||||||||||||||||
 |
||||||||||||||||
Have you finished this pattern?Tag your pictures with #dropspattern #strollintheparkset or submit them to the #dropsfan gallery. Do you need help with this pattern?You'll find 35 tutorial videos, a Comments/Questions area and more by visiting the pattern on garnstudio.com. © 1982-2026 DROPS Design A/S. We reserve all rights. This document, including all its sub-sections, has copyrights. Read more about what you can do with our patterns at the bottom of each pattern on our site. |
||||||||||||||||


With over 40 years in knitting and crochet design, DROPS Design offers one of the most extensive collections of free patterns on the internet - translated to 17 languages. As of today we count 324 catalogues and 12290 patterns translated into English (UK/cm). 12290
We work hard to bring you the best knitting and crochet have to offer, inspiration and advice as well as great quality yarns at incredible prices! Would you like to use our patterns for other than personal use? You can read what you are allowed to do in the Copyright text at the bottom of all our patterns. Happy crafting!
Post a comment to pattern DROPS Baby 33-26
We would love to hear what you have to say about this pattern!
If you want to leave a question, please make sure you select the correct category in the form below, to speed up the answering process. Required fields are marked *.