
Popular categories
Looking for a yarn?


Comments / Questions (24)
![]() Sara wrote:
Sara wrote:
Buongiorno, ho lavorato il diagramma considerando tutte le maglie al diritto ,quando facevo il rovescio riportavo le maglie in modo speculare questo mi ha allungato notevolmente il lavoro. credo di avere sbagliato ,nel completare il maglione userò più filato. suggerimenti per favore!
23.10.2025 - 07:08
![]() Dóra wrote:
Dóra wrote:
How do I make a Red Nose Jumper woman size suitable for a men?
09.10.2025 - 12:06DROPS Design answered:
Hi Dora,the biggest difference will be the length of sleeves and body. Start working on the women size that you think would fit across the chest. The additional length will be worked right before you cast off for the armhole/sleeve cap. If the pattern is worked top-down you can add the length right after the armhole or before the first decrease on sleeve. Regarding additional yarn amount, this will depend on how much length you add, but it is better with a skein too many than too few. Happy knitting!
31.10.2025 - 12:00
![]() Sara wrote:
Sara wrote:
Buongiorno questo maglione è adatto anche per uomo?
13.09.2025 - 15:00DROPS Design answered:
Buongiorno, questo modello è stato progettato per donne, ma a questo link può trovare tanti altri modelli natalizi tra cui scegliere. Buon lavoro!
14.09.2025 - 09:23
![]() Frances wrote:
Frances wrote:
How do I make woman size suitable for a child
09.09.2025 - 17:05DROPS Design answered:
Hi Frances, Her is a link to the children's jumper: https://www.garnstudio.com/pattern.php?id=8904&cid=19 Regards, Drops team.
12.09.2025 - 11:10
![]() Frances wrote:
Frances wrote:
This pattern appears to be for a woman I want this pattern in child sizes. I have down loaded Pattern No. ne-026-bn for children but prefer this one with the raglan sleeve. Also I note comparing patterns that the woman's sizes appear to have less stitches than the child's pattern I mentioned above which is confusing me. If I go ahead & use this pattern can you tell me the finish size of the small
09.09.2025 - 00:45DROPS Design answered:
Hi, Frances, you can find the measurements for this garment in the diagram below the pattern. Happy knitting!
23.10.2025 - 12:47
![]() Eva Albinsson wrote:
Eva Albinsson wrote:
Hej! Förstår inte instruktionen för ögonen på renen. Krävs nog en film på momentet. Mvh Eva
11.12.2024 - 22:58DROPS Design answered:
Hej Eva, det har vi, klik på Videoer øverst i mønsteret og vælg den første video :)
12.12.2024 - 14:47
![]() Karin Neumann wrote:
Karin Neumann wrote:
Auf dem Bild sieht die Schnauze aus, als wäre diese glatt links gestrickt, in der Beschreibung bzw. Strickschrift ist jedoch kein Hinweis
31.10.2024 - 21:21DROPS Design answered:
Liebe Frau Neumann, die Schnauze wurde glatt rechts gestrickt - siehe unser DROPS-Along. Viel Spaß beim Stricken!
01.11.2024 - 08:32
![]() Laura wrote:
Laura wrote:
Når du sier «øk på hver annen pinne» betyr det at man strikker vrang = 1 pinne så øker man maske = 2 pinne på rett siden. Dvs at man øker på hver rett pinne? Takk
24.10.2024 - 07:30DROPS Design answered:
Hej Laura, ja hvis du strikker frem og tilbage på pinden, så bliver hver 2.pind til hver pind fra retsiden (eller vrangen hvis du starter med at øke på den) :)
24.10.2024 - 08:40
![]() Gudrun wrote:
Gudrun wrote:
Ich möchte zwei Pullover stricken, einen in M und einen in L. Benötige ich dann genau die Mengenangaben wie in der Anleitung oder genügen in den Beigetönen, dem Braun und dem Ocker ggfs. gesamt 50 g?
27.07.2024 - 19:46
![]() Gudrun wrote:
Gudrun wrote:
Ich möchte zwei Pullover stricken, einen in M und einen in L. Benötige ich dann genau die Mengenangaben wie in der Anleitung oder genügen in den Beigetönen, dem Braun und dem Ocker ggfs. gesamt 50 g?
27.07.2024 - 19:40DROPS Design answered:
Liebe Gudrun, am besten kalkulieren Sie die genaue Garnmenge beide Größe zusammen, so sind Sie sicher, Sie haben genügend Garn - sonnst kann Ihnen auch gerne Ihr DROPS Händler damit weiterhelfen. Viel Spaß beim Stricken!
29.07.2024 - 11:40
|
|||||||||||||||||||
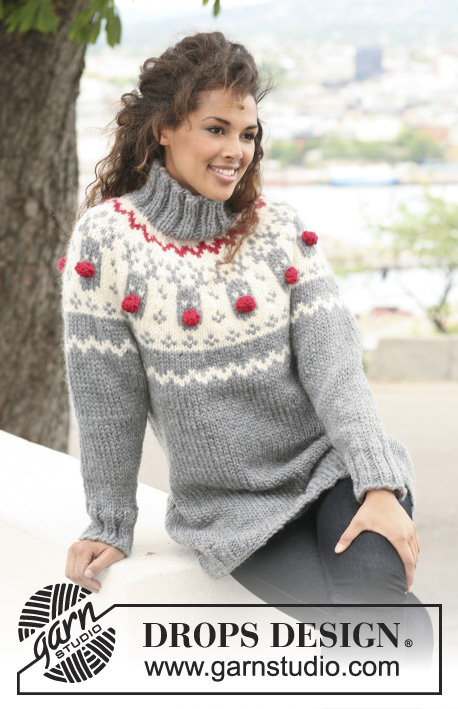
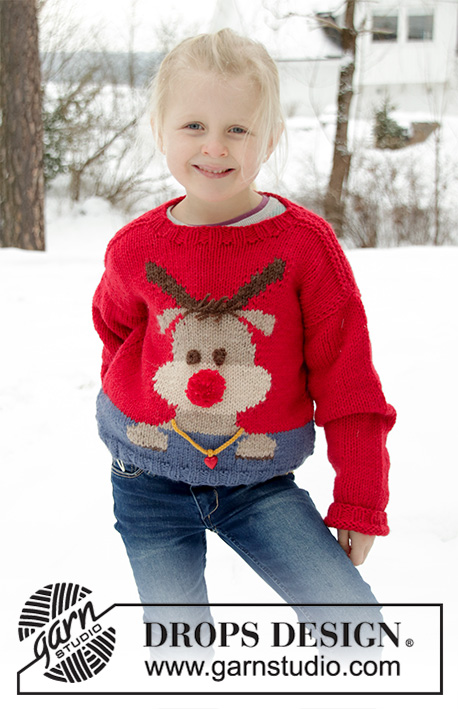
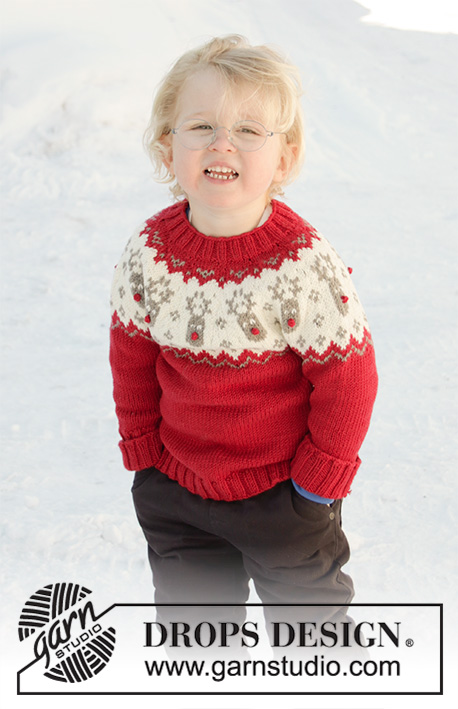
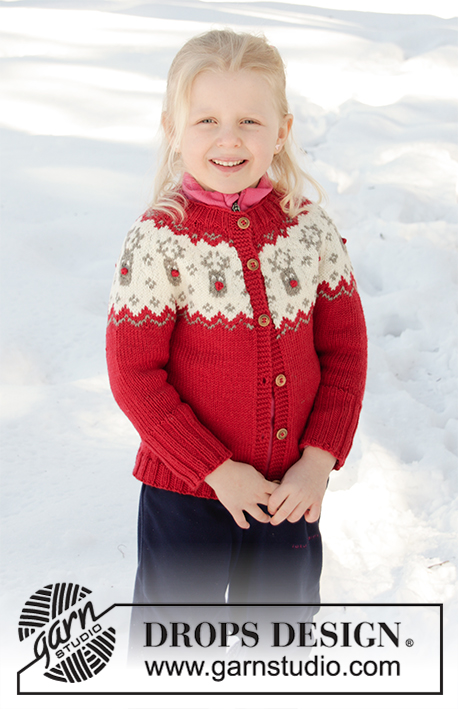
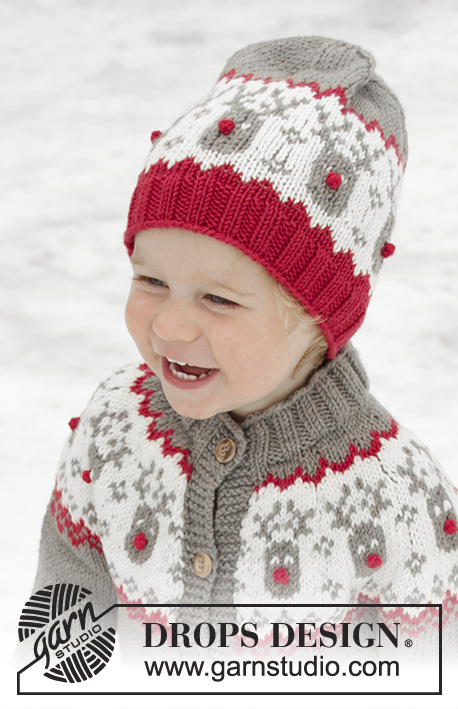
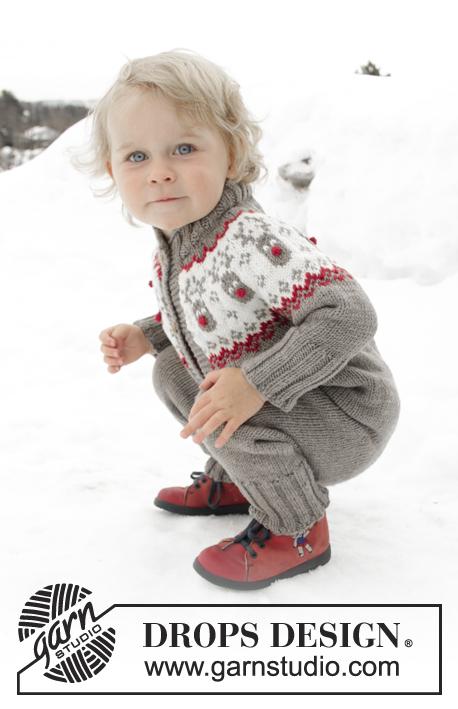
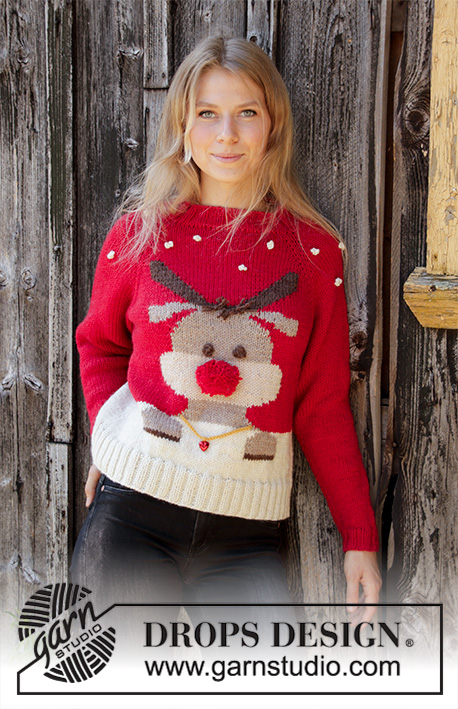
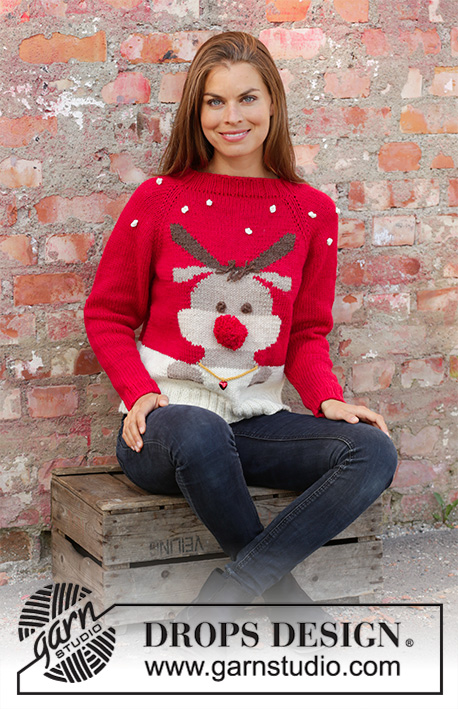
Red Nose Jumper#rednosejumper |
|||||||||||||||||||
 |
 |
||||||||||||||||||
Knitted Christmas jumper in DROPS Nepal. The piece is worked top down with raglan and reindeer motif. Sizes S - XXXL. Theme: Christmas.
DROPS 194-38 |
|||||||||||||||||||
|
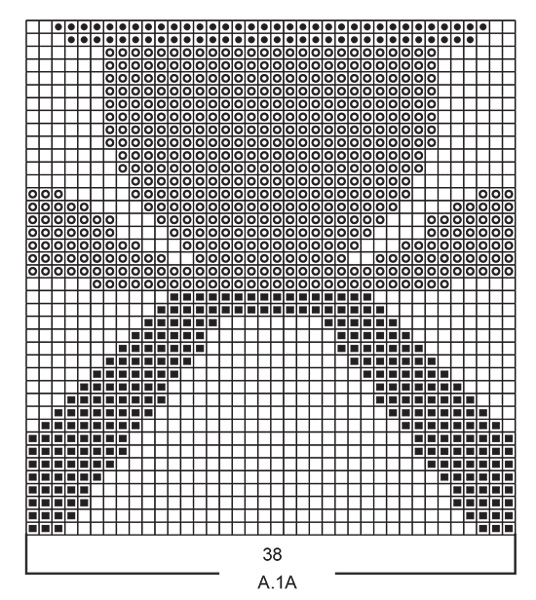
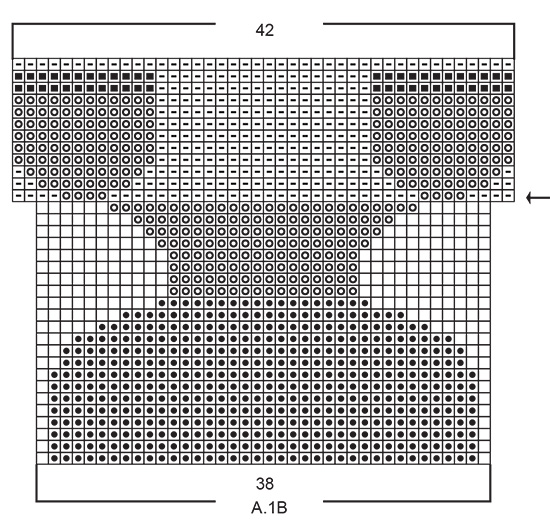
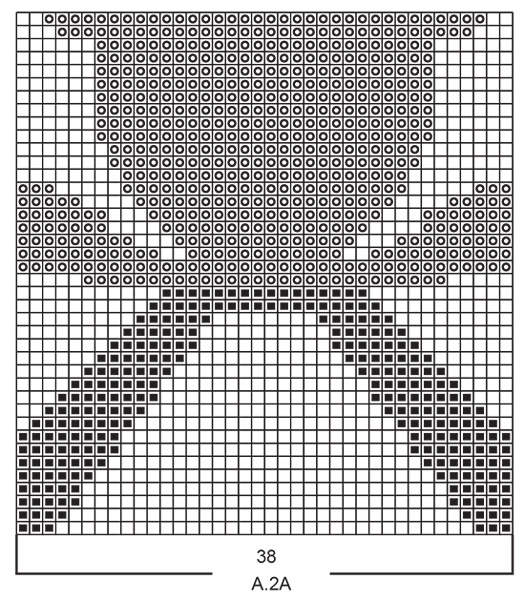
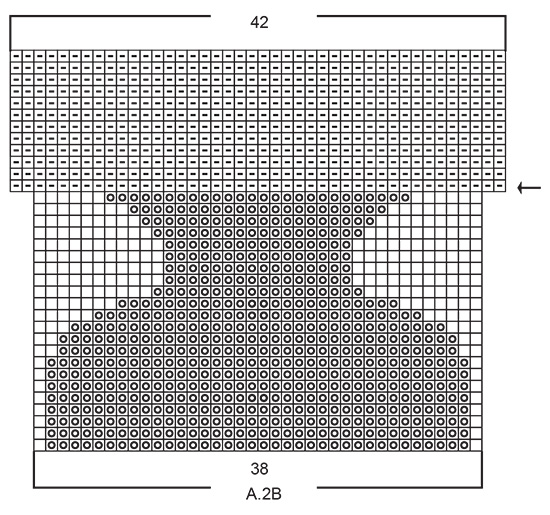
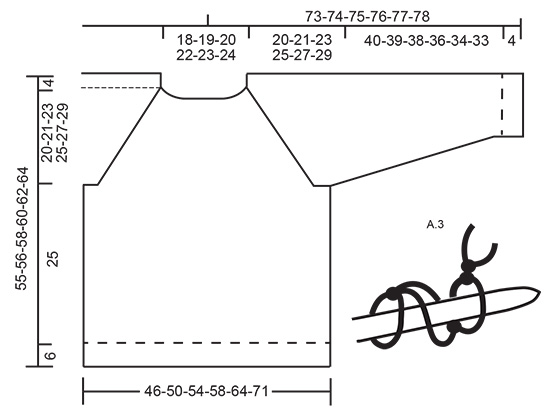
EXPLANATIONS FOR THE PATTERN: ------------------------------------------------------- RIDGE/GARTER STITCH (worked back and forth): 1 ridge = Knit 2 rows. PATTERN: See diagrams A.1 to A.3. Diagram A.3 shows a knot (= eyes and snowflakes). Diagrams A.1 and A.2 (reindeer): The whole diagram is worked in stocking stitch. Work with 3/5 balls so you avoid long strands on the wrong side. In other words, work with 1 ball red/off white on each side of the jumper and 1 ball of the pattern colour in the middle. NOTE: To avoid holes when changing colours, twist the strands together. INCREASE TIP (for raglan): All increases are worked from the right side! Work 1 edge stitch in garter stitch, knit 1, 1 yarn over, work until there are 2 stitches left, 1 yarn over, knit 1, 1 edge stitch in garter stitch. On the next row, purl the yarn overs twisted to avoid holes. Then work the new stitches in stocking stitch. DECREASE TIP (for sleeves): All decreases are worked from the right side! Decrease as follows after the 1 edge stitch: Slip 1 stitch as if to knit, knit 1 and pass the slipped stitch over the knitted stitch. Decrease as follows before the 1 edge stitch: Start 2 stitches before the edge stitch and knit 2 together. ------------------------------------------------------- START THE PIECE HERE: ------------------------------------------------------- JUMPER - SHORT OVERVIEW OF THE PIECE: The piece is worked back and forth with circular needle, top down. Front and back pieces (with or without a reindeer on the back piece) and the sleeves are worked separately, back and forth. This makes working the pattern easier. Then the pieces are sewn together, stitch for stitch along the raglan-increases and sides. The neck is worked in the round and the jumper is decorated with nose, eyes, hair, snowflakes and necklace to finish. FRONT PIECE: Cast on 28-30-32-34-36-38 stitches (including 1 edge stitch in garter stitch on each side) with circular needle size 5.5 mm and red. Purl 1 row from the wrong side. Then work stocking stitch with 1 edge stitch in GARTER STITCH - read description above, on each side. At the same time, on the first row from the right side increase 1 stitch on each side for raglan - read INCREASE TIP. Increase like this every 2nd row a total of 20-21-23-25-27-29 times = 68-72-78-84-90-96 stitches. REMEMBER THE KNITTING TENSION! AT THE SAME TIME when you have increased 7-7-8-9-10-10 times on each side and there are 42-44-48-52-56-58 stitches on the needle, work pattern as follows: 1 edge stitch in garter stitch, knit 1, 1 yarn over (= increase), knit 0-1-3-5-7-8, work A.1A (= 38 stitches) - read PATTERN above, knit 0-1-3-5-7-8 stitches, 1 yarn over (= increase), knit 1 and 1 edge stitch in garter stitch = 44-46-50-54-58-60 stitches. When all the increases to raglan are finished, the piece measures approx. 20-21-23-25-27-29 cm. At the end of the next 2 rows cast on 4-5-5-5-7-9 stitches for the armhole on each side of the piece = 76-82-88-94-104-114 stitches. THE PIECE IS NOW MEASURED FROM HERE! Continue with stocking stitch, pattern and 1 edge stitch in garter stitch on each side. When A.1A has been completed, work A.1B over A.1A. On the row with an arrow in A.1B change the background colour to off white instead of red and the pattern will now be worked over 42 stitches. When A.1B has been completed in height continue with off white, stocking stitch and 1 edge stitch in garter stitch on each side until the piece measures 25-25-25-25-25-25 cm. Now increase 16-18-20-22-24-26 stitches evenly on row = 92-100-108-116-128-140 stitches. Change to circular needle size 4.5 mm and work rib as follows from the right side: 1 edge stitch in garter stitch, (knit 2, purl 2) until there are 3 stitches left on the row, knit 2 and 1 edge stitch in garter stitch. Continue like this until the rib measures 6 cm. Cast off with knit over knit and purl over purl. The front piece measures 51-52-54-56-58-60 cm from the neck down. Cut and fasten the strand. BACK PIECE – WITH REINDEER: Cast on and work in the same way as the front piece, but work pattern A.2A instead of A.1A and pattern A.2B instead of A.1B. When A.2B has been completed in height, continue with off white, stocking stitch and 1 edge stitch in garter stitch on each side until the piece measures 25-25-25-25-25-25 cm – adjust to match the front piece. Now increase 16-18-20-22-24-26 stitches evenly on row = 92-100-108-116-128-140 stitches. Change to circular needle size 4.5 mm and work rib as follows from the right side: 1 edge stitch in garter stitch, (purl 2, knit 2) until there are 3 stitches left on the row, purl 2 and 1 edge stitch in garter stitch. Continue like this until the rib measures 6 cm. Cast off with knit over knit and purl over purl. The back piece measures 51-52-54-56-58-60 cm from the neck down. Cut and fasten the strand. BACK PIECE - WITHOUT REINDEER: Cast on 28-30-32-34-36-38 stitches (including 1 edge stitch in garter stitch on each side) with circular needle size 5.5 mm and red. Purl 1 row from the wrong side. Then work stocking stitch with 1 edge stitch in garter stitch on each side. At the same time on the first row from the right side increase 1 stitch on each side to raglan - remember INCREASE TIP. Increase like this every 2nd row a total of 20-21-23-25-27-29 times = 68-72-78-84-90-96 stitches. When all the increases to raglan are finished, the piece measures approx. 20-21-23-25-27-29 cm. At the end of the next 2 rows cast on 4-5-5-5-7-9 stitches for the armhole on each side of the piece = 76-82-88-94-104-114 stitches. THE PIECE IS NOW MEASURED FROM HERE! Continue with stocking stitch and 1 edge stitch in garter stitch on each side. When the piece measures 18-17-16-15-14-12 cm – adjust to after the change in background colour on the front piece, continue with off white to finished length. When the piece measures 25-25-25-25-25-25 cm – adjust to match the front piece, increase 16-18-20-22-24-26 stitches evenly on row = 92-100-108-116-128-140 stitches. Change to circular needle size 4.5 mm and work rib as follows from the right side: 1 edge stitch in garter stitch, (knit 2, purl 2) until there are 3 stitches left on the row, knit 2 and 1 edge stitch in garter stitch. Continue like this until the rib measures 6 cm. Cast off with knit over knit and purl over purl. The back piece measures 51-52-54-56-58-60 cm from the neck down. Cut and fasten the strand. SLEEVE: Cast on 14 stitches (including 1 edge stitch on each side) with circular needle size 5.5 mm and red. Purl 1 row from the wrong side. Then work stocking stitch with 1 edge stitch in garter stitch on each side. AT THE SAME TIME on the first row from the right side increase 1 stitch on each side - remember INCREASE TIP. Increase like this every 2nd row a total of 19-21-23-24-24-25 times = 52-56-60-62-62-64 stitches. Continue working with stocking stitch until the sleeve measures 20-21-23-25-27-29 cm. Now cast on 4-5-5-5-7-9 new stitches for the armhole at the end of the next 2 rows = 60-66-70-72-76-82 stitches. THE PIECE IS NOW MEASURED FROM HERE! Continue with stocking stitch and 1 edge stitch in garter stitch on each side. When the piece measures 4 cm decrease 1 stitch on each side - read DECREASE TIP. Decrease like this every 2-2-2-1-1-1 cm 4-13-15-7-12-14 times and then every 3-3-3-2-2-2 cm 9-2-1-10-6-6 times = 34-36-38-38-40-42 stitches. Continue working until the sleeve measures 40-39-38-36-34-33 cm. Now increase 4-6-4-4-6-8 stitches evenly on row = 38-42-42-42-46-50 stitches. Change to circular needle size 4.5 mm and work rib as follows from the right side: 1 edge stitch in garter stitch, (knit 2, purl 2) until there is 1 stitch left on the row, 1 edge stitch in garter stitch. Continue like this until the rib measures 4 cm. Cast off with knit over knit and purl over purl for 4 cm - make sure that the cast-off edge is not tight. Work the other sleeve in the same way. ASSEMBLY: Sew the sleeves to the front and back pieces - sew inside the 1 edge stitch in garter stitch. NOTE! Make sure that the seam is not tight! Sew the sleeve and side seams in one go, inside the 1 edge stitch. Sew together the hole under the sleeve. NECK: Knit up from the right side 1 stitch in each stitch (but not in the edge stitches on the sides of the pieces) with short circular needle size 4.5 mm and red = 76-80-84-88-92-96 stitches. Knit 1 round where you increase 4 stitches evenly on round = 80-84-88-92-96-100 stitches. Work rib (knit 2, purl 2) for 4 cm. Cast off with knit over knit and purl over purl - make sure that the cast-off edge is not tight. NOSE: Make a pom pom with red of approx.7 cm in diameter. Shape the pom pom into an oval, so that it is approx. 7 cm one way and approx. 5 cm the other way; remember to leave 2 strands to fasten the pom pom with. Place the pom pom on the front of the reindeer’s head, just above the middle of the light beige section – see photo. Thread the strand ends through the garment on each side of one stitch and tie together on the wrong side. EYES: Make 2 eyes with medium brown as follows: 1 eye: Cut 3 strands of approx. 40 cm. Make 4 knots around a needle size 5 mm - see diagram A.3 (i.e. make 3 LOOSE knots, then 1 more knot and tighten the strand on this knot = 1 knot). Make 1 more eye. Place the eyes on the front of the reindeer’s head, just above the light beige section - see photo. Thread the strand ends through the garment on each side of one stitch and tie together on the wrong side. HAIR: Fasten 4 fringes for hair both on the on front and back of head. 1 fringe = cut 2 strands medium brown of approx. 8-9 cm. Lay the 2 strands together, thread them around one stitch at the top of the head, between the beige on the head and the medium brown on the antlers - middle of the head itself. Tie a double knot. Fasten the other fringes in the same way – see photo. NECKLACE IN FRONT: Work a row of chain stitches of approx. 18-19 cm with hook size 4 mm and goldenrod. Thread a red heart or something similar onto the row of chain stitches and tie a knot so that it stays in the middle of the row. Place the necklace across the reindeer’s neck on the front piece. Fasten the strand ends on the wrong side of the garment. NECKLACE AT BACK: Work a row of chain stitches of approx. 15 cm with hook size 4mm and goldenrod. Place the necklace across the reindeer’s neck on the back piece. Fasten the strand ends on the wrong side of the garment. SNOW: Make approx. 16 knots with off-white for the snow. 1 knot: Cut 1 strand of approx. 40 cm. Make 4 knots around needle size 5.5 mm - see A.3 (i.e. make 3 LOOSE knots, make 1 more knot and tighten the strand on this knot = 1 knot). Place the snowflakes on the top section of the yoke, i.e. 4 snowflakes on the front piece, 5 snowflakes on the back piece, 4 snowflakes on the left sleeve and 3 snowflakes on the right sleeve. Thread the strand ends through the garment on each side of one stitch and tie together on the wrong side. |
|||||||||||||||||||
Diagram explanations |
|||||||||||||||||||
|
|||||||||||||||||||
 |
|||||||||||||||||||
 |
|||||||||||||||||||
 |
|||||||||||||||||||
 |
|||||||||||||||||||
 |
|||||||||||||||||||
Have you finished this pattern?Tag your pictures with #dropspattern #rednosejumper or submit them to the #dropsfan gallery. Do you need help with this pattern?You'll find 30 tutorial videos, a Comments/Questions area and more by visiting the pattern on garnstudio.com. © 1982-2026 DROPS Design A/S. We reserve all rights. This document, including all its sub-sections, has copyrights. Read more about what you can do with our patterns at the bottom of each pattern on our site. |
|||||||||||||||||||


With over 40 years in knitting and crochet design, DROPS Design offers one of the most extensive collections of free patterns on the internet - translated to 17 languages. As of today we count 324 catalogues and 12290 patterns translated into English (UK/cm). 12290
We work hard to bring you the best knitting and crochet have to offer, inspiration and advice as well as great quality yarns at incredible prices! Would you like to use our patterns for other than personal use? You can read what you are allowed to do in the Copyright text at the bottom of all our patterns. Happy crafting!
Post a comment to pattern DROPS 194-38
We would love to hear what you have to say about this pattern!
If you want to leave a question, please make sure you select the correct category in the form below, to speed up the answering process. Required fields are marked *.