
Popular categories
Looking for a yarn?


Comments / Questions (72)
![]() Bertorello wrote:
Bertorello wrote:
Bonjour, Merci pour l explication. Je fais le modèle 9/ 10 ans . Au premier rang du raglan Est ce normal que pour le devant j ai 31 mailles et pour le dos j ai 27 mailles. Le devant est donc plus large ? Merci
15.11.2025 - 23:31DROPS Design answered:
Bonjour Mme Bertorello, le devant aura la même largeur que le dos, mais pour justement conserver cette largeur lorsque l'on tricote le point de vagues, on va augmenter 4 mailles au tout premier rang de A.1 = on a ainsi 4 m en plus pour le devant et il a ainsi la même largeur que le dos (il faut plus de mailles au point de vagues qu'en jersey pour la même largeur, raison pour laquelle on doit augmenter). Bon tricot!
17.11.2025 - 08:05
![]() Bertorello wrote:
Bertorello wrote:
Bonjour, je fais le modèle 9/10ans . Je suis au niveau du raglan . Tous les 2 tours en doit faire des augmentations. Comment doit en faire avec le motif et le point de riz des manches. Merci
10.11.2025 - 20:36DROPS Design answered:
Bonjour Mme Bertorello, incorporez les nouvelles mailles au point de riz, si la maille suivante doit être tricotée à l'endroit, tricotez l'augmentation à l'envers, si elle doit être tricotée à l'envers, tricotez l'augmentation à l'endroit. Et si la maille précédente a été tricotée à l'endroit, tricotez l'augmentation à l'envers, et si elle a été tricotée à l'envers, tricotez l'augmentation à l'endroit. Bon tricot!
11.11.2025 - 16:20
![]() Bertorello wrote:
Bertorello wrote:
Bonjour, Je n ai pas d aiguilles doubles pointes peut on les remplacer. Prendre que des aiguilles circulaires ? Merci
05.11.2025 - 16:32DROPS Design answered:
Bonjour Mme Bertorello, tout à fait, vous pouvez utiliser une aiguille circulaire et la technique dite du magic loop, ici - en vidéo. Bon tricot!
06.11.2025 - 09:08
![]() Bertorello wrote:
Bertorello wrote:
Bonjour, Je n ai pas d aiguilles doubles pointes peut on les remplacer. Prendre que des aiguilles circulaires ? Merci
03.11.2025 - 16:33DROPS Design answered:
Bonjour Mme Bertorello, tout à fait, vous pouvez tricoter en magic loop avec une aiguille circulaire, retrouvez la technique en vidéo ici, il vous suffira juste de diviser les mailles des manches en 2 parties (dans la vidéo, on montre comment commencer un ouvrage avec cette technique). Bon tricot!
03.11.2025 - 16:54
![]() Coco wrote:
Coco wrote:
Est-ce que ce pull se tricote de haut en bas?
09.10.2025 - 20:49DROPS Design answered:
Bonjour Coco, tout à fait, on le tricote de haut en bas. Bon tricot!
10.10.2025 - 08:12
![]() Coco wrote:
Coco wrote:
Si on n’a pas des aiguilles circulaires, peut on utiliser des aiguilles normales?
09.10.2025 - 20:47DROPS Design answered:
Bonjour Coco, c'est possible, retrouvez quelques astuces pour les ajustements ici, mais pour ce type de modèles, il peut être plus simple de le tricoter en rond. Bon tricot!
10.10.2025 - 08:12
![]() Valerie wrote:
Valerie wrote:
Bonjour, j'ai un souci pour tricoter le motif A2 après avoir tricoté 1 jeté suivi des 5 mailles ensemble torse j'ai un grand trou au tour suivant. est ce normal ?
13.05.2025 - 17:27DROPS Design answered:
Bonjour Valérie, les trous formés par les jetés du rang précédent doivent avoir tous la même taille, pensez à ne pas trop lâcher la tension; dans cette vidéo, nous montrons une autre variante du point de vagues, avec 4 m ensemble à l'endroit/torse à l'endroit (et donc 6 jetés au lieu de 8 ici), mais cette vidéo pourra peut-être quand même vous aider à visualiser comment tricoter ce point. Bon tricot!
13.05.2025 - 21:13
![]() Andrea Gillespie wrote:
Andrea Gillespie wrote:
I am knitting the second size - size 3/4 the instructions say after all raglan increases there will be 176 stitches on the needle. By my calculation there will be 172 sticthes on the needle cast on 54 increase by 6 = 60 increase by 8 stitches each round in raglan increase x 14 total 8x14 =112 60 + 112 = 172 not 176 as pattern states after last increase to raglan am I doing something wrong?
09.04.2025 - 15:39DROPS Design answered:
Dear Mrs Gillespie, you increase a total of 14 times 8 sts for the raglan = 112 sts increased in total; and you increase 4 sts on first row in A.1. You started with 60 sts + 4 sts + 112 sts= 176 sts in total - you might have forgotten the 4 sts increased in A.1 that are not written in the pattern but only shown in diagram. Happy knitting!
09.04.2025 - 16:16
![]() Danypop wrote:
Danypop wrote:
Bonsoir,nEffectivement, je pense qu’il s’agit de ces 4 mailles merci beaucoup. \\\\\\r\\nJe vais détricoter et recommencer.\\r\\nPensez vous que je peux réutiliser la laine détricotée , c’est la 1ére fois que j’utilise la laine drops air. J’espère avoir assez de laine…Merci encore pour votre aide très rapide ; bonne soirée à vous. Danypop
13.11.2024 - 19:24DROPS Design answered:
Bonjour Danypop, vous pouvez tout à fait réutiliser la laine détricoter, pensez juste bien à toujours respecter la même tension pour éviter toute différence sur la partie détricotée/retricotée et le reste de l'ouvrage. Votre magasin aura sans doute une astuce pour vous qu'il partagera volontiers même par mail ou téléphone. Bon tricot!
14.11.2024 - 09:47
![]() Danypop wrote:
Danypop wrote:
Bonjour, Pull pour ma petit fille taille 9/10 ans J’ai un problème avec les augmentations de l’empiécement : Au départ j’ai 64 mailles Après augmentations après les côtes j’ai 72 mailles Puis 17 fois 8 augmentations =136 +72 = 208 mailles au lieu de 212 comme vous l’indiquez. Je suis un peu perdue et ne sais où est mon erreur. Pourriez vous s’il vous plaît, m’aider. Merci beaucoup par avance. Danypop
13.11.2024 - 14:06DROPS Design answered:
Bonjour Mme Danypop, avez-vous bien augmenté aussi dans A.1? Au tout premier tour de A.1, on doit augmenter 4 mailes, ce pourrait-il qu'il s'agisse des 4 mailles qui vous manque dans votre calcul?
13.11.2024 - 17:16
|
|||||||||||||||||||
Clover#cloversweater |
|||||||||||||||||||
 |
 |
||||||||||||||||||
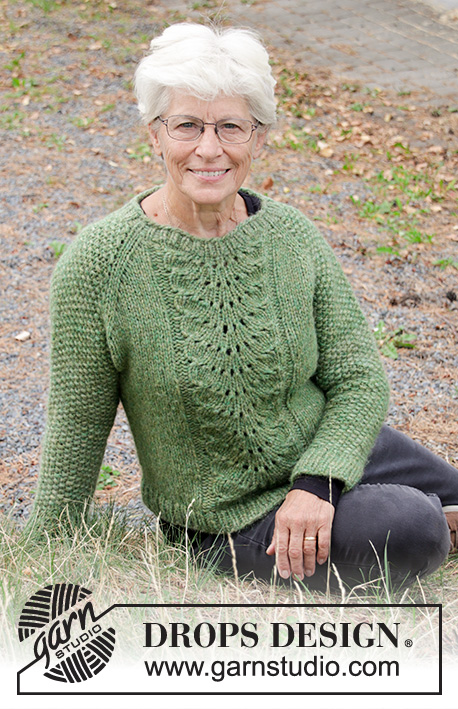
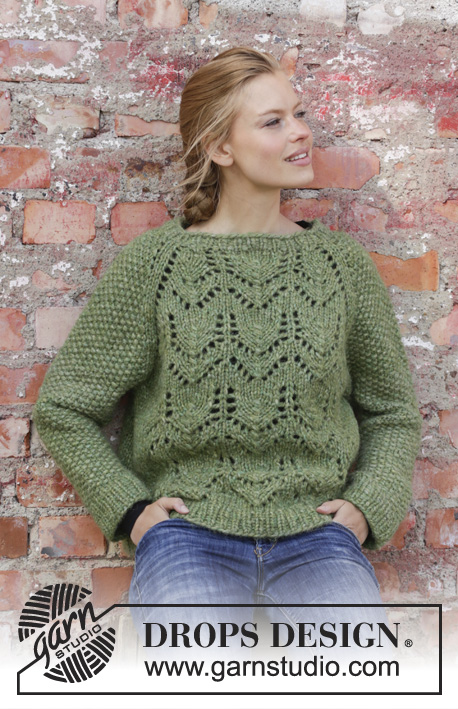
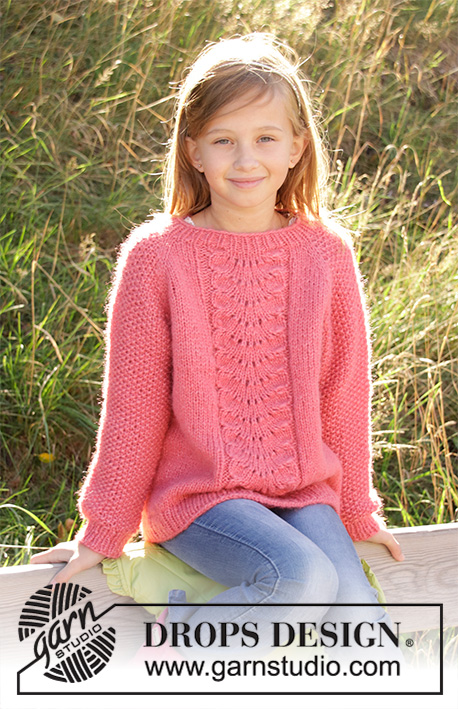
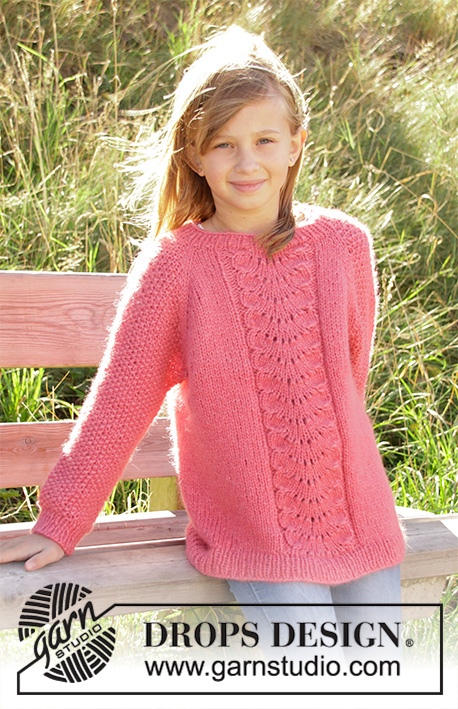
Knitted jumper for children in DROPS Air or DROPS Paris. The piece is worked top down with lace pattern and raglan. Sizes 2-12 years.
DROPS Children 34-4 |
|||||||||||||||||||
|
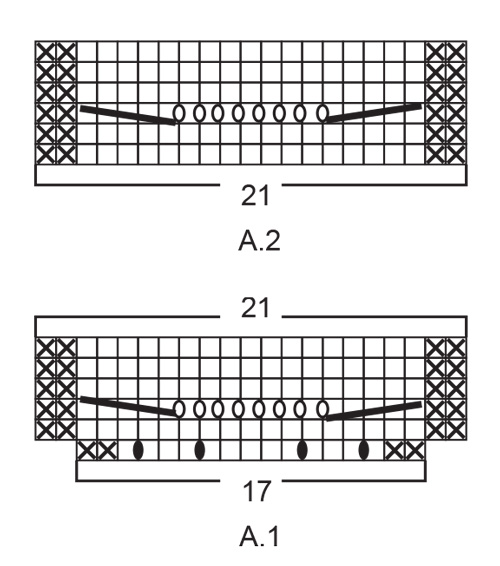
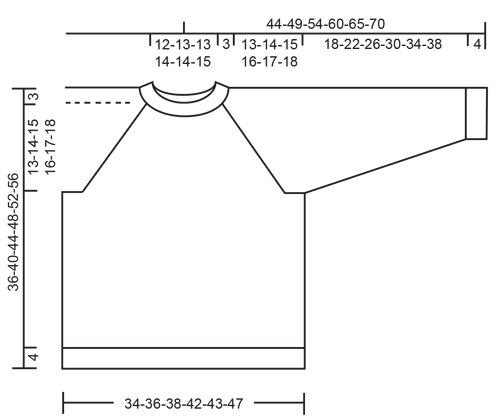
EXPLANATIONS FOR THE PATTERN: ------------------------------------------------------- PATTERN: See diagrams A.1 and A.2. The diagrams show all the rows in the pattern seen from the right side. INCREASE/DECREASE TIP (evenly spaced): To work out how to increase/decrease evenly, count the total number of stitches on the needle (e.g. 54 stitches) and divide by the number of increases/decreases to be made (e.g. 6) = 9. In this example, increase by making 1 yarn over after each 9th stitch. On the next round work the yarn overs twisted to avoid holes. When decreasing, knit together each 8th and 9th stitch (in this example). MOSS STITCH: ROUND 1: * Knit 1, Purl 1 *, work from *-*. ROUND 2: Knit over purl and purl over knit. Repeat round 2 onwards. RAGLAN: Increase 1 stitch on each side of the 2 knitted stitches in each transition between body and sleeves (= 8 stitches increased on the round). Increase 1 stitch by making 1 yarn over. On the next round work the yarn overs twisted to avoid holes. Then work the new stitches in moss stitch on the sleeves and stocking stitch on the front and back pieces. DECREASE TIP (for sleeves): Decrease 1 stitch on each side of the marker thread as follows: Work until there is 1 stitch left before the marker thread, purl 3 together. In this way, 3 stitches become 1 stitch; then move the marker thread to the stitch before this stitch. ------------------------------------------------------- START THE PIECE HERE: ------------------------------------------------------- JUMPER - SHORT OVERVIEW OF THE PIECE: The piece is worked in the round with circular needle, top down. After the yoke the body is continued in the round with circular needle. The sleeves are worked in the round with short circular needle/double pointed needles. YOKE Cast on 54-54-58-62-64-68 stitches with circular needle size 4.5 mm and Air or Paris. Knit 1 round. Then work rib in the round (= knit 1 / purl 1) for 3 cm. Knit 1 round where you increase 6-6-6-6-8-16 stitches evenly – read INCREASE/DECREASE TIP = 60-60-64-68-72-84 stitches. Change to circular needle size 5.5 mm. Insert 1 marker here - THE PIECE IS NOW MEASURED FROM HERE! Now insert 4 marker threads (without working the stitches) as follows: Insert 1 marker thread at the beginning of the round (= in transition between sleeve and back piece), 1 marker thread after 21-21-23-25-25-31 stitches (= back piece), 1 marker thread after 9-9-9-9-11-11 more stitches (= sleeve), 1 marker thread after 21-21-23-25-25-31 more stitches (= front piece). There are 9-9-9-9-11-11 stitches left to the first marker thread (= sleeve). The next round is worked as follows: The round starts at the first marker thread, in the transition between sleeve and back piece. Knit 1, make 1 yarn over, work 19-19-21-23-23-29 stitches in stocking stitch (= back piece), 1 yarn over, knit 2 (marker thread sits in the middle of these 2 stitches), 1 yarn over, work 7-7-7-7-9-9 stitches in MOSS STITCH – see description above (= sleeve), 1 yarn over, knit 2 (marker thread sits in the middle of these 2 stitches), 1 yarn over, work 1-1-2-3-3-6 stitches in stocking stitch, work A.1 (= 17 stitches = front piece), 1-1-2-3-3-6 stitches in stocking stitch, 1 yarn over, knit 2 (marker thread sits in the middle of these 2 stitches), 1 yarn over, work 7-7-7-7-9-9 stitches in moss stitch (= sleeve), 1 yarn over and knit 1. REMEMBER THE KNITTING TENSION! The first increase to RAGLAN – read description above, is now finished (= 8 stitches increased on the round). Continue with this pattern and increase to raglan every 2nd round a total of 13-14-15-16-17-17 times (including the first increase described above). NOTE: When A.1 has been completed in height, work A.2 (= 21 stitches) over A.1. Repeat A.2 in height to finished length. After the last increase to raglan there are 168-176-188-200-212-224 stitches on the needle. Continue with pattern as before, but without increasing, until the piece measures 13-14-15-16-17-18 cm from the marker at the beginning of the yoke. The next round is worked in pattern and stocking stitch as before, but start the round 1 stitch earlier (before the 2 stitches in stocking stitch between sleeve and back piece). Work stocking stitch over 49-51-55-59-61-67 stitches (= back piece), place the next 33-35-37-39-43-43 stitches on a thread (= sleeve), cast on 4-4-4-6-6-6 new stitches on the needle (= in side under sleeve), continue with stocking stitch and pattern over the next 53-55-59-63-65-71 stitches (= front piece), place the next 33-35-37-39-43-43 stitches on a thread (= the other sleeve), cast on 4-4-4-6-6-6 new stitches on the needle (= in side under sleeve). Body and sleeves are finished separately. THE PIECE IS NOW MEASURED FROM HERE! BODY: There are now 110-114-122-134-138-150 stitches on the needle. Continue with stocking stitch and pattern A.2 in the round as before. When the piece measures 16-19-22-25-28-31 cm from the division knit 1 round where you increase 10-12-14-16-18-20 stitches evenly on round = 120-126-136-150-156-170 stitches. Change to circular needle size 4.5 mm and work rib (= knit 1 / purl 1) for 4 cm. Loosely cast off with knit over knit and purl over purl – to avoid the cast-off edge being tight, you can cast off with a needle size 5.5 mm. Cut and fasten the strand. SLEEVE: Place the stitches from the thread on one side of the piece onto short circular needle/double pointed needle size 5.5 mm (= 33-35-37-39-43-43 stitches). Knit up 1 stitch in each of the 4-4-4-6-6-6 stitches cast on under the sleeve = 37-39-41-45-49-49 stitches. Insert 1 marker thread in the middle of these 4-4-4-6-6-6 stitches and start the round here. Work moss stitch. When the piece measures 2 cm from the division decrease 2 stitches mid under sleeve – read DECREASE TIP. Decrease like this every 2½-3-3½-4-4½-5½ cm a total of 6-6-7-7-7-7 times = 25-27-27-31-35-35 stitches. Continue working until the sleeve measures 18-22-26-30-34-38 cm from the division. Knit 1 round where you increase 3-3-3-3-3-3 stitches in all sizes = 28-30-30-34-38-38 stitches. Change to double pointed needles size 4.5 mm and work rib (knit 1 / purl 1) for 4 cm. Loosely cast off with knit over knit and purl over purl – to avoid the cast-off edge being tight, you can cast off with a needle size 5.5 mm. Cut and fasten the strand. Work the other sleeve in the same way. |
|||||||||||||||||||
Diagram explanations |
|||||||||||||||||||
|
|||||||||||||||||||
 |
|||||||||||||||||||
 |
|||||||||||||||||||
Have you finished this pattern?Tag your pictures with #dropspattern #cloversweater or submit them to the #dropsfan gallery. Do you need help with this pattern?You'll find 25 tutorial videos, a Comments/Questions area and more by visiting the pattern on garnstudio.com. © 1982-2026 DROPS Design A/S. We reserve all rights. This document, including all its sub-sections, has copyrights. Read more about what you can do with our patterns at the bottom of each pattern on our site. |
|||||||||||||||||||


With over 40 years in knitting and crochet design, DROPS Design offers one of the most extensive collections of free patterns on the internet - translated to 17 languages. As of today we count 324 catalogues and 12290 patterns translated into English (UK/cm). 12290
We work hard to bring you the best knitting and crochet have to offer, inspiration and advice as well as great quality yarns at incredible prices! Would you like to use our patterns for other than personal use? You can read what you are allowed to do in the Copyright text at the bottom of all our patterns. Happy crafting!
Post a comment to pattern DROPS Children 34-4
We would love to hear what you have to say about this pattern!
If you want to leave a question, please make sure you select the correct category in the form below, to speed up the answering process. Required fields are marked *.