
Popular categories
Looking for a yarn?


Comments / Questions (20)
![]() Daisy wrote:
Daisy wrote:
Would love to see this as a baby pattern
04.01.2026 - 17:00
![]() Moni wrote:
Moni wrote:
Muß ich bei den 34 cm sofort in der erstenRunde die Maschen zunehmen oder in einer länge von 34 cm die Maschen verteilen
20.08.2025 - 08:10DROPS Design answered:
Liebe Moni, wenn Sie bei der Passe sind und die 5. Größe stricken, dann stricken Sie bis die Arbeit 34 cm ab Markierung misst, dann verteilen Sie die Arbeit bei der letzten Runde. Wenn Sie schon beim Rumfpteil sind (nach der Aufteilung), stricken Sie glatt rechts in der Runde bis die Arbeit 34 cm ab die Aufteilung misst, dann nehmen Sie regelmäßig verteilt bei der nächsten Runde zu = 252-399 Maschen, dann stricken Sie Bündchen mit den kleineren Nadeln. Viel Spaß beim Stricken!
20.08.2025 - 16:16
![]() Tom wrote:
Tom wrote:
Hello, love your designs! Just one question. When it comes to the bottom of the body, and it says to increase X stitches before the waistband, why is this? I would have thought it needed to decrease to give a tapered finish at the bottom, no? If I want a more tapered finish, would you recommend decreasing instead?
08.10.2024 - 14:08DROPS Design answered:
Dear Tom, you need more stitches for the same with when working rib with smaller needles than working stocking stithc with larger needles, as we don't want here the bottom edge to tighten piece together, we need to increase before working rib. Happy knitting!
08.10.2024 - 16:35
![]() Tyler wrote:
Tyler wrote:
Why does the pattern say to Dec 18 sts after the neck ribbing and then inc 54 sts right after that? Couldn’t I just inc 36sts after the ribbing? Does it affect the structure of the collar?
22.09.2024 - 16:15DROPS Design answered:
Dear Tyler, the decreases and increases not only maintain the correct number of stitches but also help shape the piece. You first decrease with a larger needle, used for the rib, so that the pattern won't be too tight when changing to a smaller needle. Then you increase with the smaller needle to get the necessary stitches for the English rib. Since you use different needles for each step, the gauge will be different from directly increasing 36 stitches with the larger needle; the effect from the 18 decreased stitches won't be as noticeable. Happy knitting!
23.09.2024 - 01:36
![]() AH wrote:
AH wrote:
Is there something amiss with the sleeve length? The sleeves seem very short and wide, and get significantly shorter as the sizes get larger. As written they seem like 3/4 length sleeves.
06.12.2023 - 03:11
![]() Rita Eriksen wrote:
Rita Eriksen wrote:
Den 3. raden med patentstrikk vrir seg veldig mot høyre, sett i strikkeretning . Hva har jeg gjort galt?
29.08.2023 - 15:04DROPS Design answered:
Hei Rita. Ta en titt på hjelpevidoen som viser hvordan man strikker helpatent rundt. Kanskje du da ser hva som blir feil. Videoen: Hvordan strikke helpatent rundt finner du under oppskriften. mvh DROPS Design
11.09.2023 - 12:47
![]() Asveig Synøve Jessen Gschib wrote:
Asveig Synøve Jessen Gschib wrote:
Montering,skal halskant brettes og syes ned, Finner ikke montering på mønsteret
19.12.2022 - 21:35
![]() Maria wrote:
Maria wrote:
Where it says " When piece measures 24-25-26-28-29-30 cm, increase 16-29-32-38-42-49 stitches evenly = 328-368-398-432-462-502 stitches" - should we measure the piece from the marker in the rib or at the beginning of the rib?
25.07.2022 - 14:56DROPS Design answered:
Hi Maria, you have to measure from the marker thread in the neck edge. Happy knitting!
25.07.2022 - 16:57
![]() Linn wrote:
Linn wrote:
Enkelt mönster att förstå. Har inte stickat någon tröja förut. Men det var enkelt att följa med iallafall. Tycker dock att inte att man behöver öka maskorna innan man stickar resåren i slutet av plagget. Såg ut som resåren tappat elasticitet när man gjorde så. Ökade inte på armarnas resår. Blev mycket bättre. Bytte garnet mot Drops You 9 recycled cotton.
22.03.2022 - 11:42
![]() Maria G wrote:
Maria G wrote:
När jag stickat provlappen i helpatent mäter den 8x8 centimeter. Ska jag byta till rundsticka 3,5 i det partiet. Slätstickningen stämmer med sticka nummer 3. Jag undrar också över varför man först ska minska antalet maskor för att på nästa varv öka dem i början på oket?
31.01.2022 - 10:31DROPS Design answered:
Hej Maria, ja du må prøve med en tykkere pind for at få 10 cm. Man gør det for at få en fin overgang. God fornøjelse!
04.02.2022 - 14:32
|
|
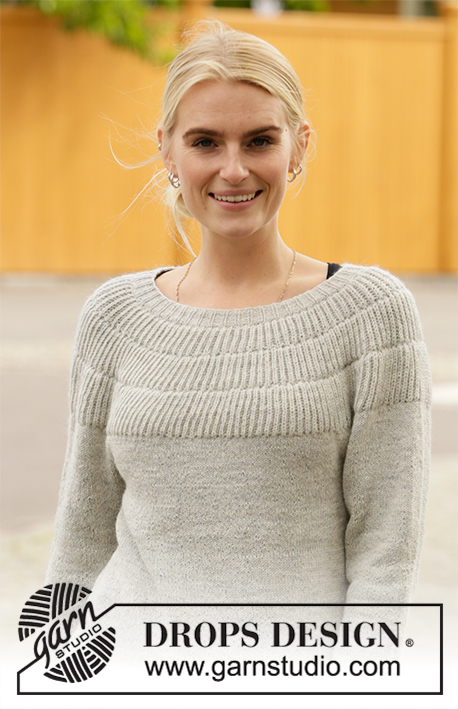
City Glow#cityglowsweater |
|
 |
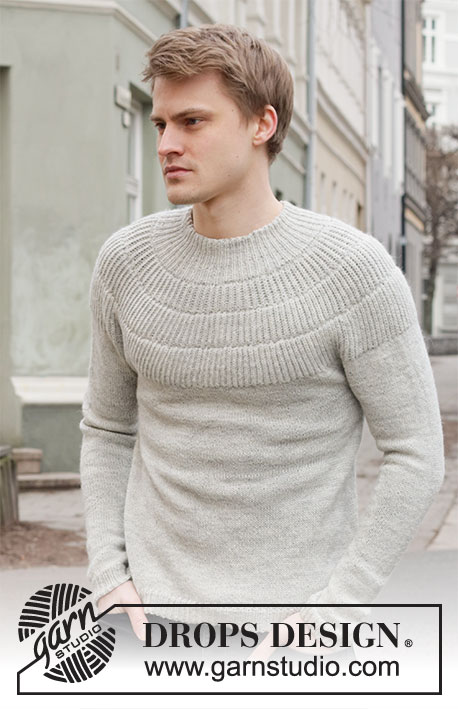 |
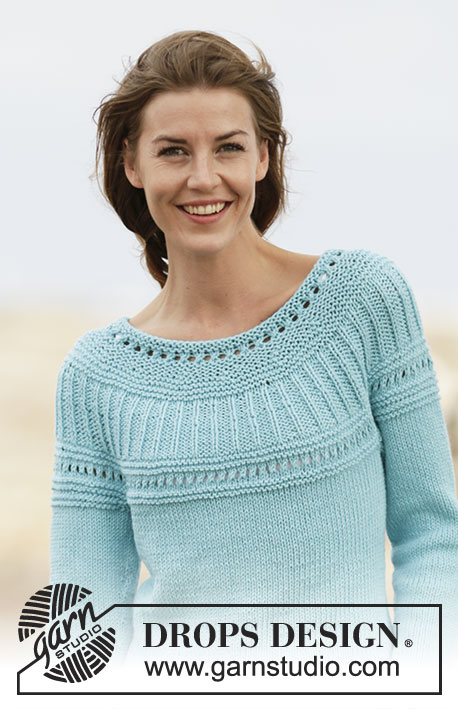
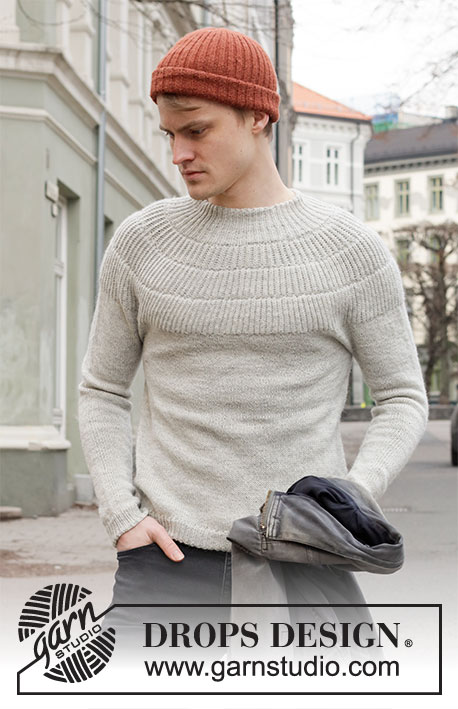
Knitted sweater with round yoke for men in DROPS Alpaca. Piece is knitted top down with English rib on yoke. Size: S - XXXL
DROPS 219-7 |
|
|
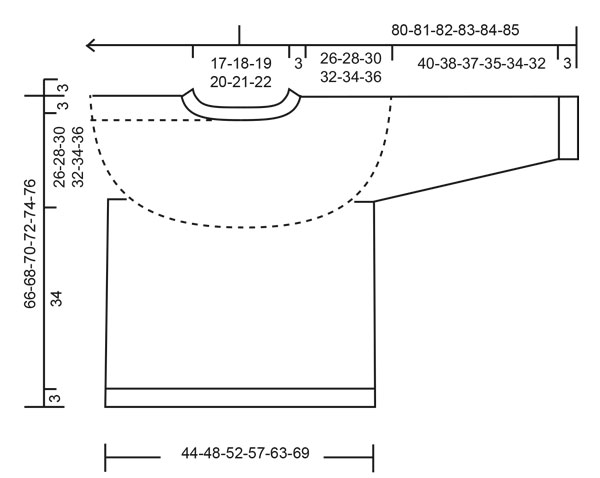
---------------------------------------------------------- EXPLANATION FOR THE PATTERN: ---------------------------------------------------------- DECREASE/INCREASE TIP (evenly): To calculate how to decrease/increase evenly, use the total number of stitches on row (e.g. 126 stitches) and divide stitches by number of decreased/increases to be done (e.g. 16) = 7.8. In this example decrease by knitting approx. every 7th and 8th stitch together. When increasing stitches, increase by getting yarn between 2 stitches approx. every 8th stitch (knit yarn twisted to avoid holes). ENGLISH RIB: ROUND 1: * Make 1 yarn over, slip 1 stitch purlwise, knit 1 *, repeat from *-* the entire round. ROUND 2: * Purl yarn over and slipped stitch together, 1 yarn over, slip 1 stitch purlwise *, repeat from *-* the entire round. ROUND 3: * Make 1 yarn over, slip 1 stitch purlwise, knit together yarn over and slipped stitch *, repeat from *-* the entire round. Repeat rounds 2 and 3. DECREASE TIP (applies to sleeves): Decrease 1 stitch on each side of marker thread as follows: Work until 3 stitches remain before marker thread and knit 2 together, knit 2 (marker thread is between these stitches), slip 1 stitch knitwise, knit 1, pass slipped stitch over stitch worked. ---------------------------------------------------------- START THE PIECE HERE: ---------------------------------------------------------- SWEATER - SHORT OVERVIEW OF THE PIECE: Worked in the round on circular needle, top down. Work sleeves in the round on a short circular needle/double pointed needles. NECK EDGE: Cast on 126-132-138-144-150-156 stitches on circular needle size 2.5 mm = US 1,5 with Alpaca. Knit 1 round. Then work rib (= knit 1/purl 2) for 3 cm = 1⅛". Insert a marker thread here. NOW MEASURE PIECE FROM HERE! YOKE: Continue with rib for 4 cm = 1½", 7 cm = 2¾" with rib have been worked in total. Knit 1 round while decreasing 16-17-18-19-20-22 stitches evenly - read DECREASE/INCREASE TIP = 110-115-120-125-130-134 stitches. Switch to circular needle size 3 mm = US 2,5. Knit 1 round while increasing 50-51-54-55-56-62 stitches evenly - remember DECREASE/INCREASE TIP = 160-166-174-180-186-196 stitches. Knit 1 round. Work ENGLISH RIB – read explanation above, for 4-4-4-5-5-5 cm = 1½"-1½"-1½"-2"-2"-2". REMEMBER THE KNITTING GAUGE! Knit 1 round where yarn overs are knitted together with stitch they belong to - increase at the same time 68-72-80-88-96-104 stitches evenly = 228-238-254-268-282-300 stitches. Knit 1 round. Now work English rib for 5-5-5-6-6-6 cm = 2"-2"-2"-2⅜"-2⅜"-2⅜". Knit 1 round where yarn overs are knitted together with stitch they belong to - increase at the same time 68-72-80-88-96-104 stitches evenly = 296-310-334-356-378-404 stitches. Knit 1 round. Now work English rib for 6-6-6-7-7-7 cm = 2⅜"-2⅜"-2⅜"-2¾"-2¾"-2¾". Knit 1 round where yarn overs are knitted together with stitch they belong to - increase at the same time 16-29-32-38-42-49 stitches = 312-339-366-394-420-453 stitches. Then work in stockinette stitch. When piece measures 24-25-26-28-29-30 cm = 9½"-9¾"-10¼"-11"-11⅜"-11¾", increase 16-29-32-38-42-49 stitches evenly = 328-368-398-432-462-502 stitches. When piece measures 26-28-30-32-34-36 cm = 10¼"-11"-11¾"-12½"-13⅜"-14¼" from marker, the yoke is finished. Work next round as follows: Work the first 47-52-56-62-68-76 stitches (= half back piece), slip the next 69-79-86-91-94-99 stitches on a stitch holder for sleeve and cast on 10-10-12-12-14-14 new stitches on needle (= in the side under sleeve), work the next 95-105-113-125-137-152 stitches (= front piece), slip the next 69-79-86-91-94-99 stitches on a stitch holder for sleeve and cast on 10-10-12-12-14-14 new stitches on needle (= in the side under sleeve), work the remaining 48-53-57-63-69-76 stitches (= half back piece). BODY: There are now 210-230-250-274-302-332 stitches for body. Work in stockinette stitch in the round. When piece measures 34 cm = 13⅜", increase 42-46-50-56-61-67 stitches evenly = 252-276-300-330-363-399 stitches. Switch to circular needle size 2.5 mm = US 1,5. Work rib (knit 1/purl 2) in the round for 3 cm = 1⅛". Bind off stitches with knit over knit and purl over purl. Sweater measures approx. 66-68-70-72-74-76 cm = 26"-26¾"-27½"-28⅜"-29⅛"-30" from shoulder and down. SLEEVE: Slip the 69-79-86-91-94-99 stitches from stitch holder in one side of piece back on a short circular needle/double pointed needles size 3 mm = US 2,5 – pick in addition up 1 stitch in each of the 10-10-12-12-14-14 new stitches cast on under sleeve = 79-89-98-103-108-113 stitches. Insert a marker thread in the middle of the new stitches (= 5-5-6-6-7-7 new stitches on each side of marker thread). Work in stockinette stitch in the round. When sleeve measures 4 cm = 1½", decrease 1 stitch on each side of marker thread under sleeve - read DECREASE TIP. Decrease like this approx. every 3½-2-1½-1½-1-1 cm = 1¼"-¾"-½"-½"-⅜"-⅜" 10-14-17-19-20-21 times in total = 59-61-64-65-68-71 stitches. Continue in stockinette stitch until sleeve measures 40-38-37-35-34-32 cm = 15¾"-15"-14½"-13¾"-13⅜"-12½". Now increase 13-14-14-16-16-16 stitches evenly = 72-75-78-81-84-87 stitches. Switch to circular needle size 2.5 mm = US 1,5. Work rib (knit 1/purl 2) in the round for 3 cm = 1⅛". Bind off stitches with knit over knit and purl over purl. Sleeve measures approx. 43-41-40-38-37-35 cm = 17"-16⅛"-15¾"-15"-14½"-13¾" from division. Work the other sleeve the same way. |
|
 |
|
Have you finished this pattern?Tag your pictures with #dropspattern #cityglowsweater or submit them to the #dropsfan gallery. Do you need help with this pattern?You'll find 20 tutorial videos, a Comments/Questions area and more by visiting the pattern on garnstudio.com. © 1982-2026 DROPS Design A/S. We reserve all rights. This document, including all its sub-sections, has copyrights. Read more about what you can do with our patterns at the bottom of each pattern on our site. |
|


With over 40 years in knitting and crochet design, DROPS Design offers one of the most extensive collections of free patterns on the internet - translated to 17 languages. As of today we count 324 catalogs and 12290 patterns - 12280 of which are translated into English (US/in).
We work hard to bring you the best knitting and crochet have to offer, inspiration and advice as well as great quality yarns at incredible prices! Would you like to use our patterns for other than personal use? You can read what you are allowed to do in the Copyright text at the bottom of all our patterns. Happy crafting!
Post a comment to pattern DROPS 219-7
We would love to hear what you have to say about this pattern!
If you want to leave a question, please make sure you select the correct category in the form below, to speed up the answering process. Required fields are marked *.