
Popular categories
Looking for a yarn?


Comments / Questions (30)
![]() Christine Michel wrote:
Christine Michel wrote:
Diese Beschreibung ist wunderbar. Man kann sehr gut danach arbeiten.
16.01.2022 - 13:37
![]() Marga Van Duijvendijk wrote:
Marga Van Duijvendijk wrote:
Ik ben de gebreide top met v-hals aan het breien mijn vraag is verspring het patroon langs de hals?En hoe doe je dat netjes met de minderingen voor de v-hals Bijvoorbaat dank Marga van Duijvendijk
23.11.2021 - 19:17DROPS Design answered:
Dag Marga,
Het patroon verspringt niet, dus het volgt de hals lijn. Dit gebeurt automatisch doordat ja naast het patroon mindert om de v-hals te vormen.
26.11.2021 - 17:18
![]() Brigitte Paulus wrote:
Brigitte Paulus wrote:
Ich kann leider die Anleitungen nicht ausdrucken. Muss ich mich evtl. zusätzlich anmelden?
21.10.2021 - 15:56
![]() Maud T wrote:
Maud T wrote:
Bonsoir, Je viens de terminer ce modèle et c’est mon premier pull sans manches. J’ai utilisé kid silk rose foncé et baby merino bruyère. Je suis très satisfaite du résultat même si j’ai un peu « galéré » pour relever les mailles des emmanchures et du col. (La technique pour obtenir une jolie encolure fonctionne bien ). Du coup cela m’a donné envie de tricoter un autre modèle, peut-être le 71-3.
13.10.2021 - 20:56
![]() Angelique Vladi wrote:
Angelique Vladi wrote:
Bonjour, je constate que la torsade s'arrête lorsque l'encolure commence. J'aimerais que la torsade continue jusqu'à l'épaule. Je pourrais faire les diminutions après la torsade. Est-ce possible?
03.01.2021 - 12:31DROPS Design answered:
Bonjour Mme Vladi, je ne suis pas bien sûre de saisir votre question, la torsade du milieu devant se divise en deux au moment de tricoter l'encolure -V et on va la terminer séparément en tricotant A.2 au-dessus de la torsade A.1 comme avant - cf 4ème photo. Bon tricot!
04.01.2021 - 16:13
![]() Gunn Farkvam wrote:
Gunn Farkvam wrote:
Hei Jeg har strikket denne vesten, den var morsom å strikke, men jeg tror det er en feil i oppskriften. Det gjelder halskanten og fellingen midt foran. Det står at en skal strikke til det gjenstår 1 m før rettmasken midt foran, ta 2 m løs av pinnen som om de skulle strikkes rett osv. Men da tar en jo rettmasken midt foran løs av.. og det er vel ikke meningen?? Vesten er ferdigstrikket og jeg valgte å felle på hver side av rettmasken. Det ble pent. Mvh Gunn
02.01.2021 - 14:21DROPS Design answered:
Hej Gunn, du skal felle ifølge felletips-2 FELLETIPS-2 (gjelder v-halsen): Alle fellinger gjøres fra retten! FELL SLIK FØR A.2: Start 2 masker før A.2, og strikk disse 2 maskene rett sammen (= 1 maske felt). FELL SLIK ETTER A.2: Ta 1 maske løs av pinnen som om den skulle strikkes rett, strikk 1 maske rett, løft den løse masken over masken som ble strikket (= 1 maske felt).
14.01.2021 - 13:15
![]() Silke wrote:
Silke wrote:
Super. Wunderschön!
11.09.2020 - 19:46
![]() Emma wrote:
Emma wrote:
Would love to see this with sleeves as well. 😍
05.06.2020 - 12:17
![]() Rosy wrote:
Rosy wrote:
Parfait pour les fraicheurs d'automne
05.06.2020 - 08:56
![]() Irene wrote:
Irene wrote:
Maybe this could be turned into a mans size?
04.06.2020 - 12:46
|
||||||||||||||||||||||
Cooler Days Ahead#coolerdaysaheadvest |
||||||||||||||||||||||
 |
 |
|||||||||||||||||||||
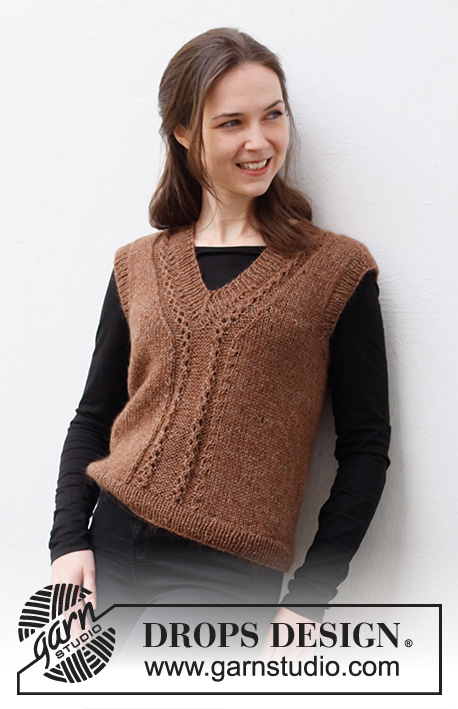
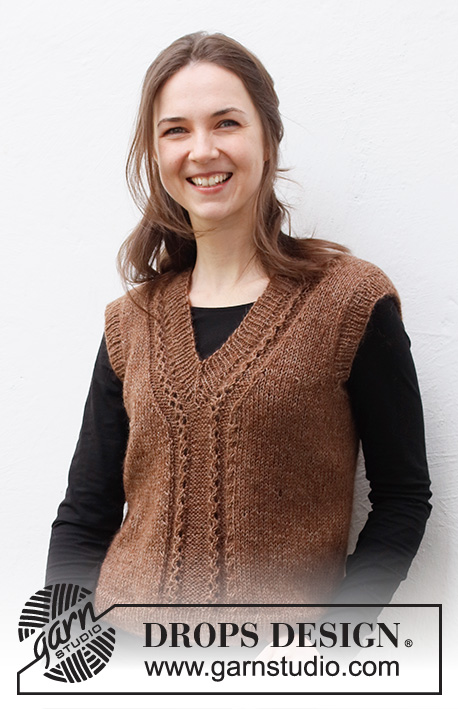
Knitted vest with V-neck in DROPS Flora and DROPS Kid-Silk. Sizes S - XXXL.
DROPS 216-35 |
||||||||||||||||||||||
|
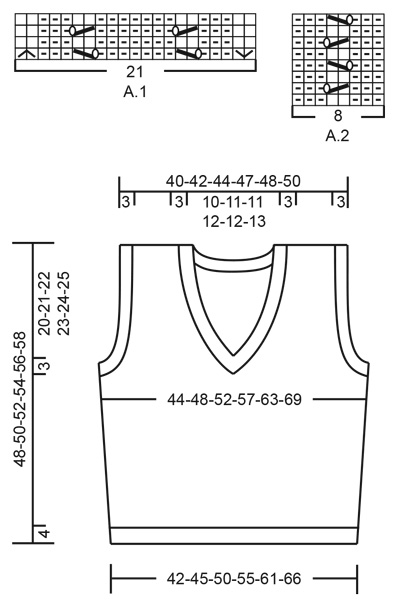
------------------------------------------------------- EXPLANATIONS FOR THE PATTERN: ------------------------------------------------------- PATTERN: See diagrams A.1 and A.2. The diagrams show all rows from the right side. DECREASE TIP-1 (evenly spaced): To work out how to decrease evenly, count the total number of stitches on needle (e.g. 170 stitches) and divide by number of decreases to be made (e.g. 28) = 6.1. In this example decrease by knitting each 5th and 6th stitch together. DECREASE TIP-2 (for V-neck): All decreases are worked from the right side! DECREASE AS FOLLOWS AFTER A.2: Slip 1 stitch as if to knit, knit 1 and pass the slipped stitch over the knitted stitch (= 1 stitch decreased). DECREASE AS FOLLOWS BEFORE A.2: Start 2 stitches before A.2 and knit 2 together (= 1 stitch decreased). INCREASE TIP (for sides of body): Work until there are 2 stitches left before the marker thread, make 1 yarn over, knit 4 (marker thread sits between these 4 stitches) make 1 yarn over (= 2 stitches increased). On the next round knit the yarn overs twisted to avoid holes. Then work the new stitches in stockinette stitch. BINDING-OFF TIP: To avoid the bind-off edge being tight you can bind off with a larger size needle. If the edge is still tight, make 1 yarn over after approx. each 4th stitch at the same time as binding off; the yarn overs are bind off as normal stitches. ------------------------------------------------------- START THE PIECE HERE: ------------------------------------------------------- VEST – SHORT OVERVIEW OF THE PIECE: The piece is worked in the round with circular needle bottom up, as far as the beginning of the V-neck. Then the piece is worked back and forth as far as the armholes, after which the front and back pieces are finished separately. Ribbed edges are worked around the neck and armholes. BODY: Cast on 170-184-204-224-248-272 stitches with circular needle size 5 mm = US 8 and 1 strand Flora and 1 strand Kid-Silk (= 2 strands). Change to circular needle size 4 mm = US 6 and knit 1 round. Then work rib in the round (= knit 1, purl 1) for 4 cm = 1½". Change back to circular needle size 5 mm = US 8 and knit 1 round where you decrease 28-30-34-38-42-46 stitches evenly spaced – read DECREASE TIP-1 = 142-154-170-186-206-226 stitches. Insert 1 marker thread at the beginning of the round and 1 marker thread after 71-77-85-93-103-113 stitches (= sides of body). Allow the threads to follow your work onwards; they will be used when increasing in the sides. Work 25-28-32-36-41-46 stitches in stockinette stitch, A.1 (= 21 stitches mid front) and stockinette stitch to the end of the round. Continue this pattern. REMEMBER THE KNITTING GAUGE! When the piece measures 9-9-10-10-11-11 cm = 3½"-3½"-4"-4"-4⅜"-4⅜", increase 1 stitch on each side of both marker threads – read INCREASE TIP (= 4 stitches increased). Repeat this increase when the piece measures 18-18-20-20-22-22 cm = 7"-7"-8"-8"-8¾"-8¾" = 150-162-178-194-214-234 stitches. When the piece measures 25-26-27-28-29-30 cm = 9¾"-10¼"-10⅝"-11"-11⅜"-11¾", start to decrease for V-neck and armholes. Adjust so that next round is 1st or 3rd round in A.1 and work next round as follows: Begin 3 stitches before the marker thread on the beginning of the round, bind off 6 stitches for armhole, work 34-37-41-45-50-55 stitches as before, place next stitch on a strand of yarn or a stitch holder (= mid front and middle of A.1), work 34-37-41-45-50-55 stitches as before, bind off 6 stitches for armhole (i.e. bind off 3 stitches on each side of the marker thread), and knit the remaining 69-75-83-91-101-111 stitches in stockinette stitch. BACK PIECE: = 69-75-83-91-101-111 stitches. Begin from the wrong side, and work stockinette stitch back and forth as before. AT THE SAME TIME bind off for armhole on the beginning of each row in each side as follows: Bind off 3 stitches 0-0-0-0-1-1 time, 2 stitches 1-2-3-4-4-5 times and 1 stitch 4-3-3-3-4-5 times on each side = 57-61-65-69-71-75 stitches. Continue working until the piece measures 45-47-49-51-53-55 cm = 17¾"-18½"-19¼"-20"-21"-21⅝". On the next row bind off the middle 19-19-21-21-23-23 stitches for the neck and each shoulder is finished separately. Continue with stockinette stitch and bind off 2 stitches on the next row from the neck = 17-19-20-22-22-24 stitches on the shoulder. Continue working until the piece measures 48-50-52-54-56-58 cm = 19"-19¾"-20½"-21¼"-22"-22¾". Bind off a little loosely. Work the other shoulder in the same way. LEFT FRONT PIECE (when garment is worn): Begin from the wrong side from mid front, work A.2 over the first 8 stitches (A.2 is read from left to right when working from wrong side), and work stockinette stitch over the remaining stitches. Continue the pattern as this – A.2 should now fit nicely above A.1. AT THE SAME TIME bind off for armhole and v-neck as described below. ARMHOLE: Bind off for armhole on the beginning of the row from the armhole as follows: Bind off 3 stitches 0-0-0-0-1-1 times, 2 stitches 1-2-3-4-4-5 times and 1 stitch 4-3-3-3-4-5 times. V-NECK: AT THE SAME TIME on first row from right side, decrease 1 stitch for v-neck before A.2 on the mid front (seen from right side) – read DECREASETIP-2. Decrease as this every 2nd row (i.e. every row from the right side) a total of 5 times in all sizes, and then on every 4th row (i.e. every other row from right side) a total of 6-6-7-7-8-8 times. After all decreases for v-neck and bind off for armhole is done, there is 17-19-20-22-22-24 stitches on shoulder. Work until the piece measures 48-50-52-54-56-58 cm = 19"-19¾"-20½"-21¼"-22"-22¾". Bind off a little loosely. RIGHT FRONT PIECE: Begin from the wrong side in the armhole side, work in stockinette stitch as before until 8 stitches remains towards mid front, work A.2 over the last 8 stitches. Continue the pattern as this. AT THE SAME TIME decrease for v-neck and bind off for armhole in the same way as left front piece but the in the opposite side. I.e. decrease for v-neck as described above, after A.2 mid front (seen from right side) and bind off for armhole on the beginning of each row from the armhole as described above. ASSEMBLY: Sew the shoulder seams inside the bind-off edge. SLEEVE EDGE: Starting from the right side at the bottom of the armhole, knit up approx. 92 to 114 stitches inside the 1 edge stitch around the armhole, using short circular needle size 4 mm = US 6 and 1 strand of each quality (the number of stitches should be divisible by 2). Work rib in the round (= knit 1, purl 1) for 3 cm = 1⅛". Loosely bind off with knit over knit and purl over purl – read BINDING-OFF TIP! Work the other sleeve edge in the same way. NECK: Start from the right side, at one of the shoulder seams, and knit up approx. 114 to 140 stitches around the neck (including the 1 stitch on the thread mid front), using short circular needle size 4 mm = US 6 and 1 strand of each quality (the number of stitches should be divisible by 2). Work rib in the round (= knit 1, purl 1), making sure 1 knitted stitch is mid front over the stitch on the thread. AT THE SAME TIME every 2nd round decrease 2 stitches mid front as follows: Work until there is 1 stitch left before the knitted stitch mid front, slip 2 stitches as if to knit together, knit 1 and pass the 2 slipped stitch over the knitted stitch (= 2 stitches decreased). This will allow the V-neck to lie neatly and the knitted stitch will create a line mid front. Bind off with knit over knit and purl over purl when the edge measures 3 cm = 1⅛" – remember BINDING-OFF TIP! |
||||||||||||||||||||||
Diagram explanations |
||||||||||||||||||||||
|
||||||||||||||||||||||
 |
||||||||||||||||||||||
Have you finished this pattern?Tag your pictures with #dropspattern #coolerdaysaheadvest or submit them to the #dropsfan gallery. Do you need help with this pattern?You'll find 22 tutorial videos, a Comments/Questions area and more by visiting the pattern on garnstudio.com. © 1982-2026 DROPS Design A/S. We reserve all rights. This document, including all its sub-sections, has copyrights. Read more about what you can do with our patterns at the bottom of each pattern on our site. |
||||||||||||||||||||||


With over 40 years in knitting and crochet design, DROPS Design offers one of the most extensive collections of free patterns on the internet - translated to 17 languages. As of today we count 325 catalogs and 12298 patterns - 12288 of which are translated into English (US/in).
We work hard to bring you the best knitting and crochet have to offer, inspiration and advice as well as great quality yarns at incredible prices! Would you like to use our patterns for other than personal use? You can read what you are allowed to do in the Copyright text at the bottom of all our patterns. Happy crafting!
Post a comment to pattern DROPS 216-35
We would love to hear what you have to say about this pattern!
If you want to leave a question, please make sure you select the correct category in the form below, to speed up the answering process. Required fields are marked *.