
Popular categories
Looking for a yarn?


Comments / Questions (6)
![]() Rebekah wrote:
Rebekah wrote:
I am on the A.1 pattern and having problems with right side row 25. Can you clarify please.
29.01.2024 - 00:25DROPS Design answered:
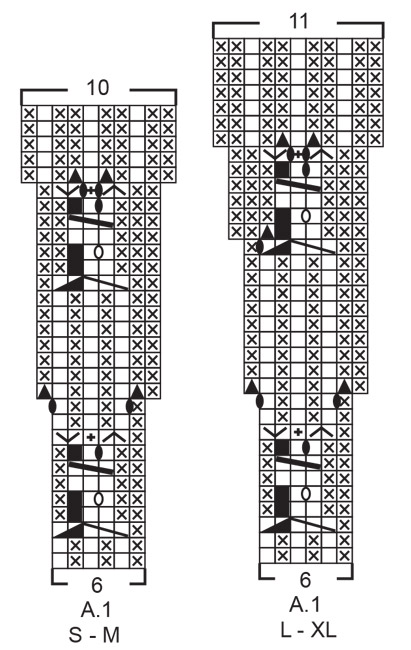
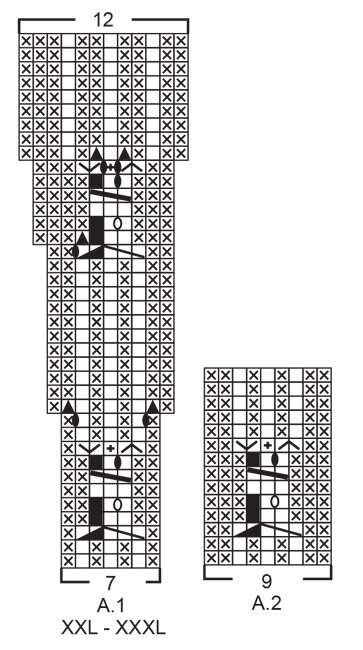
Dear Rebekah, on row 25 work as follows for A.1: purl 2, place 1 stitch on cable needle behind piece, knit 1, purl 1 from cable needle, make 1 slightly tight yarn over, yarn over purled twisted, make 1 slightly tight yarn over, place 1 stitch on cable needle in front of piece, purl 1, knit 1 from cable needle, purl 1. Because the yarn overs are each worked differently and with the objective that they don't form holes, even if you work 3 yarn overs one after the other, you won't have a big hole. Happy knitting!
29.01.2024 - 00:44
![]() Lesley Swan wrote:
Lesley Swan wrote:
Hi. I am up to the patterning on the wild mint pattern and I am confused. On row 3 do I work the light printed cable or the dark printed cable with 2?? after the cabling. I worked the dark one but now think it wrong. Thanks.
23.08.2023 - 14:26DROPS Design answered:
Dear Mrs Swan, on 3rd row work 7th symbol in diagram text, the symbol will be edited asap, but these 5 stitches have to be worked as explained here: slip 1 in front of piece, P1, K1 from cable needle, slip 1 behind piece, k1, pass the innermost of the 3 sts over the 2 sts worked, and purl 1 from cable needle. (then make 1 yarn over = 9th symbol). Happy knitting!
23.08.2023 - 16:47
![]() Jian wrote:
Jian wrote:
I have a difficult to work out the A.1 row 3 diagram. Would be able to provide a video. Many thanks.
20.05.2021 - 11:47DROPS Design answered:
Dear Jian, work the 3rd row in A.1 as follows: *purl 1, slip the next stitch on a cable needle in front of piece, purl the next stitch, knit the stitch on the cable needle; now slip the next stitch on the cable needle behind piece, knit the next stitch, slip the 3rd stitch from the tip on the right needle over the 2 outermost stitches (you decrease 1 stitch), and purl the stitch from cable needle. If working size XXL, XXXL, purl next stitch. Repeat from *. Hope this will help. Happy knitting!
20.05.2021 - 12:41
![]() Jessica wrote:
Jessica wrote:
Teckenförklaringen i det här mönstret är felaktig, de tre rutorna med diagonalt streck har samma förklaring som symbolen ovanför, i möster 215-16 verkar den korrekt.
01.11.2020 - 17:35DROPS Design answered:
Hej Jessica. Tack för info, detta är nu rättat! Mvh DROPS Design
03.11.2020 - 10:23
![]() Arina wrote:
Arina wrote:
I am having difficulty visualizing the construction of the neck band and button band. Would it be possible to supply a diagram? Thank you.
25.10.2020 - 17:06DROPS Design answered:
Dear Arina, we have two videos showing how to work the neck band and button band: how to work a double neck and how to knit up stitches for a jacket band. Hope they will help you. Happy knitting!
26.10.2020 - 08:45
![]() Ing-Marie Jungegård wrote:
Ing-Marie Jungegård wrote:
Vill se hur man stickar fläta i A1
04.10.2020 - 10:38DROPS Design answered:
Hej Ing-Marie. Vi har dessvärre ingen video på det nu men vi noterar önskemålet. Är det något speciellt du har problem med som vi kanske kan försöka förklara tydligare? Mvh DROPS Design
06.10.2020 - 07:50
|
||||||||||||||||||||||||||||||||||
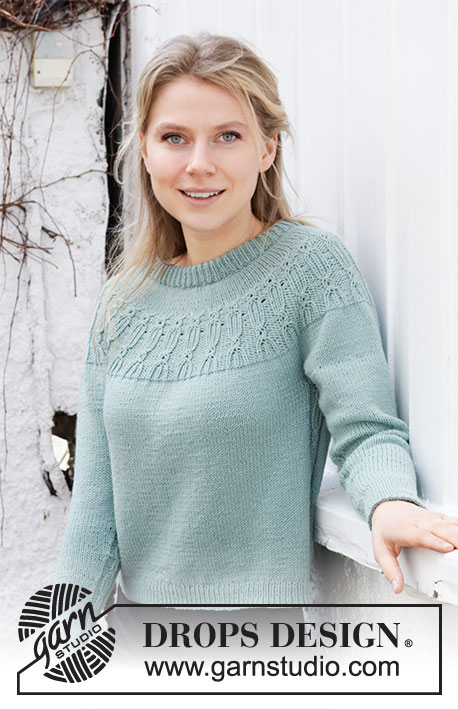
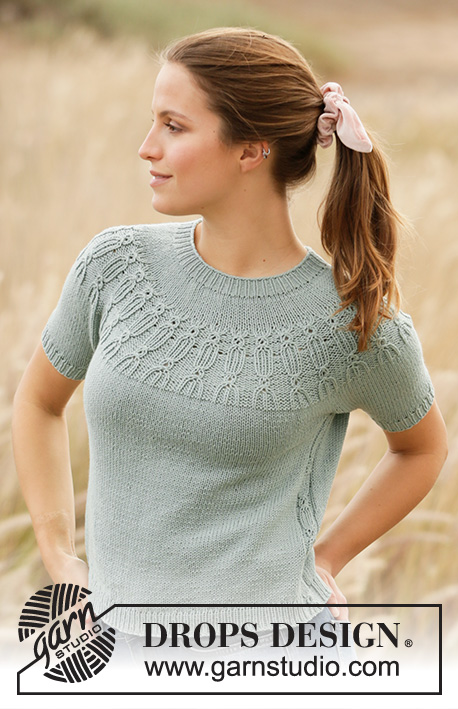
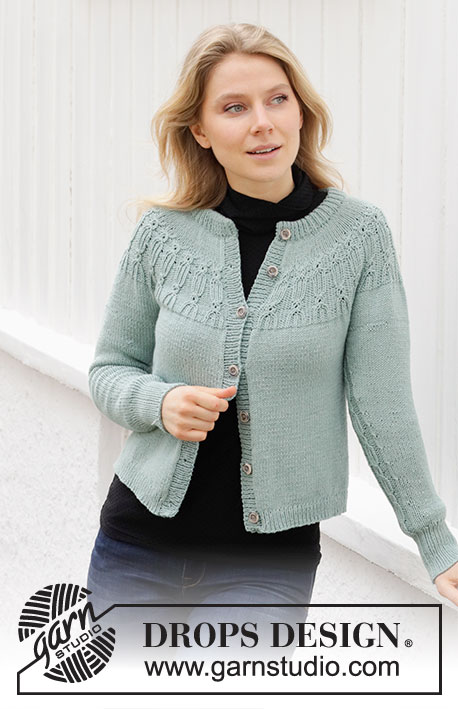
Wild Mint Cardigan#wildmintcardigan |
||||||||||||||||||||||||||||||||||
 |
 |
|||||||||||||||||||||||||||||||||
Knitted jacket in DROPS Karisma. The piece is worked top down with double neck, round yoke and textured pattern. Sizes S - XXXL.
DROPS 215-15 |
||||||||||||||||||||||||||||||||||
|
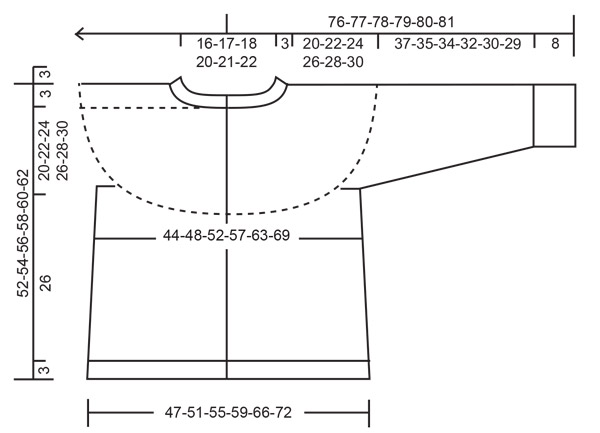
------------------------------------------------------- EXPLANATIONS FOR THE PATTERN: ------------------------------------------------------- RIDGE/GARTER STITCH (worked back and forth): Knit all rows. 1 ridge in height = Knit 2 rows. BUTTONHOLE (for the 2 buttonholes on the neck): Work buttonholes on the right band (when the garment is worn). Work from the right side when there are 3 stitches left on the row as follows: Make 1 yarn over, knit 2 together and knit 1. On the next row (wrong side) knit the yarn over to leave a hole. PATTERN: See diagrams A.1 and A.2. Choose diagram for your size (applies to A.1). INCREASE TIP-1 (evenly spaced): To work out how to increase evenly, count the total number of stitches on the needle (e.g. 95 stitches) minus edge stitches (e.g. 2 stitches) and divide the remaining stitches by the number of increases to be made (e.g. 32) = 2.9. In this example, increase by making 1 yarn over after approx. each 3rd stitch. Do not increase on edge stitches. On the next row work the yarn overs twisted to avoid holes. INCREASE TIP-2 (for sides of body): All increases are worked from the right side! Work until there is 1 stitch left before A.2, make 1 yarn over, work 1 stitch in stockinette stitch, work A.2 (= 9 stitches), 1 stitch in stockinette stitch and make 1 yarn over (= 2 stitches increased in the side and 4 stitches increased on the row). On the next row (wrong side) purl the yarn overs twisted to avoid holes. Then work the new stitches in stockinette stitch. DECREASE TIP (for mid under sleeve): Decrease 1 stitch on either side of A.2 under the sleeve as follows: Work A.2 as before over the first 9 stitches, slip 1 stitch as if to knit, knit 1 and pass the slipped stitch over the knitted stitch, work stockinette stitch until there are 2 stitches left before A.2, knit these 2 stitches together (= 2 stitches decreased). BINDING-OFF TIP: To avoid the bind-off edge being tight you can bind off with a larger size needle. If the edge is still tight, make 1 yarn over after approx. each 6th stitch at the same time as binding off; the yarn overs are bind off as normal stitches. ------------------------------------------------------- START THE PIECE HERE: ------------------------------------------------------- JACKET – SHORT OVERVIEW OF THE PIECE: The neck and yoke are worked back and forth with circular needle from mid front and top down. The yoke is divided for body and sleeves and the body continued back and forth. The sleeves are worked in the round with short circular needle/double pointed needles, top down. The bands are worked to finish. NECK: Cast on 107-111-115-121-125-129 stitches with circular needle size 3 mm = US 2,5 and Karisma. Purl 1 row (= wrong side). The next row is worked as follows from the right side: 1 edge stitch in GARTER STITCH – read description above, * knit 1, purl 1 *, work from *-* until there are 2 stitches left on the row, knit 1 and 1 edge stitch in garter stitch. Continue this rib. When the neck measures 2 cm = ¾" and 5 cm = 2", work BUTTONHOLES – read description above (these buttonholes will combine when the neck is folded double). Continue working until the neck measures 6½-7 cm = 2½"-2¾"; finish after a row from the right side. The next row is worked as follows from the wrong side: Bind off the first 7 stitches, cast on 1 new stitch at the beginning of the row (= edge stitch), work rib as before to the end of the row. Turn, bind off the first 7 stitches and cast on 1 new stitch (= edge stitch), knit all stitches and increase AT THE SAME TIME 32-32-34-36-38-38 stitches evenly over these stitches – read INCREASE TIP-1 = 127-131-137-145-151-155 stitches. Insert 1 marker inside the edge stitch at the beginning of the row; the yoke is measured from this marker. YOKE: Change to circular needle size 4 mm = US 6 and work stockinette stitch back and forth with 1 edge stitch in garter stitch on each side. REMEMBER THE KNITTING GAUGE! When the piece measures 4 cm = 1½" from the marker, increase 44-32-34-36-50-52 stitches evenly spaced – remember INCREASE TIP-1 = 171-163-171-181-201-207 stitches. Continue working until the piece measures 4-5-6-7-7-8 cm = 1½"-2"-2⅜"-2¾"-2¾"-3⅛" from the marker – at the same time increase 0-20-12-20-33-41 stitches evenly on the last row = 171-183-183-201-234-248 stitches. The next row is worked as follows from the right side: 1 edge stitch in garter stitch, work A.1 until there are 2 stitches left on the row (= 28-30-30-33-33-35 repeats of 6-6-6-6-7-7 stitches), work the first stitch in A.1 (= purled from the right side) and finish with 1 edge stitch in garter stitch. Continue this pattern. When A.1 has been completed in height, there are 283-303-333-366-399-423 stitches on the needle and the piece measures approx. 15-16-18-19-21-22 cm = 6"-6¼"-7"-7½"-8¼"-8¾" from the marker. Continue with stockinette stitch. When you have worked 1-2-2-3-3-3 cm = ⅜"-¾"-¾"-1⅛"-1⅛"-1⅛" from A.1, increase 10-14-8-15-6-14 stitches evenly spaced = 293-317-341-381-405-437 stitches. Continue with stockinette stitch. When the piece measures 20-22-24-26-28-30 cm = 8"-8¾"-9½"-10¼"-11"-11¾" from the marker, divide the yoke for the body and sleeves on the next row as follows: Work 44-48-51-56-62-68 stitches as before (= front piece), place the next 60-64-70-80-80-84 stitches on 1 thread for the sleeve, cast on 7-7-9-9-11-11 new stitches on the needle (= in side under sleeve), work 85-93-99-109-121-133 stitches in stockinette stitch (= back piece), place the next 60-64-70-80-80-84 stitches on 1 thread for the sleeve, cast on 7-7-9-9-11-11 new stitches on the needle (= in side under sleeve) and work the remaining 44-48-51-56-62-68 stitches as before (= front piece). Body and sleeves are finished separately. THE PIECE IS NOW MEASURED FROM HERE! BODY: = 187-203-219-239-267-291 stitches. Insert 1 marker in each side – in the middle of the 7-7-9-9-11-11 stitches cast on under each sleeve. Work stockinette stitch back and forth with 1 edge stitch in garter stitch on each side and A.2 over the middle 9 stitches under each sleeve (markers sit in the middle of these 9 stitches). Continue this pattern. When the piece measures 6 cm = 2⅜" from the division, increase 1 stitch on each side of A.2 on each side of the body – read INCREASE TIP-2 (= 4 stitches increased). Increase like this every 6 cm = 2⅜" a total of 3 times on each side = 199-215-231-251-279-303 stitches. Work until the piece measures 26 cm = 10¼" from the division; there is approx. 3 cm = 1⅛" left to finished length. You can try the jacket on and work to desired length but finish after a row from the right side. On the next row (wrong side) increase as follows: Work 1 edge stitch in garter stitch, work 45-49-53-58-65-71 stitches in stockinette stitch and increase 10-10-10-13-14-14 stitches evenly over these stitches, continue A.2 as before, work 89-97-105-115-129-141 stitches in stockinette stitch and increase 18-20-22-24-26-28 stitches evenly over these stitches, work A.2 as before, work 45-49-53-58-65-71 stitches in stockinette stitch and increase 10-10-10-13-14-14 stitches evenly over these stitches, finish with 1 edge stitch in garter stitch = 237-255-273-301-333-359 stitches. These increases avoid the rib being tight. Change to circular needle size 3 mm = US 2,5 and work the next row from the right side as follows: 1 edge stitch in garter stitch, work 55-59-63-71-79-85 stitches in rib (= knit 1, purl 1), work A.2 over the next 9 stitches, work 107-117-127-139-155-169 stitches in rib, A.2 over the next 9 stitches, work 55-59-63-71-79-85 stitches in rib and finish with 1 edge stitch in garter stitch. Continue this rib for 3 cm = 1⅛". Bind off with knit over knit and purl over purl – read BINDING-OFF TIP! The jacket measures approx. 52-54-56-58-60-62 cm = 20½"-21¼"-22"-22¾"-23⅝"-24⅜" from the shoulder down. SLEEVE: Place the 60-64-70-80-80-84 stitches from the thread on the one side of the piece on double pointed needles/short circular needle size 4 mm = US 6 and knit up 1 stitch in each of the 7-7-9-9-11-11stitches cast on under the sleeve = 67-71-79-89-91-95 stitches. Insert a marker thread in the middle of the 7-7-9-9-11-11stitches under the sleeve. Start the round 4 stitches before the stitch with the marker, work A.2 (= 9 stitches – the marker sits in the middle stitch of these 9 stitches), work the remaining stitches in stockinette stitch. Continue this pattern. When the sleeve measures 3 cm = 1⅛" from the division, decrease 1 stitch on each side of A.2 – read DECREASE TIP (= 2 stitches decreased). Decrease every 3½-3-2-1½-1½-1 cm = 1¼"-1⅛"-¾"-½"-½"-⅜" a total of 10-11-14-18-18-18 times = 47-49-51-53-55-59 stitches. Continue working until the sleeve measures 37-35-34-32-30-29 cm = 14½"-13¾"-13⅜"-12½"-11¾"-11⅜" from the division. There is approx. 8 cm = 3⅛" left to finished length. You can try the jacket on and work to desired length. NOTE: Shorter measurements in larger sizes due to wider neck and longer yoke. On the next round increase stitches as follows: Work A.2 as before, work 38-40-42-44-46-50 stitches in stockinette stitch and increase 9-9-11-11-11-11 stitches evenly over these stitches = 56-58-62-64-66-70 stitches. Change to double pointed needles size 3 mm = US 2,5 and work the next round as follows: Work A.2 as before over the first 9 stitches, * knit 1, purl 1 *, work from *-* until there is 1 stitch left before A.2 and finish with knit 1. Continue this rib for 8 cm = 3⅛". Bind off with knit over knit and purl over purl – read BINDING-OFF TIP! The sleeve measures approx. 45-43-42-40-38-37 cm = 17¾"-17"-16½"-15¾"-15"-14½" from the division. Work the other sleeve in the same way. LEFT BAND: Start from the right side below the neck and knit up approx. 123 to 149 stitches down the left front piece, inside the edge stitch, with circular needle size 3 mm = US 2,5 – the number of stitches should be divisible by 2 + 1. The first row is worked as follows from the wrong side: 1 edge stitch in garter stitch, * purl 1, knit 1 *, work from *-* until there are 2 stitches left on the row, purl 1 and finish with 1 edge stitch in garter stitch. Continue this rib for approx. 2½ to 3 cm = ⅞"-1⅛" (the band width should match the width of the 7 bind-off stitches on the neck). Bind off with knit over knit and purl over purl. Sew the band to the neck, inside the 1 edge stitch. RIGHT BAND: Start from the right side, at the bottom of the front piece and knit up approx. 123 to 149 stitches to the neck, inside the edge stitch, with circular needle size 3 mm = US 2,5 – the number of stitches should be divisible by 2 + 1. The first row is worked as follows from the wrong side: 1 edge stitch in garter stitch, * purl 1, knit 1 *, work from *-* until there are 2 stitches left on the row, purl 1 and finish with 1 edge stitch in garter stitch. Continue this rib for approx. 1 - 1½ cm = ⅜" -½", then work 6-6-6-7-7-7 buttonholes. 1 buttonhole = make 1 yarn over and knit 2 together. The top buttonhole is positioned approx. 7 - 8 cm = 2¾" – 3⅛" below the buttonhole on the neck and the bottom buttonhole 3 cm = 1⅛" from the edge. Continue the rib until the band measures approx. 2½ to 3 cm = ⅞" to 1⅛" (matches the left band). Bind off with knit over knit and purl over purl. Sew the band to the neck, inside the 1 edge stitch. ASSEMBLY: Fold the neck double to the wrong side and sew down neatly. Sew the buttons onto the left band. |
||||||||||||||||||||||||||||||||||
Diagram explanations |
||||||||||||||||||||||||||||||||||
|
||||||||||||||||||||||||||||||||||
 |
||||||||||||||||||||||||||||||||||
 |
||||||||||||||||||||||||||||||||||
 |
||||||||||||||||||||||||||||||||||
Have you finished this pattern?Tag your pictures with #dropspattern #wildmintcardigan or submit them to the #dropsfan gallery. Do you need help with this pattern?You'll find 34 tutorial videos, a Comments/Questions area and more by visiting the pattern on garnstudio.com. © 1982-2026 DROPS Design A/S. We reserve all rights. This document, including all its sub-sections, has copyrights. Read more about what you can do with our patterns at the bottom of each pattern on our site. |
||||||||||||||||||||||||||||||||||


With over 40 years in knitting and crochet design, DROPS Design offers one of the most extensive collections of free patterns on the internet - translated to 17 languages. As of today we count 325 catalogs and 12298 patterns - 12288 of which are translated into English (US/in).
We work hard to bring you the best knitting and crochet have to offer, inspiration and advice as well as great quality yarns at incredible prices! Would you like to use our patterns for other than personal use? You can read what you are allowed to do in the Copyright text at the bottom of all our patterns. Happy crafting!
Post a comment to pattern DROPS 215-15
We would love to hear what you have to say about this pattern!
If you want to leave a question, please make sure you select the correct category in the form below, to speed up the answering process. Required fields are marked *.