
Popular categories
Looking for a yarn?


Comments / Questions (55)
![]() Hannie Weststrate wrote:
Hannie Weststrate wrote:
Er staat een fout in de toelichting op het telpatroon. Bij de eerste beschrijving van een kabel moeten de steken op de kabelnaald VOOR het werk gehouden worden en niet erachter zoals er nu staat. Dit is al eerder doorgegeven, maar nog steeds niet verbeterd.
10.06.2021 - 11:37
![]() Kathrin Hartmann wrote:
Kathrin Hartmann wrote:
Ich würde diesen Pulli gerne in der Nr. 12, das jeansblau stricken, welche Farbe würden sie von der Silk kit dazu empfehlen?
11.05.2021 - 13:03DROPS Design answered:
Liebe Frau Hartmann, Ihr DROPS Laden wird Ihnen gerne damit helfen - auch telefonisch oder per E-Mail, die passenden Farben zu finden - Viel Spaß beim stricken!
11.05.2021 - 13:30
![]() Marialuisa Pullano wrote:
Marialuisa Pullano wrote:
Con l'aumento di 32 maglie al fondo per la taglia M, è normale che venga così scampanato il modello? Mi sembra troppo largo al bordo inferiore
07.04.2021 - 12:02DROPS Design answered:
Buonasera Marialuisa, gli aumenti servono per preparare la lavorazione delle coste, che altrimenti restringerebbero il lavoro. Buon lavoro!
07.04.2021 - 19:03
![]() Lorena wrote:
Lorena wrote:
Continua dalle due domande precedenti: credo di aver capito: probabilmente quando ho scucito ho tolto anche gli aumenti che mi facevano arrivare a 84 maglie, purtroppo era un numero corretto per fare 10 volte lo schema e non me ne sono accorta, il mio errore è stato non contare 🤨 adesso che ho finito e sono arrivata sino a questo punto la mia domanda è se posso fare gli aumenti nei prossimi 6(?) giri distribuendo le 30 maglie mancanti .... grazie mille
10.03.2021 - 17:34DROPS Design answered:
Buonasera Lorena, gli aumenti erano incorporati in modo graduale nello sprone proprio per ammorbidire la crescita e adattarlo al corpo. Può provare ad aumentare alla fine facendo provare il capo a chi poi lo indosserà per verificare che non presenti difetti. Buon lavoro!
10.03.2021 - 21:53
![]() Lorena wrote:
Lorena wrote:
Faccio seguito alla domanda precedente facendo i conti è come se avessi ripetuto lo schema 10 volte invece di 12 forse erano meno le maglie in origine? ma questo punto un consiglio: per evitare di rifare tutto, dato che la persona a cui è destinato il maglione è mingherlina, se aumentassi le 30 maglie mancanti da adesso? ma mano così da allargare le spalle sarebbe una cosa sbagliata ? così recupererei il lavoro fatto fin qui ..... grazieeeeeee
10.03.2021 - 17:15DROPS Design answered:
Buonasera Lorena, aumentare 30 maglie in questo punto non è molto bilanciato nella costruzione del modello, può però rivolgersi al suo rivenditore DROPS di fiducia per ricevere un'assistenza più personalizzata. Buon lavoro!
10.03.2021 - 21:51
![]() Lorena wrote:
Lorena wrote:
Sempre io .... ho finito la parte lavorata dello sprone secondo le istruzioni dovrei avere 216 maglie invece io ne ho 180 mi sembra molto strano perché il disegno è corretto e lo schema è rispettato coincidendo ogni punto diritto e rovescio, come mai ? come posso spiegarmelo? E poi ho un’altra domanda: “continuare in tondo quando il lavoro misura 16 cm” questa misura di 16 cm da dove la devo considerare? dalla fine del collo? grazie mille
10.03.2021 - 16:51DROPS Design answered:
Buonasera Lorena, prima di partire con lo sprone aveva 84 maglie? Il diagramma A.1 parte da 7 e arriva a 18 maglie per cui si aumentano 11 maglie per ripetizione e ci sono 12 ripetizioni, per cui 11x12= 132 + 84 = 216 maglie. Per l'altra domanda, se non diversamente indicato le misure si prendono dall'inizio del lavoro. Buon lavoro!
10.03.2021 - 21:50
![]() Lorena wrote:
Lorena wrote:
Grazie per la risposta così veloce che ottimo servizio 🤩 ma allora se a me corrisponde un diritto invece del rovescio devo pensare di aver sbagliato qualcosa..... fra l’altro ho anche dei buchi mi sa che devo scucire 😱
22.02.2021 - 00:05DROPS Design answered:
Buongiorno Lorena, come può vedere dal grafico, le 4 maglie su cui si lavorano le trecce procedono in verticale dal giro 8 al giro 16 del diagramma. Gli aumenti vengono incorporati lateralmente nelle maglie rovescio. Buon lavoro!
22.02.2021 - 15:08
![]() Lorena wrote:
Lorena wrote:
Intanto grazie per la risposta precedente, in effetti lavorando top-down avevo confuso la direzione del diagramma ed adesso è tutto chiaro. Ho però un altro dubbio: giro 10 dal basso sono previsti 2 rovesci, 4 diritti, 2 rovesci, 4 dritti, 2 rovesci, ma alcuni diritti sono sopra il simbolo pallina nera che prevede una gettata con lavorazione rovescio giro successivo, allora ecco il mio dubbio: il giro 10 devo lavorarlo come descritto o sopra la pallina nera va un rovescio ritorto in ogni caso?
21.02.2021 - 22:57DROPS Design answered:
Buonasera Lorena, i gettati con il pallino nero si lavorano a rovescio ritorto sul ferro successivo, e fanno parte dei 2 rovesci. Buon lavoro!
21.02.2021 - 23:37
![]() Lorena wrote:
Lorena wrote:
Buongiorno sono andata in crisi. Dopo il collo si passa direttamente alle istruzioni dello sprone, ma la parte fra il collo e l’inizio del diagramma, nel quale ci sono gli aumenti, non è descritta, nell’immagine si vede una parte maglia rasata, con evidenti aumenti, ma non capisco quanti e come distribuirli nei vari giri. Grazie mille.
20.02.2021 - 10:42DROPS Design answered:
Buonasera Lorena, il motivo A.1 inizia con una parte a maglia rasata con dei gettati: si ricordi che i diagrammi si leggono dal basso verso l'alto. Buon lavoro!
20.02.2021 - 18:56
![]() Lydia wrote:
Lydia wrote:
Wird der pullover vollständig mit 2 verschiedenen garnen auf 1 nadel gearbeitet.grösse S drops sky 200g/drops kid-silk 100g ????
11.02.2021 - 11:36DROPS Design answered:
Liebe Lydia, ja genau, Sie stricken den ganzen Pullover mit 1 Faden Sky + 1 Faden Kid-Silk - Maschenprobe 17 M x 22 Reihen = 10 x 10 cm. Viel Spaß beim stricken!
11.02.2021 - 12:39
|
||||||||||||||||||||||||||||||||||
Endless Possibilities Sweater#endlesspossibilitiessweater |
||||||||||||||||||||||||||||||||||
 |
 |
|||||||||||||||||||||||||||||||||
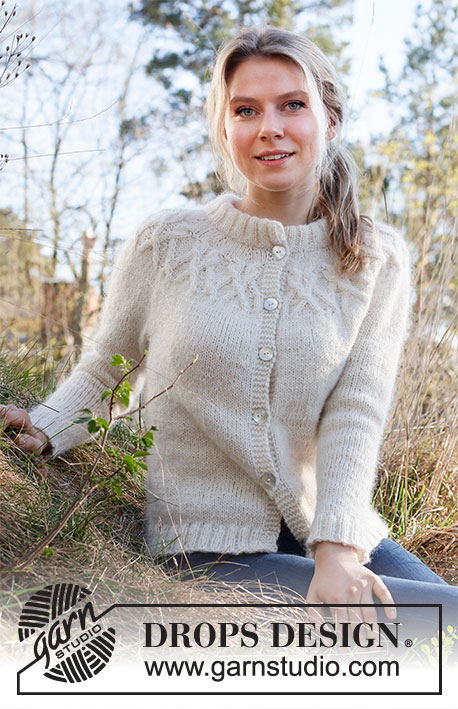
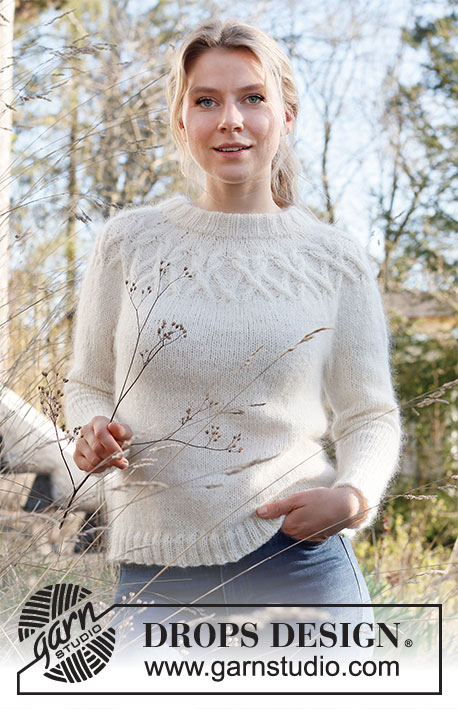
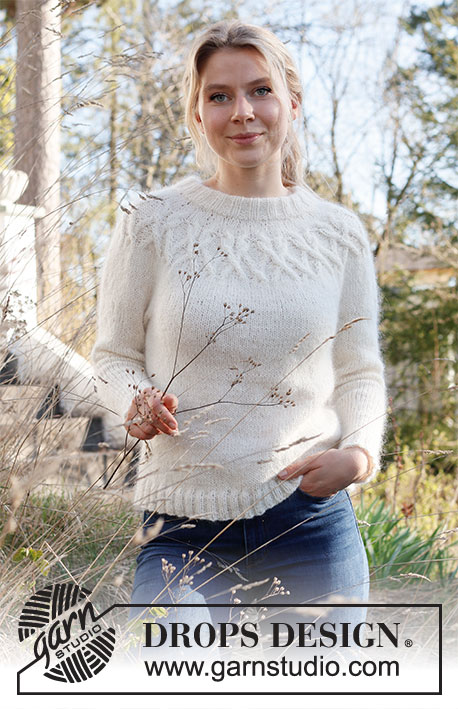
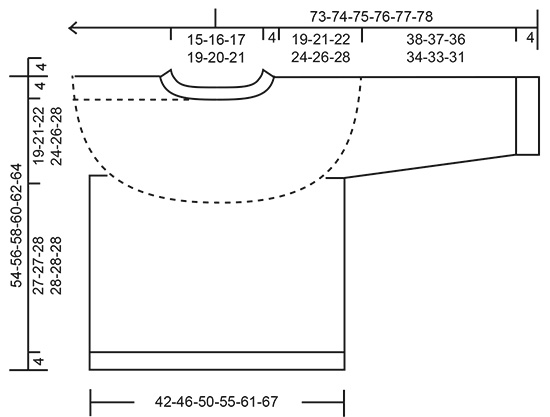
Knitted sweater in DROPS Sky and DROPS Kid-Silk. Piece is knitted top down with round yoke, cables and double neck edge. Size: S - XXXL
DROPS 216-1 |
||||||||||||||||||||||||||||||||||
|
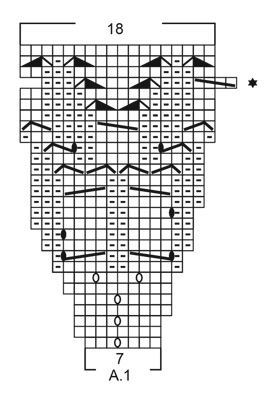
------------------------------------------------------- EXPLANATION FOR THE PATTERN: ------------------------------------------------------- PATTERN: See diagram A.1. INCREASE TIP (evenly): To calculate how to increase evenly, use the total number of stitches on row (e.g. 76 stitches) and divide stitches by number of increases to be done (e.g. 8) = 9.5. In this example increase by making 1 yarn over after alternately approx. every 9th and 10th stitch. On next round work yarn overs twisted to avoid holes. DECREASE TIP (applies to sleeves): Decrease 1 stitch on each side of marker thread as follows: Work until 3 stitches remain before marker thread and knit 2 together, knit 2 (marker thread is between these stitches), slip 1 stitch knitwise, knit 1, pass slipped stitch over stitch worked. BIND-OFF TIP: To avoid a tight bind-off edge you may use a larger needle size. If this also is too tight, work a 1 yarn over after approx. every 4th stitch while binding off (bind off yarn overs as regular stitches). ------------------------------------------------------- START THE PIECE HERE: ------------------------------------------------------- SWEATER - SHORT OVERVIEW OF THE PIECE: Work neck edge and yoke in the round on circular needle from mid back, top down. Now divide yoke for body and sleeves. Body is worked in the round on circular needle, top down. Work sleeves in the round on double pointed needles/short circular needle, top down. DOUBLE NECK EDGE: Cast on 76-80-84-92-96-100 stitches on circular needle size 4 mm = US 6 with 1 strand Sky and 1 strand Kid-Silk (= 2 strands). Knit 1 round. Then work rib (= knit 2/purl 2) in the round for 9 cm = 3½". When rib is done, knit 1 round while increasing 8-11-14-13-16-19 stitches evenly - read INCREASE TIP = 84-91-98-105-112-119 stitches. Knit 1 round. Switch to circular needle size 5 mm. Insert 1 marker mid back, measure yoke from this marker! YOKE: Now work pattern A.1 12-13-14-15-16-17 times in total on round. REMEMBER THE KNITTING GAUGE. When entire A.1 has been worked vertically, there are 216-234-252-270-288-306 stitches on round. Continue in the round with stockinette stitch. When piece measures 16-17-18-18-18-18 cm = 6¼"-6¾"-7"-7"-7"-7", increase 12-12-14-13-14-19 stitches evenly = 228-246-266-283-302-325 stitches. Increase in size S, M and L is now done - continue as explained below. Continue in size XL, XXL and XXXL with stockinette stitch until piece measures 22-24-26 cm = 8¾"-9½"-10¼". Now increase 13-14-19 stitches evenly = 296-316-344 stitches. All sizes: Continue in the round in stockinette stitch until piece measures 19-21-22-24-26-28 cm = 7½"-8¼"-8¾"-9½"-10¼"-11". Now divide piece for body and sleeves. Work next round as follows: Work the first 32-35-37-42-46-51 stitches (= half back piece), slip the next 50-53-58-64-66-70 stitches on a stitch holder for sleeve and cast on 8-8-10-10-12-12 new stitches on needle (= in the side under sleeve), work the next 64-70-75-84-92-102 stitches (= front piece), slip the next 50-53-58-64-66-70 stitches on a stitch holder for sleeve and cast on 8-8-10-10-12-12 new stitches on needle (= in the side under sleeve), work the remaining 32-35-38-42-46-51 stitches (= half back piece). Then finish body and sleeves separately. NOW MEASURE PIECE FROM HERE! BODY: = 144-156-170-188-208-228 stitches. Work in stockinette stitch in the round. When piece measures 27-27-28-28-28-28 cm = 10⅝"-10⅝"-11"-11"-11"-11", increase 28-32-34-40-44-48 stitches evenly = 172-188-204-228-252-276 stitches. Switch to circular needle size 4 mm = US 6. Work rib (knit 2/purl 2) in the round for 4 cm = 1½". Bind off with knit over knit and purl over purl - read BIND-OFF TIP. Sweater measures approx. 54-56-58-60-62-64 cm = 21¼"-22"-22¾"-23⅝"-24⅜"-25¼" from shoulder and down. SLEEVES: Slip the 50-53-58-64-66-70 stitches from stitch holder in one side back on a short circular needle/double pointed needles size 5 mm = US 8 and pick in addition up 1 stitch in each of the new 8-8-10-10-12-12 stitches cast on in the side under sleeve = 58-61-68-74-78-82 stitches. Insert a marker thread in the middle of the new stitches (= 4-4-5-5-6-6 new stitches on each side of marker thread). Work in stockinette stitch in the round. When sleeve measures 4-4-5-5-5-3 cm = 1½"-1½"-2"-2"-2"-1⅛" from division, decrease 2 stitches under sleeve - READ DECREASE TIP. Decrease like this every 3½-3-2-1½-1½-1½ cm = 1¼"-1⅛"-¾"-½"-½"-½" 9-10-13-15-16-17 times in total = 40-41-42-44-46-48 stitches. When sleeve measures 38-37-36-34-33-31 cm = 15"-14½"-14¼"-13⅜"-13"-12¼" (shorter measurements in the larger sizes because of longer yoke), increase 8-7-10-8-10-8 stitches evenly = 48-48-52-52-56-56 stitches. Switch to double pointed needles size 4 mm = US 6. Work rib (knit 2/purl 2) in the round for 4 cm = 1½". Bind off with knit over knit and purl over purl - remember BIND-OFF TIP. Sleeve measures 42-41-40-38-37-35 cm = 16½"-16⅛"-15¾"-15"-14½"-13¾" in total from division. Work the other sleeve the same way. ASSEMBLY: Fold rib at the top of neck down on the inside of garment. Fasten rib to form a double neck edge. To avoid a tight neck edge and avoiding the edge to tip outwards, it is important to make the seam elastic. |
||||||||||||||||||||||||||||||||||
Diagram explanations |
||||||||||||||||||||||||||||||||||
|
||||||||||||||||||||||||||||||||||
 |
||||||||||||||||||||||||||||||||||
 |
||||||||||||||||||||||||||||||||||
Have you finished this pattern?Tag your pictures with #dropspattern #endlesspossibilitiessweater or submit them to the #dropsfan gallery. Do you need help with this pattern?You'll find 26 tutorial videos, a Comments/Questions area and more by visiting the pattern on garnstudio.com. © 1982-2026 DROPS Design A/S. We reserve all rights. This document, including all its sub-sections, has copyrights. Read more about what you can do with our patterns at the bottom of each pattern on our site. |
||||||||||||||||||||||||||||||||||


With over 40 years in knitting and crochet design, DROPS Design offers one of the most extensive collections of free patterns on the internet - translated to 17 languages. As of today we count 325 catalogs and 12298 patterns - 12288 of which are translated into English (US/in).
We work hard to bring you the best knitting and crochet have to offer, inspiration and advice as well as great quality yarns at incredible prices! Would you like to use our patterns for other than personal use? You can read what you are allowed to do in the Copyright text at the bottom of all our patterns. Happy crafting!
Post a comment to pattern DROPS 216-1
We would love to hear what you have to say about this pattern!
If you want to leave a question, please make sure you select the correct category in the form below, to speed up the answering process. Required fields are marked *.