
Popular categories
Looking for a yarn?


Comments / Questions (140)
![]() Helle Jannsen wrote:
Helle Jannsen wrote:
Jeg har forsøgt at strikke bagstykket flere gange, men synes ikke jeg kan få det til at passe sammen. Har snakket med en anden som har samme problem. Kan der være en fejl i opskriften? Synes heller ikke de 7 masker der strikkes først i diagrammerne passer med den lille retkant der vises på billederne af toppen (ryg)
08.07.2020 - 12:14DROPS Design answered:
Hei Helle. Vi skal hjelpe deg så godt vi kan, men hvilken størrelse strikker du og hvor på bakstykket får du problemer / hva mener du er feil? mvh DROPS design
13.07.2020 - 08:57
![]() Chantal wrote:
Chantal wrote:
Bonjour ! Je fais la grandeur med et j’ai terminé le début quand le 34 cm est fait à tricoter A2 9 mailles tout a l’endroit malgré que je suis en côte 2 -2 et quand je continu avec A1 50 mailles cela défait tout le cote 2-2 est-ce normal ? Parce que quand le regarde la photo les cote 2-2 se poursuit tjrs Merci et bonne journée
08.07.2020 - 07:27DROPS Design answered:
Bonjour Chantal, tout à fait, A.2 = 3 côtes mousse qui vont donc se tricoter en rond: 1 tour end, 1 tour env. On tricote A.2 au-dessus des mailles des emmanchures pour avoir une jolie finition avant de rabattre les mailles des emmanchures et conserver 5 m point mousse pour la bordure. Bon tricot!
08.07.2020 - 08:24
![]() Aude wrote:
Aude wrote:
Bonjour,en faisant le A6 (52 m - 8dim = 44m- 8dim= 36m) pour le devant. Je ne vois pas comment avoir 34m
03.07.2020 - 12:13DROPS Design answered:
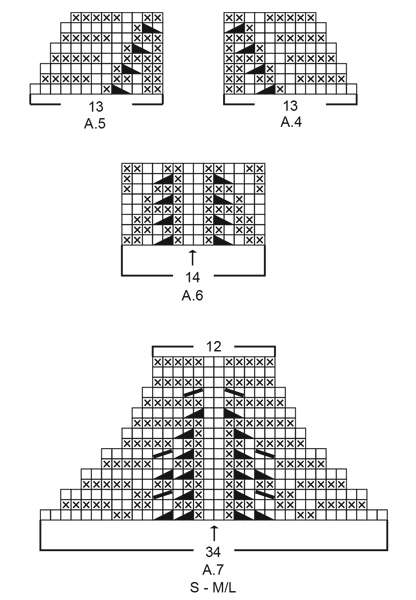
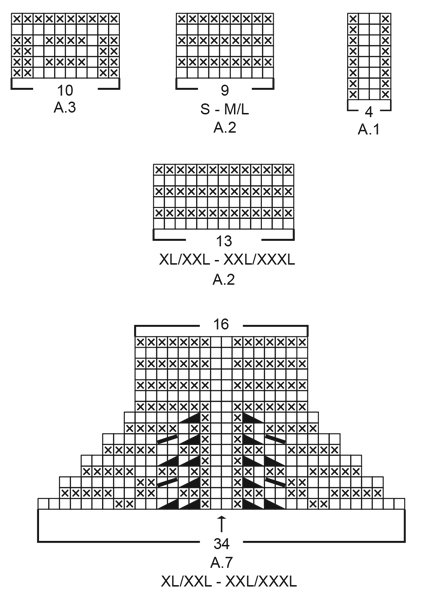
Bonjour Aude, tricotez 2 fois A.6 au total en hauteur (= vous diminuez 2 m à chaque rang impair, soit 8 m après les 8 rangs du digramme x 2 fois en hauteur = 16 diminutions = il reste 36 m. Tricotez encore 1 fois le 1er rang de A.6 = il reste 34 m. Tricotez le rang retour sur l'envers. Tricotez maintenant A.7 sur ces 34 mailles. Bon tricot!
03.07.2020 - 12:59
![]() Aude wrote:
Aude wrote:
Bonjour, apres avoir fait le schema A6 pour le devant, je me retrouve avec 36m au lieu de 34; Comment se fai il? il n y aurait pas une erreur dans le tuto? merci
02.07.2020 - 12:31DROPS Design answered:
Bonjour Aude, vous devez répéter A.6 jusqu'à ce qu'il reste 34 mailles - si vous avez 36 mailles, vous devez tricoter encore 2 rangs de A.6 (= 1 sur l'endroit en diminuant 2 m + 1 sur l'envers) pour qu'il reste 34 mailles. Vous tricoterez ensuite ces 34 mailles en suivant A.7. Bon tricot!
02.07.2020 - 13:56
![]() Lucinda wrote:
Lucinda wrote:
J'ai un soucis avec le diagramme A6, car il y a des diminutions : le diagramme devrait logiquement ressembler à un escalier comme les diagrammes précédents, or ce n'est pas le cas? La dernière maille des lignes paires n'est-elle pas en trop? Merci d'avance
23.06.2020 - 18:23DROPS Design answered:
Bonjour Lucinda, vous avez raison, A.6 fait diminuer le nombre de mailles, ces diminutions doivent se faire comme elles sont représentées dans le diagramme, les 3 premières et les 3 dernières mailles de A.6 montrent comment tricoter les mailles avant et après (pour montrer comment les côtes vont être diminuées au milieu), mais à chaque diminution, vous avez effectivement 1 m en moins de chaque côté soit 2 en moins par rang. Quand il reste 34 m vous avez: 10m, A.6, 10 m. Bon tricot!
24.06.2020 - 07:18
![]() Sabrina Magali Alonso wrote:
Sabrina Magali Alonso wrote:
Hola. Me encanta este patrón. Estoy empezando la espalda pero soy novata y no entiendo bien el diagrama A4. Al tejer los dos puntos juntos al revés se disminuye un punto. ¿ Debo disminuir también puntos en los bordes?. Los diagramas A4 y A5 empiezan en 13 puntos pero termina con 9. No entiendo si se corresponden al borde o si debo tejer 5 puntos de musgo, 13 del diagrama y en la siguiente vuelta 6 de musgo y los 12 del diagrama y así sucesivamente. Muchas gracias.
21.06.2020 - 23:32
![]() Lori Hewitt wrote:
Lori Hewitt wrote:
Hello, I am knitting 211/18, Strawberry Summer. On chart A7, there are slash and back slash marks on rows, 3, 7 and 13. The symbol is not in the key. Could you please let me know what these mean. It is greatly appreciated! Lori
13.06.2020 - 01:29DROPS Design answered:
Dear Mrs Hewitt, you will find these symbols under diagram text as 5th symbol (= slash) and 6th symbol (back slash). Happy knitting!
15.06.2020 - 08:19
![]() Elleke Groeneweg wrote:
Elleke Groeneweg wrote:
Ik heb dit patroon gebruikt voor de vriendin van mijn zoon en het is een prima patroon en het topje zit als gegoten. Ga het nu voor mijn dochter maken en ik hoop met hetzelfde resultaat.
10.06.2020 - 19:51
![]() Anna wrote:
Anna wrote:
Vedr. Bagstykket, tager man kun ind til ærmegab på retsiden? Og hvordan får jeg det til at passe med de 5 (ret)kantmasker, når jeg strikker vrangsiden? Jeg får vrangsidens retkantmasker til at kollidere med 2. omgangs vr. på retsiden? Kan i hjælpe mig?
09.06.2020 - 15:41DROPS Design answered:
Hej Anna, du tager ind fra retsiden ifølge diagrammerne, først ifølge A.4 i højre side af bagstykket og sidst på pinden ifølge A.5. Se også billedet af ryggen. God fornøjelse!
12.06.2020 - 10:40
![]() Nettl wrote:
Nettl wrote:
Ah! Ok, jetzt verstehe ich! Die Symbolerklärung muss man genau lesen ;) und mit der Strickschrift kombinieren... Also Hinreihe in A7 sind am Rand re Maschen (leeres Viereck) und in der Rückreihe eig. li Maschen (Kreuz), aber lt. Symbolbeschreibung wäre das dann re Maschen. Das ist etwas verwirrend. Da hätte man ja gleich die Strickschrift so zeichnen können, dass es nur re Maschen sind und es in der Symbolbeschr. weglassen können. Naja, jetzt ist es eh zu spät ;) danke trotzdem.
09.06.2020 - 13:51
|
||||||||||||||||||||||
Strawberry Summer#strawberrysummertop |
||||||||||||||||||||||
 |
 |
|||||||||||||||||||||
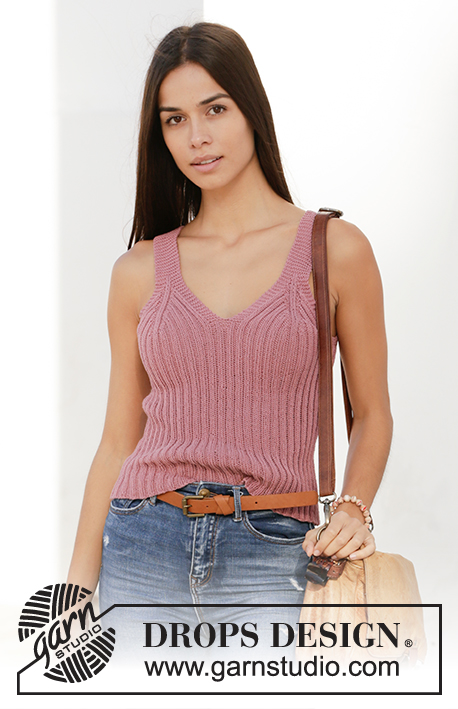
Knitted top in DROPS Safran. Piece is knitted bottom up with rib. Size: S - XXXL
DROPS 211-18 |
||||||||||||||||||||||
|
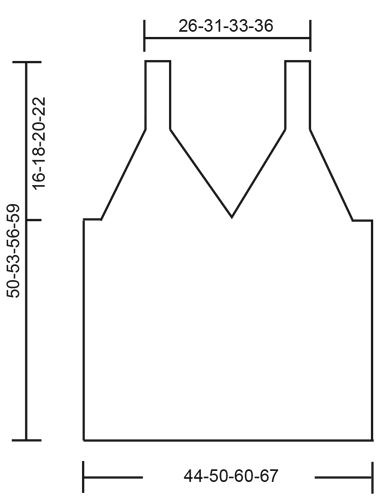
---------------------------------------------------------- EXPLANATION FOR THE PATTERN: ---------------------------------------------------------- GARTER STITCH (back and forth): Knit all rows. 1 ridge vertically = knit 2 rows. PATTERN: See diagrams A.1 to A.7. Choose diagram for your size (applies to A.2 and A.7). Diagrams show all rows in pattern seen from the right side. ---------------------------------------------------------- START THE PIECE HERE: ---------------------------------------------------------- TOP - SHORT OVERVIEW OF THE PIECE: Work body in the round on circular needle, from the bottom and up to armholes. Then work back piece and the 2 front pieces separately, back and forth on circular needle until finished measurements. Straps on front piece are fastened to back piece. BODY: Cast on 224-256-304-336 stitches on circular needle size 3 mm = US 2,5 with Safran. Work A.1 in the round – insert at the same time 1 marker thread at the beginning of round (= left side when garments is worn), and 1 marker thread after 112-128-152-168 stitches (= right side when garment is worn). Both marker threads is between 2 purl stitches. Move the marker thread upwards when working. REMEMBER THE KNITTING GAUGE! When piece measures 33-34-35-36 cm = 13"-13⅜"-13¾"-14¼", work next round as follows (approx. 1 cm = ⅜" remains until piece is divided mid front, and decrease for armholes): Work A.2 (= 9-9-13-13 stitches), continue A.1 over the next 42-50-58-66 stitches, work A.3 (= 10 stitches mid front), continue A.1 over the next 42-50-58-66 stitches), work A.2 over the next 18-18-26-26 stitches (= 2 repetitions of 9-9-13-13 stitches – marker thread is between these 2 repetitions), continue A.1 over the next 94-110-126-142 stitches (= back piece), and work A.2 over the remaining 9-9-13-13 stitches. Continue pattern like this until A.2 and A.3 have been worked vertically. On next round bind off for armholes, i.e. work next round as follows: Bind off 4-4-8-8 stitches for armhole, work 5 stitches in GARTER STITCH – read explanation above, continue A.1 over the next 42-50-58-66 stitches, work 10 stitches in garter stitch (= mid front), continue A.1 over the next 42-50-58-66 stitches, work 5 stitches in garter stitch, bind off 8-8-16-16 stitches for armhole, work 5 stitches in garter stitch, continue A.1 over the next 94-110-126-142 stitches, work 5 stitches in garter stitch, and bind off the remaining 4-4-8-8 stitches for armhole. Cut the yarn. Finish back piece and front pieces separately. BACK PIECE: = 104-120-136-152 stitches. Begin from wrong side and work 1 row in rib as before with 5 edge stitches in garter stitch in each side. Continue to work in rib with 5 edge stitches in garter stitch in each side while AT THE SAME TIME decreasing for armholes on every row from right side as explained below. I.e. work first row from right side as follows: Work A.4 (= 13 stitches), continue rib as before until 13 stitches remain on row, finish with A.5 (= 13 stitches). Continue pattern like this until A.4 and A.5 have been worked 4-4-5-6 times in total vertically (= 16-16-20-24 stitches decreased in each side) = 72-88-96-104 stitches remain. Work 3 ridges back and forth over all stitches. Bind off - make sure that the bind-off edge is not too tight. Back piece measures approx. 11-11-14-16 cm = 4⅜"-4⅜"-5½"-6¼" from where piece was divided for front piece and bac piece. FRONT PIECE: = 104-120-136-152 stitches. Divide the piece mid front and slip half the stitches on 1 stitch holder or extra needle. Then work first part as explained below. PART-1: = 52-60-68-76 stitches. Begin from wrong side and work 1 row in rib as before with 5 edge stitches in garter stitch in each side. Insert 1 marker between the 2 middle stitches on row (= between 2 knit stitch seen from right side). Marker indicates the middle. Continue to work in rib with 5 edge stitches in garter stitch in each side while at the same time decreasing on each side of the middle as explained below. I.e. work first row from right side as follows: 5 edge stitches in garter stitch, work rib as before until 7 stitches remain before marker, work A.6 (= 14 stitches), work rib as before until 5 stitches remain on row, and finish with 5 edge stitches in garter stitch. Continue pattern like this, and repeat A.6 vertically until 34 stitches remain on row – finish after 1 row from wrong side. Now work A.7 over these 34 stitches. When A.7 has been worked, 12-12-16-16 stitches remain on needle for strap, and front piece measures approx. 11-13-16-18 cm = 4⅜"-5⅛"-6¼"-7" from where piece was divided for front and back piece. Work strap as explained below. STRAP: = 12-12-16-16 stitches. Work in garter stitch back and forth until the strap measures approx. 10-12-10-10 cm = 4"-4¾"-4"-4" – try the top on and work to desired length, strap should continue over the shoulder and down to back piece. Bind off. PART-2: Slip the 52-60-68-76 stitches from stitch holder or extra needle back on circular needle size 3 mm = US 2,5, and work part-2 the same way as part-1. Then work strap the same way as on part-1. Bind off. ASSEMBLY: Fasten straps to back piece - begin at the edge in each side and sew stitch too stitch. Cut and fasten the thread. |
||||||||||||||||||||||
Diagram explanations |
||||||||||||||||||||||
|
||||||||||||||||||||||
 |
||||||||||||||||||||||
 |
||||||||||||||||||||||
 |
||||||||||||||||||||||
Have you finished this pattern?Tag your pictures with #dropspattern #strawberrysummertop or submit them to the #dropsfan gallery. Do you need help with this pattern?You'll find 15 tutorial videos, a Comments/Questions area and more by visiting the pattern on garnstudio.com. © 1982-2026 DROPS Design A/S. We reserve all rights. This document, including all its sub-sections, has copyrights. Read more about what you can do with our patterns at the bottom of each pattern on our site. |
||||||||||||||||||||||


With over 40 years in knitting and crochet design, DROPS Design offers one of the most extensive collections of free patterns on the internet - translated to 17 languages. As of today we count 324 catalogs and 12291 patterns - 12281 of which are translated into English (US/in).
We work hard to bring you the best knitting and crochet have to offer, inspiration and advice as well as great quality yarns at incredible prices! Would you like to use our patterns for other than personal use? You can read what you are allowed to do in the Copyright text at the bottom of all our patterns. Happy crafting!
Post a comment to pattern DROPS 211-18
We would love to hear what you have to say about this pattern!
If you want to leave a question, please make sure you select the correct category in the form below, to speed up the answering process. Required fields are marked *.