
Popular categories
Looking for a yarn?


Comments / Questions (140)
![]() Mirka wrote:
Mirka wrote:
Zrozumiałam schemat A6 😉 top gotowy. Dziękuję i pozdrawiam
12.10.2020 - 16:19
![]() Mirka wrote:
Mirka wrote:
Dzień dobry, nie rozumiem schematu A6. W rzędach nieparzystych zmniejszamy liczbę oczek o 2. Czyli po rzędzie 1 mam 12 oczek a schemat pokazuje nadal 14 oczek. Jak przerabiać rząd lewy?
11.10.2020 - 19:31DROPS Design answered:
Witaj Mirko, masz rację, liczba oczek w schemacie A.6 spada, a schemat jest dalej taki sam. Ten schemat ma obrazować jak są zamykane oczka na środku miseczki, a 3 pierwsze i 3 ostatnie oczka schematu A.6 pokazują jak przerabiać oczka po bokach. Na środku na prawej stronie robótki będą zawsze 2 oczka prawe, a po dwóch ich stronach 2-4 oczek lewych, zależy od rzędu w schemacie. Miłej pracy!
12.10.2020 - 09:50
![]() Hege wrote:
Hege wrote:
Hei, jeg strikker strawberry summer. Jeg skal begynne å strikke fronten. Men jeg sitter igjen med 2 masker som jeg ikke skjønner hvor skal være. 52 masker, dele på 2 bryst= 26 masker på hver. 5 kantmasker på hver side= 16 masker. Mønster rapporten er på 14. Hva skal gjøres med de 2 maskene til overs? Hilsen Hege
23.09.2020 - 14:15DROPS Design answered:
Hei Hege. Du har 52 masker til DEL-1 på forstykket. Midt mellom disse maskene har du satt et merke. 26 masker på hver side av merket. Nå strikker du 5 masker riller, vrangbord som før til det gjentstår 7 masker før merket, strikk A.6 (7 masker av A.6 strikkes før merket og 7 masker av A.6 strikkes etter merket). Så strikker du vrangbord som før til det gjenstår 5 masker, strikke 5 masker i riller. Go Fornøyelse!
28.09.2020 - 10:14
![]() Janique wrote:
Janique wrote:
Bonsoir, Je fais la grandeur XL. J’ai terminé de tricoter les 35 en A1 et je rencontre un problème au tour suivant. En tricotant 1x A2(XL) - 13 mailles, si je suis avec A1, ça décale le motif A1.
29.08.2020 - 22:10DROPS Design answered:
Bonjour Janique, après 35 cm de A.1, vous tricotez le tour suivant: 13 mailles en A.3, puis les 58 mailles suivantes en A.1 comme avant (= vous continuez A.1, vous ne reprenez pas A.1 à la 1ère maille) pour ne pas décaler A.1. Bon tricot!
31.08.2020 - 09:41
![]() Nuria wrote:
Nuria wrote:
No me salen las disminuciones del esquema A.6, no me coincide y tampoco sale como en la foto. ¿Son disminuciones con 2 puntos del revés retorcidos? ¿O son disminuciones normales? ¿Alguien puede ayudarme? Gracias.
25.08.2020 - 18:39DROPS Design answered:
Hola Nuria! En el esquema A.6, a la derecha hay 2 puntos juntos de revés retorcido y a la izqierda hay 2 puntos juntos de revés. Tengo el mismo top y es estupendo :) Buen trabajo!
20.11.2020 - 16:44
![]() Mai Britt wrote:
Mai Britt wrote:
Hei skal begynne på denne toppen nå, det står at merkene skal være mellom 2 vrange masker. På S så går ikke mønsteret opp fra vrang til vrang med 112 masker. Misforstår jeg helt?
10.08.2020 - 20:12DROPS Design answered:
Hej Mai Britt Du sätter en markör i början av varvet, sedan stickar du A.1 (=4 m) 28 gånger, dvs 112 m. Sedan sätter du en maskör och stickar A.1 ytterligare 28 gånger (dvs 112 m). Du har nu markörerna mellan 2 vrange masker. Mvh DROPS Design
14.08.2020 - 10:55
![]() Carina Mæhle wrote:
Carina Mæhle wrote:
Hei. Har nå strikket lengde på 33cm (str. S) og skal begynne med diagram. Forsiden tror jeg er ok, men etter å ha strikket de 9 første maskene under armen på bakstykket og skal begynne på diagram A1, får jeg ikke dette til å stemme. Det blir da en forskyvning i mønsteret, dvs at de rette maskene møter ikke de rette maskene fra forrige omgang og det samme med de vrange. For med andre ord ikke «rette» striper oppover lenger. Takknemlig om dere kan hjelpe meg. Hilsen Carina
30.07.2020 - 23:33
![]() Carina Mæhle wrote:
Carina Mæhle wrote:
Hei. Har nå strikket lengde på 33cm (str. S) og skal begynne med diagram. Forsiden tror jeg er ok, men etter å ha strikket de 9 første maskene under armen på bakstykket og skal begynne på diagram A1, får jeg ikke dette til å stemme. Det blir da en forskyvning i mønsteret, dvs at de rette maskene møter ikke de rette maskene fra forrige omgang og det samme med de vrange. For med andre ord ikke «rette» striper oppover lenger. Takknemlig om dere kan hjelpe meg. Hilsen Carina
30.07.2020 - 23:32
![]() Annette Davis wrote:
Annette Davis wrote:
I guess this is really both a comment and a question. It would be really nice to have the facility to translate the comments into English. Even a machine read one would help. It’s always good to read other people’s questions, and your answers that go with them. Thank you
14.07.2020 - 18:10DROPS Design answered:
Dear Mrs Davis, we are unable to translate every comment in every language, you can try with an online translator to have an idea even if it won't be always perfect - or simply ask your question here ;) Happy knitting!
15.07.2020 - 07:30
![]() Louise wrote:
Louise wrote:
Je tricote une taille S, pour tricoter le dos et le devant, il faut tricoter 33 cm avec le motif A.1. Ensuite je dois faire un cm de plus pour commencer les emmanchures et donc séparer mon travail (Dos/devant 1/devant 2). Donc j’aurais 35 cm Max du bas jusqu’à l’emmanchure. Or, sur le patron avec mesure cette mesure là est de 50 cm (ce qui est d’ailleurs beaucoup trop grand !) Pourquoi cette différence de 15 cm ? Erreur du patron ?
12.07.2020 - 17:21DROPS Design answered:
Bonjour Louise, les 50 cm en taille S s'appliquent à la longueur totale du top, y compris les 16 cm du haut, autrement dit 33 cm + 1 cm avant la division + 16 cm après la division = 50 cm . Bon tricot!
13.07.2020 - 09:12
|
||||||||||||||||||||||
Strawberry Summer#strawberrysummertop |
||||||||||||||||||||||
 |
 |
|||||||||||||||||||||
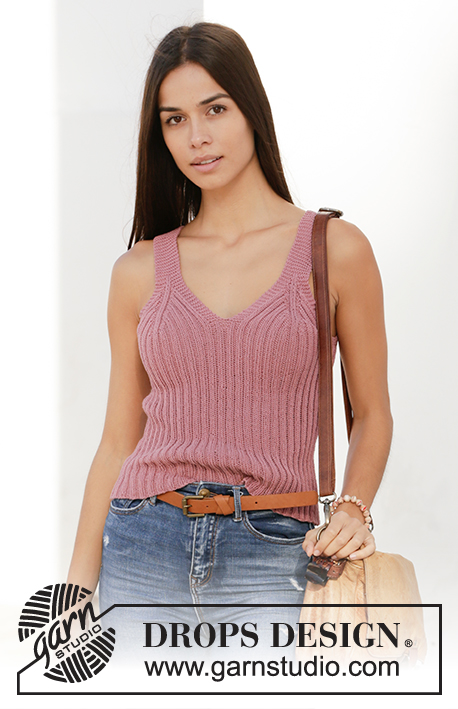
Knitted top in DROPS Safran. Piece is knitted bottom up with rib. Size: S - XXXL
DROPS 211-18 |
||||||||||||||||||||||
|
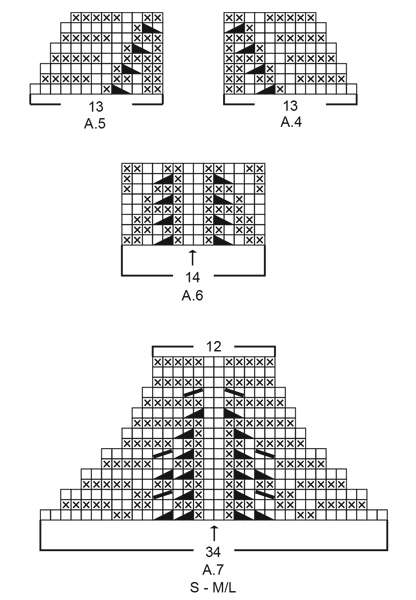
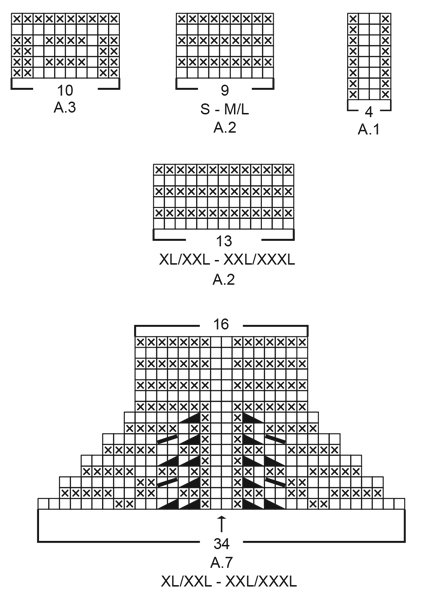
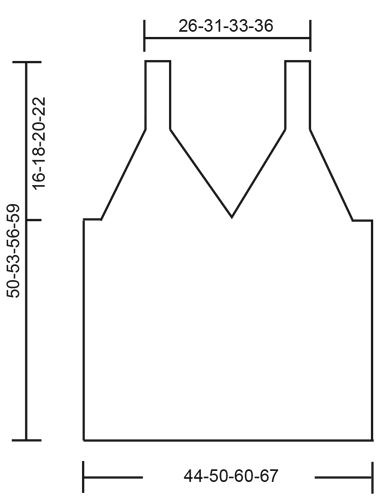
---------------------------------------------------------- EXPLANATION FOR THE PATTERN: ---------------------------------------------------------- GARTER STITCH (back and forth): Knit all rows. 1 ridge vertically = knit 2 rows. PATTERN: See diagrams A.1 to A.7. Choose diagram for your size (applies to A.2 and A.7). Diagrams show all rows in pattern seen from the right side. ---------------------------------------------------------- START THE PIECE HERE: ---------------------------------------------------------- TOP - SHORT OVERVIEW OF THE PIECE: Work body in the round on circular needle, from the bottom and up to armholes. Then work back piece and the 2 front pieces separately, back and forth on circular needle until finished measurements. Straps on front piece are fastened to back piece. BODY: Cast on 224-256-304-336 stitches on circular needle size 3 mm = US 2,5 with Safran. Work A.1 in the round – insert at the same time 1 marker thread at the beginning of round (= left side when garments is worn), and 1 marker thread after 112-128-152-168 stitches (= right side when garment is worn). Both marker threads is between 2 purl stitches. Move the marker thread upwards when working. REMEMBER THE KNITTING GAUGE! When piece measures 33-34-35-36 cm = 13"-13⅜"-13¾"-14¼", work next round as follows (approx. 1 cm = ⅜" remains until piece is divided mid front, and decrease for armholes): Work A.2 (= 9-9-13-13 stitches), continue A.1 over the next 42-50-58-66 stitches, work A.3 (= 10 stitches mid front), continue A.1 over the next 42-50-58-66 stitches), work A.2 over the next 18-18-26-26 stitches (= 2 repetitions of 9-9-13-13 stitches – marker thread is between these 2 repetitions), continue A.1 over the next 94-110-126-142 stitches (= back piece), and work A.2 over the remaining 9-9-13-13 stitches. Continue pattern like this until A.2 and A.3 have been worked vertically. On next round bind off for armholes, i.e. work next round as follows: Bind off 4-4-8-8 stitches for armhole, work 5 stitches in GARTER STITCH – read explanation above, continue A.1 over the next 42-50-58-66 stitches, work 10 stitches in garter stitch (= mid front), continue A.1 over the next 42-50-58-66 stitches, work 5 stitches in garter stitch, bind off 8-8-16-16 stitches for armhole, work 5 stitches in garter stitch, continue A.1 over the next 94-110-126-142 stitches, work 5 stitches in garter stitch, and bind off the remaining 4-4-8-8 stitches for armhole. Cut the yarn. Finish back piece and front pieces separately. BACK PIECE: = 104-120-136-152 stitches. Begin from wrong side and work 1 row in rib as before with 5 edge stitches in garter stitch in each side. Continue to work in rib with 5 edge stitches in garter stitch in each side while AT THE SAME TIME decreasing for armholes on every row from right side as explained below. I.e. work first row from right side as follows: Work A.4 (= 13 stitches), continue rib as before until 13 stitches remain on row, finish with A.5 (= 13 stitches). Continue pattern like this until A.4 and A.5 have been worked 4-4-5-6 times in total vertically (= 16-16-20-24 stitches decreased in each side) = 72-88-96-104 stitches remain. Work 3 ridges back and forth over all stitches. Bind off - make sure that the bind-off edge is not too tight. Back piece measures approx. 11-11-14-16 cm = 4⅜"-4⅜"-5½"-6¼" from where piece was divided for front piece and bac piece. FRONT PIECE: = 104-120-136-152 stitches. Divide the piece mid front and slip half the stitches on 1 stitch holder or extra needle. Then work first part as explained below. PART-1: = 52-60-68-76 stitches. Begin from wrong side and work 1 row in rib as before with 5 edge stitches in garter stitch in each side. Insert 1 marker between the 2 middle stitches on row (= between 2 knit stitch seen from right side). Marker indicates the middle. Continue to work in rib with 5 edge stitches in garter stitch in each side while at the same time decreasing on each side of the middle as explained below. I.e. work first row from right side as follows: 5 edge stitches in garter stitch, work rib as before until 7 stitches remain before marker, work A.6 (= 14 stitches), work rib as before until 5 stitches remain on row, and finish with 5 edge stitches in garter stitch. Continue pattern like this, and repeat A.6 vertically until 34 stitches remain on row – finish after 1 row from wrong side. Now work A.7 over these 34 stitches. When A.7 has been worked, 12-12-16-16 stitches remain on needle for strap, and front piece measures approx. 11-13-16-18 cm = 4⅜"-5⅛"-6¼"-7" from where piece was divided for front and back piece. Work strap as explained below. STRAP: = 12-12-16-16 stitches. Work in garter stitch back and forth until the strap measures approx. 10-12-10-10 cm = 4"-4¾"-4"-4" – try the top on and work to desired length, strap should continue over the shoulder and down to back piece. Bind off. PART-2: Slip the 52-60-68-76 stitches from stitch holder or extra needle back on circular needle size 3 mm = US 2,5, and work part-2 the same way as part-1. Then work strap the same way as on part-1. Bind off. ASSEMBLY: Fasten straps to back piece - begin at the edge in each side and sew stitch too stitch. Cut and fasten the thread. |
||||||||||||||||||||||
Diagram explanations |
||||||||||||||||||||||
|
||||||||||||||||||||||
 |
||||||||||||||||||||||
 |
||||||||||||||||||||||
 |
||||||||||||||||||||||
Have you finished this pattern?Tag your pictures with #dropspattern #strawberrysummertop or submit them to the #dropsfan gallery. Do you need help with this pattern?You'll find 15 tutorial videos, a Comments/Questions area and more by visiting the pattern on garnstudio.com. © 1982-2026 DROPS Design A/S. We reserve all rights. This document, including all its sub-sections, has copyrights. Read more about what you can do with our patterns at the bottom of each pattern on our site. |
||||||||||||||||||||||


With over 40 years in knitting and crochet design, DROPS Design offers one of the most extensive collections of free patterns on the internet - translated to 17 languages. As of today we count 324 catalogs and 12291 patterns - 12281 of which are translated into English (US/in).
We work hard to bring you the best knitting and crochet have to offer, inspiration and advice as well as great quality yarns at incredible prices! Would you like to use our patterns for other than personal use? You can read what you are allowed to do in the Copyright text at the bottom of all our patterns. Happy crafting!
Post a comment to pattern DROPS 211-18
We would love to hear what you have to say about this pattern!
If you want to leave a question, please make sure you select the correct category in the form below, to speed up the answering process. Required fields are marked *.