Comments / Questions (140)
![]() Tina Stjernholm wrote:
Tina Stjernholm wrote:
Jeg kan ikke få bagstykket til at se rigtig ud. Skal kantmaskerne regnes udenfor diagrammet? Jeg er gået ud fra, at de var ned i A4 og A5.
27.07.2021 - 12:42
![]() Masset wrote:
Masset wrote:
Modele drops 211/18, les diminutions en A6: le schema be decompte pas les mailles: rang1 a 8 il y a toujours 7 mailles a tricoter or si on enlève 8 mailles il n’en reste que 3 +3… donc comment appliquer le schema? Merci
20.07.2021 - 15:01DROPS Design answered:
Bonjour Mme Masset, le diagramme A.6 montre comment diminuer de part et d'autre de (1 m env, 2 m end, 1 m env) tout en continuant les côtes de chaque côté, autrement dit, les côtes vont se décaler vers le milieu, en diagonale, commencez A.6 1 m avant à chaque nouvelle diminution (à chaque rang) et A.6 se terminera 1 m après la fois précédente à chaque fois. Vous allez ainsi "manger" les mailles en côtes au niveau de la m env avant les 2 m end et après la m env, après les 2 m end. Bon tricot!
20.07.2021 - 15:28
![]() Chris wrote:
Chris wrote:
Die Strickschriften A 4 und A5 verwirren mehr als dass sie hilfreich sind. Vor allem Rückreihen zeigen die Maschen so, wie sie von der Vorderseite aussehen sollen. Am besten die Maschen stricken wie sie erscheinen. mir hat das jedenfalls mehr geholfen.
19.07.2021 - 09:47
![]() Alena wrote:
Alena wrote:
Need one more skein for S size.
18.07.2021 - 13:25
![]() Masset wrote:
Masset wrote:
Comment realiser le dos schema 4 et 5 pour garder les cotes 2/2… maille endroit sur endroit= endroit du tricot ou maille endroit du rang précédent? Tout se decale chez moi…
17.07.2021 - 13:58DROPS Design answered:
Bonjour Mme Masset, tricotez les mailles des côtes comme elles se présentent et tricotez les mailles de A.4 /A.5 comme indiqué dans le diagramme (x = à tricoter à l'endroit sur l'envers et les cases blanches à tricoter à l'endroit sur l'envers), les 5 premières mailles de A.4 et les 5 dernières mailles de A.5 sont des mailles au point mousse (à l'endroit sur l'endroit et à l'endroit sur l'envers). Bon tricot!
19.07.2021 - 08:29
![]() Audrey wrote:
Audrey wrote:
Hi, I just knitted this today and found upon trying the garment on, that the top of the back piece (where the 3 ridges of garter stitch are) do not lie properly against the body and instead, warp slightly in the middle section and float. Is this normal?
08.07.2021 - 19:04DROPS Design answered:
Dear Audrey, not really, it should be somewhat tighter around the breasts and a little looser around the wais, bup no warping there. Happy Stitching!
08.07.2021 - 21:32
![]() Kirstine wrote:
Kirstine wrote:
Jeg har forsøgt at strikke bagstykket flere gange, men synes ikke jeg kan få det til at passe sammen. Har snakket med en anden som har samme problem. Kan der være en fejl i opskriften? Synes heller ikke de 7 masker der strikkes først i diagrammerne passer med den lille retkant der vises på billederne af toppen (ryg)
08.06.2021 - 20:59DROPS Design answered:
Hej Kirstine, hvilken størrelse? Hvor er du i opskriften? Hvor mange masker har du? Hvilket diagram skal du strikke?
11.06.2021 - 11:00
![]() Iwona wrote:
Iwona wrote:
Nie zgadza mi się ilość oczek: np. piszecie że tył zamknąć, gdy zostaje 72 oczka, a widać na foto że tył ma ok. 50 oczek, czy mam rację?
07.06.2021 - 17:50DROPS Design answered:
Witaj Iwono, na szczęście mam już ten sweterek w najmniejszym rozmiarze więc szybko sprawdzam - wg wzoru jest 72 oczka na górze tyłu i wszystko się zgadza. Na zdjęciu jest wykonany mniejszy sweterek niż S. Pozdrawiamy i miłej pracy :)
07.06.2021 - 18:23
![]() Barbara Zeller wrote:
Barbara Zeller wrote:
Zu meiner vorherigen Frage: Leider hilft mir Ihre Auskunft nicht. Ich hatte ja am Rückteil auch keine Probleme mit der Strickschrift und am Abnehmen liegt es auch nicht. Aber wenn Sie A.6 ansehen, werden die mittleren beiden Maschen laut Strickschrift in der Hin- und Rückreihe rechts gestrickt- wird also kraus rechts. Das stimmt ja aber nicht..... Bin noch genauso ratlos wie bisher.
02.06.2021 - 12:40DROPS Design answered:
Liebe Frau Zeller, die 2 mittleren Maschen in A.6 sind rechte Maschen vom Bündchen, die werden rechts bei den Hin-Reihen und links bei den Rückreihen (Krausrechts würde rechts bei Hin sowie Rückreihen). Beim Vorderteil stricken Sie im Rippenmuster wie zuvor, und gleichzeitig nehmen Sie beidseitig von den 2 mittleren rechten Maschen wie in A.6 gezeigt. Hilft es Ihnen besser?
02.06.2021 - 13:21
![]() Barbara Zeller wrote:
Barbara Zeller wrote:
Ich habe ein Problem mit A.6. Habe das Top bis zur Teilung Vorderteil fertig. Wenn ich nach der Anleitung genau mit den Hin- und Rückreihen (Hinreihe von rechts nach links, Rückreihe von links nach rechts) stricke, entsteht ein krauses Kuddelmuddel und keine schöne rechte Linie, die zum Träger führt. Sind bei A.6 nur Hinreihen angegeben? Oder muss man es anders lesen? Bin wirklich eine geübte Strickerin, aber hier habe ich einen Knoten im Hirn. Danke für schnelle Hilfe.
01.06.2021 - 18:20DROPS Design answered:
Liebe Frau Zeller, alle Reihen sind in A.6 gezeigt, dh genauso wie bei allen anderen Diagrammen. Vorderteil beginnt mit einer Rückreihe und die 2 mittleren Maschen vom 1. Teil sollen in der Mitte sein = wo Sie die Markierung eingesetzt haben, dh die Abnahmen werden bei den Hinreihen gestrickt (mit 2 M links zs/2 M links verschränkt zs beidseitig von den 2 Mittleren rechte Maschen). Kann das Ihnen helfen?
02.06.2021 - 07:36
Strawberry Summer#strawberrysummertop |
||||||||||||||||||||||
 |
 |
|||||||||||||||||||||
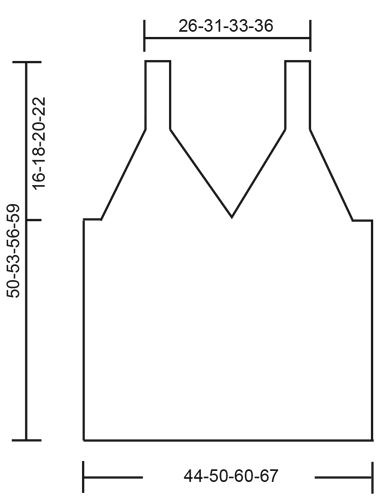
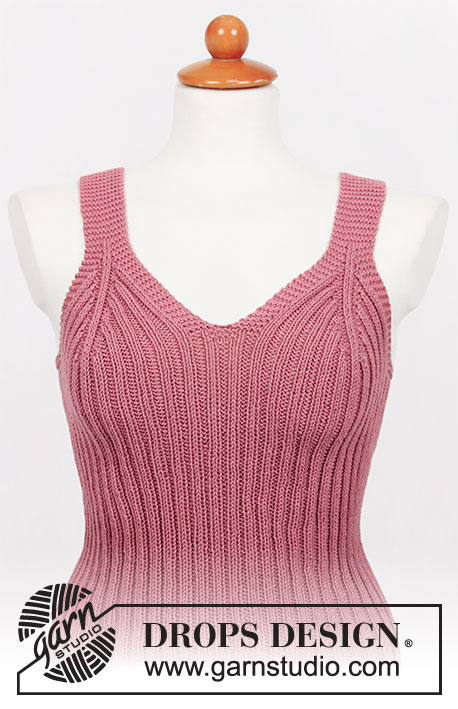
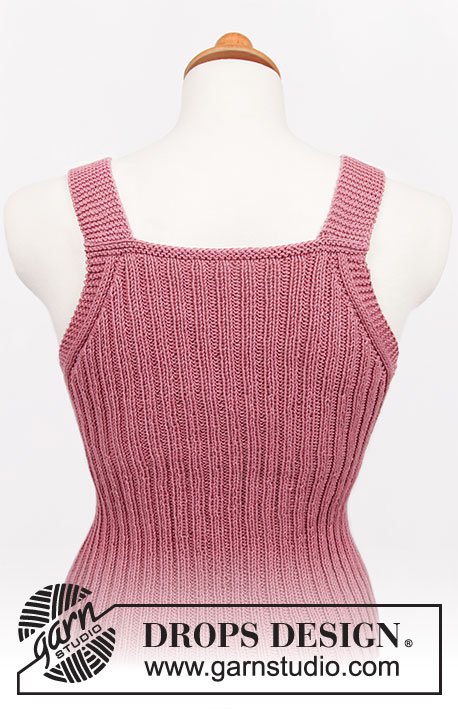
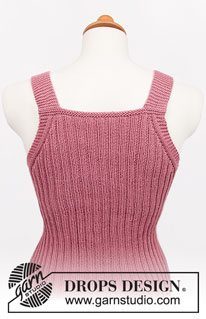
Knitted top in DROPS Safran. Piece is knitted bottom up with rib. Size: S - XXXL
DROPS 211-18 |
||||||||||||||||||||||
|
---------------------------------------------------------- EXPLANATION FOR THE PATTERN: ---------------------------------------------------------- GARTER STITCH (back and forth): Knit all rows. 1 ridge vertically = knit 2 rows. PATTERN: See diagrams A.1 to A.7. Choose diagram for your size (applies to A.2 and A.7). Diagrams show all rows in pattern seen from the right side. ---------------------------------------------------------- START THE PIECE HERE: ---------------------------------------------------------- TOP - SHORT OVERVIEW OF THE PIECE: Work body in the round on circular needle, from the bottom and up to armholes. Then work back piece and the 2 front pieces separately, back and forth on circular needle until finished measurements. Straps on front piece are fastened to back piece. BODY: Cast on 224-256-304-336 stitches on circular needle size 3 mm = US 2,5 with Safran. Work A.1 in the round – insert at the same time 1 marker thread at the beginning of round (= left side when garments is worn), and 1 marker thread after 112-128-152-168 stitches (= right side when garment is worn). Both marker threads is between 2 purl stitches. Move the marker thread upwards when working. REMEMBER THE KNITTING GAUGE! When piece measures 33-34-35-36 cm = 13"-13⅜"-13¾"-14¼", work next round as follows (approx. 1 cm = ⅜" remains until piece is divided mid front, and decrease for armholes): Work A.2 (= 9-9-13-13 stitches), continue A.1 over the next 42-50-58-66 stitches, work A.3 (= 10 stitches mid front), continue A.1 over the next 42-50-58-66 stitches), work A.2 over the next 18-18-26-26 stitches (= 2 repetitions of 9-9-13-13 stitches – marker thread is between these 2 repetitions), continue A.1 over the next 94-110-126-142 stitches (= back piece), and work A.2 over the remaining 9-9-13-13 stitches. Continue pattern like this until A.2 and A.3 have been worked vertically. On next round bind off for armholes, i.e. work next round as follows: Bind off 4-4-8-8 stitches for armhole, work 5 stitches in GARTER STITCH – read explanation above, continue A.1 over the next 42-50-58-66 stitches, work 10 stitches in garter stitch (= mid front), continue A.1 over the next 42-50-58-66 stitches, work 5 stitches in garter stitch, bind off 8-8-16-16 stitches for armhole, work 5 stitches in garter stitch, continue A.1 over the next 94-110-126-142 stitches, work 5 stitches in garter stitch, and bind off the remaining 4-4-8-8 stitches for armhole. Cut the yarn. Finish back piece and front pieces separately. BACK PIECE: = 104-120-136-152 stitches. Begin from wrong side and work 1 row in rib as before with 5 edge stitches in garter stitch in each side. Continue to work in rib with 5 edge stitches in garter stitch in each side while AT THE SAME TIME decreasing for armholes on every row from right side as explained below. I.e. work first row from right side as follows: Work A.4 (= 13 stitches), continue rib as before until 13 stitches remain on row, finish with A.5 (= 13 stitches). Continue pattern like this until A.4 and A.5 have been worked 4-4-5-6 times in total vertically (= 16-16-20-24 stitches decreased in each side) = 72-88-96-104 stitches remain. Work 3 ridges back and forth over all stitches. Bind off - make sure that the bind-off edge is not too tight. Back piece measures approx. 11-11-14-16 cm = 4⅜"-4⅜"-5½"-6¼" from where piece was divided for front piece and bac piece. FRONT PIECE: = 104-120-136-152 stitches. Divide the piece mid front and slip half the stitches on 1 stitch holder or extra needle. Then work first part as explained below. PART-1: = 52-60-68-76 stitches. Begin from wrong side and work 1 row in rib as before with 5 edge stitches in garter stitch in each side. Insert 1 marker between the 2 middle stitches on row (= between 2 knit stitch seen from right side). Marker indicates the middle. Continue to work in rib with 5 edge stitches in garter stitch in each side while at the same time decreasing on each side of the middle as explained below. I.e. work first row from right side as follows: 5 edge stitches in garter stitch, work rib as before until 7 stitches remain before marker, work A.6 (= 14 stitches), work rib as before until 5 stitches remain on row, and finish with 5 edge stitches in garter stitch. Continue pattern like this, and repeat A.6 vertically until 34 stitches remain on row – finish after 1 row from wrong side. Now work A.7 over these 34 stitches. When A.7 has been worked, 12-12-16-16 stitches remain on needle for strap, and front piece measures approx. 11-13-16-18 cm = 4⅜"-5⅛"-6¼"-7" from where piece was divided for front and back piece. Work strap as explained below. STRAP: = 12-12-16-16 stitches. Work in garter stitch back and forth until the strap measures approx. 10-12-10-10 cm = 4"-4¾"-4"-4" – try the top on and work to desired length, strap should continue over the shoulder and down to back piece. Bind off. PART-2: Slip the 52-60-68-76 stitches from stitch holder or extra needle back on circular needle size 3 mm = US 2,5, and work part-2 the same way as part-1. Then work strap the same way as on part-1. Bind off. ASSEMBLY: Fasten straps to back piece - begin at the edge in each side and sew stitch too stitch. Cut and fasten the thread. |
||||||||||||||||||||||
Diagram explanations |
||||||||||||||||||||||
|
||||||||||||||||||||||
 |
||||||||||||||||||||||
 |
||||||||||||||||||||||
 |
||||||||||||||||||||||
Have you finished this pattern?Tag your pictures with #dropspattern #strawberrysummertop or submit them to the #dropsfan gallery. Do you need help with this pattern?You'll find 15 tutorial videos, a Comments/Questions area and more by visiting the pattern on garnstudio.com. © 1982-2026 DROPS Design A/S. We reserve all rights. This document, including all its sub-sections, has copyrights. Read more about what you can do with our patterns at the bottom of each pattern on our site. |
||||||||||||||||||||||








Post a comment to pattern DROPS 211-18
We would love to hear what you have to say about this pattern!
If you want to leave a question, please make sure you select the correct category in the form below, to speed up the answering process. Required fields are marked *.