
Popular categories
Looking for a yarn?


Comments / Questions (140)
![]() Nettl wrote:
Nettl wrote:
Hallo nochmal, Bezgl. Antwort " DROPS Design 09.06.2020 kl. 09:50:" danke für eure schnelle Antwort! Darauf Bezug nehmend bleibt meine Frage: lt. A7 sind am Rand aber Hinreihe re und Rückreihe li. Das ist nicht kraus rechts. Oder sind diese 5 Randmaschen in A7 nicht eingezeichnet? In der Beschreibung steht nur was von 34 Maschen gesamt. In der Mitte ist ebenso Hinr. Re und Rückr. Li zu sehen.
09.06.2020 - 13:19DROPS Design answered:
Liebe Frau Nettl, die 5 ersten und letzten Maschen in A.7 werden: rechts in Hin-Reihen (= 1. Symbol) und rechts in Rückreihen (= 2. Symbol) gestrickt = kraus rechts. die ersten und letzen 5 Maschen in A.7 sind die 5 Maschen beidseitig krausrechts gestrickt. Viel Spaß beim stricken!
09.06.2020 - 13:36
![]() Nettl wrote:
Nettl wrote:
Hallo, ich habe eine Frage oder vllt. ist es auch ein Hinweis. Ich bin beim Top bis zu Träger 1 gekommen. Allerdings glaube ich, dass die Strickschrift A6 und A7 irgendwie verkehrt herum ist. Lt. Fotos sieht die Mitte der genannten Abschnitte glatt rechts aus. Gehe ich aber nach der Anleitung, so ist die Mitte kraus rechts was ich auch am gestrickten Träger erkenne. Kann es sein, dass die Rückreihen verkehrt abgebildet sind? Lt. Anweisung sind alle Muster mit Hin- und Rückreihe skizziert.
08.06.2020 - 20:25DROPS Design answered:
Liebe Nettl, siehe Antwort unten :)
09.06.2020 - 10:00
![]() Nettl wrote:
Nettl wrote:
Hallo, ich habe eine Frage oder vllt. ist es auch ein Hinweis. Ich bin beim Top bis zu Träger 1 gekommen. Allerdings glaube ich, dass die Strickschrift A7 irgendwie verkehrt herum ist. Lt. Fotos sieht der Rand komplett kraus rechts gestrickt aus. Gehe ich aber nach der Anleitung, so ist der Rand glatt rechts, was ich auch gestrickten Träger erkenne. Kann es sein, dass die Rückreihen von A7 verkehrt abgebildet sind? Lt. Anweisung sind alle Muster mit Hin- und Rückreihe skizziert.
08.06.2020 - 20:23DROPS Design answered:
Liebe Nettl, Sie stricken zuerst das Rippenmuster mit A.6 in der Mitte und 5 Maschen krausrechts bis 34 M bleiben, diese 34 M stricken Sie dann wie im A.7 gezeigt= 5 Maschen krausrechts beidseitig und Rippenmuster mit abnahmen (mit 2 M re in der Mitte). Viel Spaß beim stricken!
09.06.2020 - 09:50
![]() Maria Gast wrote:
Maria Gast wrote:
Hallo, Ich stricke gerade dieses Oberteil, komme aber bei dem Muster ein bisschen ins Stolpern... nachdem die 33 cm des Rumpfteiles gestrickt wurden in Muster A1, soll man anschließend A2, A1 und A3 in den jeweils angegeben maschenzahlen Stricken. Soll ich dann bei A1 die Maschen so stricken wie sie erscheinen? Oder strikt nach Muster? Ist der Markierungsfaden Beginn der Runde / des Musters? Mal wird links über rechts gestrickt, mal anders rum und mal Rechts über Rechts?
04.06.2020 - 22:30DROPS Design answered:
Liebe Frau Gast, ja genau, Sie stricken A.2 und A.3 wie beschrieben aber die Maschen in A.1 stricken Sie wie zuvor, dh wie sie erscheinen, damit das Muster wie zuvor bleibt. Viel Spaß beim stricken!
05.06.2020 - 07:58
![]() Monica wrote:
Monica wrote:
Come si lavorano due maglie insieme a rovescio ritorto? Grazie, saluti.
31.05.2020 - 16:11
![]() Julie wrote:
Julie wrote:
Hej Jeg vil gerne strikke den i en størrelse xs, men jeg har lidt svært ved at regne ud, hvor mange masker jeg skal slå op og de øvrige ændringer i opskriften. Jeg håber, at I kan hjælpe mig :)
26.05.2020 - 22:57
![]() Bettina wrote:
Bettina wrote:
Hallo, ich bin auf der Suche nach meinem Lieblingstop! Es war bei der neuen Kollektion in der Nähe dieses Tops und ist jetzt plötzlich nirgends mehr zu finden. Es ist mit der Wolle Paris gestrickt, vermutlich Farbe Nr.63. Es ist enganliegend, relativ kurz und schliesst eng am Hals mit einem kleinen Bündchen. Ich habe schon die passende Wolle gekauft und wäre wirklich froh, wenn ich die Anleitung für dieses wunderschöne Top bekommen könnte. Vielen Dank im voraus und freundliche Grüsse!
25.05.2020 - 08:03DROPS Design answered:
Liebe Bettina, hier finden Sie alle neuesten Tops in Paris - die letzten Modellen von der Kollektion wird bis Juli hochgeladen, melden Sie sich für unsere Mailingliste an, um kein Modell zu verpassen. Viel Spaß beim stricken!
25.05.2020 - 10:36
![]() Lydia wrote:
Lydia wrote:
Ik mis een ander topje waar ik al lang op wachtte en die ik niet terug zie in de nieuwe lente/zomer patronen die nu allemaal online staan. Is daar een reden voor? Weet helaas het nummer niet meer.
20.05.2020 - 18:49
![]() Ana María wrote:
Ana María wrote:
El patrón A.1 cuando has acabado los 33 cm del cuerpo, no coincide con la labor en ningún momento.
14.05.2020 - 06:05DROPS Design answered:
Hola Ana. ¿Puedes especificar por favor, el problema?
15.05.2020 - 10:43
![]() Franca wrote:
Franca wrote:
I diagrammi A4 e A5 sono segnati sia il diritto che il rovescio o solo il diritto? Grazie
11.05.2020 - 09:51DROPS Design answered:
Buongiorno Franca. Nei diagrammi trova tutti i ferri, sia quelli sul diritto che quelli sul rovescio . Buon lavoro!
11.05.2020 - 10:30
|
||||||||||||||||||||||
Strawberry Summer#strawberrysummertop |
||||||||||||||||||||||
 |
 |
|||||||||||||||||||||
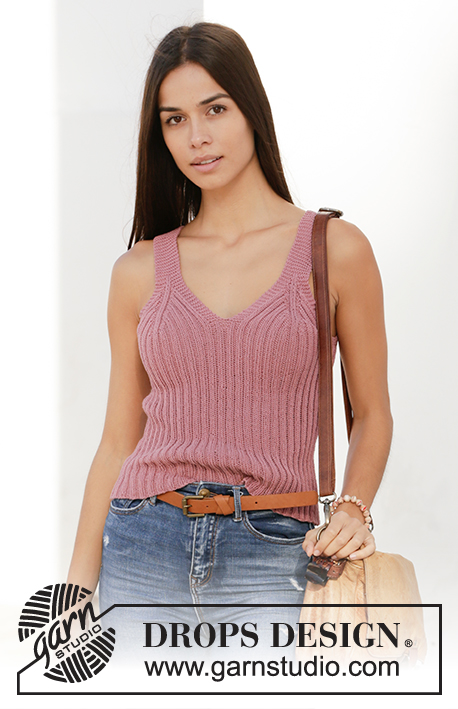
Knitted top in DROPS Safran. Piece is knitted bottom up with rib. Size: S - XXXL
DROPS 211-18 |
||||||||||||||||||||||
|
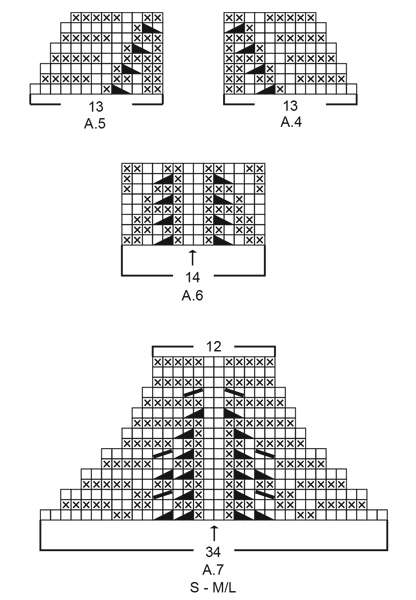
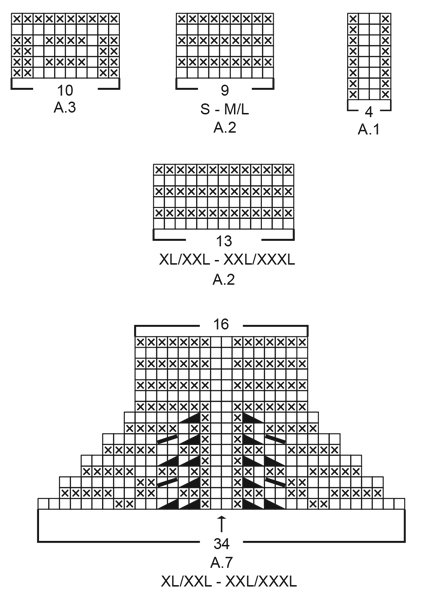
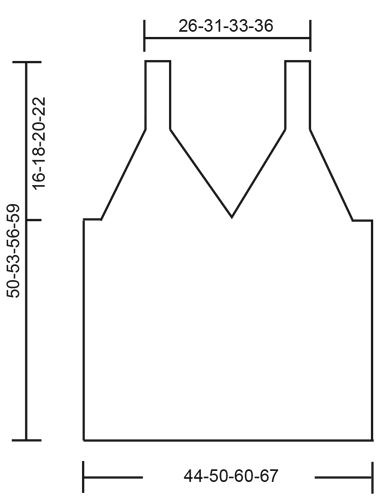
---------------------------------------------------------- EXPLANATION FOR THE PATTERN: ---------------------------------------------------------- GARTER STITCH (back and forth): Knit all rows. 1 ridge vertically = knit 2 rows. PATTERN: See diagrams A.1 to A.7. Choose diagram for your size (applies to A.2 and A.7). Diagrams show all rows in pattern seen from the right side. ---------------------------------------------------------- START THE PIECE HERE: ---------------------------------------------------------- TOP - SHORT OVERVIEW OF THE PIECE: Work body in the round on circular needle, from the bottom and up to armholes. Then work back piece and the 2 front pieces separately, back and forth on circular needle until finished measurements. Straps on front piece are fastened to back piece. BODY: Cast on 224-256-304-336 stitches on circular needle size 3 mm = US 2,5 with Safran. Work A.1 in the round – insert at the same time 1 marker thread at the beginning of round (= left side when garments is worn), and 1 marker thread after 112-128-152-168 stitches (= right side when garment is worn). Both marker threads is between 2 purl stitches. Move the marker thread upwards when working. REMEMBER THE KNITTING GAUGE! When piece measures 33-34-35-36 cm = 13"-13⅜"-13¾"-14¼", work next round as follows (approx. 1 cm = ⅜" remains until piece is divided mid front, and decrease for armholes): Work A.2 (= 9-9-13-13 stitches), continue A.1 over the next 42-50-58-66 stitches, work A.3 (= 10 stitches mid front), continue A.1 over the next 42-50-58-66 stitches), work A.2 over the next 18-18-26-26 stitches (= 2 repetitions of 9-9-13-13 stitches – marker thread is between these 2 repetitions), continue A.1 over the next 94-110-126-142 stitches (= back piece), and work A.2 over the remaining 9-9-13-13 stitches. Continue pattern like this until A.2 and A.3 have been worked vertically. On next round bind off for armholes, i.e. work next round as follows: Bind off 4-4-8-8 stitches for armhole, work 5 stitches in GARTER STITCH – read explanation above, continue A.1 over the next 42-50-58-66 stitches, work 10 stitches in garter stitch (= mid front), continue A.1 over the next 42-50-58-66 stitches, work 5 stitches in garter stitch, bind off 8-8-16-16 stitches for armhole, work 5 stitches in garter stitch, continue A.1 over the next 94-110-126-142 stitches, work 5 stitches in garter stitch, and bind off the remaining 4-4-8-8 stitches for armhole. Cut the yarn. Finish back piece and front pieces separately. BACK PIECE: = 104-120-136-152 stitches. Begin from wrong side and work 1 row in rib as before with 5 edge stitches in garter stitch in each side. Continue to work in rib with 5 edge stitches in garter stitch in each side while AT THE SAME TIME decreasing for armholes on every row from right side as explained below. I.e. work first row from right side as follows: Work A.4 (= 13 stitches), continue rib as before until 13 stitches remain on row, finish with A.5 (= 13 stitches). Continue pattern like this until A.4 and A.5 have been worked 4-4-5-6 times in total vertically (= 16-16-20-24 stitches decreased in each side) = 72-88-96-104 stitches remain. Work 3 ridges back and forth over all stitches. Bind off - make sure that the bind-off edge is not too tight. Back piece measures approx. 11-11-14-16 cm = 4⅜"-4⅜"-5½"-6¼" from where piece was divided for front piece and bac piece. FRONT PIECE: = 104-120-136-152 stitches. Divide the piece mid front and slip half the stitches on 1 stitch holder or extra needle. Then work first part as explained below. PART-1: = 52-60-68-76 stitches. Begin from wrong side and work 1 row in rib as before with 5 edge stitches in garter stitch in each side. Insert 1 marker between the 2 middle stitches on row (= between 2 knit stitch seen from right side). Marker indicates the middle. Continue to work in rib with 5 edge stitches in garter stitch in each side while at the same time decreasing on each side of the middle as explained below. I.e. work first row from right side as follows: 5 edge stitches in garter stitch, work rib as before until 7 stitches remain before marker, work A.6 (= 14 stitches), work rib as before until 5 stitches remain on row, and finish with 5 edge stitches in garter stitch. Continue pattern like this, and repeat A.6 vertically until 34 stitches remain on row – finish after 1 row from wrong side. Now work A.7 over these 34 stitches. When A.7 has been worked, 12-12-16-16 stitches remain on needle for strap, and front piece measures approx. 11-13-16-18 cm = 4⅜"-5⅛"-6¼"-7" from where piece was divided for front and back piece. Work strap as explained below. STRAP: = 12-12-16-16 stitches. Work in garter stitch back and forth until the strap measures approx. 10-12-10-10 cm = 4"-4¾"-4"-4" – try the top on and work to desired length, strap should continue over the shoulder and down to back piece. Bind off. PART-2: Slip the 52-60-68-76 stitches from stitch holder or extra needle back on circular needle size 3 mm = US 2,5, and work part-2 the same way as part-1. Then work strap the same way as on part-1. Bind off. ASSEMBLY: Fasten straps to back piece - begin at the edge in each side and sew stitch too stitch. Cut and fasten the thread. |
||||||||||||||||||||||
Diagram explanations |
||||||||||||||||||||||
|
||||||||||||||||||||||
 |
||||||||||||||||||||||
 |
||||||||||||||||||||||
 |
||||||||||||||||||||||
Have you finished this pattern?Tag your pictures with #dropspattern #strawberrysummertop or submit them to the #dropsfan gallery. Do you need help with this pattern?You'll find 15 tutorial videos, a Comments/Questions area and more by visiting the pattern on garnstudio.com. © 1982-2026 DROPS Design A/S. We reserve all rights. This document, including all its sub-sections, has copyrights. Read more about what you can do with our patterns at the bottom of each pattern on our site. |
||||||||||||||||||||||


With over 40 years in knitting and crochet design, DROPS Design offers one of the most extensive collections of free patterns on the internet - translated to 17 languages. As of today we count 324 catalogs and 12291 patterns - 12281 of which are translated into English (US/in).
We work hard to bring you the best knitting and crochet have to offer, inspiration and advice as well as great quality yarns at incredible prices! Would you like to use our patterns for other than personal use? You can read what you are allowed to do in the Copyright text at the bottom of all our patterns. Happy crafting!
Post a comment to pattern DROPS 211-18
We would love to hear what you have to say about this pattern!
If you want to leave a question, please make sure you select the correct category in the form below, to speed up the answering process. Required fields are marked *.