
Popular categories
Looking for a yarn?


Comments / Questions (91)
![]() Sas wrote:
Sas wrote:
Hallo. Leuk patroon! Na de mouwen, kan ik het lijf (met het deel waar de vos komt) ook rondbreien in plaats van heen en weer?
22.12.2020 - 16:09DROPS Design answered:
Dag Sas,
Jazeker dat kan. Je breit dan het voor en achterpand samen in de rondte en je hebt dan geen kantsteken nodig aan beide zijkanten van beide panden.
17.01.2021 - 14:24
![]() Ana Belén Calviño Álvarez wrote:
Ana Belén Calviño Álvarez wrote:
Hola cuando tejo el jersey una vez echo el cuello poniendo que son 60 puntos más 2 de orillo =62p aquí hago uno de orillo 2p del derecho,2del revés así hasta que me queda uno de orillo si aumento como dice para la talla 18 meses me sobran 2 puntos por más vueltas que le doy sigue saliendo lo mismo o yo no veo el fallo o el patrón está mal explicado me podrían decir que hago mal o que pasa? Gracias 😉
12.12.2020 - 18:16DROPS Design answered:
Hola Ana. Los puntos de orillo están incluidos en los puntos totales, no los tienes que añadir. Comenzar con 60 puntos y seguir según el patrón.
13.12.2020 - 11:41
![]() Claudia wrote:
Claudia wrote:
Ciao a tutti..Sono alla fase bordo del Raglan.. Dopo aver ripreso le maglie sul dritto davanti e lavorato 1 cm a coste mi dice di lavorare 4 asole in modo uniforme. Come lavoro il ferro di ritorno? Devo fare direttamente la chiusura intrecciando le maglie? Grazie
11.12.2020 - 09:58DROPS Design answered:
Buongiorno Claudia, deve continuare a lavorare il bordo fino ai 2 cm poi lo chiude. Buon lavoro!
11.12.2020 - 15:39
![]() Paige wrote:
Paige wrote:
On your “increase tip,” it says you would have increased by 8 stitches, but I’m only counting 6...?
01.12.2020 - 20:24DROPS Design answered:
Dear Page, you first increase before marker-1 ( 1st inc), then increase on each side of markers-2,-3 and-4 (= 2 sts at each marker x 3 markers = 6 sts inc) and 1 st before marker-5 (1st inc) = you increased a total of 8 sts. Happy knitting!
02.12.2020 - 08:05
![]() Elisa wrote:
Elisa wrote:
Ciao, non riesco a capire quanto misura la circonferenza del collo del maglioncino nella misura 12/18 mesi. Grazie mille Elisa
11.11.2020 - 22:36DROPS Design answered:
Buonasera Elisa, per le misure deve fare riferimento allo schema in fondo alla pagina. Per la taglia 12/18 mesi il collo misura 24 cm. Buon lavoro!
11.11.2020 - 22:43
![]() Elena Linder wrote:
Elena Linder wrote:
När jag delar upp i framstycke, bakstycke och ärmar står det på framtrycket: " sticka rätmaskor över 45-49-51 (56-60-63-66) maskor,/ 1 maska rätstickning och lägg upp 4/ -4-4 (4-4-4-5) maskor i slutet av varvet". Ska man först lägga upp 4 maskor och sen sticka en rätstickad som kantmaska ?
08.10.2020 - 16:47DROPS Design answered:
Hei Elena. De 4 siste maskene som legges opp er der raglanstolpen senere skal strikkes. Det strikkes 1 rillemaske (rätstickning, alle varv stickas räta) som kantmaskene i hver side. God Fornøyelse!
12.10.2020 - 12:03
![]() Flo wrote:
Flo wrote:
Bonjour, Est ce que cette laine est assez douce pour un bebe de 3 mois? Je voudrais peut etre la changer par celle Baby Alpaca silk mais je ne sais pas si elle sera adaptée au patron?
04.10.2020 - 18:05DROPS Design answered:
Bonjour Flo, DROPS Sky est très douce, n'hésitez pas à demander conseil (même par mail ou téléphone) à votre magasin DROPS habituel - dans ce cas, DROPS BabyAlpaca Silk ne peut être être une alternative car c'est une laine du groupe A alors que Sky est une laine du groupe B. Utilisez notre convertisseur pour voir d'autres alternatives (Merino Extra Fine par exemple). Bon tricot!
05.10.2020 - 11:08
![]() Michaela Kunert wrote:
Michaela Kunert wrote:
Der Ausdruck hat jetzt geklappt. Danke für die prompte Antwort. Aber die Antwort auf meine Frage zur Maschenprobe konnte leider nicht geklärt werden. Ich stricke mit Original Drops Sky. Ich kann nicht doch dickere Nadeln nehmen. Soll ich jetzt doch einfach die Maschenangeben für die nächste Größe nehmen?
28.09.2020 - 18:01DROPS Design answered:
Liebe Frau Kunert, wenn Sie etwas fest stricken, dann brauchen Sie vielleicht grössere Nadeln, errineren Sie sich, daß die Nadelgrösse nur ein Vorschlag ist, um die richtigen fertigen Massen zu haben, soll die Maschenprobe stimmen. Waschen und lassen die Maschenprobe mal trocknen, sollte sie immer nicht richtig sein, dann mit grösseren Nadeln nochmal versuchen. Sonnst sollen Sie die ganze Anleitung nach Ihrer Maschenprobe (in der Breite sowie in der Höhe wegen Raglan) neu kalkulieren. Viel Spaß beim stricken!
29.09.2020 - 07:45
![]() Michaela Kunert wrote:
Michaela Kunert wrote:
Ich möchte den Fuchspulli für mein Enkelkind stricken und habe 2 Probleme. Die Anleitung lässt sich bei mir nicht ausdrucken. Gibt es da einen Trick. Und ich komme mit der Maschenprobe nicht hin. Mit Nadelstärke 5 habe ich 23 Maschen und 30 Reihen auf 10 mal 10 und ich stricke eigentlich eher locker und 4,5 ( 25 Maschen)wäre schöneres Maschenbild. Soll ich einfach die nächste Größe stricken? oder wie komm ich sonst mit dem Muster hin?
28.09.2020 - 16:20DROPS Design answered:
Liebe Frau Kunert, prüfen Sie mal die Drukcereinstellungen, wir können dieses Modell gerade ausdrücken. Stricken Sie mit DROPS Sky.? hier lesen Sie mehr über Maschenprobe. Viel Spaß beim stricken!
28.09.2020 - 16:38
![]() Muggianu wrote:
Muggianu wrote:
Suite au précédent... toutes mes excuses, le diagramme est apparu en rechargeant la page....
16.09.2020 - 16:45
|
|||||||||||||
Little Fox#littlefoxsweater |
|||||||||||||
 |
 |
||||||||||||
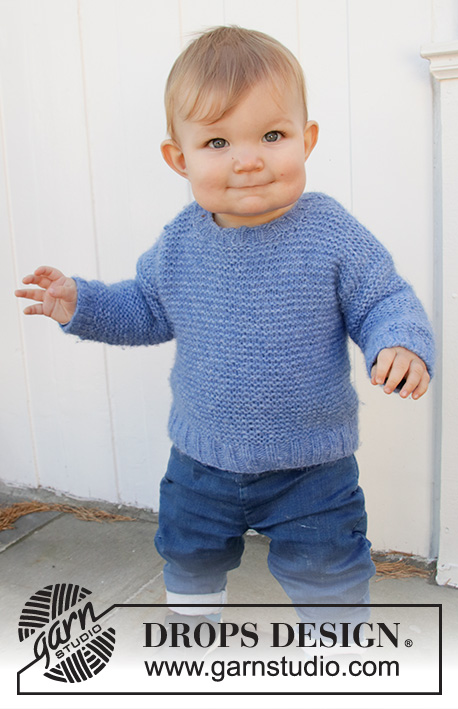
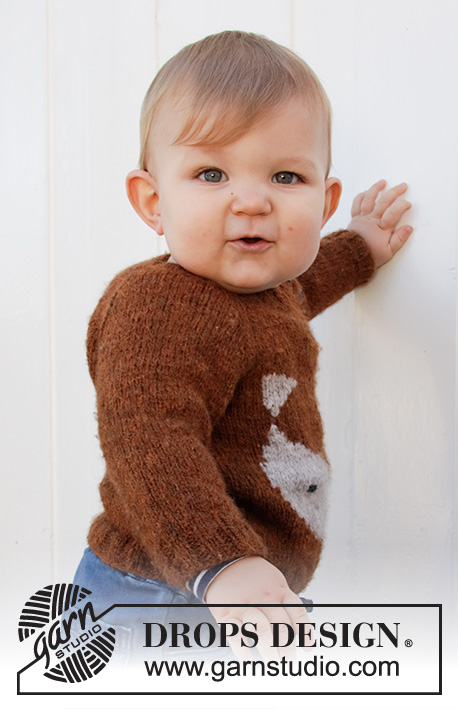
Knitted sweater with raglan for babies and kids in DROPS Sky. The piece is worked top down with fox-pattern. Sizes 1 month – 8 years.
DROPS Baby 36-14 |
|||||||||||||
|
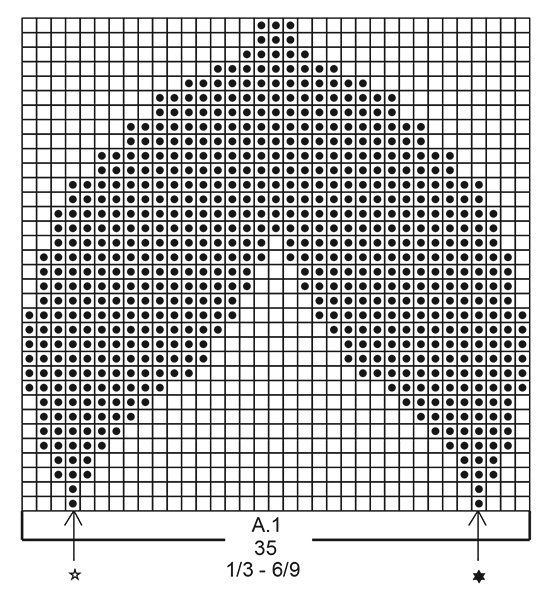
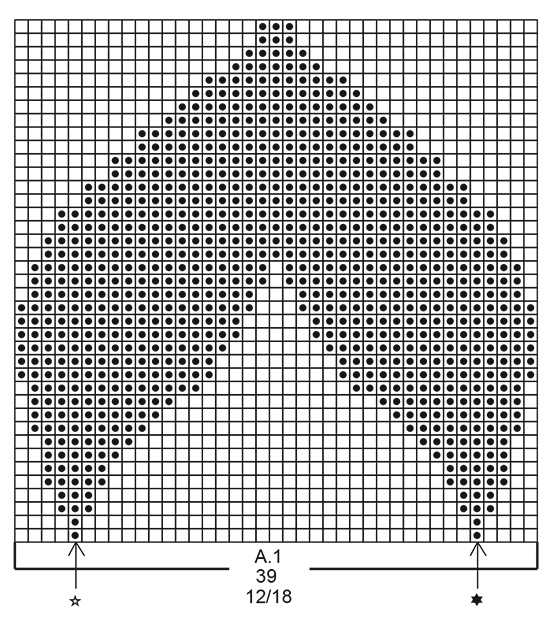
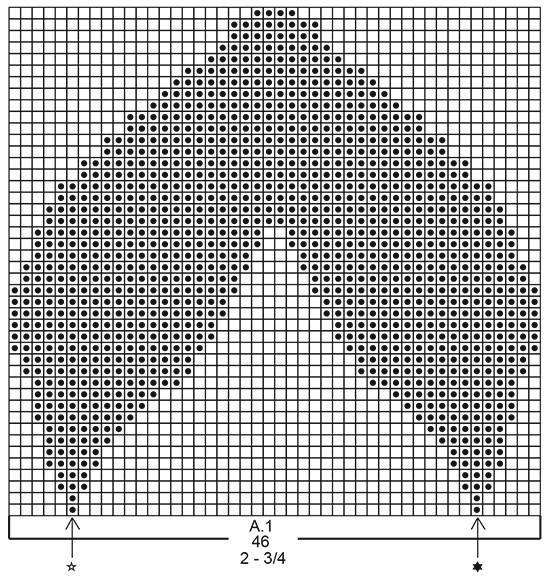
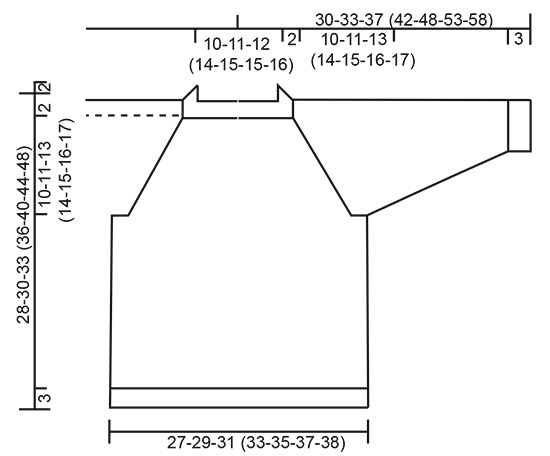
------------------------------------------------------- EXPLANATIONS FOR THE PATTERN: ------------------------------------------------------- RIDGE/GARTER STITCH (worked back and forth): Knit all rows. 1 ridge in height = Knit 2 rows. PATTERN: Diagrams A.1 to A.3 – choose diagram for your size. The whole of diagram A.1 is worked in stockinette stitch. The diagrams show all rows in the pattern from the right side. When working with 2 colors, work with more than 1 strand of each color to avoid long strands on the wrong side. You can use the strand from both the inside and outside of the ball. I.e. the first part of A.1 is knitted with 5 threads (1 thread hazelnut, 1 thread light beige, 1 thread hazelnut, 1 thread light beige, 1 thread hazelnut), the rest of A.1 is knitted with 3 threads ( 1 thread hazelnut, 1 thread light beige, 1 thread hazelnut) NOTE: To avoid holes when changing color, twist the 2 strands together. Diagrams A.2 and A.3 show how the ears are sewn with duplicate stitches. INCREASE TIP: All increases are worked from the right side! Increase 1 stitch after marker 1, work until there is 1 stitch left before markers 2, 3 and 4, 1 yarn over, work 2 stitches (markers sit between these 2 stitches), 1 yarn over and increase 1 stitch before marker 5 (= 8 stitches increased). Increase by making 1 yarn over, which is worked twisted on the next row to avoid holes. DECREASE TIP (for sleeves): Decrease 1 stitch on each side of the marker as follows: Work until there are 3 stitches left before the marker, knit 2 together, knit 2 (marker sits between these 2 stitches), slip 1 stitch as if to knit, knit 1 and pass the slipped stitch over the knitted stitch (= 2 stitches decreased). BINDING-OFF TIP: To avoid the bind-off edge being tight you can bind off with a larger size needle. If the edge is still tight, make 1 yarn over after approx. each 4th stitch at the same time as binding off and the yarn overs are bind off as normal stitches. ------------------------------------------------------- START THE PIECE HERE: ------------------------------------------------------- SWEATER – SHORT OVERVIEW OF THE PIECE: The piece is worked top down. The yoke is worked back and forth with circular needle, before it is divided for sleeves and body. The body is continued back and forth with circular needle. The sleeves are worked in the round with double pointed needles. YOKE: Cast on 56-60-60 (68-72-72-76) stitches (including 1 edge stitch on each side) with circular needle size 3.5 mm = US 4 and hazelnut. Purl 1 row from the wrong side. Then work rib as follows: Work 1 edge stitch in GARTER STITCH – read description above, * knit 2, purl 2 *, work from *-* until there are 3 stitches left, knit 2 and 1 edge stitch in garter stitch. When the rib measures 1½ to 2 cm = ½" to ¾", change to circular needle size 4.5 mm = US 7. Insert 5 markers in the piece and increase evenly from the right side as follows: Work 1 edge stitch in garter stitch, knit 1, insert marker 1, knit 7 and increase 2-4-2 (2-2-2-2) stitches evenly, insert marker 2 (= left sleeve), knit 21-23-23 (27-29-29-31) and increase 2-2-2 (1-1-2-1) stitches evenly, insert marker 3 (= back piece), knit 8 and increase 2-4-2 (2-2-2-2) stitches evenly, insert marker 4 (= right sleeve), knit 16-18-18 (22-24-24-26) and increase 2-2-2 (1-1-2-1) stitches evenly, insert marker 5, knit 1 and finish with 1 edge stitch in garter stitch = 64-72-68 (74-78-80-82) stitches. Continue with stockinette stitch and 1 edge stitch in garter stitch on each side and increase to raglan on each row from the right side as follows: Increase at each marker – read INCREASE TIP, a total of 13-14-15 (16-17-18-19) times = 168-184-188 (202-214-224-234) stitches. REMEMBER THE KNITTING GAUGE! Work until the piece measures 12-13-15 (16-17-18-19) cm = 4¾"-5⅛"-6" (6¼"-6¾"-7"-7½") from the cast-on edge. Now divide the piece for body and sleeves on the next row from the right side as follows: Work 1 stitch in garter stitch, place the next 36-40-40 (42-44-46-48) stitches on 1 thread for the sleeve and cast on 4-4-6 (6-6-6-6) stitches under the sleeve, knit 49-53-55 (60-64-67-70) stitches (= back piece), place the next 36-40-40 (42-44-46-48) stitches on 1 thread for the sleeve and cast on 4-4-6 (6-6-6-6) stitches under the sleeve, knit 45-49-51 (56-60-63-66) stitches, 1 stitch in garter stitch and cast on 4-4-4 (4-4-4-5) stitches at the end of the row = 108-116-124 (134-142-148-155) stitches. BODY: Continue back and forth with stockinette stitch and 1 edge stitch in garter stitch on each side until the piece measures 0-0-0 (0-1-2-3) cm = 0"-0"-0" (0"-⅜"-¾"-1⅛") from the division. Now work A.1 on the front piece as follows: Work 1 edge stitch in garter stitch, stockinette stitch over 62-68-72 (76-82-84-89) stitches, A.1 (= 35-35-39 (46-46-51-51) stitches), stockinette stitch over 9-11-11 (10-12-11-13) stitches and 1 edge stitch in garter stitch. Continue this pattern. When A.1 has been worked 1 time in height, finish the piece with hazelnut. Work stockinette stitch with 1 edge stitch in garter stitch on each side until the piece measures 12-13-14 (17-20-22-25) cm = 4¾"-5⅛"-5½" (6¾"-8"-8¾"-9¾") from the division. On the next row from the right side increase 2-2-2 (0-0-2-3) stitches evenly spaced = 110-118-126 (134-142-150-158) stitches. Change to circular needle size 3.5 mm = US 4. On the next row from the right side work rib as follows: 1 edge stitch in garter stitch, * knit 2, purl 2 *, work from *-* until there is 1 stitch left and finish with 1 edge stitch in garter stitch. Bind off with knit from the right side when the rib measures 3 cm = 1⅛" – read BINDING-OFF TIP. The sweater measures approx. 28-30-33 (36-40-44-48) cm = 11"-11¾"-13" (14¼"-15¾"-17¼"-19") from the shoulder down. SLEEVE: Place the 36-40-40 (42-44-46-48) stitches from the thread on the one side of the piece on double pointed needles size 4.5 mm = US 7 and knit up 1 stitch in each of the 4-4-6 (6-6-6-6) stitches cast on under the sleeve = 40-44-46 (48-50-52-54) stitches. Insert 1 marker in the middle of the 4-4-6 (6-6-6-6) stitches under the sleeve. Allow the marker to follow your work onwards; it will be used when decreasing under the sleeve. Work stockinette stitch in the round. When the sleeve measures 2 cm = ¾" from the division decrease 1 stitch on each side of the marker – read DECREASE TIP! Decrease like this every 2-2-1½ (2½-3½-4-5) cm = ¾"-¾"-½" (7/8"-1¼"-1½"-2") a total of 3-4-5 (5-5-5-5) times = 34-36-36 (38-40-42-44) stitches. When the sleeve measures 10-12-13 (16-21-25-28) cm = 4"-4¾"-5 1/8 (6¼"-8¼"-9¾"-11") from the division decrease 2-0-0 (2-0-2-0) stitches evenly spaced = 32-36-36 (36-40-40-44) stitches. Change to double pointed needles size 3.5 mm = US 4 and work rib (= knit 2, purl 2). Bind off with knit when the rib measures 3 cm = 1⅛". Work the other sleeve in the same way. RAGLAN-BAND: Knit up from the right side approx. 28 to 36 stitches (divisible by 4) inside the 1 edge stitch along the sleeve’s raglan-opening with circular needle size 3.5 mm = US 4 and hazelnut. Work rib (= knit 2, purl 2) with 1 edge stitch in garter stitch and 2 knitted stitches on each side (seen from the right side). When the band measures 2 cm = ¾", bind off with knit over knit and purl over purl. Repeat along the raglan-opening on the front piece but when the band measures 1 cm = ⅜" work 4 buttonholes evenly spaced. 1 buttonhole = purl 2 together in the purled section, (seen from the right side) and make 1 yarn over. ASSEMBLY: Sew the side seam inside the 1 edge stitch. Embroider the fox’s eyes and nose on the front piece using black. The ears are sewn using duplicate stitches and light beige, according to diagrams A.2 and A.3. The stitches are sewn top down. The stitch with the arrow and a star in diagrams A.2 and A.3, is sewn approx. 2 rows above the stitch with the arrow and a star in A.1. Sew the bands at the bottom of the raglan-openings (this is where the body starts) – the band on the front piece should lie over the band on the sleeve. Sew buttons onto the band on the sleeve. |
|||||||||||||
Diagram explanations |
|||||||||||||
|
|||||||||||||
 |
|||||||||||||
 |
|||||||||||||
 |
|||||||||||||
 |
|||||||||||||
 |
|||||||||||||
 |
|||||||||||||
Have you finished this pattern?Tag your pictures with #dropspattern #littlefoxsweater or submit them to the #dropsfan gallery. Do you need help with this pattern?You'll find 29 tutorial videos, a Comments/Questions area and more by visiting the pattern on garnstudio.com. © 1982-2026 DROPS Design A/S. We reserve all rights. This document, including all its sub-sections, has copyrights. Read more about what you can do with our patterns at the bottom of each pattern on our site. |
|||||||||||||


With over 40 years in knitting and crochet design, DROPS Design offers one of the most extensive collections of free patterns on the internet - translated to 17 languages. As of today we count 325 catalogs and 12298 patterns - 12288 of which are translated into English (US/in).
We work hard to bring you the best knitting and crochet have to offer, inspiration and advice as well as great quality yarns at incredible prices! Would you like to use our patterns for other than personal use? You can read what you are allowed to do in the Copyright text at the bottom of all our patterns. Happy crafting!
Post a comment to pattern DROPS Baby 36-14
We would love to hear what you have to say about this pattern!
If you want to leave a question, please make sure you select the correct category in the form below, to speed up the answering process. Required fields are marked *.