
Popular categories
Looking for a yarn?


Comments / Questions (91)
![]() Christine wrote:
Christine wrote:
Hallo zusammen , ich weiß nicht , ob ich einen Denkfehler habe . Wenn die Länge bei Größe 80/ 86 33 cm ab Schulter sein soll, komme ich ab Teilung auf ca . 17 cm und nicht auf 14 cm , plus 3 cm Bündchen. Liebe Grüße
13.12.2022 - 13:57
![]() Cate Campbell wrote:
Cate Campbell wrote:
Trying to knit size 2 yrs Yoke has 68 sts, with 6 increases 16 times (96 increases), there would be 164 sts (68 + 96 = 164) Pattern says there should be 202
29.10.2022 - 22:14DROPS Design answered:
Dear Cate, first, when inserting the markers, you have worked a row where you have increased 6 stitches, from 68 sts to 74 stitches. Next, it indicates to increase not as before, but rather as established in the INCREASE TIP, which can be found in the section EXPLANATIONS FOR THE PATTERN. There, you increase 8 stitches on each row. So, 8 increases 16 times = 128 sts. 74 + 128 sts = 202 sts. Happy knitting!
30.10.2022 - 20:00
![]() Suzanne Jordan wrote:
Suzanne Jordan wrote:
When dividing the body and sleeves(size 2) , do I knit 42 stitches and then place them on a thread and continue with casting on 6 stitches and continue or do I place 42 on the thread right from the start- not knitting the stitches. It\'s my first time knitting a sweater in one. I\'m confused how this whole division of body and sleeves work.
15.09.2022 - 13:24DROPS Design answered:
Dear Mrs Jordan, these 42 sts won't be work on this round: work 1 st in garter stitch, slip the 42 sts on a thread and cast of (after the first st worked) 6 sts for under sleeve, work the next 60 sts for back piece, slip the next 42 sts on a thread and cast on 6 sts, work 56 sts, 1 st in garter stitch and cast on 4 sts at the end of the row. Happy knitting!
15.09.2022 - 15:39
![]() Suzanne Jordan wrote:
Suzanne Jordan wrote:
Can I use a 100 cm circular needle for the 2 yr old pattern?
14.08.2022 - 16:29DROPS Design answered:
Dear Suzanne, you can use a needle longer than recommended, taking into account that you will need to use the magic loop technique (since the needle will be too long). Happy knitting!
14.08.2022 - 22:06
![]() Janice wrote:
Janice wrote:
Using size 4mm end ndles I have cast on 68 stitche. DomI join in the round? Or work back & forth. Also when starting the fox face pattern, it says to separate the strands of hazelnut/beige Colors across the pattern….please explain? I have used multiple yarns for stranding in other patterns, but not unwinding each strand by thread. Thank you!
09.08.2022 - 22:57DROPS Design answered:
Dear Janice, yoke is worked back and forth on circular needle not in the round - the fox face (diagram A.1) will be worked on body (after dividing yoke for body and sleeve) - this video might help you to understand how to work with 3 balls on a same row. Happy knitting!
10.08.2022 - 08:57
![]() Francine wrote:
Francine wrote:
Bonjour,je ne comprends pas la bordure des raglans.Je relève 28 mailles.Je tricote 2 m.endroit/2 envers/2 endroit/1m. point mousse/2 endroit et après je recommence? Merci!
24.05.2022 - 21:43DROPS Design answered:
Bonjour Francine, pas exactement, vous devez tricoter en côtes avec 1 m lis au point mousse + 1 m endroit de chaque côté, autrement dit, vu sur l'endroit: 1 m lis au point mousse, côtes (2 m end,2 m env), répétez de (à) jusqu'à ce qu'il reste 3 mailles et terminez par 2 m end et 1 m lis au point mousse. Sur l'envers vous tricotez: 1 m lis au point mousse, (2 m env, 2 m end) jusqu'à ce qu'il reste 3 m, terminez par 2 m env, 1 m lis au point mousse. Bon tricot!
25.05.2022 - 07:48
![]() Jasmin wrote:
Jasmin wrote:
Hallo ich habe den Pullover in Gr. 110/116 gestrickt und musste feststellen das 150g Haselnuss bei weitem nicht ausreichen, ich musste noch 2 Knäul nachlaufen, vllt könnte man die Anleitung anpassen
24.03.2022 - 17:11
![]() Inga wrote:
Inga wrote:
Hur monterar man tröjan? Jag får inte ihop det med sidsömmen. Det blir en bit över ( De maskorna man lade till kanske).
04.03.2022 - 12:00DROPS Design answered:
Hei Inga. Om du tenker på de maskene man la til under hvert erme, så strikker man opp i disse maskene når man strikker ermene. Da slipper man å sys ihop hullet under ermene. Slik står det i oppskriften: ÄRMAR: Sätt de 36-40-40 (42-44-46-48) maskorna från tråden i den ena sidan av arbetet på strumpstickor 4,5 och sticka upp 1 maska i var och en av de 4-4-6 (6-6-6-6) maskorna som lades upp under ärmen = 40-44-46 (48-50-52-54) maskor. mvh DROPS Design
07.03.2022 - 14:29
![]() Ingela wrote:
Ingela wrote:
Hej! Jag förstår hur jag ska sy ihop sidsömmen. De fyra maskorna jag lade upp vid delningen blir ju över?
01.03.2022 - 16:10DROPS Design answered:
Hei Ingela. Er det de 4 maskene du la opp under hvert erme under BÆRESTYKKET du tenker på? Når du skal strikke ermene setter maskene fra tråden(e) tilbake på pinnen, skal du strikke opp 1 maske i hver av de 4 maskene du la opp under BÆRESTYKKET. Om det ikke er det du tenker på, vær vennlig å beskriv hvor i oppskriften du mener og hvilken str. du strikker. mvh DROPS Design
07.03.2022 - 11:55
![]() Sandra Junier wrote:
Sandra Junier wrote:
I can't get the jumper sewn together. Sewing the left side up to the armpit leaves a gap from the underarm to the raglan band. It seems to me that the cause might be that the extra four stitches- on the front side of the body- cast on when dividing the yoke should have been cast on after ending the raglan increases. Am I right? Could you show me how the parts should come together?
16.02.2022 - 20:19DROPS Design answered:
Dear Mrs Junier, you should sew the seam side frim the bottom edge towards under sleeve - you picked up on sleeves 4-5 sts mid under arm in the 4-5 sts cast on when dividing piece. Then sew the right side of button band (worked along front piece) on to the 4-5 new sts cast off at the end of the dividing row. Hope it will help :)
17.02.2022 - 10:10
|
|||||||||||||
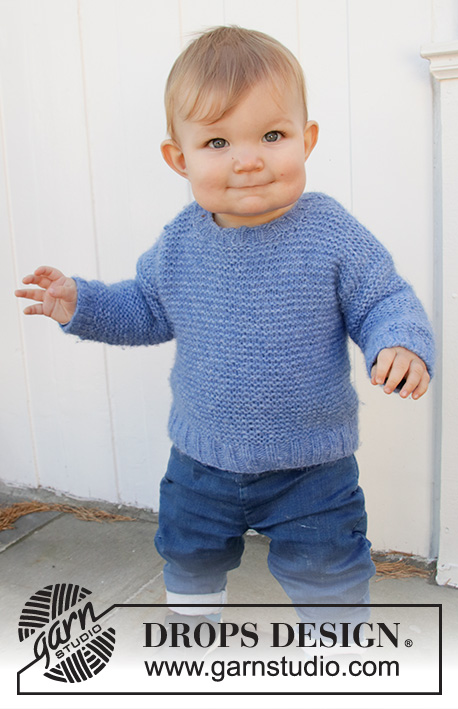
Little Fox#littlefoxsweater |
|||||||||||||
 |
 |
||||||||||||
Knitted sweater with raglan for babies and kids in DROPS Sky. The piece is worked top down with fox-pattern. Sizes 1 month – 8 years.
DROPS Baby 36-14 |
|||||||||||||
|
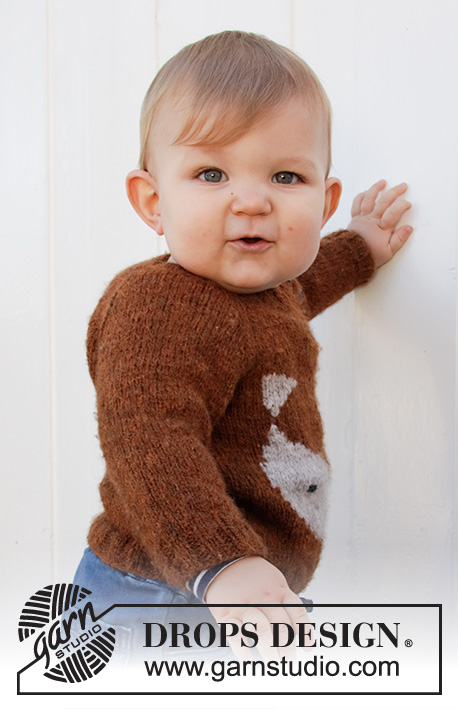
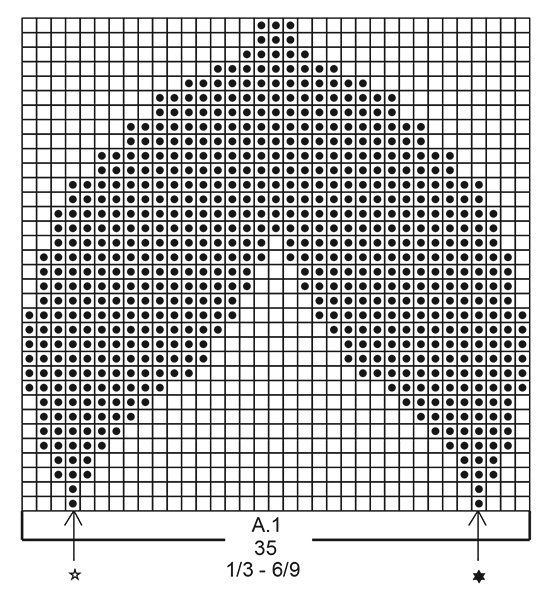
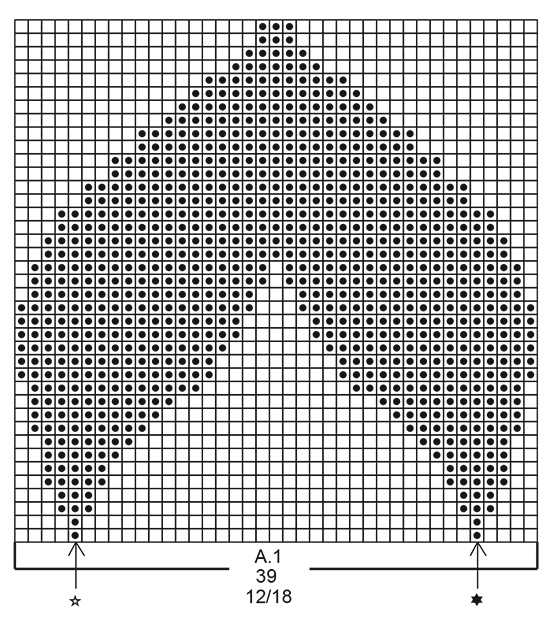
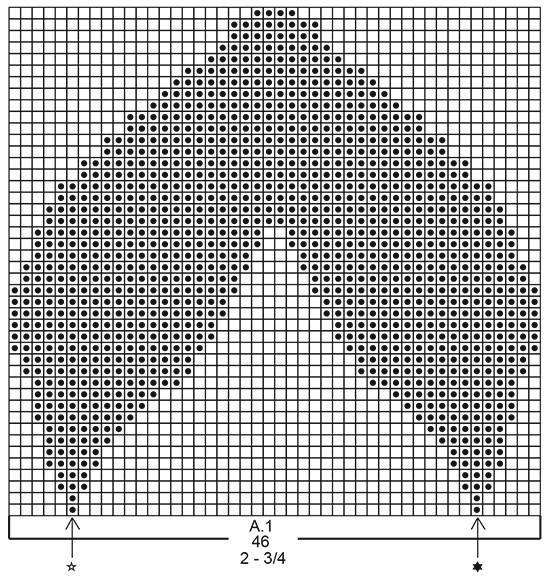
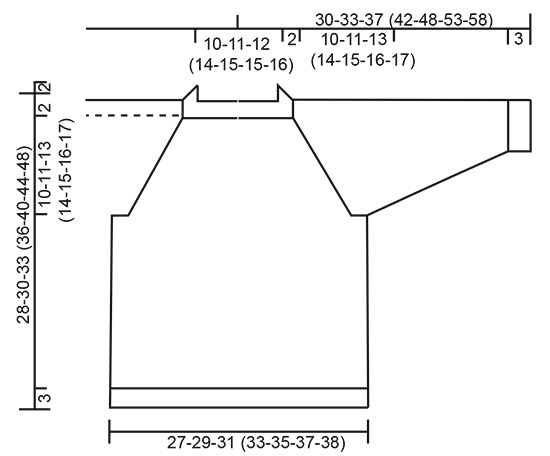
------------------------------------------------------- EXPLANATIONS FOR THE PATTERN: ------------------------------------------------------- RIDGE/GARTER STITCH (worked back and forth): Knit all rows. 1 ridge in height = Knit 2 rows. PATTERN: Diagrams A.1 to A.3 – choose diagram for your size. The whole of diagram A.1 is worked in stockinette stitch. The diagrams show all rows in the pattern from the right side. When working with 2 colors, work with more than 1 strand of each color to avoid long strands on the wrong side. You can use the strand from both the inside and outside of the ball. I.e. the first part of A.1 is knitted with 5 threads (1 thread hazelnut, 1 thread light beige, 1 thread hazelnut, 1 thread light beige, 1 thread hazelnut), the rest of A.1 is knitted with 3 threads ( 1 thread hazelnut, 1 thread light beige, 1 thread hazelnut) NOTE: To avoid holes when changing color, twist the 2 strands together. Diagrams A.2 and A.3 show how the ears are sewn with duplicate stitches. INCREASE TIP: All increases are worked from the right side! Increase 1 stitch after marker 1, work until there is 1 stitch left before markers 2, 3 and 4, 1 yarn over, work 2 stitches (markers sit between these 2 stitches), 1 yarn over and increase 1 stitch before marker 5 (= 8 stitches increased). Increase by making 1 yarn over, which is worked twisted on the next row to avoid holes. DECREASE TIP (for sleeves): Decrease 1 stitch on each side of the marker as follows: Work until there are 3 stitches left before the marker, knit 2 together, knit 2 (marker sits between these 2 stitches), slip 1 stitch as if to knit, knit 1 and pass the slipped stitch over the knitted stitch (= 2 stitches decreased). BINDING-OFF TIP: To avoid the bind-off edge being tight you can bind off with a larger size needle. If the edge is still tight, make 1 yarn over after approx. each 4th stitch at the same time as binding off and the yarn overs are bind off as normal stitches. ------------------------------------------------------- START THE PIECE HERE: ------------------------------------------------------- SWEATER – SHORT OVERVIEW OF THE PIECE: The piece is worked top down. The yoke is worked back and forth with circular needle, before it is divided for sleeves and body. The body is continued back and forth with circular needle. The sleeves are worked in the round with double pointed needles. YOKE: Cast on 56-60-60 (68-72-72-76) stitches (including 1 edge stitch on each side) with circular needle size 3.5 mm = US 4 and hazelnut. Purl 1 row from the wrong side. Then work rib as follows: Work 1 edge stitch in GARTER STITCH – read description above, * knit 2, purl 2 *, work from *-* until there are 3 stitches left, knit 2 and 1 edge stitch in garter stitch. When the rib measures 1½ to 2 cm = ½" to ¾", change to circular needle size 4.5 mm = US 7. Insert 5 markers in the piece and increase evenly from the right side as follows: Work 1 edge stitch in garter stitch, knit 1, insert marker 1, knit 7 and increase 2-4-2 (2-2-2-2) stitches evenly, insert marker 2 (= left sleeve), knit 21-23-23 (27-29-29-31) and increase 2-2-2 (1-1-2-1) stitches evenly, insert marker 3 (= back piece), knit 8 and increase 2-4-2 (2-2-2-2) stitches evenly, insert marker 4 (= right sleeve), knit 16-18-18 (22-24-24-26) and increase 2-2-2 (1-1-2-1) stitches evenly, insert marker 5, knit 1 and finish with 1 edge stitch in garter stitch = 64-72-68 (74-78-80-82) stitches. Continue with stockinette stitch and 1 edge stitch in garter stitch on each side and increase to raglan on each row from the right side as follows: Increase at each marker – read INCREASE TIP, a total of 13-14-15 (16-17-18-19) times = 168-184-188 (202-214-224-234) stitches. REMEMBER THE KNITTING GAUGE! Work until the piece measures 12-13-15 (16-17-18-19) cm = 4¾"-5⅛"-6" (6¼"-6¾"-7"-7½") from the cast-on edge. Now divide the piece for body and sleeves on the next row from the right side as follows: Work 1 stitch in garter stitch, place the next 36-40-40 (42-44-46-48) stitches on 1 thread for the sleeve and cast on 4-4-6 (6-6-6-6) stitches under the sleeve, knit 49-53-55 (60-64-67-70) stitches (= back piece), place the next 36-40-40 (42-44-46-48) stitches on 1 thread for the sleeve and cast on 4-4-6 (6-6-6-6) stitches under the sleeve, knit 45-49-51 (56-60-63-66) stitches, 1 stitch in garter stitch and cast on 4-4-4 (4-4-4-5) stitches at the end of the row = 108-116-124 (134-142-148-155) stitches. BODY: Continue back and forth with stockinette stitch and 1 edge stitch in garter stitch on each side until the piece measures 0-0-0 (0-1-2-3) cm = 0"-0"-0" (0"-⅜"-¾"-1⅛") from the division. Now work A.1 on the front piece as follows: Work 1 edge stitch in garter stitch, stockinette stitch over 62-68-72 (76-82-84-89) stitches, A.1 (= 35-35-39 (46-46-51-51) stitches), stockinette stitch over 9-11-11 (10-12-11-13) stitches and 1 edge stitch in garter stitch. Continue this pattern. When A.1 has been worked 1 time in height, finish the piece with hazelnut. Work stockinette stitch with 1 edge stitch in garter stitch on each side until the piece measures 12-13-14 (17-20-22-25) cm = 4¾"-5⅛"-5½" (6¾"-8"-8¾"-9¾") from the division. On the next row from the right side increase 2-2-2 (0-0-2-3) stitches evenly spaced = 110-118-126 (134-142-150-158) stitches. Change to circular needle size 3.5 mm = US 4. On the next row from the right side work rib as follows: 1 edge stitch in garter stitch, * knit 2, purl 2 *, work from *-* until there is 1 stitch left and finish with 1 edge stitch in garter stitch. Bind off with knit from the right side when the rib measures 3 cm = 1⅛" – read BINDING-OFF TIP. The sweater measures approx. 28-30-33 (36-40-44-48) cm = 11"-11¾"-13" (14¼"-15¾"-17¼"-19") from the shoulder down. SLEEVE: Place the 36-40-40 (42-44-46-48) stitches from the thread on the one side of the piece on double pointed needles size 4.5 mm = US 7 and knit up 1 stitch in each of the 4-4-6 (6-6-6-6) stitches cast on under the sleeve = 40-44-46 (48-50-52-54) stitches. Insert 1 marker in the middle of the 4-4-6 (6-6-6-6) stitches under the sleeve. Allow the marker to follow your work onwards; it will be used when decreasing under the sleeve. Work stockinette stitch in the round. When the sleeve measures 2 cm = ¾" from the division decrease 1 stitch on each side of the marker – read DECREASE TIP! Decrease like this every 2-2-1½ (2½-3½-4-5) cm = ¾"-¾"-½" (7/8"-1¼"-1½"-2") a total of 3-4-5 (5-5-5-5) times = 34-36-36 (38-40-42-44) stitches. When the sleeve measures 10-12-13 (16-21-25-28) cm = 4"-4¾"-5 1/8 (6¼"-8¼"-9¾"-11") from the division decrease 2-0-0 (2-0-2-0) stitches evenly spaced = 32-36-36 (36-40-40-44) stitches. Change to double pointed needles size 3.5 mm = US 4 and work rib (= knit 2, purl 2). Bind off with knit when the rib measures 3 cm = 1⅛". Work the other sleeve in the same way. RAGLAN-BAND: Knit up from the right side approx. 28 to 36 stitches (divisible by 4) inside the 1 edge stitch along the sleeve’s raglan-opening with circular needle size 3.5 mm = US 4 and hazelnut. Work rib (= knit 2, purl 2) with 1 edge stitch in garter stitch and 2 knitted stitches on each side (seen from the right side). When the band measures 2 cm = ¾", bind off with knit over knit and purl over purl. Repeat along the raglan-opening on the front piece but when the band measures 1 cm = ⅜" work 4 buttonholes evenly spaced. 1 buttonhole = purl 2 together in the purled section, (seen from the right side) and make 1 yarn over. ASSEMBLY: Sew the side seam inside the 1 edge stitch. Embroider the fox’s eyes and nose on the front piece using black. The ears are sewn using duplicate stitches and light beige, according to diagrams A.2 and A.3. The stitches are sewn top down. The stitch with the arrow and a star in diagrams A.2 and A.3, is sewn approx. 2 rows above the stitch with the arrow and a star in A.1. Sew the bands at the bottom of the raglan-openings (this is where the body starts) – the band on the front piece should lie over the band on the sleeve. Sew buttons onto the band on the sleeve. |
|||||||||||||
Diagram explanations |
|||||||||||||
|
|||||||||||||
 |
|||||||||||||
 |
|||||||||||||
 |
|||||||||||||
 |
|||||||||||||
 |
|||||||||||||
 |
|||||||||||||
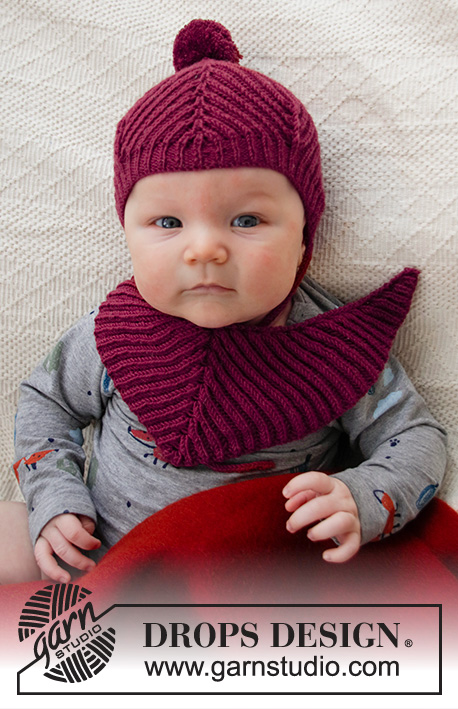
Have you finished this pattern?Tag your pictures with #dropspattern #littlefoxsweater or submit them to the #dropsfan gallery. Do you need help with this pattern?You'll find 29 tutorial videos, a Comments/Questions area and more by visiting the pattern on garnstudio.com. © 1982-2026 DROPS Design A/S. We reserve all rights. This document, including all its sub-sections, has copyrights. Read more about what you can do with our patterns at the bottom of each pattern on our site. |
|||||||||||||


With over 40 years in knitting and crochet design, DROPS Design offers one of the most extensive collections of free patterns on the internet - translated to 17 languages. As of today we count 325 catalogs and 12298 patterns - 12288 of which are translated into English (US/in).
We work hard to bring you the best knitting and crochet have to offer, inspiration and advice as well as great quality yarns at incredible prices! Would you like to use our patterns for other than personal use? You can read what you are allowed to do in the Copyright text at the bottom of all our patterns. Happy crafting!
Post a comment to pattern DROPS Baby 36-14
We would love to hear what you have to say about this pattern!
If you want to leave a question, please make sure you select the correct category in the form below, to speed up the answering process. Required fields are marked *.