
Popular categories
Looking for a yarn?


Comments / Questions (151)
![]() Melanie wrote:
Melanie wrote:
Jeg er i tvivl om ærmet skal strikket rundt eller frem og tilbage, der er for lidt masker hvis der skal strikkes rundt😅
01.08.2021 - 18:58
![]() Ingrid wrote:
Ingrid wrote:
Hei! Forstår ikke helt hvordan man skal felle til ermehull der man starter med å felle 3m 1-1-1-1-1-1 gang, 2m 1-1-1-1-1-1 gang og 1m 1-1-2-2-2-3gang i starten av hver pinne, der det totalt skal felles 12m (fra 82m til 70m etter felling er ferdig). Kan dere forklare dette litt bedre for en fersk strikker?
13.07.2021 - 12:08DROPS Design answered:
Hej Ingrid. I storlek M gör du såhär: Fell 3 masker, sticka pinnen ut, snu arbetet, fell 3 masker, sticka pinnen ut, snu arbetet, fell 2 masker, sticka pinnen ut, snu arbetet, fell 2 masker, sticka pinnen ut, snu arbetet, fell 1 maska, sticka pinnen ut, snu arbetet, fell 1 maska och sticka pinnen ut. 3+3+2+2+1+1= 12 m fellt. Mvh DROPS Design
13.07.2021 - 12:29
![]() Cornelis Bos wrote:
Cornelis Bos wrote:
Waarom de panden breien met een rondbreinaald en niet met naalden met knop
25.05.2021 - 07:27DROPS Design answered:
Dag Cornelis,
Bij royale modellen wordt vaak rondbreinaalden geadviseerd vanwege het groot aantal steken, met name bij de grotere maten.
25.05.2021 - 19:25
![]() Emilia wrote:
Emilia wrote:
Hej! Jag är lite förvirrad angående bakstycket när man ska maska av till ärmhål och det står "Maska av i början av varje varv i varje sida: Maska av 3 maskor 1-1-1-1-1-1 gång, 2 maskor 1-1-1-1-1-1 gång. och 1 maska 1-1-2-2-2-3 gånger = 64-70-74-82-92-100 maskor". innebär det att man första varvet när man ska maska av, maskar av 3 maskor, andra varvet 2 maskor och tredje varvet 1 maska? Och vad betyder det att man maskar av 3 maskor en gång, och 1 maska 2 gånger?
07.05.2021 - 08:49DROPS Design answered:
Hej Emilia. Ja det är som du skriver, först maskar du av 3 maskor i början av varje varv, 1 gång; dvs du maskar av 3 maskor, stickar varvet ut, vänder, maskar av 3 maskor och stickar varvet ut. Sedan gör du samma sak fast med 2 maskor. Till sist samma sak fast med 1 maska och sedan samma sak en gång till med 1 maska (eftersom det står att det ska göras 2 gånger). Mvh DROPS Design
07.05.2021 - 12:13
![]() Lotte wrote:
Lotte wrote:
Deze trui wil ik graag breien met Brushed Alpaca Silk. Het mooiste wordt het met dit garen als ik naald 4.5 gebruik (in plaats van de aangeraden naald 5). Alleen kom ik dan net niet aan de 10 cm breedte (ik brei redelijk los dus) . Omdat mijn maat XS is, kan ik dan maat S aanhouden?
06.05.2021 - 17:11DROPS Design answered:
Dag Lotte,
Dat zou ik zo niet kunnen zeggen, want ik weet niet wat je stekenverhouding is. Op basis van je eigen stekenverhouding zou je uit kunnen rekenen hoe breed bijvoorbeeld de panden wordt met het aangegeven aantal op te zetten steken in maat S.
07.05.2021 - 10:09
![]() Lotte wrote:
Lotte wrote:
Ik snap niet wat hier mee bedoelt wordt: " Om te voorkomen dat de hals te strak wordt en naar buiten gaat staan, zorg ervoor dat de naad elastisch is" Hoe zorg je ervoor dat de naad elastisch is? wordt daarmee bedoelt dat je losjes afkant? Of wordt er iets anders mee bedoelt?
06.05.2021 - 17:06DROPS Design answered:
Dag Lotte,
Ja, er wordt inderdaad mee bedoelt dat je losjes afkant, maar ook dat je de boord dusdanig vastnaait, dat je hem nog uit kunt rekken.
07.05.2021 - 10:51
![]() Anna Eriksson wrote:
Anna Eriksson wrote:
Hej! Jag är nybörjare och använder strumpstickor för ärmarna. Jag förstår inte det sista med avmaskningen, vart ska de 6 maskorna maskas av och vart ska resterande, efter det, maskas av? Alltså detta: Maska av till ärmkulle i början av varje varv i varje sida så här: 2 maskor 1 gång, 3 maskor 1 gång, sedan maskas de resterande maskorna av. Exakt var ska jag maska av? Tack! Anna
05.05.2021 - 07:58DROPS Design answered:
Hej Anna. Du satte en markör i början av varvet och det är där du ska maska av 6 maskor (3 maskor på varje sida av markören). Efter det börjar du sticka fram och tillbaka istället för runt. Sedan maskar du av i början av varje varv (alltså så att du avmaskar på varje sida av där du maskade av de 6 maskorna). Maska av 2 maskor 1 gång på varje sida och sedan 3 maskor 1 gång på varje sida. Hoppas det hjälper. Mvh DROPS Design
05.05.2021 - 11:07
![]() Anna wrote:
Anna wrote:
Hej! jag är väldigt förvirrad över detta mönster. Man ska sticka med rundstickor även fast man inte stickar runt? Då borde man ju använda andra stickor än rundsticka? Jag funderar om man kan sticka först bakstycket resår och flytta över till en rundsticka, sedan sticka framstyckets resår och flytta över det till samma rundsticka. Sedan stickar man runt tills ärmhålen då man flyttar över dem till olika stickor och stickar enligt mönstret? Dvs. om man hellre vill sticka runt?
10.04.2021 - 17:26DROPS Design answered:
Hej Anna. Vi har valt att använda rundsticka när man stickar fram och tillbaka för att vara säker på att få plats med alla maskor, men det går fint att använda parstickor också. Det går helt fint att sticka arbetet runt som du skriver om du hellre vill det. Mvh DROPS Design
13.04.2021 - 07:37
![]() Michelle wrote:
Michelle wrote:
Je ne comprends pas au niveau des emmanchures rabattre au début de chaque côté : 1-1-1-1-1-1 fois 3 mailles; 1 -1-1-1-1-1- fois 2mailles et 1-1-2-2-2-2-3fois une maille ? merci pour votre réponse
08.04.2021 - 19:27DROPS Design answered:
Bonjour Michelle, tricotez 1 rang en rabattant les 3 premières mailles, tournez, rabattez les 3 premières mailles et terminez ce rang. Tournez et rabattez les 2 premières mailles, terminez le rang, tournez, rabattez les 2 premières mailles et terminez le rang. Tournez, rabattez la première maille, terminez le rang, tournez, rabattez la première maille, terminez le rang - tricotez les 2 derniers rangs 1-1-2-2-2-3 fois au total selon la taille. Bon tricot!
09.04.2021 - 07:32
![]() Mia wrote:
Mia wrote:
Hej, Hur ökar man detta när man gör ärmarna: Öka med 3½-3½-3-3-2-2 cm mellanrum totalt 11-12-13-13-15-15 gånger = 60-64-68-70-74-76 maskor. Det är ju omöjligt att få in så många maskor, jag ökade var 3-4 maska och kom upp i 59 maskor. Fungerar det?
08.04.2021 - 10:36DROPS Design answered:
Hej Mia. Du ska öka 1 maska på varje sida av markören mitt under ärmen, dvs 2 maskor ökade per varv. Stickar du storlek S så ska du öka med 3½ cm mellanrum (dvs första ökning av 2 maskor när arb mäter 10 cm, andra ökning av 2 maskor när arb mäter 13½ cm osv) och du ökar totalt 11 gånger. 38 m + (11x2) = 60 m. Mvh DROPS Design
13.04.2021 - 08:05
|
|
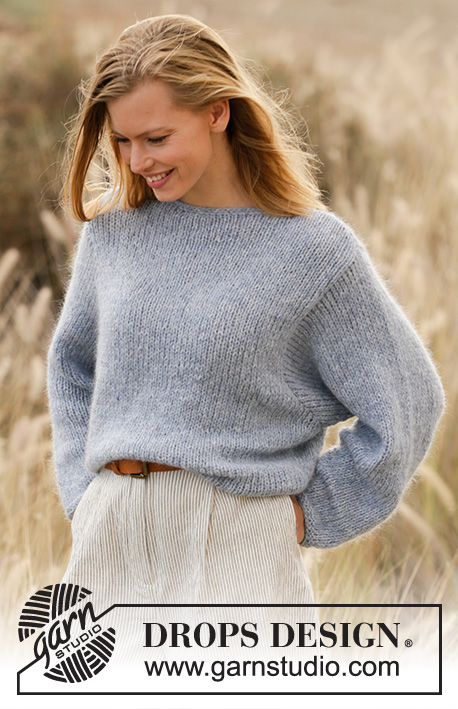
Grey Pearl#greypearlsweater |
|
 |
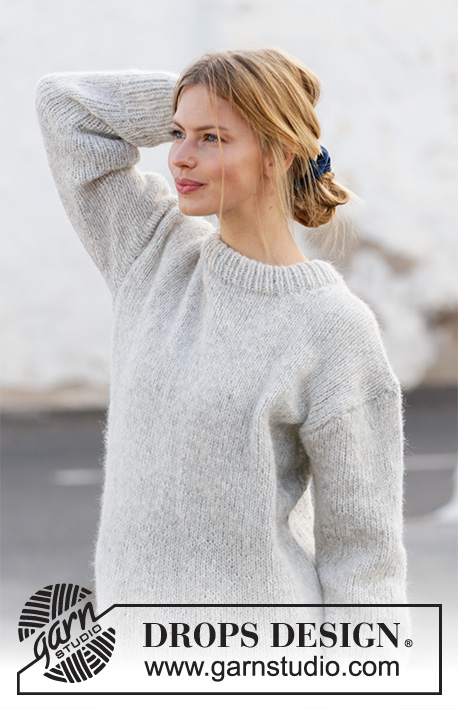 |
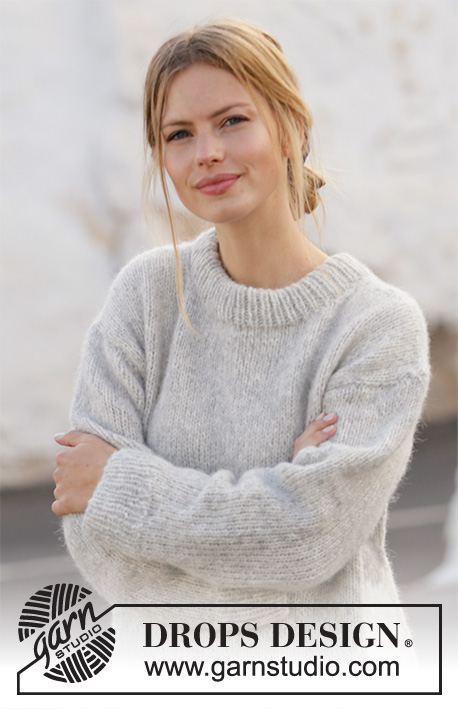
Knitted sweater in DROPS Air. Sizes S - XXXL.
DROPS 210-36 |
|
|
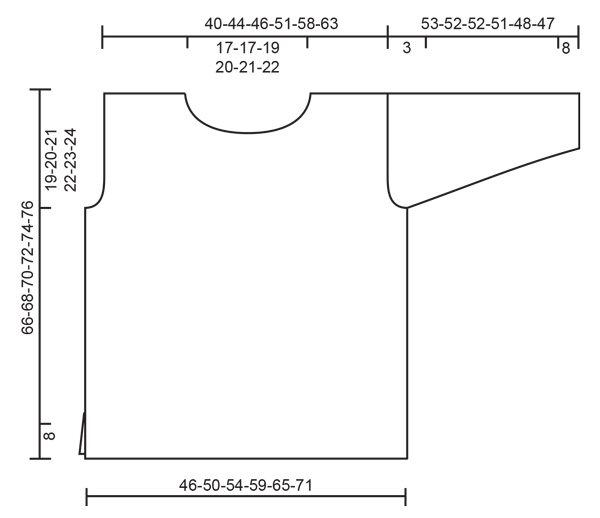
------------------------------------------------------- EXPLANATIONS FOR THE PATTERN: ------------------------------------------------------- RIDGE/GARTER STITCH (worked back and forth): Knit all rows. 1 ridge in height = Knit 2 rows. DECREASE TIP (evenly spaced): To work out how to decrease evenly, count the total number of stitches on needle (e.g. 89 stitches) and divide by number of decreases to be made (e.g. 13) = 6.8. In this example decrease by knitting together alternately each 5th and 6th stitch and each 6th and 7th stitch (approx.). INCREASE TIP (for sleeves): Start 1 stitch before the marker thread, 1 yarn over, work 2 stitches (marker thread sits between these 2 stitches), 1 yarn over. On the next round knit the yarn overs twisted to avoid holes. ------------------------------------------------------- START THE PIECE HERE: ------------------------------------------------------- SWEATER – SHORT OVERVIEW OF THE PIECE: The sweater is worked back and forth in 2 parts which are sewn together to finish. The sleeves are worked in the round with double pointed needles/short circular needle. BACK PIECE: Cast on 89-97-103-113-125-137 stitches with circular needle size 4.5 mm = US 7 and Air. Purl 1 row from the wrong side then work as follows – from the right side: 2 edge stitches in GARTER STITCH – see description above, *knit 1, purl 1 *, work from *-* until there are 3 stitches left, knit 1 and 2 edge stitches in garter stitch. Continue like this until the piece measures 8 cm = 3⅛". Change to circular needle size 5.5 mm = US 9 and knit 1 row from the right side where you decrease 13-15-15-17-19-21 stitches evenly spaced – read DECREASE TIP = 76-82-88-96-106-116 stitches. Continue with stockinette stitch and 1 edge stitch in garter stitch on each side. When the piece measures 47-48-49-50-51-52 cm = 18½"-19"-19¼"-19¾"-20"-20½", bind off for the armholes on both sides at the beginning of each row as follows: Bind off 3 stitches 1-1-1-1-1-1 time, 2 stitches 1-1-1-1-1-1 time and 1 stitch 1-1-2-2-2-3 times = 64-70-74-82-92-100 stitches. Continue with stockinette stitch until the piece measures 64-66-68-70-72-74 cm = 25¼"-26"-26¾"-27½"-28⅜"-29⅛". Now bind off the middle 26-26-28-30-32-34 stitches for the neck and each shoulder is finished separately. Then bind off at the beginning of next row from the neck as follows: 1 stitch 1 time = 18-21-22-25-29-32 stitches on the shoulder. Continue working until the piece measures 66-68-70-72-74-76 cm = 26"-26¾"-27½"-28⅜"-29⅛"-30" and bind off. Work the other shoulder in the same way. FRONT PIECE: Cast on and work as for the back piece until the piece measures 60-62-64-66-68-70 cm = 23⅝"-24⅜"-25¼"-26"-26¾"-27½". Now place the middle 20-20-22-24-26-28 stitches on 1 thread for the neck and finish each shoulder separately. Then bind off at the beginning of each row from the neck as follows: 2 stitches 1 time and 1 stitch 2 times = 18-21-22-25-29-32 stitches left on the shoulder. Continue working until the piece measures 66-68-70-72-74-76 cm = 26"-26¾"-27½"-28⅜"-29⅛"-30", then bind off. Work the other shoulder in the same way. SLEEVE: The sleeves are worked bottom up, in the round, with double pointed needles/short circular needle. The piece is then divided and worked back and forth for the sleeve cap. Cast on 46-48-50-52-52-56 stitches with double pointed needles size 4.5 mm = US 7 and Air. Knit 1 round, then work rib (knit 1 / purl 1) for 8 cm = 3⅛". Change to double pointed needles size 5.5 mm = US 9 and continue with stockinette stitch. On the first round decrease 8-8-8-8-8-10 stitches evenly spaced = 38-40-42-44-44-46 stitches. Insert a marker thread at the beginning of the round = mid under sleeve. Continue with stockinette stitch, AT THE SAME TIME when the piece measures 10-10-10-10-12-12 cm = 4"-4"-4"-4"-4¾"-4¾", increase 1 stitch on each side of the marker thread – read INCREASE TIP. The yarn overs are worked twisted on the next round to avoid holes. Increase like this 3½-3½-3-3-2-2 cm = 1¼"-1¼"-1⅛"-1⅛"-¾"-¾" a total of 11-12-13-13-15-15 times = 60-64-68-70-74-76 stitches. When the sleeve measures 50-49-49-48-45-44 cm = 19¾"-19¼"-19¼"-19"-17¾"-17¼", bind off 3 stitches on each side of the marker thread (= 6 stitches bind off mid under the sleeve), then continue working back and forth. Bind off for the sleeve cap at the beginning of each row on both sides as follows: 2 stitches 1 time, 3 stitches 1 time, then bind off the remaining stitches. Work the other sleeve in the same way. ASSEMBLY: Sew the shoulder seams. Sew in the sleeves and sew the side seams, inside the 1 edge stitch and until there is 8 cm = 3⅛" left at the bottom = split. NECK: Knit up approx. 92-106 stitches with circular needle size 4,5 mm = US 7 around the neck (including the stitches on the thread and the number divisible by 2). Work rib (knit 1 / purl 1) for 9 cm = 3½". Then bind off. Fold the rib at the top to the wrong side and fasten down. To avoid the neck being tight and turning outwards, make sure the seam is elastic. |
|
 |
|
Have you finished this pattern?Tag your pictures with #dropspattern #greypearlsweater or submit them to the #dropsfan gallery. Do you need help with this pattern?You'll find 29 tutorial videos, a Comments/Questions area and more by visiting the pattern on garnstudio.com. © 1982-2026 DROPS Design A/S. We reserve all rights. This document, including all its sub-sections, has copyrights. Read more about what you can do with our patterns at the bottom of each pattern on our site. |
|


With over 40 years in knitting and crochet design, DROPS Design offers one of the most extensive collections of free patterns on the internet - translated to 17 languages. As of today we count 324 catalogs and 12290 patterns - 12280 of which are translated into English (US/in).
We work hard to bring you the best knitting and crochet have to offer, inspiration and advice as well as great quality yarns at incredible prices! Would you like to use our patterns for other than personal use? You can read what you are allowed to do in the Copyright text at the bottom of all our patterns. Happy crafting!
Post a comment to pattern DROPS 210-36
We would love to hear what you have to say about this pattern!
If you want to leave a question, please make sure you select the correct category in the form below, to speed up the answering process. Required fields are marked *.