
Popular categories
Looking for a yarn?


Comments / Questions (39)
![]() Christine wrote:
Christine wrote:
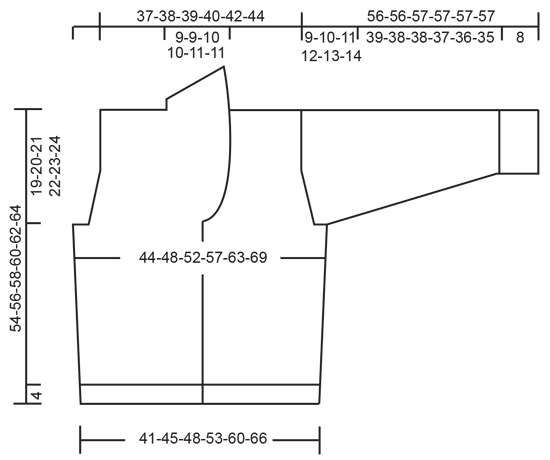
I would appreciate the cm-to-inches conversion to be made already on the schematic, instead of doing it myself. The schematic doesn't include the back. This is an unusual construction, seeing how the back looks would be helpful.
15.03.2020 - 19:30
![]() Sussi Beck wrote:
Sussi Beck wrote:
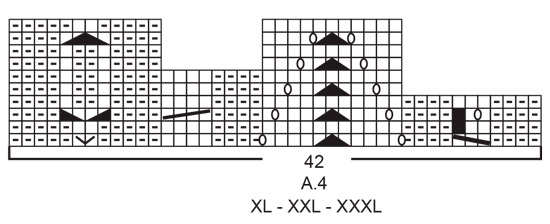
Er der ikke fejl i A4 str. XL-XXXL? Iflg. A4 str. S-L skal der strikkes V så den bliver omvendt i forhold til A3, men i str. XL-XXXL er den det sammen som i A3. Det kan da ikke være rigtigt?
31.01.2020 - 12:48DROPS Design answered:
Hej Sussi, Det ser ud som om du har ret, vi skal få diagrammet rettet. Tak for info :)
11.02.2020 - 09:07
![]() Angela wrote:
Angela wrote:
Thank you for the reply to my question. I worked it out for myself in the end based on the diagram which I don't think I had printed off. It is a very pretty design and it is quite distinctive.
12.12.2019 - 20:01
![]() Angela wrote:
Angela wrote:
Please provide more explicit instructions on the decreases of the sleeves and how many stitches should be left on the needle when finished. I've completed the body of the cardigan and it is lovely.
11.12.2019 - 14:10DROPS Design answered:
Dear Angela, the number of sts remaining at the end of sleeve cap will depend on your number of rows in height, measurements are here more important than number of remaining stitches, cast off first 6 sts mid under sleeve, then continue to cast off stitches at the beg of each row (both from RS and WS) as explained for your size, make sure you cast off the same number of stitches on each side, following measurements at the same time, hope it helps. Happy knitting!
11.12.2019 - 14:38
![]() Charo wrote:
Charo wrote:
Como se puede acceder al patrón de este modelo?
13.10.2019 - 00:16DROPS Design answered:
Hola Charo. Este patrón será publicado en español esta semana.
13.10.2019 - 22:37
![]() Jeanne wrote:
Jeanne wrote:
Bij rugpand worden voor de hals 20 steken afgekant. Waar worden deze steken bij de voorpanden geminderd ?
19.08.2019 - 09:15DROPS Design answered:
Dag Jeanne,
Deze minderingen zijn op de voorpanden verwerkt in de v-hals/sjaalkraag.
01.09.2019 - 13:48
![]() Jeanne wrote:
Jeanne wrote:
Ik ben nu bij het meerderen van de kraag. Worden er dan geen steken geminderd om een mooie kraag te krijgen?
18.08.2019 - 20:48DROPS Design answered:
Dag Jeanne,
Er wordt inderdaad niet geminderd voor de hals. De kabels lopen ook recht door naar boven op de voorpanden. Er wordt dus alleen gemeerderd voor de kraag.
16.10.2019 - 10:03
![]() Maschefuermasche wrote:
Maschefuermasche wrote:
Guten Morgen Bei der Strickschrift A.3 neunte Reihe bekomme ich mit der 4-6. Masche weniger Maschen ... Das sollte doch nicht sein? Muss ich jeweils 2 Umschläge arbeiten? Danke für die schnelle Antwort
16.08.2019 - 08:54DROPS Design answered:
Liebe Maschefuermasche, in A.3 wird die Maschenanzhal um 1 Masche unterschiedlich sein, wegen den schmallen Zopf (am Ende A.3), dh bei der 1. und 4. Reihe im Zopf haben Sie 35-42 M in A.3, und bei der 2. und 3. Reihe im Zopf haben Sie 34-41 M in A.3. Viel Spaß beim stricken!
16.08.2019 - 09:37
![]() Jeanne wrote:
Jeanne wrote:
Hoe kan ik het patroon aanpassen dat de schouder niet afhangend wordt? Is mi ook veel mooier
14.08.2019 - 07:44DROPS Design answered:
Dag Jeanne,
Helaas is het voor ons niet mogelijk om patronen aan te passen naar persoonlijke wens. Eventueel kun je hulp vragen bij de winkel waar je het garen hebt gekocht.
17.10.2019 - 10:03
![]() Martina wrote:
Martina wrote:
Ein wirklich wunderschönes tragbares Modell, werde demnächst die Anleitung genau durcharbeiten und nachstricken. Vielen Dank an Ihr Team....tolle Arbeit..die Ihr da leistet.
12.08.2019 - 18:32
|
||||||||||||||||||||||||||||||||||||||||
Marigold Sunshine#marigoldsunshinejacket |
||||||||||||||||||||||||||||||||||||||||
 |
 |
|||||||||||||||||||||||||||||||||||||||
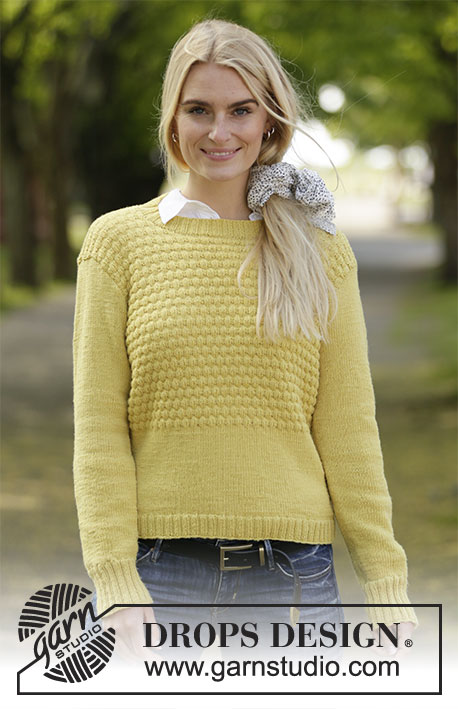
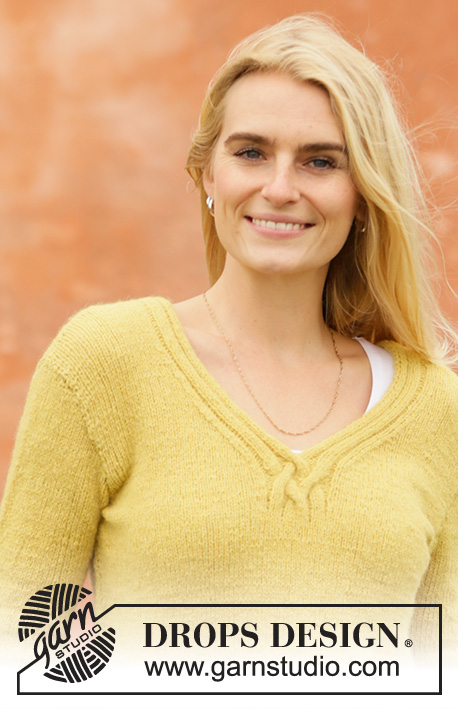
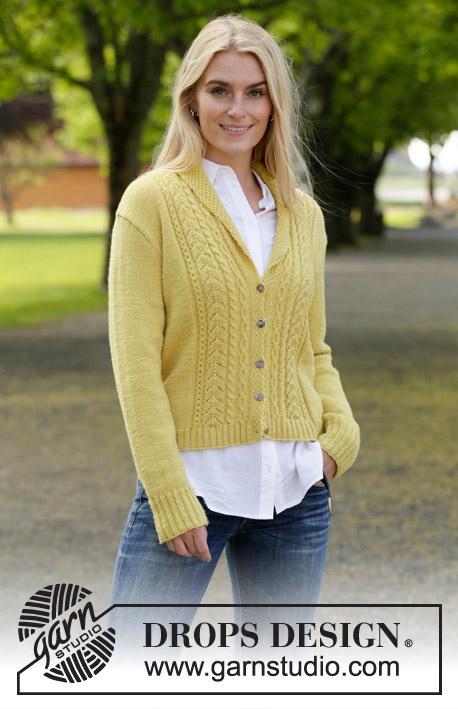
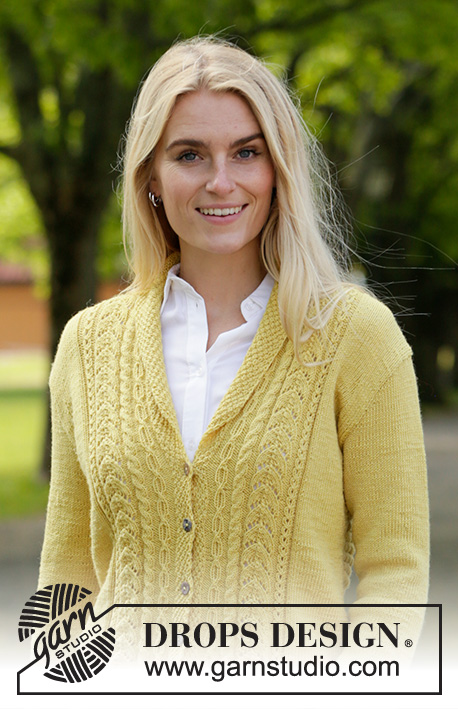
Knitted jacket in DROPS BabyMerino. The piece is worked with cables, lace pattern and shawl collar. Sizes S - XXXL.
DROPS 207-4 |
||||||||||||||||||||||||||||||||||||||||
|
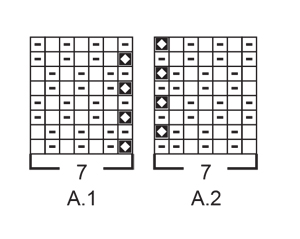
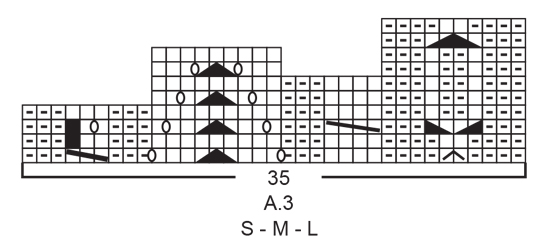
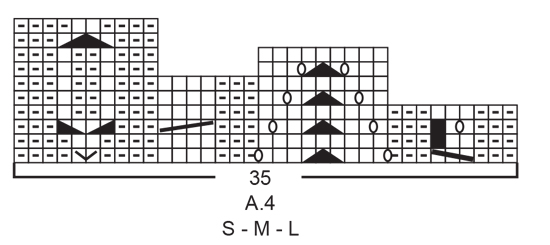
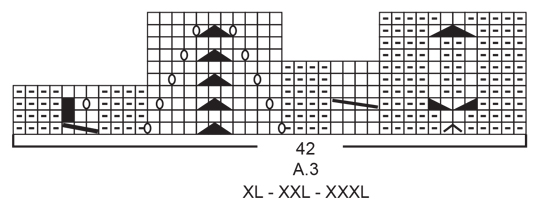
------------------------------------------------------- EXPLANATIONS FOR THE PATTERN: ------------------------------------------------------- RIDGE/GARTER STITCH (worked back and forth): Knit all rows. 1 ridge in height = Knit 2 rows. PATTERN: See diagrams A.1 to A.4. Choose diagram for your size (applies to A.3 and A.4). The diagrams show all rows in the pattern seen from the right side. NOTE: Both A.3 and A.4 show 1 repeat in height, but the diagrams differ in height because each cable/lace pattern covers different numbers of rows in height. And the smallest cable in A.3 and A.4 varies from 3 to 2 stitches. The number of stitches in the pattern can therefore vary by 1 stitch, depending on where you are in the cable. DECREASE TIP-1 (evenly spaced): All decreases are made from the right side! To work out how to decrease evenly, count the total number of stitches on needle (e.g. 252 stitches) minus the bands (e.g. 14 stitches) and divide the remaining stitches by the number of decreases to be made (e.g. 26) = 9.2. In this example decrease by knitting together approx. each 8th and 9th stitch together. Do not decrease on bands. DECREASE TIP-2 (for armholes): All decreases are worked from the right side! Decrease for the armholes on the inside of the 6 outermost stitches towards the armholes as described below. Decrease as follows after the 6 outermost stitches: Work 1 edge stitch in garter stitch, knit 5, slip 1 stitch as if to knit, knit 1 and pass the slipped stitch over the knitted stitch (= 1 stitch decreased). Decrease as follows before the 6 outermost stitches: Work until there are 8 stitches left on the row, knit 2 together, knit 5 and finish with 1 edge stitch in garter stitch (= 1 stitch decreased). INCREASE TIP-1 (for sides of body and mid under sleeves): All increases are worked from the right side! Start 3 stitches before the marker thread, make 1 yarn over, knit 6 (the marker thread sits in the middle of these 6 stitches), 1 yarn over (= 2 stitches increased). On the next row (wrong side) purl the yarn overs twisted to avoid holes. Then work the new stitches in stockinette stitch. INCREASE TIP-2 (for shawl collar): All increases are worked from the right side! Increase for the collar on the inside of the outermost stitch towards mid front (i.e. on the inside of the slipped stitch). Increase 1 stitch by making 1 yarn over. On the next row work the yarn over twisted to avoid a hole. The increased stitches are worked into A.1 / A.2 as you go. BUTTONHOLES: Work buttonholes on the right band. 1 BUTTONHOLE = Start from the right side and knit the 3rd and 4th stitch from the edge together, then make 1 yarn over. On the next row (wrong side) knit the yarn over (= hole). Work buttonholes when the piece measures: S: 2, 9, 15, 22 and 28 cm = ¾", 3½", 6", 8¾" and 11" M: 2, 9, 16, 23 and 29 cm = ¾", 3½", 6¼", 9" and 11⅜" L: 2, 9, 16, 23 and 30 cm = ¾", 3½", 6¼", 9" and 11¾" XL: 2, 8, 14, 20, 26 and 31 cm = ¾", 3⅛", 5½", 8", 10¼" and 12¼" XXL: 2, 8, 14, 20, 26 and 32 cm = ¾", 3⅛", 5½", 8", 10¼" and 12½" XXXL: 2, 9, 15, 21, 27 and 33 cm = ¾", 3½", 6", 8¼", 10⅝" and 13" ------------------------------------------------------- START THE PIECE HERE: ------------------------------------------------------- JACKET – SHORT OVERVIEW OF THE PIECE: The body is worked back and forth with circular needle from mid front, bottom up as far as the armholes. Then the back and front pieces are finished separately. The sleeves are worked in the round with double pointed needles/short circular needle, bottom up. BODY: Cast on 252-276-296-328-364-396 stitches (including 7 band stitches on each side towards mid front) with circular needle size 2.5 mm = US 1,5 and BabyMerino. Purl 1 row (= wrong side). The next row is worked as follows from the right side: Work A.1 over the first 7 stitches (= band), * knit 2, purl 2 *, work from *-* until there are 9 stitches left on the row, knit 2 and finish with A.2 over the last 7 stitches (= band). Continue this rib for 4 cm = 1½" – remember BUTTONHOLES on right band – read description above. Purl 1 row from the wrong side (bands worked in A.1/A.2) – AT THE SAME TIME decrease 26-30-34-36-40-44 stitches evenly spaced – read DECREASE TIP-1 = 226-246-262-292-324-352 stitches. Change to circular needle size 3 mm = US 2,5. Insert 1 marker thread 64-69-73-82-90-97 stitches in from each side (= 98-108-116-128-144-158 stitches between marker threads on back piece). Read PATTERN and work the next row from the right side as follows: 7 band stitches in A.1, work A.3 (= 35-35-35-42-42-42 stitches), work stockinette stitch until there are 42-42-42-49-49-49 stitches left on the row, work A.4 (= 35-35-35-42-42-42 stitches) and finish with 7 band stitches in A.2. Continue this pattern. REMEMBER THE KNITTING GAUGE! Now increase in the sides, increase for the shawl collar and decrease for the armholes as described below (increasing to shawl collar and decreasing for armholes will in some sizes occur simultaneously): INCREASING IN SIDES: When the piece measures 10 cm = 4" in all sizes increase 1 stitch on each side of both marker threads – read INCREASE TIP-1 (= 4 stitches increased). Increase like this every 7-7-7-8-8-8 cm = 2¾"-2¾"-2¾"-3⅛"-3⅛"-3⅛" a total of 4 times on each side (= a total of 16 stitches increased). SHAWL COLLAR: When the piece measures approx. 29-30-31-32-33-34 cm = 11⅜"-11¾"-12¼"-12½"-13"-13⅜" (you should have worked a couple of rows after the last buttonhole), increase 1 stitch on each side towards mid front – read INCREASE TIP-2. Increase for the collar like this every 2nd row (i.e. every row from the right side) a total of 8-8-10-10-12-12 times (after the final increase for the collar there are 15-15-17-17-19-19 stitches on the band/collar). ARMHOLES: When the piece measures 35-36-37-38-39-40 cm = 13¾"-14¼"-14½"-15"-15¼"-15¾", bind off for the armholes on each side of the body; the next row is worked as follows from the wrong side: Work as before until there are 3-5-7-9-11-13 stitches left before the first marker thread, bind off 6-10-14-18-22-26 stitches for the armhole, work as before until there are 3-5-7-9-11-13 stitches left before the second marker thread, bind off 6-10-14-18-22-26 stitches for the armhole and work to end of row as before. Front and back pieces are now finished separately. RIGHT FRONT PIECE (when garment is worn): Continue back and forth as before with A.1 over the band/shawl collar, A.3 (= 35-35-35-42-42-42 stitches) and stockinette stitch over the remaining stitches. AT THE SAME TIME on the first row from the right side decrease 1 stitch in the side for the armhole – read DECREASE TIP-2. Decrease for the armhole like this every 2nd row (i.e. each row from the right side) a total of 6-7-8-11-15-17 times. After all increases and decreases there are 67-69-72-76-80-83 stitches on the row. Continue the pattern. When the piece measures approx. 53-55-57-59-61-63 cm = 21"-21⅝"-22½"-23¼"-24"-24¾" knit 1 row from the right side as before – AT THE SAME TIME on this row decrease 8-8-8-11-11-11 stitches evenly over the 35-35-35-42-42-42 stitches in A.3 = 59-61-64-65-69-72 stitches left. Knit 1 row from the wrong side over all stitches. The next row is worked as follows from the right side: Knit 26-26-29-29-32-32 stitches (= shawl collar) and bind off the 33-35-35-36-37-40 stitches on the shoulder. Cut the strand. Now work RIGHT COLLAR as described below. RIGHT COLLAR: Keep the 26-26-29-29-32-32 stitches on circular needle size 3 mm = US 2,5. The collar is worked in garter stitch with short rows towards the neck. Start from the wrong side and knit 1 row. Now work garter stitch back and forth as follows: * Work 1 ridge back and forth over all 26-26-29-29-32-32 stitches, work 1 ridge back and forth over the first 20-20-23-23-26-26 stitches *, work from *-* until the collar measures approx. 7-7-7-7-8-8 cm = 2¾"-2¾"-2¾"-2¾"-3⅛"-3⅛" inside where shortest (measures approx. 14-14-14-14-16-16 cm = 5½"-5½"-5½"-5½"-6¼"-6¼" outside where longest). Bind off with knit from the right side. LEFT FRONT PIECE (when garment is worn): Continue back and forth as before with stockinette stitch, A.4 (= 35-35-35-42-42-42 stitches) and A.2 over the band/shawl collar. AT THE SAME TIME on the first row from the right side decrease 1 stitch in the side for the armhole – read DECREASE TIP-2. Decrease for the armhole like this every 2nd row (i.e. each row from the right side) a total of 6-7-8-11-15-17 times. After all increases and decreases there are 67-69-72-76-80-83 stitches on the row. Continue the pattern. When the piece measures 53-55-57-59-61-63 cm = 21"-21⅝"-22½"-23¼"-24"-24¾", work 1 row from the right side as before – AT THE SAME TIME on this row decrease 8-8-8-11-11-11 stitches evenly over the 35-35-35-42-42-42 stitches in A.4 = 59-61-64-65-69-72 stitches left. Knit 1 row from the wrong side over all stitches. The next row is worked as follows from the right side: Bind off 33-35-35-36-37-40 stitches for the shoulder and knit the remaining 26-26-29-29-32-32 stitches (= shawl collar). Now work LEFT COLLAR as described below. LEFT COLLAR: = 26-26-29-29-32-32 stitches. Start from the wrong side and work garter stitch back and forth as follows: * Work 1 ridge back and forth over all 26-26-29-29-32-32 stitches, work 1 ridge back and forth over the first 20-20-23-23-26-26 stitches *, work from *-* until the collar measures approx. 7-7-7-7-8-8 cm = 2¾"-2¾"-2¾"-2¾"-3⅛"-3⅛" inside where shortest (measures approx. 14-14-14-14-16-16 cm = 5½"-5½"-5½"-5½"-6¼"-6¼" outside where longest). Knit 1 row from the wrong side and bind off with knit from the right side. BACK PIECE: = 100-106-110-118-130-140 stitches. Continue with stockinette stitch. AT THE SAME TIME on the first row from the right side decrease 1 stitch on each side for the armholes – read DECREASE TIP-2. Decrease for the armholes like this every 2nd row a total of 6-7-8-11-15-17 times = 88-92-94-96-100-106 stitches. Work until the piece measures 52-54-56-58-60-62 cm = 20½"-21¼"-22"-22¾"-23⅝"-24⅜". Now bind off the middle 18-18-20-20-22-22 stitches for the neck and each shoulder is finished separately. Continue with stockinette stitch and bind off at the beginning of each row from the neck as follows: Bind off 1 stitch 2 times = 33-35-35-36-37-40 stitches. Work until the piece measures 54-56-58-60-62-64 cm = 21¼"-22"-22¾"-23⅝"-24⅜"-25¼". Knit 1 row from the wrong side and bind off with knit from the right side. Work the other shoulder in the same way. SLEEVE: Cast on 68-72-72-76-76-80 stitches with double pointed needles size 2.5 mm = US 1,5 and BabyMerino. Knit 1 round, then work rib in the round (= knit 2/ purl 2) for 8 cm = 3⅛". Change to double pointed needles size 3 mm = US 2,5 and knit 1 round where you decrease 12-14-12-14-12-12 stitches evenly spaced = 56-58-60-62-64-68 stitches. Insert 1 marker thread at the beginning of the round = mid under sleeve and allow it to follow your work onwards; it will be used when increasing mid under sleeve. Work stockinette stitch in the round. When the sleeve measures 9-9-9-9-10-10 cm = 3½"-3½"-3½"-3½"-4"-4" from the cast-on edge, increase 2 stitches mid under the sleeve – read INCREASE TIP-1. Increase like this every 3½-3-2½-2-1½-1½ cm = 1¼"-1⅛"-1"-¾"-½"-½" a total of 11-13-15-18-21-22 times = 78-84-90-98-106-112 stitches. Continue working until the sleeve measures 47-46-46-45-44-43 cm = 18½"-18"-18"-17¾"-17¼"-17" (there is 9-10-11-12-13-14 cm = 3½"-4"-4⅜"-4¾"-5⅛"-5½" left to finished length; alternately, continue to desired length). NOTE; Shorter measurements in larger sizes due to broader shoulders and longer sleeve cap. The next round is worked as follows: Start 3 stitches before the marker thread, bind off 6 stitches (= mid under sleeve) and work stockinette stitch to end of round = 72-78-84-92-100-106 stitches left. Now work stockinette stitch back and forth and AT THE SAME TIME bind off stitches for the sleeve cap at the beginning of each row on both sides as follows: Bind off 3 stitches 1 time on each side, 2 stitches 2-2-2-3-3-3 times on each side and 1 stitch 5-7-9-9-11-12 times on each side. Then bind off 2 stitches on each side until the sleeve measures approx. 55-55-56-56-56-56 cm = 21⅝"-21⅝"-22"-22"-22"-22". Bind off 3 stitches 1 time on each side and then bind off the remaining stitches. The sleeve measures approx. 56-56-57-57-57-57 cm = 22"-22"-22½"-22½"-22½"-22½" from the top down. Work the other sleeve in the same way. ASSEMBLY: Sew the shoulder seams inside the bind-off edge. Sew in the sleeves inside the 1 edge stitch. Sew the collar together mid back (make sure the seam turns towards the wrong side when the collar is turned down). Sew the collar to the neck at the back, with the seam on the wrong side. |
||||||||||||||||||||||||||||||||||||||||
Diagram explanations |
||||||||||||||||||||||||||||||||||||||||
|
||||||||||||||||||||||||||||||||||||||||
 |
||||||||||||||||||||||||||||||||||||||||
 |
||||||||||||||||||||||||||||||||||||||||
 |
||||||||||||||||||||||||||||||||||||||||
 |
||||||||||||||||||||||||||||||||||||||||
 |
||||||||||||||||||||||||||||||||||||||||
 |
||||||||||||||||||||||||||||||||||||||||
Have you finished this pattern?Tag your pictures with #dropspattern #marigoldsunshinejacket or submit them to the #dropsfan gallery. Do you need help with this pattern?You'll find 28 tutorial videos, a Comments/Questions area and more by visiting the pattern on garnstudio.com. © 1982-2026 DROPS Design A/S. We reserve all rights. This document, including all its sub-sections, has copyrights. Read more about what you can do with our patterns at the bottom of each pattern on our site. |
||||||||||||||||||||||||||||||||||||||||


With over 40 years in knitting and crochet design, DROPS Design offers one of the most extensive collections of free patterns on the internet - translated to 17 languages. As of today we count 325 catalogs and 12298 patterns - 12288 of which are translated into English (US/in).
We work hard to bring you the best knitting and crochet have to offer, inspiration and advice as well as great quality yarns at incredible prices! Would you like to use our patterns for other than personal use? You can read what you are allowed to do in the Copyright text at the bottom of all our patterns. Happy crafting!
Post a comment to pattern DROPS 207-4
We would love to hear what you have to say about this pattern!
If you want to leave a question, please make sure you select the correct category in the form below, to speed up the answering process. Required fields are marked *.