
Popular categories
Looking for a yarn?


Comments / Questions (19)
![]() Elaine wrote:
Elaine wrote:
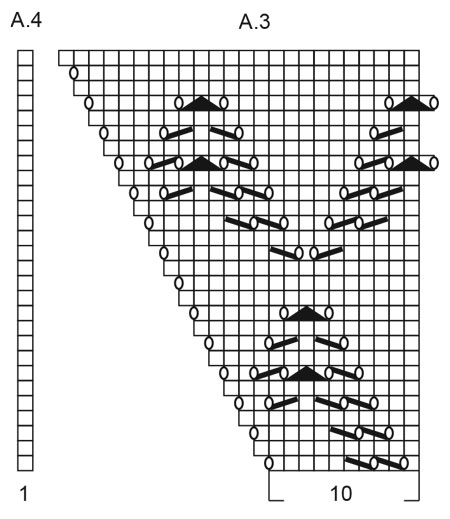
Bonjour j ai un problème je suis rendu à la ligne 21 du diagramme A3 et j ai sur mon aiguille 20 mailles alors que sur le patron je devrai avoir 21 mailles Exemple dans le diagramme A2 à la ligne 21 il y a un décalage ( c'est correct le tout fonctionne ) mais pour les diagramme A3 et A5 il y a une maille de plus que je n ai pas sur l aiguille que doit je faire ?
20.01.2020 - 03:18DROPS Design answered:
Bonjour Elaine, la dernière maille du dernier A.2 n'est pas dessinée, car elle figure dans A.3 (comme entre A.1 et A.2), et ce sera la même chose entre A.5 (= la dernière m, celle en plus de A.5 est la 1ère m de A.6 et la dernière m de A.6 est la 1ère du A.6 suivant/la 1ère de A.7. Bon tricot!
20.01.2020 - 10:17
![]() Cath wrote:
Cath wrote:
Merci pour votre réponse rapide ! :)
04.12.2019 - 16:32
![]() Cath wrote:
Cath wrote:
Bonjour à vous ! Avant de commencer, j'aimerais savoir si ce châle se tricote en commençant par le haut ou par le bas, je n'arrive pas à comprendre uniquement par la lecture. Merci pour la réponse !
04.12.2019 - 13:54DROPS Design answered:
Bonjour Cath, on tricote ce châle de haut en bas, en augmentant sur les côtés et au milieu pour créer le triangle. Bon tricot!
04.12.2019 - 13:57
![]() Anne wrote:
Anne wrote:
Liebes Drops-Team, mir gefällt dieses Tuch sehr gut. Ich habe bereits angefangen es zu stricken. Nun frage ich mich wie das Karomuster in der Spitze entstehen soll, wenn ich Reihe 5 bis 5 wiederhole. Müsste nich zwischen den Umschlägen am Rand und den Umschlägen an der mittleren Masche noch mehr Umschläge gemacht werden, um eine Lochreihe in der Mitte zu erhalten? Viele Grüße, Anne
25.11.2019 - 07:51DROPS Design answered:
Liebe Anne, Sie wiederholen Reihe 5 (Hinreihe), dh 6 Maschen werden in jeder Hinreihe zugenommen: 2 am Anfang der Reihe (= 1 Masche rechts, 1 Umschlag, 1 Masche rechts, 1 Umschlag, bis zur markierten Masche rechts stricken,), 2 beidseitg der mittleren Masche (= 1 Umschlag, 1 Masche rechts (= mittlere Masche) und 1 Umschlag.) und 2 am Ende der Reihe (=Rechts stricken bis noch 2 Maschen übrig sind, 1 Umschlag, 1 Masche rechts, 1 Umschlag und 1 Masche rechts). So bekommen Sie die Löcher beidseitg der mittleren Masche. Viel Spaß beim stricken!
25.11.2019 - 10:45
![]() 202-20 wrote:
202-20 wrote:
È giusto lavorare dal 5° ferro 6 gettate per ogni ferro a diritto? Il lavoro non viene un bel triangolo ma le punte esterne tendono ad avvicinarsi a cerchio! Grazie Giuseppina Botta - Como Italia
15.11.2019 - 22:06DROPS Design answered:
Buonasera, le spiegazioni sono corrette, è uno scialle lavorato dall'alto in basso come indicato nel titolo. Buon lavoro!
17.11.2019 - 23:11
![]() Bjoerg Osmark wrote:
Bjoerg Osmark wrote:
Oppskrift drops 202/20 stemmer ikke med bilde. Der er det ruter i mønster. Men hvilket nr har det rutesjalet. Bjørg
03.09.2019 - 10:15DROPS Design answered:
Hej Bjoerg, jo det bliver til ruder når du har nok masker til at gentage diagrammerne flere gange. God fornøjelse!
06.09.2019 - 08:33
![]() Sabine wrote:
Sabine wrote:
Ist das Modell auf dem Foto mit Lace oder Alpaca gestrickt? So wegen der Größe...
14.05.2019 - 11:32DROPS Design answered:
Liebe Sabine, das Modell auf dem Foto wurde mit Lace gestrickt. Viel Spaß beim stricken!
15.05.2019 - 11:04
![]() Petra Pirvu Cristea wrote:
Petra Pirvu Cristea wrote:
J`aime vraiment! merci!
14.01.2019 - 18:07
![]() Doris wrote:
Doris wrote:
Gefällt mir gut.
28.12.2018 - 13:11
|
||||||||||||||||
Glowing Embers#glowingembersshawl |
||||||||||||||||
 |
 |
|||||||||||||||
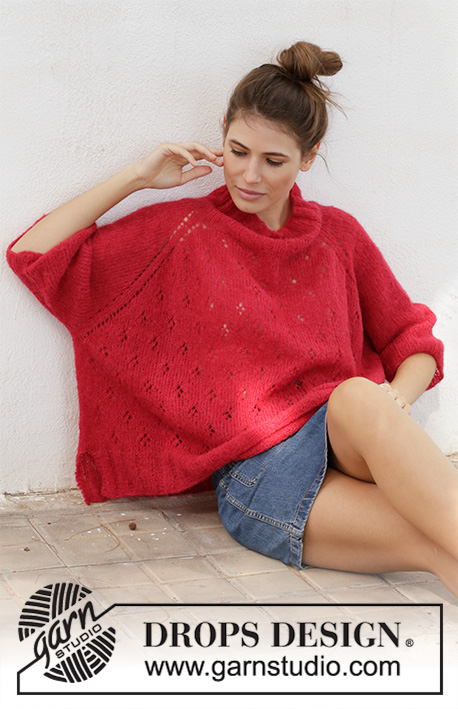
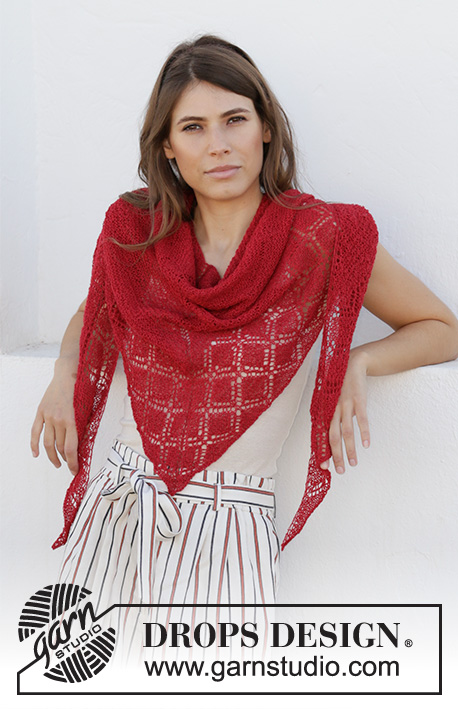
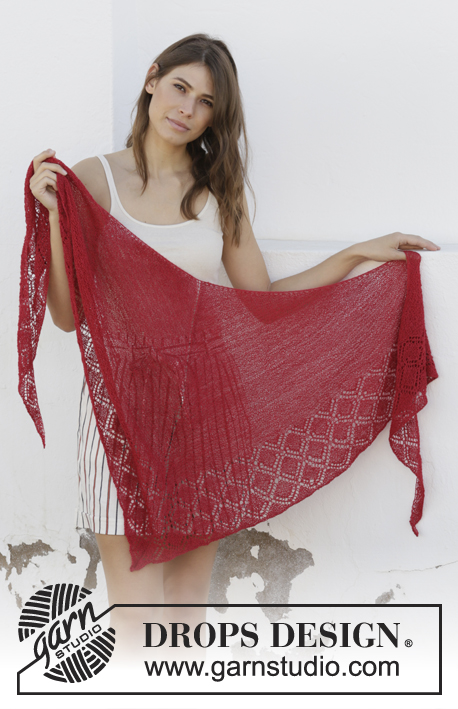
Knitted shawl in DROPS Lace or DROPS Alpaca. The piece is worked top down with garter stitch and lace pattern.
DROPS 202-20 |
||||||||||||||||
|
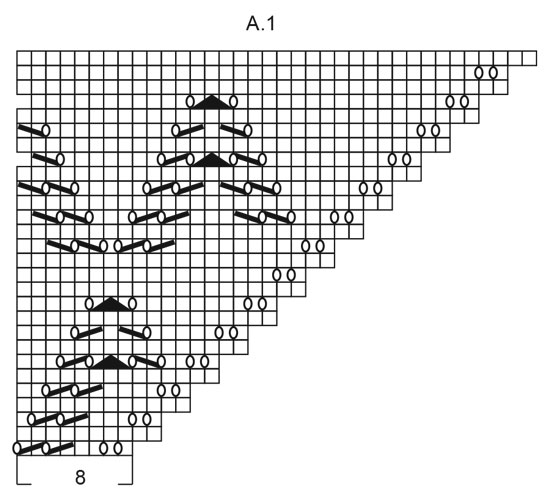
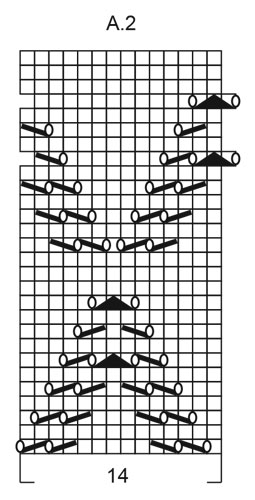
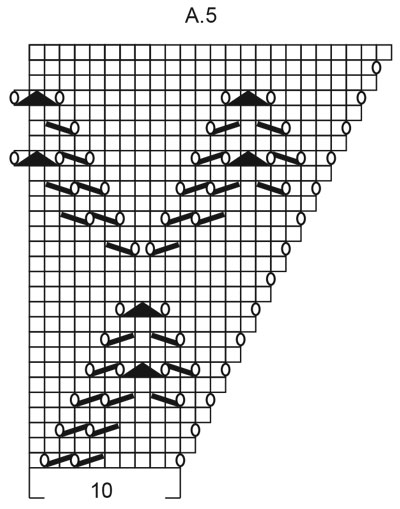
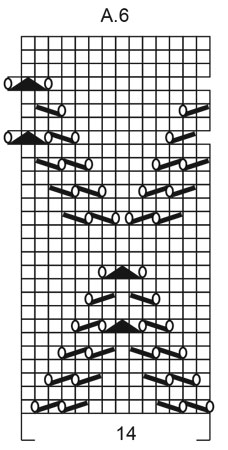
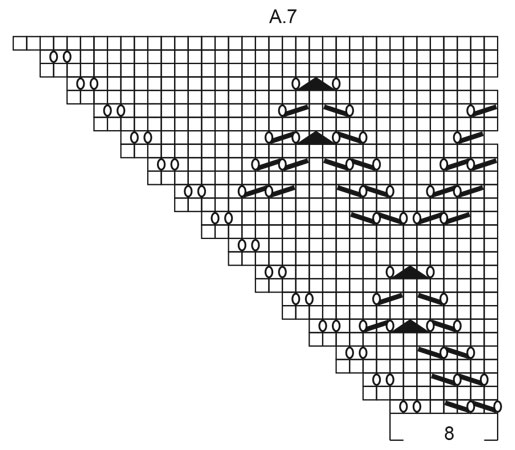
------------------------------------------------------- EXPLANATIONS FOR THE PATTERN: ------------------------------------------------------- RIDGE/GARTER STITCH (worked back and forth): Knit all rows. 1 ridge in height = Knit 2 rows. PATTERN: See diagrams A.1 to A.7. The diagrams show all rows in the pattern seen from the right side. SHAPING: Lay the piece in lukewarm water until it is thoroughly wet. Press the water gently out– do not wring the garment. Then roll the piece in a towel and press more water out. The piece will now be damp. Lay the piece on a mat or mattress – pull gently to the measurements given above under SIZE and allow to dry. Repeat this process after each wash. ------------------------------------------------------- START THE PIECE HERE: ------------------------------------------------------- SHAWL – SHORT OVERVIEW OF THE PIECE: The piece is worked back and forth with circular needle so you have room for all the stitches. The whole piece is worked in GARTER STITCH – read description above. SHAWL: Cast on 5 stitches with circular needle size 3 mm = US 2,5 and work as follows: ROW 1 (= right side): Knit 1, 1 yarn over, knit 1, 1 yarn over, knit 1, 1 yarn over, knit 1, 1 yarn over and 1 knit 1 (= 4 stitches increased and 9 stitches on needle). ROW 2 (= wrong side): Knit all stitches and yarn overs. ROW 3 (= right side): Knit 1, 1 yarn over, knit 3, 1 yarn over, knit 1, 1 yarn over, knit 3, 1 yarn over and knit 1 (= 4 stitches increased and 13 stitches on needle). ROW 4 (= wrong side): Knit all stitches and yarn overs. Insert 1 marker thread in the middle stitch and allow it to follow your work onwards. Work the next row as follows: ROW 5 (= right side): Knit 1, 1 yarn over, knit 1, 1 yarn over, knit as far as the stitch with marker thread. Make 1 yarn over, knit 1 (= mid-stitch) and 1 yarn over. Knit until there are 2 stitches left on row, 1 yarn over, knit 1, 1 yarn over and knit 1 (= 6 stitches increased and 19 stitches on needle). ROW 6 (= wrong side): Knit all stitches and yarn overs. Repeat ROWS 5 and 6 onwards until there are 373 stitches on the needle (rows 5 and 6 have been worked a total of 60 times). Then work according to diagram A.1-A.7 as follows from the right side: Work A.1 over 8 stitches, A.2 until there are 10 stitches left before the mid-stitch (=12 repeats in width), work A.3 over 10 stitches, A.4 over 1 stitch (= mid-stitch), A.5 over 10 stitches, A.6 until there are 8 stitches left on row (= 12 repeats in width) and work A.7 over 8 stitches. When the diagrams have been completed there are 457 stitches on the needle. Work the diagrams 1 more time in height as follows: Work A.1 over 8 stitches, A.2 until there are 10 stitches left before the mid-stitch (=15 repeats in width), work A.3 over 10 stitches, A.4 over 1 stitch (= mid-stitch), A.5 over 10 stitches, A.6 until there are 8 stitches left on row (= 15 repeats in width) and work A.7 over 8 stitches. When the diagrams have been completed there are 541 stitches on the row. On the next row from the right side work as follows: Knit 1, 1 yarn over, knit 1, 1 yarn over, knit as far as the mid-stitch, 1 yarn over, knit 1 (= mid-stitch) 1 yarn over. Knit until there are 2 stitches left on row, 1 yarn over, knit 1, 1 yarn over and knit 1 = 547 stitches on needle. Knit 1 row from the wrong side. BINDING OFF: So the bind-off edge is not tight you can make yarn overs at the same time as you bind off with knit from the right side as follows: Make 1 yarn over above the yarn overs in the pattern and then bind them off as normal stitches. Make sure the strand is not tight as you bind off. If the edge is still tight, use a larger needle size when casting off. Cut and fasten the strand. When the shawl is finished, it can be dampened and shaped – read SHAPING above. |
||||||||||||||||
Diagram explanations |
||||||||||||||||
|
||||||||||||||||
 |
||||||||||||||||
 |
||||||||||||||||
 |
||||||||||||||||
 |
||||||||||||||||
 |
||||||||||||||||
 |
||||||||||||||||
Have you finished this pattern?Tag your pictures with #dropspattern #glowingembersshawl or submit them to the #dropsfan gallery. Do you need help with this pattern?You'll find 13 tutorial videos, a Comments/Questions area and more by visiting the pattern on garnstudio.com. © 1982-2026 DROPS Design A/S. We reserve all rights. This document, including all its sub-sections, has copyrights. Read more about what you can do with our patterns at the bottom of each pattern on our site. |
||||||||||||||||


With over 40 years in knitting and crochet design, DROPS Design offers one of the most extensive collections of free patterns on the internet - translated to 17 languages. As of today we count 324 catalogs and 12290 patterns - 12280 of which are translated into English (US/in).
We work hard to bring you the best knitting and crochet have to offer, inspiration and advice as well as great quality yarns at incredible prices! Would you like to use our patterns for other than personal use? You can read what you are allowed to do in the Copyright text at the bottom of all our patterns. Happy crafting!
Post a comment to pattern DROPS 202-20
We would love to hear what you have to say about this pattern!
If you want to leave a question, please make sure you select the correct category in the form below, to speed up the answering process. Required fields are marked *.