
Popular categories
Looking for a yarn?


Comments / Questions (17)
![]() Annette wrote:
Annette wrote:
Kann es sein, dass das Bild vom Tuch mit der Anleitung nicht übereinstimmt ? Wenn ich die Reihen stricke wie in der Anleitung , und nachdem 373 Maschen auf der Nadel sind mit dem Rapport A1 - A7 weiterarbeite, dann müsste doch das Lochmuster oben ( am Hals) sein. Oder lese ich es falsch?
20.12.2024 - 14:35DROPS Design answered:
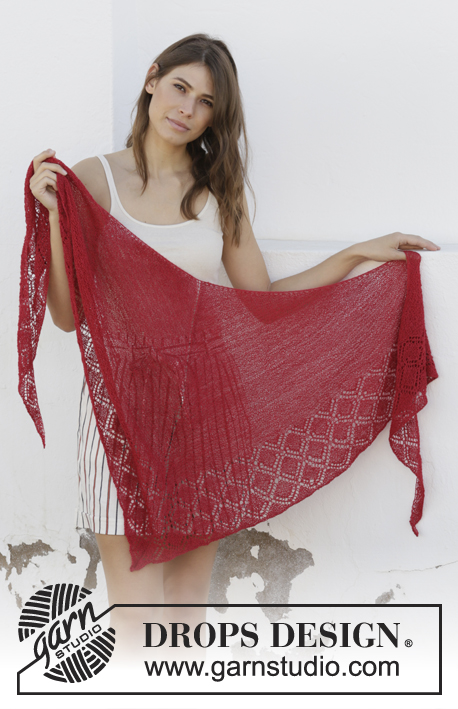
Liebe Annette, dieses Tuch wird von oben nach unten gestrickt, so wird das Lochmuster am "Ende" sein - siehe 2. Foto. Viel Spaß beim Stricken!
20.12.2024 - 16:02
![]() Elena Onorati wrote:
Elena Onorati wrote:
La parte tutta a legaccio, è possibile lavorarla a maglia rasata, in sostituzione del legaccio? Mantenendo sempre comunque i vari aumenti . Grazie
15.04.2024 - 17:01DROPS Design answered:
Buonasera Elena, può apoortare la modello le modifche che desidera. Buon lavoro!
17.04.2024 - 16:58
![]() Christine Orvik wrote:
Christine Orvik wrote:
Hei! Skjønner ikke helt at man skal strikke A3 over 10 masker i 3. runde, da det er økt slik at det gjenstår 11 masker fra diagramstart A3 til midtmasken i diagram A4. Er det sånn at man i 1.omgang av diagrammet skal sette maskemerke 10 masker før midtmasken ( og tilsvarende etter midmasken) og forholde seg til det? Det økes jo 2 masker annenhver omgang ved midtmaska (+ til sammen 4 i hver ytterside). Jeg har rett og slett gått meg litt fast ;)
03.09.2021 - 11:41DROPS Design answered:
Hei Christine. Det økes på hver side av midtmasken (A.4) hver gang det strikkes fra retten. På første rad når det strikkes etter diagrammene (A.1-A.7) strikkes A.3 over 10 masker, men på neste rad strikkes A.3 over 11 masker og på 3. rad strikkes det over 11 masker + det lages et kast, så på 4. rad strikkes det over 12 masker. mvh DROPS design
13.09.2021 - 10:46
![]() AL wrote:
AL wrote:
Jag förstår inte var omslagen i avmaskningen ska göras. Ska de vara ovanför alla omslag i mönstret, alltså mellan varje maska?
18.01.2021 - 22:10
![]() Roosa wrote:
Roosa wrote:
I'm so sad that you are no longer producing Drops Lace. I have used this fabulous yarn for beautiful woven and knitten textiles. There is no similar, cost-effective wool-silk yarn in the market. Why was the producement ceased? Are you planning to have a replacement yarn?
09.01.2021 - 21:35DROPS Design answered:
Dear Roosa, DROPS BabyAlpaca Silk has the exact same content as DROPS Lace did, and would be a nice alternative - try out our yarn converter to get new amount required. Happy knitting!
11.01.2021 - 08:42
![]() Elin wrote:
Elin wrote:
Om man skulle vilja göra sjalen till endast 35cm höjd (eller bredd?), hur gör jag då? Jag förstår att även längden blir kortare då! Mvh
10.06.2020 - 23:00DROPS Design answered:
Hej Elin, vi har desværre ikke mulighed for at skrive mønsteret om til andre mål. Vi har også lidt mindre sjaler, hvis det er lettere for dig at følge en opskrift. Prøv at søge på sjaler og vælg strikke. :)
12.06.2020 - 10:50
![]() Evin Zerdest wrote:
Evin Zerdest wrote:
Hej , kan någon förklara mig : om diagrammet går ut på 8 maskor och i början av en varv står omslag om stickan ska jag börja varv med en omslag ? Tack
16.03.2020 - 12:25DROPS Design answered:
Hej Ja det stämmer, är det är en symbol för omslag först i diagrammet så börjar du varvet med ett omslag. Lycka till!
18.03.2020 - 10:08
![]() Evin wrote:
Evin wrote:
Hej, Jag är nu i början av 23råd men fortfarande har 373 maskor. Kan inte inte begripa mig hur jag kommer till 457 maskor och samtligt ska följa diagrammet (jag menar följa antalet maskor efter A1, A2 också vidare) det blir ju mer maskor. Kan jag i 26 råd öka med maskor? Så det blir rätt antalet maskor till nästa omgång ? Tycker ni inte att det är fel i uppskrivet arbete? Vänligen Evin .
10.03.2020 - 08:01DROPS Design answered:
Hej Evin, Jo men i A.1 och A.7 öker du 2 maskor i varje sida på vart annat varv enligt diagrammet. Lycka till!
10.03.2020 - 11:31
![]() Elaine wrote:
Elaine wrote:
Bonjour j ai un problème je suis rendu à la ligne 21 du diagramme A3 et j ai sur mon aiguille 20 mailles alors que sur le patron je devrai avoir 21 mailles Exemple dans le diagramme A2 à la ligne 21 il y a un décalage ( c'est correct le tout fonctionne ) mais pour les diagramme A3 et A5 il y a une maille de plus que je n ai pas sur l aiguille que doit je faire ?
20.01.2020 - 03:18DROPS Design answered:
Bonjour Elaine, la dernière maille du dernier A.2 n'est pas dessinée, car elle figure dans A.3 (comme entre A.1 et A.2), et ce sera la même chose entre A.5 (= la dernière m, celle en plus de A.5 est la 1ère m de A.6 et la dernière m de A.6 est la 1ère du A.6 suivant/la 1ère de A.7. Bon tricot!
20.01.2020 - 10:17
![]() Cath wrote:
Cath wrote:
Merci pour votre réponse rapide ! :)
04.12.2019 - 16:32
|
||||||||||||||||
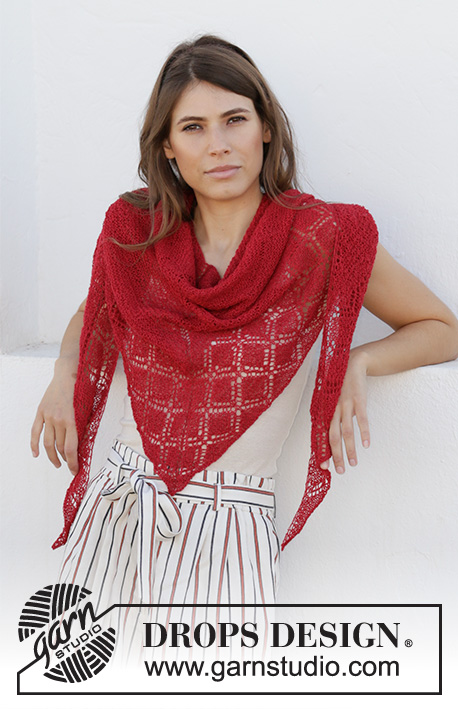
Glowing Embers#glowingembersshawl |
||||||||||||||||
 |
 |
|||||||||||||||
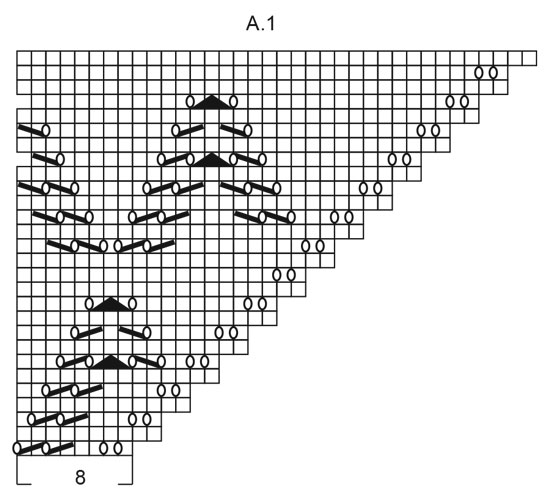
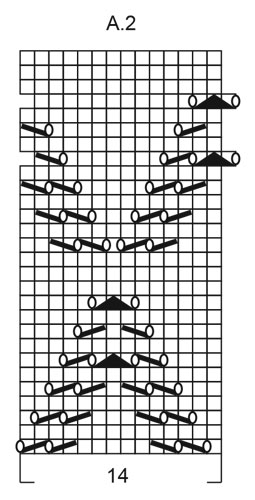
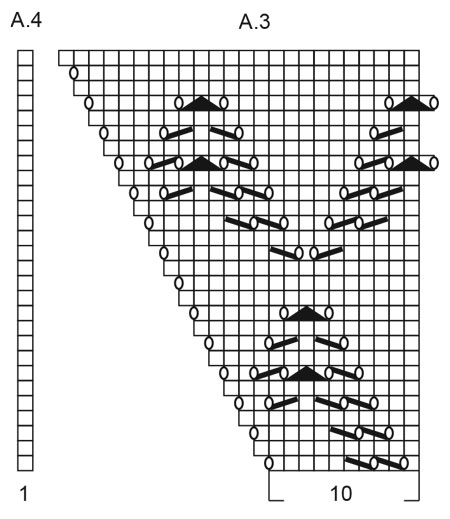
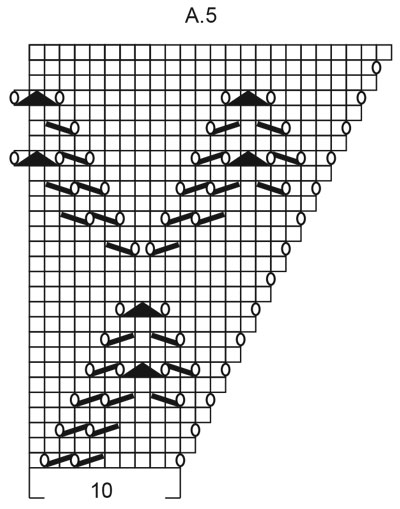
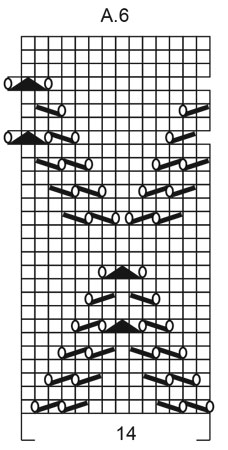
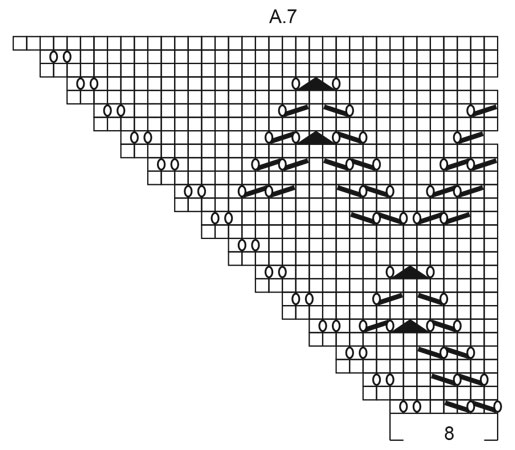
Knitted shawl in DROPS Lace or DROPS Alpaca. The piece is worked top down with garter stitch and lace pattern.
DROPS 202-20 |
||||||||||||||||
|
------------------------------------------------------- EXPLANATIONS FOR THE PATTERN: ------------------------------------------------------- RIDGE/GARTER STITCH (worked back and forth): Knit all rows. 1 ridge in height = Knit 2 rows. PATTERN: See diagrams A.1 to A.7. The diagrams show all rows in the pattern seen from the right side. SHAPING: Lay the piece in lukewarm water until it is thoroughly wet. Press the water gently out– do not wring the garment. Then roll the piece in a towel and press more water out. The piece will now be damp. Lay the piece on a mat or mattress – pull gently to the measurements given above under SIZE and allow to dry. Repeat this process after each wash. ------------------------------------------------------- START THE PIECE HERE: ------------------------------------------------------- SHAWL – SHORT OVERVIEW OF THE PIECE: The piece is worked back and forth with circular needle so you have room for all the stitches. The whole piece is worked in GARTER STITCH – read description above. SHAWL: Cast on 5 stitches with circular needle size 3 mm and work as follows: ROW 1 (= right side): Knit 1, 1 yarn over, knit 1, 1 yarn over, knit 1, 1 yarn over, knit 1, 1 yarn over and 1 knit (= 4 stitches increased and 9 stitches on needle). ROW 2 (= wrong side): Knit all stitches and yarn overs. ROW 3 (= right side): Knit 1, 1 yarn over, knit 3, 1 yarn over, knit 1, 1 yarn over, knit 3, 1 yarn over and knit 1 (= 4 stitches increased and 13 stitches on needle). ROW 4 (= wrong side): Knit all stitches and yarn overs. Insert 1 marker thread in the middle stitch and allow it to follow your work onwards. Work the next row as follows: ROW 5 (= right side): Knit 1, 1 yarn over, knit 1, 1 yarn over, knit as far as the stitch with marker thread. Make 1 yarn over, knit 1 (= mid-stitch) and 1 yarn over. Knit until there are 2 stitches left on row, 1 yarn over, knit 1, 1 yarn over and knit 1 (= 6 stitches increased and 19 stitches on needle). ROW 6 (= wrong side): Knit all stitches and yarn overs. Repeat ROWS 5 and 6 onwards until there are 373 stitches on the needle (rows 5 and 6 have been worked a total of 60 times). Then work according to diagram A.1-A.7 as follows from the right side: Work A.1 over 8 stitches, A.2 until there are 10 stitches left before the mid-stitch (=12 repeats in width), work A.3 over 10 stitches, A.4 over 1 stitch (= mid-stitch), A.5 over 10 stitches, A.6 until there are 8 stitches left on row (= 12 repeats in width) and work A.7 over 8 stitches. When the diagrams have been completed there are 457 stitches on the needle. Work the diagrams 1 more time in height as follows: Work A.1 over 8 stitches, A.2 until there are 10 stitches left before the mid-stitch (=15 repeats in width), work A.3 over 10 stitches, A.4 over 1 stitch (= mid-stitch), A.5 over 10 stitches, A.6 until there are 8 stitches left on row (= 15 repeats in width) and work A.7 over 8 stitches. When the diagrams have been completed there are 541 stitches on the row. On the next row from the right side work as follows: Knit 1, 1 yarn over, knit 1, 1 yarn over, knit as far as the mid-stitch, 1 yarn over, knit 1 (= mid-stitch) 1 yarn over. Knit until there are 2 stitches left on row, 1 yarn over, knit 1, 1 yarn over and knit 1 = 547 stitches on needle. Knit 1 row from the wrong side. CASTING OFF: So the cast-off edge is not tight you can make yarn overs at the same time as you cast off with knit from the right side as follows: Make 1 yarn over above the yarn overs in the pattern and then cast them off as normal stitches. Make sure the strand is not tight as you cast off. If the edge is still tight, use a larger needle size when casting off. Cut and fasten the strand. When the shawl is finished, it can be dampened and shaped – read SHAPING above. |
||||||||||||||||
Diagram explanations |
||||||||||||||||
|
||||||||||||||||
|
||||||||||||||||
|
||||||||||||||||
|
||||||||||||||||
|
||||||||||||||||
|
||||||||||||||||
|
||||||||||||||||
Have you finished this pattern?Tag your pictures with #dropspattern #glowingembersshawl or submit them to the #dropsfan gallery. Do you need help with this pattern?You'll find 14 tutorial videos, a Comments/Questions area and more by visiting the pattern on garnstudio.com. © 1982-2025 DROPS Design A/S. We reserve all rights. This document, including all its sub-sections, has copyrights. Read more about what you can do with our patterns at the bottom of each pattern on our site. |
||||||||||||||||


With over 40 years in knitting and crochet design, DROPS Design offers one of the most extensive collections of free patterns on the internet - translated to 17 languages. As of today we count 314 catalogues and 11822 patterns translated into English (UK/cm).
We work hard to bring you the best knitting and crochet have to offer, inspiration and advice as well as great quality yarns at incredible prices! Would you like to use our patterns for other than personal use? You can read what you are allowed to do in the Copyright text at the bottom of all our patterns. Happy crafting!
Post a comment to pattern DROPS 202-20
We would love to hear what you have to say about this pattern!
If you want to leave a question, please make sure you select the correct category in the form below, to speed up the answering process. Required fields are marked *.