
Popular categories
Looking for a yarn?


Comments / Questions (64)
![]() Tracey Connor wrote:
Tracey Connor wrote:
I’m now starting the sleeves and have picked up the stitches onto circular needles, the pattern also mentions the double pointed needles and don’t understand where they fit in as the sleeve is circular.
27.02.2026 - 13:30DROPS Design answered:
Dear Mrs Connor, you can work the sleeves with either the double pointed needles or with the circular needles. Happy knitting!
02.03.2026 - 07:03
![]() Valérie wrote:
Valérie wrote:
Bonjour, je pense qu'il y a une erreur lorsque l'on est a la partie ttes tailles. Je réalise en xxl et après avoir fait les augmentations je dois avoir 491 mailles que j'ai. Mais lorsque l'on fait la séparation avec les manches, si je calcule les différentes parties, je devrais avoir 515 mailles. Est ce bien cela ? Et du coup comment répartir les différentes parties ? Merci à vous
21.09.2025 - 16:23DROPS Design answered:
Bonjour Valérie, vous avez bien 491 pour la division: 75 pour chaque devant, 101 pour chaque manche et 139 pour le dos soit: 75+101+139+101+75=491, vous montez 12 m à la place des manches, vous aurez ainsi: 75+12+139+12+75=313 pour le dos et les devants. Bon tricot!
24.09.2025 - 07:56
![]() Guri Tønseth wrote:
Guri Tønseth wrote:
3, da er det 162 masker til mønster A1 og mønster A2. Deler du 162 på 22, går det ikke opp. Kan du forklare hvor jeg gjør feil? Ser av andre kommentarer at det er forklart, som jeg har beskrevet, så håper på et svar som kan gjøre at jeg kommer videre.
23.08.2025 - 18:43DROPS Design answered:
Hei Guri, Du sier ikke hvilken størrelse du strikker, men regner med at du mener 163 masker etter du har byttet til pinnenr. 3 (ikke 162). Du strikker videre slik: 5 stolpemasker rille , A.1 (= 12 masker), A.2 x 14 (= 140 masker), A.3 (= 1 maske) og 5 stolpemasker rille til slutt. 5 + 12 + 140 + 1 + 5 = 163 masker. Håper dette hjelper. Hilsen Drops team.
25.08.2025 - 06:45
![]() Karin wrote:
Karin wrote:
Hej! Går det att göra längre ärmar på denna? Typ 3/4..Hur mycke mera garn behövs då?Storlek M. 😊
11.07.2025 - 07:00DROPS Design answered:
Hej Karin. Ja det ska gå fint att göra längre ärmar på denna om du önskar det. När jag ser på andra modeller i DROPS Safran med 3/4 ärmar så går det åt 350 g i minsta storleken. Mvh DROPS Design
11.07.2025 - 08:31
![]() Carina wrote:
Carina wrote:
Hej Nu blir jag otålig skev en fråga igår o har inte fått nåt svar än, hur ska jag göra med de ökade maskorna ?? kommer inte vidare Carina
05.06.2025 - 09:57
![]() Carina wrote:
Carina wrote:
Hej Jag har problem med de två sista varven på oket. På rätsidan ökas 10 maskor men på avigsidan är dom ju inte " stickade"när man ska sätta dom på en tråd . det talas också om mönster på avigsidan ??? Snälla hjälp
04.06.2025 - 13:18DROPS Design answered:
Hei Carina. Nest siste pinne, fra retten øker du x-antall masker jevnt fordelt 2 steder = 351-383-423-451-491-537 masker. Snu og strikk siste pinne på bærestykke fra vrangen. Først strikkes det x-antall masker, så settes det x-antall masker på en tråd (uten at de strikkes først), så legges det opp x-antall nye masker på pinnen, strikk mønster som før over x-antall masker. Så settes de neste x-antall masker på en tråd (uten at de strikkes først), legg opp x-antall nye masker på pinnen, strikk mønster som før over de resterende maskene. mvh DROPS Design
10.06.2025 - 14:06
![]() Carina Richard wrote:
Carina Richard wrote:
Hej Känner mej inte vidare smart,men om jag ska fortsätta sticka A4B så blir ju maskorna fler än 11 efter hand + ökningar ska man då öka de andra 11 också efterhand ? Jag förstår resten det är bara dom 11 som stular till det för mej mvh Carina
27.05.2025 - 15:08DROPS Design answered:
Hej Carina. Ja det stämmer att det ökas maskor i A4B. Om du ser på de 11 sista maskorna i A.4 så ökas det maskor även där, så du ökar alltså även på de sista 11 maskorna i A.4. Mvh DROPS Design
28.05.2025 - 07:01
![]() Carina Richard wrote:
Carina Richard wrote:
Vet inte om jag förstår ändå betyder det att jag hela tiden ska sticka 11maskor före och efter A5 som sedan blir A6. Jag ska väl följa diagrammen och även göra ökningar. behöver en tydligare förklaring .mvh Carina
27.05.2025 - 14:08DROPS Design answered:
Hej Carina. Du stickar såhär: "5 framkantsmaskor i rätstickning, 2 maskor slätstickning, A.5 över de nästa 22 maskorna, A.4 över de nästa 110 maskorna (= 5 rapporter på bredden). Sticka A.4B (= 11 maskor), sticka A.5 över de nästa 66 maskorna (= 3 rapporter), sticka de sista 11 maskorna i A.4, sticka A.4 över de nästa 110 maskorna (= 5 rapporter på bredden), A.5 över de nästa 22 maskorna, 1 maska slätstickning, 5 framkantsmaskor i rätstickning." Det stämmer att du följer diagrammen och gör ökningar enligt diagrammen. Mvh DROPS Design
27.05.2025 - 14:41
![]() Carina Richard wrote:
Carina Richard wrote:
Hej Jag har en fråga som gäller st XL . Vad menas med sticka de sista 11 maskorna i A 4 verkar som om dom blir över. Tack hoppas på snabbt svar jag kommer inte vidare.
27.05.2025 - 12:10DROPS Design answered:
Hej Carina. Du stickar de 11 sista (av de totalt 22) maskorna i A.4. Det är för att mönstret ska bli jämnt på båda sidor (eftersom du tidigare på varvet stickade A.4B). Mvh DROPS Design
27.05.2025 - 13:44
![]() Ingrid Løseth wrote:
Ingrid Løseth wrote:
Får ikke mønstert til å stemme I S har jeg 4 masker I gjen før knappetolpen 5 m rille blir ikke like på begge sider
26.04.2025 - 08:09DROPS Design answered:
Hej Ingrid, du har 153 masker, strikker 5 kantm, A.1 =12m, A.2=10m x13=130m, A.3=1m, 5 kantm = 153 masker :)
30.04.2025 - 14:26
|
|||||||||||||||||||
Spring Melt#springmeltcardi |
|||||||||||||||||||
 |
 |
||||||||||||||||||
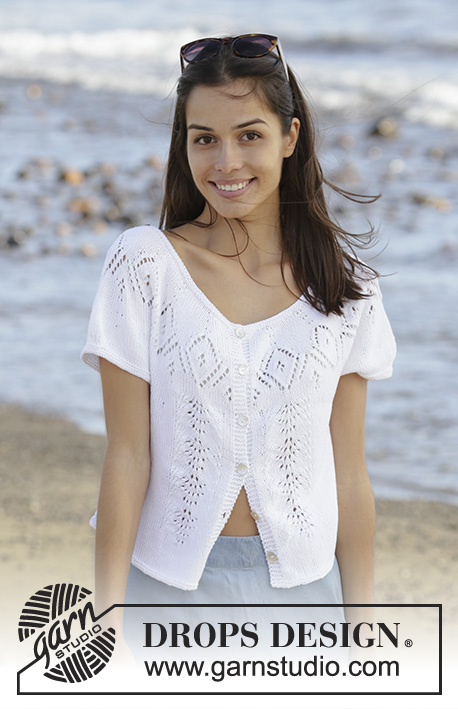
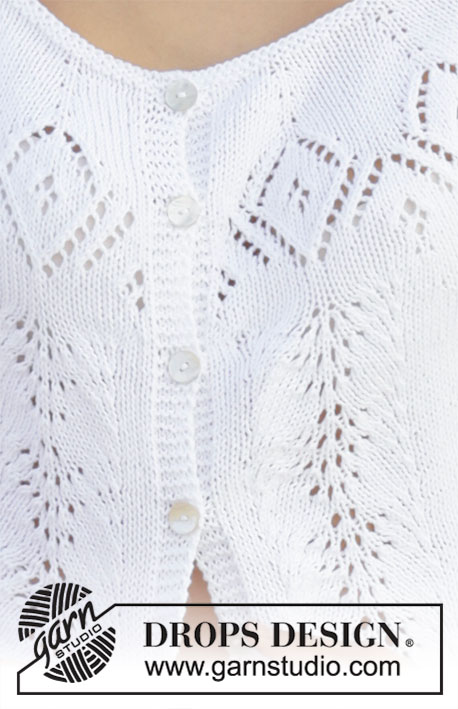
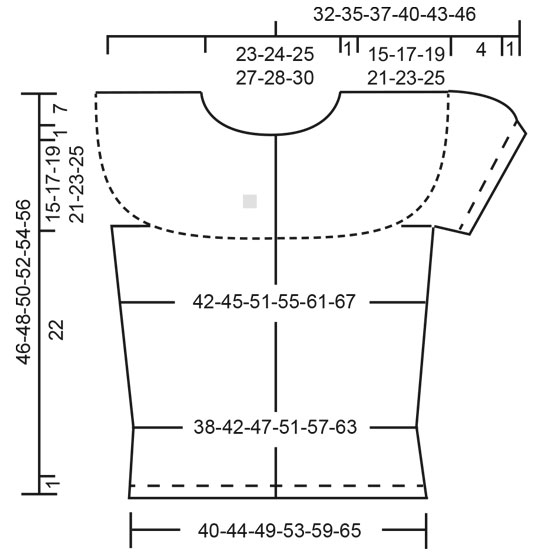
Knitted jacket with round yoke and short sleeves in DROPS Safran. The piece is worked top down with lace pattern. Sizes S - XXXL.
DROPS 199-41 |
|||||||||||||||||||
|
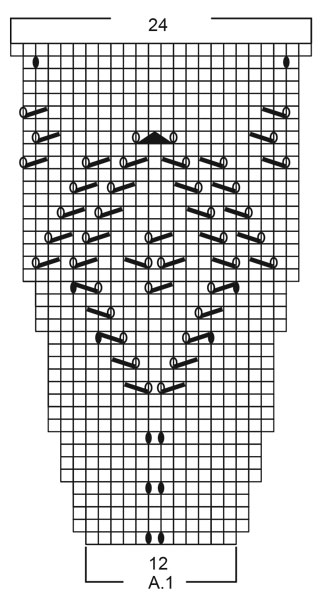
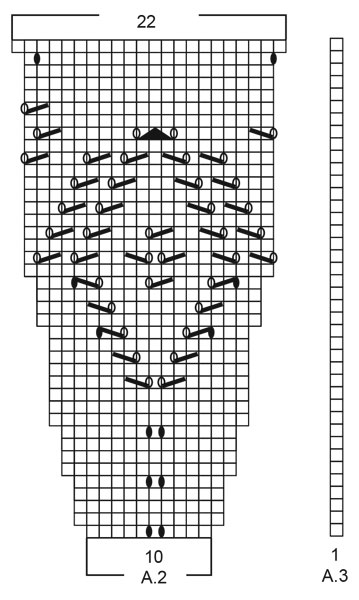
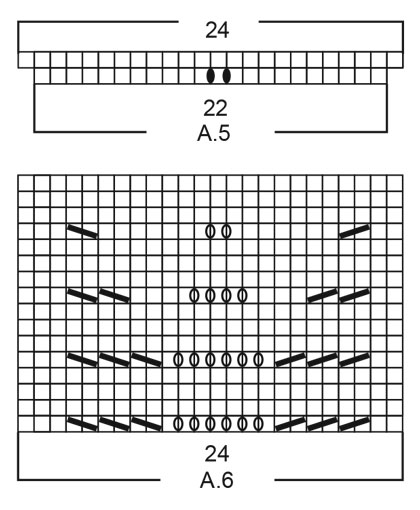
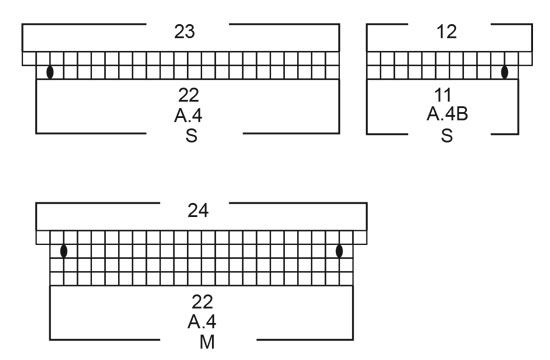
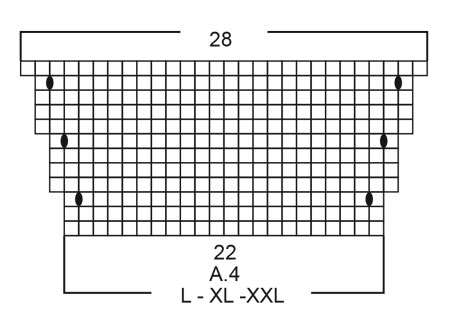
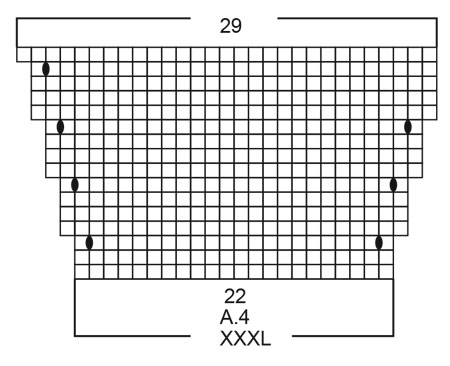
------------------------------------------------------- EXPLANATIONS FOR THE PATTERN: ------------------------------------------------------- RIDGE/GARTER STITCH (worked in the round): 1 ridge in height = 2 rounds; knit 1 round and purl 1 round. RIDGE/GARTER STITCH (worked back and forth): Knit all rows. 1 ridge in height = Knit 2 rows. PATTERN: See diagrams A.1 to A.6. Choose diagram for your size. The diagrams show all the rows in the pattern seen from the right side. INCREASE TIP (evenly spaced): To work out how to increase evenly, count the total number of stitches on the needle (e.g. 158 stitches) minus the bands (e.g. 10 stitches) and divide by the number of increases to be made (e.g. 5) = 29.6. In this example increase by making 1 yarn over after approx. each 30th stitch. On the next row knit the yarn overs twisted to avoid holes (do not increase on bands). DECREASE TIP: Decrease 1 stitch on each side of marker thread as follows: Work until there are 3 stitches left before the marker thread, knit 2 together, knit 2 (marker thread sits between these stitches), slip 1 stitch as if to knit, knit 1 and pass the slipped stitch over the knitted stitch. BUTTONHOLES: Work buttonholes on right band (when garment is worn). Work from the right side when there are 3 stitches left on row as follows: Make 1 yarn over, knit 2 together and knit the last stitch. On the next row knit the yarn over to leave a hole. First buttonhole worked on first row after the garter stitch edge for neck. Then the other 5-5-5-5-6-6 buttonholes with approx. 7-7-7½-8-7-7½ cm = 2¾"-2¾"-3"-3⅛"-2¾"-3" between each one. ------------------------------------------------------- START THE PIECE HERE: ------------------------------------------------------- JACKET - SHORT OVERVIEW OF THE PIECE: The piece is worked back and forth with circular needle, top down. The sleeves are worked in the round with short circular needle/double pointed needles. JACKET: YOKE: Cast on 153-158-163-171-178-183 stitches (including 5 band stitches on each side) with circular needle size 2.5 mm = US 1,5 and Safran. Work 2 RIDGES – read description above. Change to circular needle size 3 mm = US 2,5. Then work 2 rows stockinette stitch with 5 band stitches in garter stitch on each side towards mid front, AT THE SAME TIME increase 0-5-0-2-5-10 stitches evenly spaced on 1st row – read INCREASE TIP and REMEMBER BUTTONHOLES = 153-163-163-173-183-193 stitches. Now work pattern as follows: Work 5 band stitches in garter stitch, A.1 (= 12 stitches), A.2 (= 10 stitches) a total of 13-14-14-15-16-17 times, A.3 (= 1 stitch), 5 band stitches in garter stitch. Continue like this back and forth. REMEMBER THE KNITTING GAUGE! When A.1 to A.3 have been completed there are 321-343-343-365-387-409 stitches on the needle. The piece measures approx. 14 cm = 5½" from the cast-on edge. Now work pattern in the different sizes as follows: Sizes S, XL and XXXL: The next row is worked as follows: 5 band stitches in garter stitch, 2 stitches in stockinette stitch, A.5 over the next 22 stitches, A.4 over the next 88-110-132 stitches (= 4-5-6 repeats in width). Work A.4B (= 11 stitches), A.5 over the next 66 stitches (= 3 repeats), work the last 11 stitches in A.4, A.4 over the next 88-110-132 stitches (= 4-5-6 repeats in width), A.5 over the next 22 stitches, 1 stitch in stockinette stitch, 5 band stitches in garter stitch. Continue like this back and forth. When A.5 has been completed, work A.6 over each repeat of A.5; i.e. work a repeat of A.6 beside each band (+ 1 or 2 stitches in stockinette stitch) and 3 repeats of A.6 mid back. When A.4 has been completed there are 341-441-511 stitches on the needle. Continue with stockinette stitch, A.6 (+ 1 or 2 stitches stockinette stitch) and 5 band stitches in garter stitch towards mid front until the piece measures 15-21-25 cm = 6"-8¼"-9¾". Sizes M, L and XXL: The next row is worked as follows: 5 band stitches in garter stitch, 2 stitches in stockinette stitch, A.5 over the next 22 stitches, A.4 over the next 110-110-132 stitches (= 5-5-6 repeats in width), work A.5 over the next 66 stitches (= 3 repeats), A.4 over the next 110-110-132 stitches (= 5-5-6 repeats in width), A.5 over the next 22 stitches, 1 stitch in stockinette stitch, 5 band stitches in garter stitch. Continue like this back and forth. When A.5 has been completed, work A.6 over each repeat of A.5; i.e. work one repeat of A.6 beside each band (+ 1 or 2 stitches in stockinette stitch) and there are 3 repeats of A.6 mid back. When A.4 has beeen completed, there are 373-413-469 stitches on the needle. Continue with stockinette stitch, A.6 (+ 1 or 2 stitches in stockinette stitch) and 5 band stitches in garter stitch towards mid front until the piece measures 17-19-23 cm = 6¾"-7½"-9". All sizes: The next row is worked as follows from the right side: Work pattern as before over the first 31 stitches, knit the next 104-120-140-154-168-189 stitches and increase at the same time 5-5-5-5-11-13 stitches evenly spaced, work pattern as before over the next 72 stitches, knit the next 104-120-140-154-168-189 stitches and increase at the same time 5-5-5-5-11-13 stitches evenly spaced, work pattern as before over the remaining 30 stitches = 351-383-423-451-491-537 stitches. Turn and work the last row on the yoke as follows (from the wrong side): Work pattern as before over the first 54-59-64-69-75-82 stitches, place the next 72-79-89-93-101-110 stitches on a thread for sleeve and cast on 8-8-10-10-12-12 new stitches on the needle, work pattern as before over the next 99-107-117-127-139-153 stitches, place the next 72-79-89-93-101-110 stitches on a thread for sleeve and cast on 8-8-10-10-12-12 new stitches on the needle, work pattern as before over the remaining 54-59-64-69-75-82 stitches. BODY: = 223-241-265-285-313-341 stitches. Insert a marker thread in the middle of the 8-8-10-10-12-12 new stitches cast on under the sleeves on each side (= 4-4-5-5-6-6 new stitches on each side of the marker thread). Continue back and forth with A.6, stockinette stitch and 5 band stitches in garter stitch on each side towards mid front as before. NOTE: You work 2 stitches stockinette stitch between the first 5 band stitches and A.6 at the start of the row (seen from the right side) and 1 stitch stockinette stitch between A.6 and the last 5 band stitches at the end of the row (seen from the right side). When the piece measures 4 cm = 1½" decrease 1 stitch on each side of the marker threads in each side – read DECREASE TIP. Decrease like this every 2 cm = ¾" a total of 5 times = 203-221-245-265-293-321 stitches. When the piece measures 17 cm = 6¾" – adjust so that you finish after a complete repeat of A.6 in height (there are now 6 cm = 2⅜" left to finished length), continue with stockinette stitch and 5 band stitches in garter stitch on each side. When the piece measures 22 cm = 8¾" change to circular needle size 2.5 mm = US 1,5 and work 2 ridges over all stitches. Bind off, but to avoid the bind-off edge being tight you can make a yarn over after each 6th stitch. Yarn overs bind off as normal stitches. SLEEVE: Place the 72-79-89-93-101-110 stitches from the thread on the one side of the piece back onto double pointed needles/short circular needle size 3 mm = US 2,5 and knit up 1 stitch in each of the 8-8-10-10-12-12 new stitches cast on under the sleeve = 80-87-99-103-113-122 stitches. Work stockinette stitch in the round for 3 cm = 1⅛". Now decrease stitches mid top of sleeve as follows: Work the first 30-33-35-37-41-45 stitches, knit 2 and 2 stitches together over the next 20-20-28-28-30-32 stitches (= 10-10-14-14-15-16 stitches decreased), knit the next 30-34-36-38-42-45 stitches = 70-77-85-89-98-106 stitches. Work 2 rounds stockinette stitch. Change to double pointed needles size 2.5 mm = US 1,5 and work 3 ridges. Bind off. Work the other sleeve in the same way. ASSEMBLY: Sew buttons on to left front band. |
|||||||||||||||||||
Diagram explanations |
|||||||||||||||||||
|
|||||||||||||||||||
 |
|||||||||||||||||||
 |
|||||||||||||||||||
 |
|||||||||||||||||||
 |
|||||||||||||||||||
 |
|||||||||||||||||||
 |
|||||||||||||||||||
 |
|||||||||||||||||||
 |
|||||||||||||||||||
Have you finished this pattern?Tag your pictures with #dropspattern #springmeltcardi or submit them to the #dropsfan gallery. Do you need help with this pattern?You'll find 26 tutorial videos, a Comments/Questions area and more by visiting the pattern on garnstudio.com. © 1982-2026 DROPS Design A/S. We reserve all rights. This document, including all its sub-sections, has copyrights. Read more about what you can do with our patterns at the bottom of each pattern on our site. |
|||||||||||||||||||


With over 40 years in knitting and crochet design, DROPS Design offers one of the most extensive collections of free patterns on the internet - translated to 17 languages. As of today we count 324 catalogs and 12290 patterns - 12280 of which are translated into English (US/in).
We work hard to bring you the best knitting and crochet have to offer, inspiration and advice as well as great quality yarns at incredible prices! Would you like to use our patterns for other than personal use? You can read what you are allowed to do in the Copyright text at the bottom of all our patterns. Happy crafting!
Post a comment to pattern DROPS 199-41
We would love to hear what you have to say about this pattern!
If you want to leave a question, please make sure you select the correct category in the form below, to speed up the answering process. Required fields are marked *.