
Popular categories
Looking for a yarn?


Comments / Questions (66)
![]() Cheryl Crulci wrote:
Cheryl Crulci wrote:
I'm struggling to start the yoke. Where exactly are the 5 band stitches placed? It says towards the mid front, which I don't understand!
19.04.2026 - 19:09DROPS Design answered:
Hi Cheryl, The band stitches are at the beginning and end of each row. Regards, Drops Team.
20.04.2026 - 06:11
![]() Henna wrote:
Henna wrote:
Teen tätä koossa S. Lisätäänkö työhön siis yhteensä 240 silmukkaa raglanlisäysten tekovaiheessa? Eli 30 kpl reunapuolille ja jokaisen merkkilangan molemmille puolille 30 kpl eli yhteensä 60 kpl per "välikkö"? Tällä tavalla työstäni tulee pidempi kuin ohjeessa. Tekstissä oleva "yhteensä 30 silmukkaa" vähän hämää eli onko 30 vai 60?
14.10.2025 - 09:25DROPS Design answered:
Hei, jokaisen 4 merkkilangan kummallekin puolelle lisätään 30 silmukkaa, eli raglanlisäykset tehdään yhteensä 240 kertaa ja jokaisen merkkilangan kohdalle lisätään yhteensä 60 silmukkaa. Jos työstä tulee liian pitkä, tarkista, että neuletiheytesi on sama kuin ohjeessa annettu tiheys ja vaihda tarvittaessa ohuempiin puikkoihin.
14.10.2025 - 14:14
![]() Beatrice wrote:
Beatrice wrote:
Jag menade storlek XL i min fråga under. Men det är fortfarande något som står konstigt till. Bakstycket ska ha 124 maskor på sig efter raglan är klart, men matten går ju inte ihop? 34 maskor från början på bakstycket, det ökas med 2 39 ggr. Det blir inte 124, det blir 112. Vad är det jag missar?
05.07.2025 - 22:25DROPS Design answered:
Hei Beatrice. Se vår forrige svar til deg. mvh DROPS Design
10.07.2025 - 07:14
![]() Beatrice wrote:
Beatrice wrote:
Hej! När jag har stickat storlek L och det står att när det är klart med raglan så ska det vara 82 stycken på ärmarna och 124 på oket men jag har bara 102 stycken på oket? Jag förstår inte matten här. Ska jag sluta sticka raglan på ärmarna men fortsätta på oket? Jag är inte där längdmässigt heller så hur i allsin dar kan jag ha så många maskor till ärmen? Har jag räknat fel? Hur kan jag inte ha längden och siffrorna rätt efter 39 ökningar?
05.07.2025 - 22:10DROPS Design answered:
Hei Beatrice. Når du skal dele arbeidet, skal noen av maskene (som er økt til raglan på ermene) strikkes sammen med forstykkene / bakstykkene. Da får plagget en bedre passform rundt ermene. Så følg beskrivelsen/maskeantallet i oppskriften så blir det riktig :) mvh DROPS Design
10.07.2025 - 07:13
![]() Elisabeth Wahl wrote:
Elisabeth Wahl wrote:
Jag sticker i Stl L men jag hittade sen i ett svar från en annan kommentar vad mitt räknefel var. Så nu har jag börjat om och nu blir det rätt.
30.04.2025 - 13:24
![]() Elisabeth wrote:
Elisabeth wrote:
Hej. När jag sticker oket och raglan kommer jag efter 35 rakan ökningar plus ökningar för V hals till 390 masker innan delningen fast det ska bara vara 290 masker på delningen. Hur funkar det?
21.04.2025 - 13:59DROPS Design answered:
Hej Elisabeth, du siger det skal være 290 masker, hvor står det og hvilken størrelse strikker du?
30.04.2025 - 13:04
![]() Anna wrote:
Anna wrote:
Ciao non capisco bene questa parte del lavoro BORDO DEI DAVANTI/COLLO: quali sono le 5 maglie da riprendere? quelle del primo giro con le maglie del bordo? (in alto visino al collo)
11.04.2025 - 13:34DROPS Design answered:
Buonasera Anna, sono le 5 maglie del bordo sullo sprone. Buon lavoro!
12.04.2025 - 17:54
![]() Sari wrote:
Sari wrote:
Olen tekemässä kokoa L. Kuinka monta kertaa V-aukon lisäykset kaiken kaikkiaan työssä tehdään? 15? Ohjeessa sanotaan että jatka V-aukon lisäyksiä kuten edellä. Tuleeko lisäyksiä siis enemmän kuin 15 kertaa? Ja joka neljännellä rivillä?
04.03.2025 - 12:00DROPS Design answered:
V-aukon lisäykset tehdään yhteensä 15 kertaa. Kun ohjeessa sanotaan, että V-aukon lisäyksiä jatketaan, tämä tarkoittaa vain että nämä lisäykset jatkuvat vaikka kaikki raglanlisäykset on jo tehty.
04.03.2025 - 18:19
![]() Sara Moltke wrote:
Sara Moltke wrote:
Jeg har nu delt arbejdet op til hhv ærmer, for- og rygstykke! Der er 63 masker-12 opslags masker -114 masker-12 opslagsmadker-63 masker = 264 masker på pinden (str L). Der står jeg skal fortsætte med V hals som ovenfor til der er 262 masker på pinden??? Det er jo mindre end der er nu! Når der står ‘som ovenfor’ er det så med udtagning på hver 6. Pind eller hver 4. Pind?
27.02.2025 - 21:18DROPS Design answered:
Hej Sara, du skal trække ærme-maskerne fra når du tæller maskerne til ryg og forstykker :)
06.03.2025 - 11:45
![]() Cate wrote:
Cate wrote:
Hola! Estoy haciendo el patrón y hay algún error en los números y cantidades. En ocasiones, la explicación está bien, aunque de la técnica concreta no concuerda con el desarrollo correcto del patrón. Y lleva a confusión y duda. ¿Podríais revisarlo? Muchas gracias!
11.10.2024 - 09:41
|
|
Meet the Sun#meetthesuncardigan |
|
 |
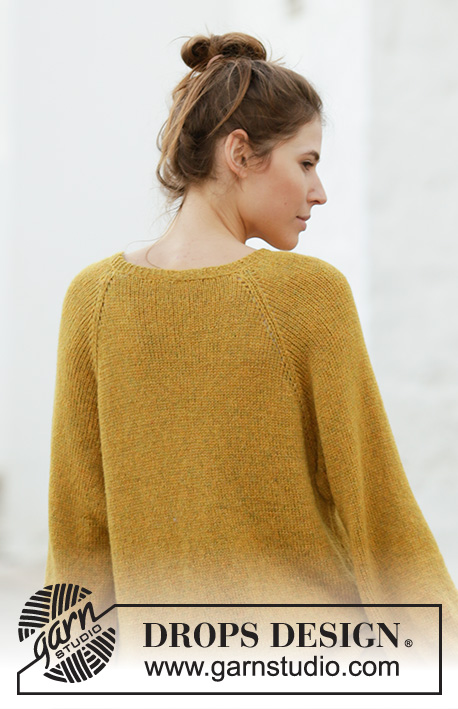 |
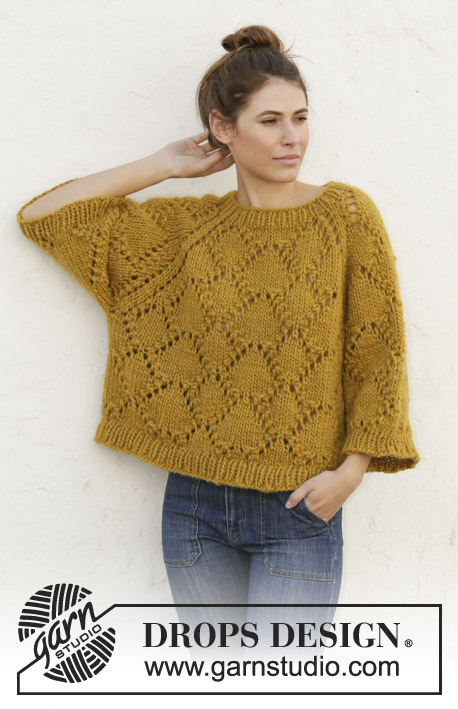
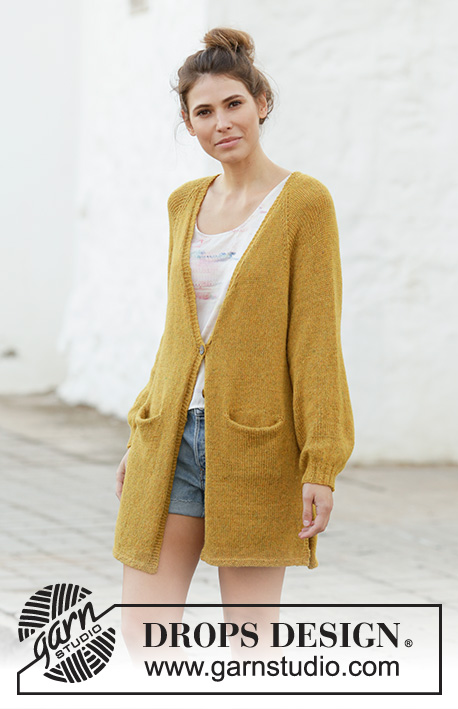
Knitted long jacket with balloon sleeves and raglan in DROPS Sky. The piece is worked top down with V-neck, pockets and split in sides. Sizes S - XXXL.
DROPS 200-6 |
|
|
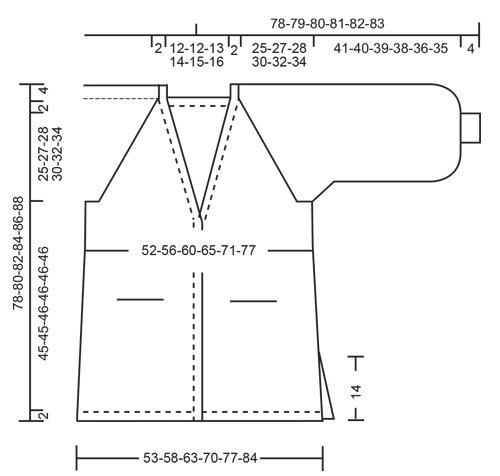
------------------------------------------------------- EXPLANATIONS FOR THE PATTERN: ------------------------------------------------------- RIDGE/GARTER STITCH (worked back and forth): Knit all rows. 1 ridge in height = Knit 2 rows. INCREASE/DECREASE TIP (evenly spaced): To work out how to increase/decrease evenly, count the total number of stitches on needle (e.g. 72 stitches), minus bands (e.g. 10 stitches) and divide the remaining stitches by the number of increases/decreases to be made (e.g. 4) = 15.5. In this example, increase by making 1 yarn over after alternately each 15th and 16th stitch. On the next row (wrong side) purl the yarn overs twisted to avoid holes. Do not increase on bands. When decreasing, work alternately each 14th and 15th stitch and each 15th and 16th stitch together. RAGLAN: All increases are worked from the right side! Increase to raglan in each transition between body and sleeves as follows: Work until there is 1 stitch left before the marker thread, make 1 yarn over, knit 2 (marker thread sits between these 2 stitches), make 1 yarn over (= 2 stitches increased). On the next row (wrong side) purl the yarn overs twisted to avoid holes. Then work the new stitches in stockinette stitch. A total of 8 stitches increased on each increase-row. V-NECK: All increases are worked from the right side! Make 1 yarn over inside the 5 band stitches and knit 1 stitch (= 1 stitch increased). On the next row (wrong side) purl the yarn over twisted to avoid a hole. Then work the new stitch in stockinette stitch. A total of 2 stitches increased on each increase-row. BUTTONHOLES: Work buttonholes on the right band (when garment is worn). Work from the right side when there are 4 stitches left on the row as follows: Make 1 yarn over, knit 2 together and knit 2. On the next row (wrong side), knit the yarn over to leave a hole. The first buttonhole is worked when the increases for the V-neck are finished. Then the second buttonhole is worked after 9 cm = 3½" in all sizes. INCREASE TIP (for sides of body): Work until there are 2 stitches left before the marker thread, make 1 yarn over, knit 4 (marker thread sits in the middle of these 4 stitches), make 1 yarn over. On the next round work the yarn overs twisted to avoid holes. Then work the new stitches in stockinette stitch. KNITTING TIP (for bands/neck): Knit up from the right side 62-62-66-66-68-70 stitches along the whole neck (not over bands) with a new needle. When working the bands, knit together 1 stitch from the band and 1 stitch from the new needle until half the stitches have been worked (= mid back). Work the remaining stitches together with the band on the opposite side. ------------------------------------------------- START THE PIECE HERE: ------------------------------------------------------- JACKET - SHORT OVERVIEW OF THE PIECE: Yoke and body are worked back and forth with circular needle from mid front, top down. One half of both pockets are worked before the yoke so that they can be worked into the piece. Pockets worked back and forth. Sleeves are worked in the round with short circular needle/double pointed needles, top down. Then the bands/neck are worked back and forth and sewn on to finish. POCKETS (first half): Cast on 28-28-30-30-32-32 stitches (including 1 edge stitch in each side) with double pointed needle/circular needle size 4 mm = US 6 and Sky. Work stockinette stitch with 1 edge stitch in GARTER STITCH – read description above, on each side. REMEMBER THE KNITTING GAUGE! When the piece measures 12-12-13-13-14-14 cm = 4¾"-4¾"-5⅛"-5⅛"-5½"-5½" bind off the edge stitches = 26-26-28-28-30-30 stitches. Place stitches on 1 thread and work 1 more pocket in the same way. Lay the pockets to one side and work yoke. The other half of the pocket is worked and assembled when the jacket is finished. YOKE: Cast on 72-74-76-76-78-80 stitches (including 5 band stitches on each side towards mid front) with circular needle size 3.5 mm = US 4 and Sky. Purl 1 row from the wrong side with 5 band stitches in garter stitch on each side towards mid front. Knit 1 row where you increase 4-4-4-4-8-8 stitches evenly spaced – read INCREASE/DECREASE TIP = 76-78-80-80-86-88 stitches. Change to circular needle size 4 mm = US 6 and purl 1 row from the wrong side with 5 band stitches in garter stitch on each side towards mid front. Insert 4 marker threads in the piece (without working the stitches) as follows: First marker thread is inserted after the first 7 stitches (= front piece), second after the next 16 stitches (= sleeve), third after the next 30-32-34-34-40-42 stitches (= back piece) and the fourth marker thread is inserted after the next 16 stitches (= sleeve). There are 7 stitches left after the last marker thread (= front piece). Continue with stockinette stitch and 5 band stitches in garter stitch on each side – AT THE SAME TIME on the first row from the right side increase to RAGLAN in each transition between body and sleeves – read description above. Continue to increase to raglan every 2nd row (i.e. each row from the right side) until you have increased a total of 30-34-35-39-41-44 times on each side of the 4 marker threads. AT THE SAME TIME on row 6 (i.e. 3rd row from the right side) increase to V-NECK on each side towards mid front – read description above, as follows: Increase every 6th row a total of 13-14-13-15-10-9 times and then every 4th row a total of 0-0-2-0-8-10 times (= a total of 13-14-15-15-18-19 stitches increased in each side towards mid front). After the last increase to raglan the piece measures approx. 21-24-25-28-29-31 cm = 8¼"-9½"-9¾"-11"-11⅜"-12¼" from the cast-on edge. Continue working without further raglan increases until the piece measures 25-27-28-30-32-34 cm = 9¾"-10⅝"-11"-11¾"-12½"-13⅜", but continue to increase to V-neck as before. The next row from the right side is worked as follows: Work as far as the first marker thread, work 5-4-5-6-7-8 stitches after the marker thread (= front piece), place the next 66-76-76-82-84-88 stitches on 1 thread for sleeve, cast on 10-10-12-12-14-16 new stitches on the needle (= in side under sleeve), work 100-108-114-124-136-146 stitches (= back piece), place the next 66-76-76-82-84-88 stitches on 1 thread for sleeve, cast on 10-10-12-12-14-16 new stitches on the needle (= in side under sleeve), work as far as the fourth marker thread (= 5-4-5-6-7-8 stitches) and work to end of row (= front piece). Body and sleeves are continued separately. THE PIECE IS NOW MEASURED FROM HERE! BODY: Insert 1 marker thread in each side, in the middle of the 10-10-12-12-14-16 stitches cast on under each sleeve. Allow the marker threads to follow your work onwards; they will be used when increasing in the sides. Continue with stockinette stitch, 5 band stitches in garter stitch on each side and increasing to V-neck as before. When the increases to V-neck are finished there are 230-246-262-282-310-334 stitches on the needle. The piece measures approx. 3-3-3-2-1-0 cm = 1⅛"-1⅛"-1⅛"-¾"-⅜"-9" from the division (V-neck measures approx. 28-30-31-32-33-34 cm = 11"-11¾"-12¼"-12½"-13"-13⅜" from the cast-on edge). Now work the first BUTTONHOLE on right band, read description above. When the piece measures 5 cm = 2" from the division increase 1 stitch on each side of both marker threads – read INCREASE TIP = 4 stitches increased. Increase like this every 0-20-12-7-5-4 cm a total of 1-2-3-5-6-7 times = 234-254-274-302-334-362 stitches. AT THE SAME TIME, when piece measures approx. 16-16-17-17-17-17 cm = 6¼"-6¼"-6¾"-6¾"-6¾"-6¾" from the division, work next row from the right side as follows: Work the first 17-17-19-19-21-21 stitches, place the next 26-26-28-28-30-30 stitches on 1 thread (other half of the pocket will be worked here later), work the 26-26-28-28-30-30 stitches from the thread on the one pocket (make sure you continue from the right side of the pocket), work until there are 43-43-47-47-51-51 stitches left on the row, place the next 26-26-28-28-30-30 stitches on 1 thread (other half of the pocket will be worked here later), work the 26-26-28-28-30-30 stitches from the other pocket (make sure you continue from the right side of the pocket) and work the last 17-17-19-19-21-21 stitches on the row. Continue with stockinette stitch and 5 band stitches in garter stitch on each side until the piece measures 32-32-33-33-33-33 cm = 12½"-12½"-13"-13"-13"-13" from the division. Now divide the piece at the marker threads in the sides. BACK PIECE: = 112-122-132-146-162-176 stitches. Work stockinette stitch with 4 edge stitches in garter stitch on each side until the piece measures 45-45-46-46-46-46 cm = 17¾"-17¾"-18"-18"-18"-18" from the division. Change to circular needle size 3.5 mm = US 4 and work 3 ridges. Loosely bind off; to avoid the bind-off edge being tight you can bind off with needle size 4 mm = US 6. The jacket measures approx. 76-78-80-82-84-86 cm = 30¾"-31½"-32¼"-33"-33⅞"-34⅝" from the shoulder. RIGHT FRONT PIECE: = 61-66-71-78-86-93 stitches. Work stockinette stitch with 5 band stitches in garter stitch towards mid front and 4 edge stitches in garter stitch towards the side. Work until the piece measures 45-45-46-46-46-46 cm = 17¾"-17¾"-18"-18"-18"-18" from the division. Change to circular needle size 3.5 mm = US 4 and work 3 ridges. Loosely bind off; to avoid the bind-off edge being tight you can bind off with needle size 4 mm. The jacket measures approx. 76-78-80-82-84-86 cm = 30¾"-31½"-32¼"-33"-33⅞"-34⅝" from the shoulder. LEFT FRONT PIECE: Work as for the right front piece. SLEEVE: Place the 66-76-76-82-84-88 stitches from the thread on the one side of the piece on short circular needle/double pointed needles size 4 mm = US 6 and knit up 1 stitch in each of the 10-10-12-12-14-16 stitches cast on under the sleeve = 76-86-88-94-98-104 stitches. Insert 1 marker in the middle of the 10-10-12-12-14-16 stitches under the sleeve; this is the beginning of the round. Start here and work stockinette stitch in the round. When the piece measures 41-40-39-38-36-35 cm = 16⅛"-15¾"-15¼"-15"-14¼"-13¾" from the division (shorter measurements in larger sizes due to longer yoke) work 1 round where you decrease 32-38-36-42-42-44 stitches evenly spaced – remember INCREASE/DECREASE TIP = 44-48-52-52-56-60 stitches. Change to double pointed needles size 3.5 mm = US 4. Work rib (= knit 2 / purl 2) for 4 cm = 1½". Loosely bind off with knit over knit and purl over purl, but to avoid the bind-off edge being tight you can bind off with a needle size 4 mm = US 6. Work the other sleeve in the same way. BAND/NECK: Knit up from the right side 1 stitch in each of the 5 band stitches on the right front piece with needle size 3.5 mm = US 4. Work the 5 band stitches in garter stitch back and forth. If you wish the band can be worked together with the neck – read KNITTING TIP. When the band measures approx. 14-14-15-15-16-16 cm = 5½"-5½"-6"-6"-6¼"-6¼" bind off. Work the band on the left front piece in the same way. Sew the 2 bands together mid back and then sew them to the neck of the jacket. POCKETS: Work back and forth with circular needle. Place the 26-26-28-28-30-30 stitches from the thread on the right front piece on needle size 4 mm = US 6. On the first row cast on 1 edge stitch on each side = 28-28-30-30-32-32 stitches. Work stockinette stitch with 1 edge stitch in garter stitch on each side until the pocket measures 12-12-13-13-14-14 cm = 4¾"-4¾"-5⅛"-5⅛"-5½"-5½"; loosely bind off. Work the pocket on the left front piece in the same way. ASSEMBLY: Sew the pockets inside the 1 edge stitch around the whole pocket. Then fasten to the inside of the jacket with one small neat stitch in each of the bottom corners (the stitches should not show on the right side of the jacket). Sew buttons onto left front piece. |
|
 |
|
Have you finished this pattern?Tag your pictures with #dropspattern #meetthesuncardigan or submit them to the #dropsfan gallery. Do you need help with this pattern?You'll find 27 tutorial videos, a Comments/Questions area and more by visiting the pattern on garnstudio.com. © 1982-2026 DROPS Design A/S. We reserve all rights. This document, including all its sub-sections, has copyrights. Read more about what you can do with our patterns at the bottom of each pattern on our site. |
|


With over 40 years in knitting and crochet design, DROPS Design offers one of the most extensive collections of free patterns on the internet - translated to 17 languages. As of today we count 324 catalogs and 12290 patterns - 12280 of which are translated into English (US/in).
We work hard to bring you the best knitting and crochet have to offer, inspiration and advice as well as great quality yarns at incredible prices! Would you like to use our patterns for other than personal use? You can read what you are allowed to do in the Copyright text at the bottom of all our patterns. Happy crafting!
Post a comment to pattern DROPS 200-6
We would love to hear what you have to say about this pattern!
If you want to leave a question, please make sure you select the correct category in the form below, to speed up the answering process. Required fields are marked *.